|
|

Before you install QoS Policy Manager (QPM), ensure that the systems meet the requirements for running QPM. These sections describe the requirements and procedures for installing QPM:
 |
Note For information on uninstalling QPM, see "Uninstalling QPM." |
Table 2-1 shows the hardware and software requirements for installing QPM.
| Complete QoS Policy Manager | Remote QoS Policy Manager |
|---|---|
Pentium 266 MHz processor or better. Works on single or multiple processor machines. | Pentium 266 MHz processor or better. Works on single or multiple processor machines. |
64MB RAM or more. | |
50MB or more free hard disk space. | |
Any of these operating systems running TCP/IP and Microsoft Networking:
| Any of these operating systems running TCP/IP and Microsoft Networking:
|
Microsoft Internet Explorer 5.01 or higher, or Netscape Navigator 4.5 or higher. Needed to view the online help and QPM reports. | Microsoft Internet Explorer 5.01 or higher, or Netscape Navigator 4.5 or higher. Needed to view the online help and QPM reports. |
You can upgrade a QPM installation without first uninstalling it. You can only upgrade a QPM installation from the same installation type (full or remote installation).
You can upgrade remote installations and use them with a former complete installation version. Similarly, you can upgrade a complete installation and use it with previous versions of remote installations.
Follow the instructions in Installing the Complete QPM (or Installing the Remote QPM for remote installations).
 |
Note Databases that were created with previous versions of QPM can be read by QPM 2.1 without any additional conversion program. Refer to "Working with QoS Databases" for more information. |
Before you upgrade a QPM1.x system, consider these changes in QPM 2.x:
The complete QoS Policy Manager includes the management interfaces that you use to create and distribute your QoS policies to network devices and the QoS Manager service used to manage and process the QoS database.
If you are upgrading from a previous version of QPM, exit Policy Manager and Distribution Manager if you are currently running either program. The installation program automatically stops the QoS Manager service.
Step 1 Insert the QoS Policy Manager CD-ROM into the CD-ROM drive on your computer.
 |
Note We do not recommend that you install QPM from a network CD-ROM drive. |
Step 2 The installation process should start automatically. If it does not, select Start>Run, and enter d:\qpm.exe, where d: is the drive letter for your CD-ROM drive.
The following window appears:
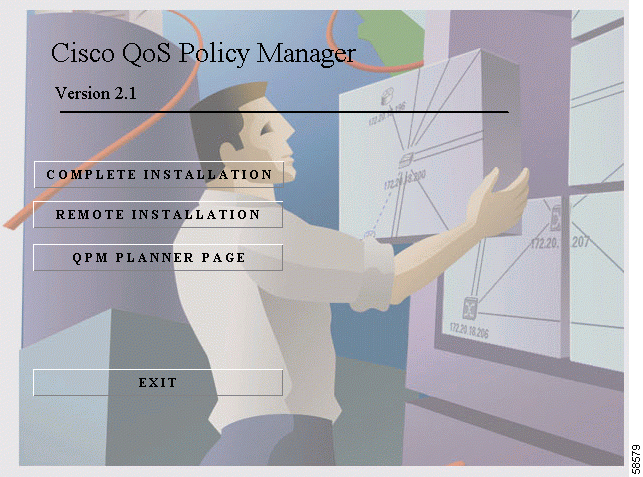
Step 3 Select Complete Installation.

Click OK to upgrade the old version of QPM.
 |
Note The new version of QPM will be installed in the installation folder from the previous version, which contains all your existing databases. |
Back up your QoS databases, if required, then click Next.
Step 4 Read the Welcome window and click Next.
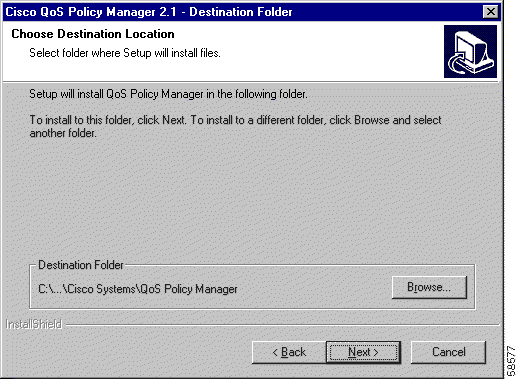
Step 5 Choose a destination folder (QoS Policy Manager is the default) and click Next.
 |
Note If there is not enough space to complete the installation, a message appears. Click OK, then clear disk space and repeat the installation. |
Step 6 Enter a Windows NT or Windows 2000 local group name in the Users Group window, or use the default name shown, and click Next.
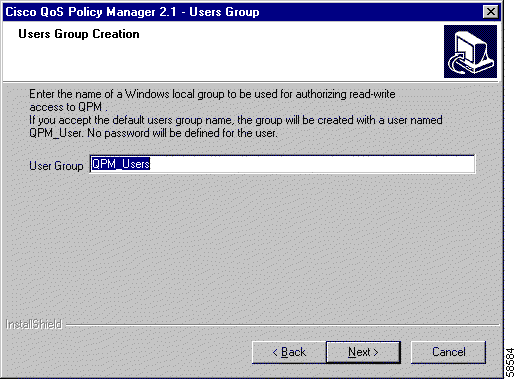
The QPM user group is used for authenticating QPM read-write users. Members of this group can save changes to the QoS database. You can enter the name of an existing group, or have QPM create a new group. The default user group is QPM_Users.
Step 7 Enter a Windows NT or Windows 2000 local group name in the Guest Group window, or use the default name shown, and click Next. If the group does not exist, you are prompted to create it.
The QPM guest group is used for authenticating QPM read-only users. Members of this group can view the QoS database, but they cannot save changes. You can enter the name of an existing group, or have QPM create a new group. The default guest group is QPM_Guests.
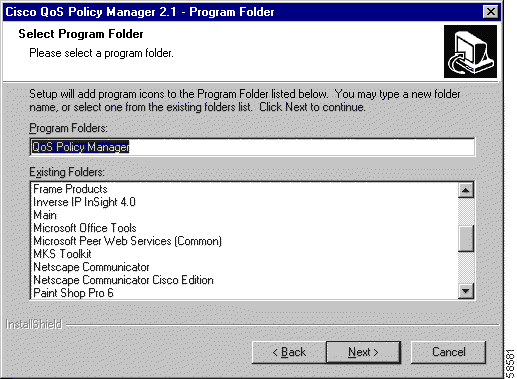
Step 8 In the Program Folder window, specify or select a program group, if you do not want to use the default name, and click Next.
Step 9 Review your selections in the Start Copying Files window. If you are satisfied, click Next. If you are not satisfied, click Back until you come to the window that has selections you want to change.
After you click Next, QPM is installed on your system. The last step of the installation is to set permissions on QPM directories.
The following box appears:

This process might take a few moments.
See "Managing QPM Users" for more information about these permissions.
Step 10 Click Finish to complete the setup.
 |
Note If you uninstalled a previous version of QPM before installing the newest version, your existing databases will remain in the previous installation folder. In order to work with your existing databases, you must first copy them into the Database folder in the new installation folder. |
You can install the remote QoS Policy Manager on any machine that has access to QoS Manager (the Windows NT or Windows 2000 service installed with the complete QPM). This allows you to manage the QoS policies from remote locations, for example, from a laptop.
Determine the host name of the workstation where you installed, or intend to install, the complete QPM.
If you are upgrading from a previous version of QPM, exit Policy Manager and Distribution Manager if you are currently running either program.
Step 1 Insert the QoS Policy Manager CD-ROM into the CD-ROM drive on your computer.
 |
Note We do not recommend that you install QPM from a network CD-ROM drive. |
Step 2 The installation process should start automatically. If it does not, select Start>Run, and enter d:\qpm.exe, where d: is the drive letter for your CD-ROM drive. The window in Figure 2-1 appears.
Step 3 Select Remote Installation.
If you are upgrading from a previous version of QPM, the window in Figure 2-2 appears. Click Next to upgrade the previous version. Your existing databases will be saved and restored at the end of the installation process.
Step 4 Read the Welcome window and click Next.
Step 5 Choose a destination folder (one is selected by default) and click Next. The following window appears:
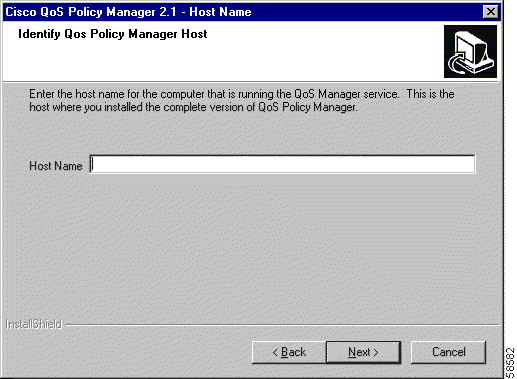
Step 6 Enter the host name of the machine that is running the QoS Policy Manager service. This is the machine where you installed, or intend to install, the complete QPM.
Step 7 Specify or select a program group, if you do not want to use the default name, and click Next.
Step 8 Review your selections on the Start Copying Files window. If you are satisfied, click Next. If you are not satisfied, click Back until you come to the window that has selections you want to change.
After you click Next, QPM is installed on your system. If you are upgrading from a previous version of QPM, the window in Figure 2-6 appears. Click OK.
Step 9 Click Finish to complete the setup.
![]()
![]()
![]()
![]()
![]()
![]()
![]()
![]()
Posted: Tue Nov 12 12:21:35 PST 2002
All contents are Copyright © 1992--2002 Cisco Systems, Inc. All rights reserved.
Important Notices and Privacy Statement.