The ISM program provides an extensive set of management options that can be applied to the management of all your router resources. These options allow you to customize the ISM operating environment to suit your site's needs.
The ISM environment can be set up with global configuration options using the ISM Router Management Setup panels and other related setup panels. In addition, ISM provides you with the ability to override certain global configuration options on a per-router basis (such as performance thresholds) to further customize your router management options. This chapter describes how to set up the global configuration options for ISM and how to set up router-specific monitoring options for all routers that are defined to ISM.
ISM implements default router management settings so that you can begin monitoring resources soon after you have completed the software installation. If you want to modify the ISM management environment, you can perform the following tasks:
After you have installed and configured ISM on your mainframe, the next step is to define your routers and begin monitoring them using ISM.
If you are an existing NSP Release 2.0 customer and you have converted your router definitions using CLIST NSPCONVR, then your current router definitions are available in ISM Release 3.0. You can access your existing router resource definitions and update them from within ISM Release 3.0.
For more information about converting your router definitions, see the chapter, "Migrating From NSP Release 2.0" in the CiscoWorks Blue Internetwork Status Monitor Installation Guide. For more information on adding router definitions and setting up router monitoring options, see the "Monitoring Routers" chapter.
Use the ISM Router Management Setup panels to enable the ISM management applications and to specify some of the global ISM router management options. These management options apply to all of the routers (and the router resources) that you will be monitoring in ISM.
Setting up the router management options includes the following tasks:
- Setting up the monitoring intervals and performance thresholds for routers, interfaces, and CMCCs.
- Selecting the types of router interfaces to be monitored.
- Changing database IDs and maximum record sizes for the history databases.
Note The history database IDs can only be changed in ISM Router Management Setup after ISM is installed and before ISM is initialized for the first time.
Note The wrap counts are set for all routers and interfaces. If you change these values after initializing ISM, the new values apply to new routers and interfaces defined to ISM. You can apply the new values to existing resources if you reset the history for an individual router or interface. Another method of applying changed wrap counts to previously defined routers and interfaces is to delete the router definition and redefine the router to ISM.
To set up the global ISM router management options, complete the following steps:
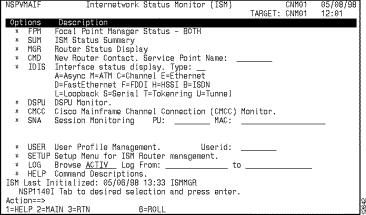
Step 1 On the ISM main menu panel (Figure 3-1), press the Tab key until the cursor is located on the * SETUP option and press Enter.
The first ISM Router Management Setup panel is displayed (Figure 3-2).
Figure 3-1: Internetwork Status Monitor (ISM) Main Menu Panel
Note The first user to execute the * SETUP option (or to run the ismsetup command) is automatically defined as an ISM administrator. For more information about ISM administrator profiles, see the section "Defining the ISM User Profiles".
 Timesaver
 To go directly to the ISM Router Management Setup panel, type the
ismsetup command at any ISM command prompt and press
Enter.
Figure 3-2: ISM Router Management Setup--First Panel
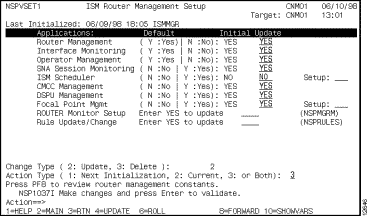
Step 2 To enable or disable an ISM management application, type Y or N in the Update column corresponding to the name of the application that you want to modify. The default values for the ISM management applications are shown in the Default column beside the application name.
Note To access additional setup panels from the first ISM Router Management Setup panel for the ISM Scheduler, Focal Point Management, Router Monitor Setup, and Rules options, enable the corresponding application, type
Yes while the cursor is positioned on the Setup field or Update field, and press
Enter.
For more information on setting up the detailed options for these ISM applications, see the corresponding sections in this chapter:
Step 3 To set up the global router monitoring interval and performance thresholds for all routers and CMCCs, press F8.
The second ISM Router Management Setup panel (Figure 3-3) is displayed. The default router monitoring interval is 15 minutes. The default CPU threshold for routers and CMCCs is 90 percent, and the default free memory threshold is 10 percent.
 Tips
Tips
You can override the router monitoring interval using the ISM Scheduler when your routers are assigned to management groups. For more information see the section "Setting Up the Router Monitoring Schedules" in this chapter.
You can override the performance thresholds on a per-router basis using the ISM Router Administration panel or Router Management Settings panel and the ISM CMCC Administration panel.
Figure 3-3: ISM Router Management Setup--Second Panel
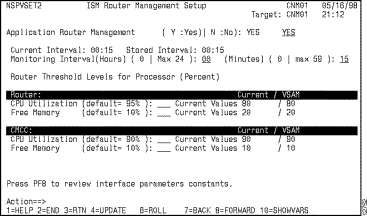
Note If you want ISM to send generic alerts to NetView's NPDA hardware monitor for router performance, memory, and status alerts, then the alert generation rules for routers must be enabled. Alert generation to NPDA from ISM is disabled by default when ISM is first initialized. For information about enabling alert generation, see the section "Setting Up the ISM Management Rules" in this chapter.
Step 4 To specify the interface monitoring interval and select the types of router interfaces that you want to monitor, press F8. The third ISM Router Management Setup panel is displayed (Figure 3-4).
For detailed instructions on setting up the interface options, see the section "Setting Up ISM to Monitor Interfaces" in the "Monitoring Interfaces" chapter.
Figure 3-4: ISM Router Management Setup--Third Panel

Step 5 If you have not initialized ISM for the first time and want to change the history database IDs or if you want to change the number of records in the database for newly defined resources to ISM, press F8.
The Router Management Constants Setup panel is displayed (Figure 3-5). The default record counts allow for approximately 24 hours of statistics collection before the database record will be overwritten for a resource.
Note The history database IDs can be changed in ISM Router Management Setup only after ISM is installed and before ISM is initialized (ISMMGR task is not running) for the first time. To do this, you can access ISM Setup using the
ismsetup command even though the ISMMGR task is not running.
Figure 3-5: Router Management Constants Setup Panel

Step 6 When you have completed specifying the options, press F2 to return to the first ISM Router Management Setup panel (Figure 3-2).
Step 7 In the Change Type option, type 2 to specify that you want to update the management record.
Step 8 In the Action Type option, do one of the following to enable the ISM router management setup options that you specified:
- To activate the setup options the next time that ISM is initialized, type 1.
- To activate the setup options for the current ISM session only, type 2.
- To activate the setup options when ISM is next initialized and for the current ISM session, type 3.
Step 9 To confirm the options that you selected, press Enter.
Step 10 To update the ISM router management setup definition according to the Change Type and Action Type options that you selected, press F4.
There are two methods that you can use in ISM to set up how often statistics are collected for routers and their CMCC resources:
If you choose to use the ISM Scheduler application to set up the router monitoring interval, then the Monitoring Interval option on the ISM Router Management Setup panel is no longer used as the default monitoring interval for all routers.
Use the ISM Schedule Setup panel (Figure 3-6) to specify how often to collect router and interface statistics and to assign an ISM autotask manager to a router group. This function is optional.
Guidelines
Note the following guidelines when using the ISM Scheduler to set up your router monitoring intervals:
- If you use the ISM Scheduler application to specify router monitoring intervals by group you must be sure that every router group that you have set up in ISM is specified on the ISM Schedule Setup panel or that router group will not be monitored.
- If you have not assigned some routers to a group you can specify None as a default group ID with a monitoring interval. All routers not assigned to a group will be monitored according to the interval that you specified for the None group ID.
- If a router is assigned to more than one group, then the monitoring interval is implemented according to the interval specified for the first group to which the router is assigned.
Complete the following steps to set up the router monitoring schedules:
Step 1 On the ISM Router Management Setup panel (Figure 3-2), type Y in the ISM Scheduler Update field to enable the ISM Scheduler application.
Step 2 Press the Tab key to position the cursor on the Setup option adjacent to the ISM Scheduler option. Type Yes, and press Enter.
The ISM Schedule Setup panel is displayed (Figure 3-6).
Figure 3-6: ISM Schedule Setup Panel
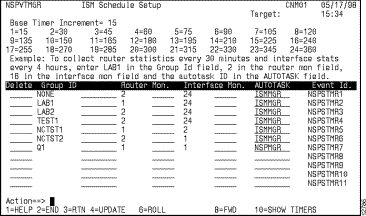
Step 3 In the Group ID column, type the name of the router group to which you want to assign an autotask and define a monitoring schedule.
You can assign routers to a group using the Router Management Settings panel.
Step 4 To specify a monitoring interval (in 15-minute, base-timer increments) type the number of 15-minute increments in the Router Mon. and Interface Mon. fields.
This number corresponds to the amount of time that you want the assigned autotask to wait before collecting router and interface statistics for the specified router group. Use the table at the top of the panel to determine the number of increments that correspond to the actual time-interval (in minutes) that you want to use. For example, a value of 4 specifies four, 15-minute time intervals (a total of 60 minutes).
Step 5 To assign an autotask to a router group in the AUTOTASK field, type the name of the ISM autotask member that you want to use to manage the corresponding group of routers.
For more information about assigning ISM autotasks to individual router service points, see the section "Assigning ISM Autotasks to Monitor Routers" in this chapter.
Step 6 To remove an autotask monitoring schedule, type D in the Delete field beside the router group ID.
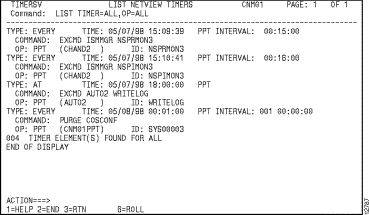
Step 7 To view a list of the NetView timers according to the current scheduler options, press F10.
The List NetView Timers panel is displayed (Figure 3-7).
Figure 3-7: List NetView Timers Panel
Step 8 To return to the ISM Schedule Setup panel, press F3.
Step 9 To update the ISM management record, press F4 on the ISM Schedule Setup panel.
Step 10 To finish setting up the router monitoring schedules do one of the following tasks:
- To update the control files, press Enter.
- To initialize the ISM timers, press F4.
- To cancel the update, press F3.
ISM provides three autotasks that you can use to manage your routers. These autotasks automatically start the ISM program when NetView starts. The number of autotasks that you should install and configure depends upon the number of routers that you want to manage at your site. It is recommended that one autotask be used for every 200 routers that you plan to monitor using ISM. The following autotasks are provided by ISM:
- ISMMGR--Use if you plan to monitor 1 to 200 routers.
- ISMMGRA--Use in addition to ISMMGR if you plan to monitor 201 to 400 routers.
- ISMMGRB--Use in addition to ISMMGR and ISMMGRA if you plan to monitor over 400 routers.
If you have more than 200 routers to manage using ISM you should install more than one ISM autotask to manage your routers. For more information on installing the ISM autotasks, see the "Installing ISM" chapter in the CiscoWorks Blue Internetwork Status Monitor Installation Guide.
Once you have installed the ISM autotasks (part of the ISM software installation), ISM automatically assigns the installed autotasks to the active routers that it is currently monitoring and balances the monitoring load among those autotasks. If a router is unavailable, the Autotask field appears empty in the router definition.
If you want to control the assignment of autotasks to your routers, you can assign the ISM autotasks that you want to use to manage each of the routers defined to ISM on the ISM Schedule Setup panel (Figure 3-6). This step is optional.
Note Be sure that the ISM autotasks that you assigned are either manually or automatically started by NetView to manage the router groups that you specified.
The Focal Point Management application is used for managing routers in an environment of multiple NetView domains. In this management environment, the ISM program is installed and operated in each NetView domain to manage the routers for that domain. The ISM Focal Point Management application provides visibility and control from a local ISM environment and domain into the ISM router management environment of one or more remote domains. For more information about the Focal Point Management application, see the chapter "Using the Focal Point Manager."
Complete the following steps to set up the Focal Point Management options:
Step 1 On the ISM Router Management Setup panel (Figure 3-2), type Y to enable the Focal Point Mgmt application.
Step 2 Press the Tab key to position the cursor on the Setup option adjacent to the Focal Point Mgmt option. Type Yes, and press Enter.
The ISM Focal Point Setup panel is displayed (Figure 3-8).
Figure 3-8: ISM Focal Point Setup Panel
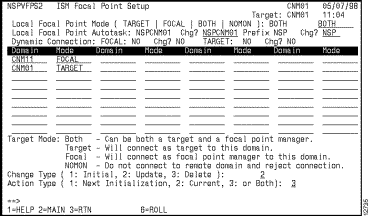
The ISM Focal Point Setup options can be categorized into the local domain options and the remote domain options. The remote domain options define how the remote domain will connect to the local domain.
Step 1 To specify the focal point mode for your local domain, type one of the following in the Local Focal Point Mode option:
- To specify that the local domain (the domain that you are currently in) can connect to and be managed by other remote focal point domains, type target. This is the default selection.
- To specify that the local domain can connect to and manage other remote target domains, type focal.
- To specify that the local domain can connect to other remote domains as both a focal point manager and a target domain, type both.
- To specify that the local domain rejects connection attempts by other remote focal point domains, type nomon.
Step 2 To change the ISM autotask used to manage the local focal point domain, type the autotask name that you want to specify in the Chg? field of the Local Focal Point Autotask option. This step is optional.
The default autotask used by ISM for focal point management is NSPCNM01. You can change this if you need to control or maintain the security of the ISM operator task.
Step 3 To change the prefix used for the ISM autotask, type the characters that you want to specify as the prefix in the Chg? field of the Prefix option. This step is optional.
The default prefix is NSP.
Step 4 To allow remote domains to dynamically connect to your local domain and remotely manage your routers, type Yes in the Chg? field of the Dynamic Connection: FOCAL option.
The default selection is No. You need to define how you want to allow your domain to be connected to other NetView domains using the focal point manager in ISM. The Dynamic Connection options specify how you will allow another domain to set up the connection mode to your domain and view your resources.
Step 5 To allow remote domains to dynamically connect as targets to your local domain so that you can remotely manage their routers, type Yes in the Chg? field of the Dynamic Connection: TARGET option.
To define the relationship of a remote NetView domain that is managed by ISM to your local domain, complete the following steps:
Step 1 In the Domain field, type the name of the remote domain that you want to define.
Step 2 To specify the type of connection that the remote domain can have with your local domain, type the option in the Mode field beside the Domain name that you specified. The ISM interface controls the available options for you to set up the remote domain connection modes, depending upon the mode that is set up for your local domain.
The following four options are available when the local domain is set up as both (a focal point and a target domain):
- To specify that the remote domain can connect to your local domain and be managed by your local domain, type target. This is the default selection for remote domains when the local domain is set up as a focal point, or both a focal point and a target.
- To specify that the remote domain can connect to your local domain and manage your local domain, type focal.
- To specify that the remote domain can connect to your local domain as both a focal point manager and a target domain, type both.
- To specify that the remote domain cannot be managed by your local domain and will reject connection attempts by your local domain, type nomon.
Step 3 In the Change Type option, do one of the following to define the type of change:
- To create an initial focal point management record, type 1.
- To update the focal point management record, type 2.
- To delete the focal point management record, type 3.
Step 4 In the Action Type option, do one of the following to enable the ISM Focal Point Management setup options that you specified:
- To activate the setup options the next time that ISM is initialized, type 1.
- To activate the setup options for the current ISM session only, type 2.
- To activate the setup options when ISM is next initialized and for the current ISM session, type 3.
Step 5 To confirm the options that you selected, press Enter.
Step 6 To update the ISM Focal Point Management setup definition according to the Change Type and Action Type options that you selected, press F4.
Step 7 Press F2 to return to the first ISM Router Management Setup panel (Figure 3-2) and press F4 again to initialize the ISM Focal Point Management setup definition.
You can use the Router Management Settings panels to view and set up the router management definitions for all of the routers that are currently defined to ISM. For more information about configuring the individual router options, see the section "Setting Up the Router Monitoring Options" in the "Monitoring Routers" chapter.
You can use the ISM Management Rules Setup panel to enable certain ISM setup options such as RIF monitoring, alert generation, and CMCC recovery. If your Cisco routers run Cisco IOS Release 11.3 or later, then you can use ISM to perform Routing Information Field (RIF) monitoring. The alert generation options allow ISM to indicate status and performance alerts. The CMCC recovery option allows ISM to initiate recovery of a disabled CMCC.
You must be an operator with ISM administrator authority to modify the ISM management rules. For more information on setting up operator authority, see the section "Defining the ISM User Profiles" in this chapter.
To set up the ISM management rules:
Step 1 On the ISM Router Management Setup panel (Figure 3-2), type Yes in the Enter YES to update field beside the Rule Update/Change application and press Enter.
The ISM Management Rules Setup panel (Figure 3-9) is displayed.
Step 2 To enable RIF monitoring, type Yes in the Current field beside the ISM RIF Monitoring function.
The default selection is no RIF monitoring.
Step 3 To enable alert generation, type Yes in the Current field beside each of the types of alert generation that you want ISM to perform.
The default selection is no alert generation. If you want ISM to indicate router and interface status changes or to indicate when CPU or memory thresholds have been exceeded then you need to enable ISM's alert generation.
Figure 3-9: ISM Management Rules Setup Panel
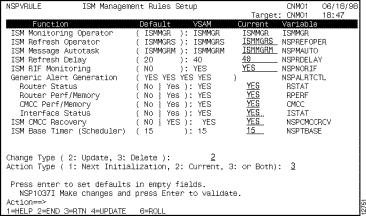
Step 4 To enable ISM to recover or reset the status of CMCC connections, type Yes in the Current field beside the ISM CMCC Recovery function.
Step 5 When you have completed updating the options, do one of the following tasks to define the type of change in the Change Type option:
- To update the router management record, type 2.
- To delete the router management record, type 3.
Step 6 In the Action Type option, do one of the following to enable the router management setup options that you specified:
- To activate the setup options the next time that ISM is initialized, type 1.
- To activate the setup options for the current ISM session only, type 2.
- To activate the setup options when ISM is next initialized and for the current ISM session, type 3.
Step 7 To confirm the options that you selected, press Enter.
Step 8 To update the router management setup definition according to the Change Type and Action Type options that you selected, press F4.
If you want ISM to send generic alerts to NetView's NPDA hardware monitor for router status alerts, then the alert generation rule for router status must be enabled. Alert generation to NPDA is disabled by default when ISM is first initialized.
You must be an operator with ISM enable authority to enable interface alert generation or modify other ISM rules.
Complete the following tasks to set up interface alert generation:
Step 1 From the ISM Management Rules Setup panel (Figure 3-9) in the Router Status option under Generic Alert Generation, type Yes.
Note The Interface Status option does
not generate alerts and is reserved for future use.
Step 2 In the Change Type option, type 2 for Update.
Step 3 In the Action Type option, do one of the following:
- To activate the setup options the next time that ISM is initialized, type 1.
- To activate the setup options for the current ISM session only, type 2.
- To activate the setup options when ISM is next initialized and for the current ISM session, type 3.
Step 4 To verify the options that you selected, press Enter.
Step 5 To update the ISM management definition according to the Change Type and Action Type options that you selected, press F4.
This section describes the tasks required to define the ISM user profiles. The ISM user profiles offer two functions, one is administrative and the other is operational.
- Administrative--The ISM user profile specifies the operator ID and authority to perform ISM and router functions.
- Operational--The ISM user profile allows an operator to specify status filters (in the operator's own profile setup) for the routers to be managed.
For existing NSP Release 2.0 customers who have converted the ISM configuration data by running CLIST NSPCONVR, the existing NSP Release 2.0 user profile records are available from ISM Release 3.0. You need to define the user profiles only if you want to add new operators. For more information about converting your router definitions, see the chapter, "Migrating From NSP Release 2.0" in the CiscoWorks Blue Internetwork Status Monitor Installation Guide.
For new ISM Release 3.0 sites, the ISM user profiles need to be defined by an ISM administrator. By default, the first user to run ismsetup is automatically defined as an administrator by ISM.
The ISM user profile management function provides the following operator types, which dictate the actions an operator can perform using ISM:
ISM administrators maintain the ISM management environment. ISM administrators also are responsible for assigning "authority levels" for users, which dictate the ISM actions that a user can perform. ISM administrators can also be enabled users. An enabled user has the ability to issue Cisco IOS software enable commands--a disabled user does not have this authority.
A disabled ISM administrator can perform the following tasks:
- Create operator profiles and assign user authority
- Configure and change the ISM management environment
- Set group filters
In addition to the tasks that a disabled ISM administrator can perform, an enabled ISM administrator can perform the following tasks:
- Issue the Cisco IOS software enable command and issue commands that control and configure Cisco routers
- Add, modify, and delete router and DSPU resource definitions
- Modify interface settings
An enabled user is defined by an E in the Router Enable Authority option on the User Administration panel. A disabled user is defined by a D in the Router Enable Authority option on the User Administration panel.
Note An enabled ISM user must know the password to a router to issue the
enable command. If the router supports TACACS, then the ISM user must know the userid and password.
ISM operators can create their own profiles for user-identification purposes and for filtering purposes.
A disabled ISM operator can perform the following tasks:
- Collect and display data that allows them to monitor the status of the Cisco routers, interfaces, and other resources in their network.
- Set status filters.
In addition to the tasks that a disabled operator can perform, an enabled ISM operator can perform the following tasks:
- Issue the Cisco IOS software enable command and issue commands that control and configure Cisco routers.
- Add, modify, and delete router and DSPU resource definitions.
- Modify interface settings.
An enabled user is defined by an E in the Router Enable Authority option on the User Administration panel. A disabled user is defined by a D in the Router Enable Authority option on the User Administration panel.
Note An enabled ISM operator must know the password to a router to issue the enable command. If the router supports TACACS, then the ISM operator must know the userid and password.
All ISM users should have an operator profile. They can use their profile for user identification and status filtering purposes. Only an ISM administrator can create or change the authority level of another operator's profile.
To create or change an operator profile, perform the following tasks:
Step 1 Start ISM. The ISM main menu panel is displayed (Figure 3-1).
Step 2 Access the Cisco Router User Administration panel using one of the following methods:
- If you are creating or changing your own profile, position the cursor on the * USER option on the ISM main menu panel and press Enter.
- If you are an ISM administrator and are creating or changing an operator's profile, position the cursor in the Userid field on the ISM main menu panel, type the ID of the operator, and press Enter.
- The ISM User Administration panel is displayed (Figure 3-10).
Figure 3-10: ISM User Administration Panel
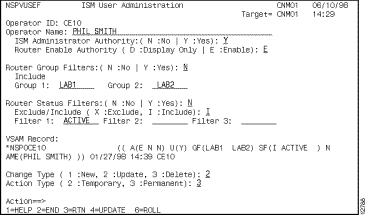
Step 3 To set up the operator authority (if you are an ISM administrator), do one of the following tasks:
- To define a disabled administrator, type Y for ISM Administrator Authority and D for Router Enable Authority.
- To define an enabled administrator, type Y for ISM Administrator Authority and E for Router Enable Authority.
- To define a disabled operator, type N for ISM Administrator Authority and D for Router Enable Authority.
- To define an enabled operator, type N for ISM Administrator Authority and E for Router Enable Authority.
For a description of the operator capabilities by authority see the section "Overview of the Operator Types."
Step 4 To enable Group Filters, type Y and specify viewing of a certain set of routers assigned to a group name by typing the name of the router groups (up to two) that you want to view.
The routers that are defined to the group name that you specified will be the only routers to appear on the ISM Router Status Panel (for your operator's ISM session).
Step 5 To enable Status Filters, type Y and do the following tasks:
- To specify viewing routers with a certain status, type I in the Exclude/Include option and specify the types of status (up to three) that you want to view.
- To disable viewing routers with a certain status, type X in the Exclude/Include option and specify the types of status (up to three) that you want to view.
The routers with the status that you specified will be the only routers to appear on the ISM Router Status Panel (for your operator's ISM session).
Step 6 To save the user profile, complete the following tasks:
- Type a value for the record Change Type (New or Update).
- Type 3 for the record Action Type to permanently update the record.
- Press F4 to update the record.
Tips
You can also modify ISM user profiles on the ISM Authorized Users panel.
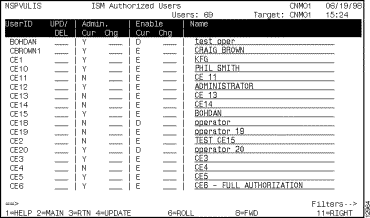
The ISM User List utility enables you to view and modify the profiles of all the users defined to ISM. The ISM user list includes the name of each user (if the name is specified in their profile), the user ID, and the ISM user authority level.
To view a list of all the users defined to ISM, type the ismusers command. The ISM Authorized Users panel is displayed (Figure 3-11). To modify a users profile, change the profile options and press F4 to update.
Figure 3-11: ISM Authorized Users Panel