|
|

This chapter describes the following tasks to help you find information about interfaces on your routers:
Once you have enabled the Interface Monitoring application in ISM, you can disable monitoring of individual interfaces when you set up the router or interface monitoring options. For information on setting up interface-specific management options, see the section "Setting Up Interface-Specific Management Options".
ISM's architecture provides two layers of interface management control options--global and individual.
Complete the following tasks to set up ISM to monitor interfaces for all routers in ISM:
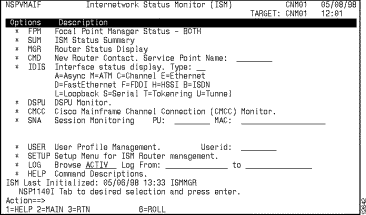
Step 1 On the ISM main menu panel (Figure 6-1), press the Tab key until the cursor is located on the * SETUP option and press Enter.
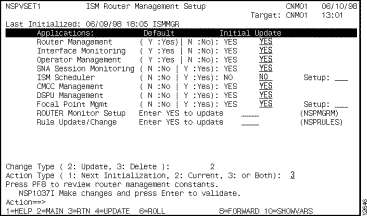
The first ISM Router Management Setup panel is displayed (Figure 6-2).
Step 2 Verify that the Router Management option is set to Yes.
 Timesaver To go directly to the ISM Router Management Setup panel, type the ismsetup command at any ISM command prompt and press Enter.
Step 3 In the Interface Monitoring option, type Y in the Update column.Yes appears in the Update column beside the Interface Monitoring option. This is the default selection.
The Interface Status Display option (* IDIS) will appear on the ISM main menu panel (Figure 6-1). The asterisk indicates that the Interface Monitoring application is enabled for all routers.
Step 4 To continue setting up other global interface monitoring options, skip to the third setup panel by pressing F8 from the first ISM Router Management Setup panel. Press F8 again to display the third ISM Router Management Setup panel (Figure 6-3).
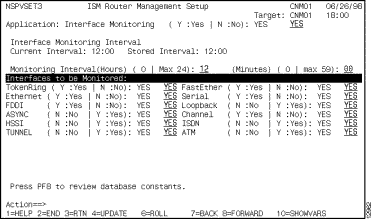
Step 5 To specify the interface monitoring interval for all interfaces, type the number of hours and minutes in the Monitoring Interval (Hours) and (Minutes) option. The default interval is 12 hours.
Step 6 To select the interfaces to be monitored, type a Y in the field corresponding to the interface type that you want to enable for monitoring.
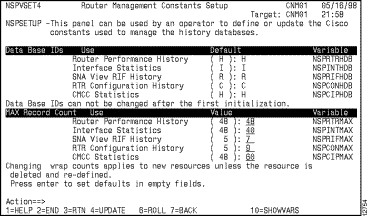
Step 7 If you have not initialized ISM for the first time and want to change the interface history database ID, or if you want to change the number of records in the database for new resources, press F8.
The Router Management Constants Setup panel is displayed (Figure 6-4). The default record counts allow for approximately 24 hours of statistics collection before the database record will wrap for a resource.
Step 8 When you have completed specifying the options, press F2 to return to the first ISM Router Management Setup panel (Figure 6-2).
Step 9 In the Change Type option, type 2 for Update.
Step 10 In the Action Type option, do one of the following to enable router monitoring and the other setup options that you specified:
Step 11 To verify the options that you selected are acceptable, press Enter.
To override some of the global management options and manage other aspects of the interface on that router use the ISM Interface Administration panel to specify options for individual interfaces in routers that are known to ISM.
You can access the interface management options for an individual router from the ISM main menu panel or the ISM Status Summary panel.
To set up interface monitoring options for an individual interface from the ISM main menu panel, follow these steps:
Step 1 From the ISM main menu panel, press the Tab key until the cursor is positioned in the Type field beside the * IDIS option. Type the letter that corresponds to the interface type that you want to modify and press Enter.
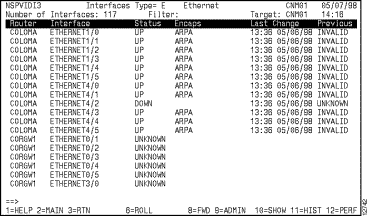
The Interfaces Type panel is displayed showing the routers with the interface type that you selected (Figure 6-5).
Step 2 Position the cursor on the name of the router whose interface you want to modify and press F9.
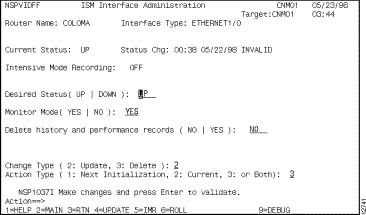
The ISM Interface Administration panel is displayed (Figure 6-6).
Step 3 Go on to Step 3 in the section, "Setting Up Interface-Specific Management Options From the ISM Status Summary Panel."
To set up interface monitoring options for an individual interface from the ISM Status Summary panel, follow these steps:
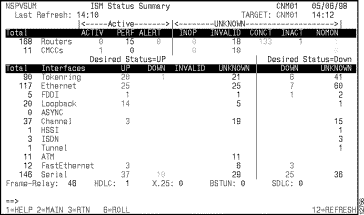
Step 1 From the ISM Status Summary panel (Figure 6-7), press the Tab key until the cursor is located in the Total column beside the Interfaces type that you want to update and press Enter.
The Interfaces Type panel is displayed showing the routers with the interface type that you selected (Figure 6-5).
Step 2 Position the cursor on the name of the router whose interface you want to modify and press F9.
The ISM Interface Administration panel is displayed (Figure 6-6).
Step 3 To specify the status condition that you want for the interface, type Up or Down in the Desired Status option.
Step 4 To disable monitoring for the selected interface, type No in the Monitor Mode option.
Step 5 When you have completed specifying the options, press Enter to verify the options that you selected.
Step 6 In the Change Type option, type 2 for Update.
Step 7 In the Action Type option, do one of the following to enable the ISM router management setup options that you specified:
Step 8 To update the ISM interface management setup definition according to the Change Type and Action Type options that you selected, press F4.
Complete the following tasks to set up high-rate interface statistics collection:
Step 1 On the ISM Interface Administration panel (Figure 6-6), press F5.
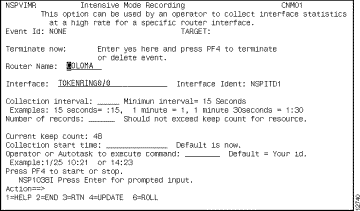
The Intensive Mode Recording panel (Figure 6-8) is displayed for the selected interface.
Step 2 When you have completed specifying the options, press Enter to confirm the options that you selected.
Step 3 To update the ISM interface management setup definition, press F4 to return to the ISM Interface Administration panel.
You can disable interface archiving on a global or individual router basis. For information about disabling router interface archiving see the "Disabling Router Interface Archiving" in the "Monitoring Routers" chapter.
You can remove history and performance records from the VSAM database for a specific interface using the Delete History and Performance Records option on the ISM Interface Administration panel (Figure 6-6). When you enable the Reset Performance History option, the history records are removed from the database when you press F4 to update.
You can use this option to update the record wrap counts when ISM reinitializes the history file. The record wrap counts are specified on the Router Management Constants Setup panel (Figure 6-4).
Complete the following tasks to delete history and performance records for a specific router:
Step 1 On the ISM Interface Administration panel (Figure 6-6), type Yes in the Delete history and performance records option.
Step 2 In the Change Type option, type 2 for Update.
Step 3 To verify the options that you selected, press Enter.
Step 4 To delete the history and performance records immediately, press F4.
The history and performance records for the interface on the router that you selected are deleted from the database when you press F4. This option is implemented for the current session only. The Action Type option does not apply to deleting history and performance records.
When you configure the ISM management environment, you specify the types of interfaces that you want to monitor and the interval (in hours and minutes) at which you want router interfaces monitored. For more information on selecting the interfaces that are enabled for monitoring by ISM, see the section "Setting Up ISM to Monitor Interfaces" in this chapter.
Once ISM has been set up to monitor interfaces, you can perform the following monitoring operations for interfaces and view status descriptions:
You can monitor all of the interfaces for a specific router (as long as those interface types are enabled for monitoring in ISM) from the Router Status panel (Figure 6-9).
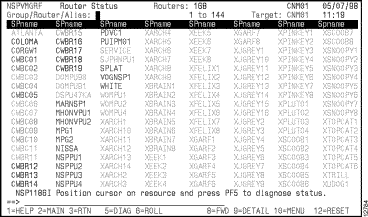
Complete the following tasks to display a list of interfaces configured in a specific router:
Step 1 On the Router Status panel (Figure 6-9), position the cursor on the router for which you want to view ISM management information and press F10. The Router Status with Options panel is displayed (Figure 6-10).
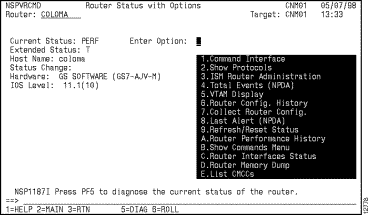
Step 2 To display the Interfaces Type panel (Figure 6-11), type C in the Enter Option field and press Enter.
The Interfaces Type panel is displayed for the first type of interface supported by ISM for monitoring. The router that you select might not have an interface of that type. If there are not any interfaces of that type, a message informs you that there are no interfaces of the specified type in that router (Figure 6-11).
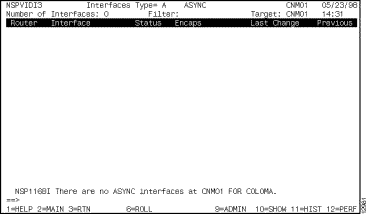
Step 3 To scroll an alphabetical list of all of the interface types that are being managed globally by ISM to find the interface types supported by that particular router, press F3.
Step 4 To access the ISM Interface Administration panel (Figure 6-6) for a particular interface, position the cursor on the interface that you want to view and press F9.
Step 5 Continue to press F3 until you get to the last router interface type being managed. At the last interface, F3 returns you to the Router Status with Options panel (Figure 6-10).
Complete the following tasks to monitor interface types and status from the ISM Status Summary panel:
Step 1 From the ISM main menu panel, press the Tab key until the cursor is positioned on the * SUM option and press Enter.
The ISM Status Summary panel is displayed showing the total number of interfaces being monitored by type and the subtotals of those interfaces categorized by status.
 Timesaver Type the ismsum command at any ISM command prompt and press Enter to go directly to the ISM Status Summary panel (Figure 6-7).
Step 2 To view a list of all of the interfaces of a particular type, press the Tab key until the cursor is positioned in the Totals field beside the interface type that you want to view and press Enter.
The Interfaces Type panel is displayed showing all of the routers with interfaces of a particular type being monitored by ISM.
Step 3 To view a list of all of the interfaces of a particular type by status category, press the Tab key until the cursor is positioned in the status field that you want to view and press Enter.
The Interfaces Type panel is displayed showing only the interfaces with the status that you selected. The status filter is displayed at the top of the panel in the Filter field.
To monitor interface types and status from the ISM main menu panel, press the Tab key until the cursor is positioned in the Type field beside the * IDIS option. Type the letter character that corresponds to the interface type that you want to modify and press Enter.
The Interfaces Type panel is displayed showing the interfaces of the type that you selected for all routers being monitored by ISM.
The color in which an interface status is displayed on the ISM Status Summary panel or Interfaces Type panel (Figure 6-5) indicates the condition of that interface.
Table 6-1 lists the color and definition of each status.
| Color | Status | Definition |
| White | Not applicable | Total number of interfaces of a particular type that are being monitored by ISM on the ISM Status Summary panel. |
| Green | UP
DOWN | Interfaces that are up with a desired status of up.
Interfaces that are down with a desired status of down. |
| Red | DOWN
INVALID | Interfaces that are down with a desired status of up.
Interfaces that are no longer defined to the router. |
| Yellow | UNKNOWN | Interface status is unknown because the router is down. |
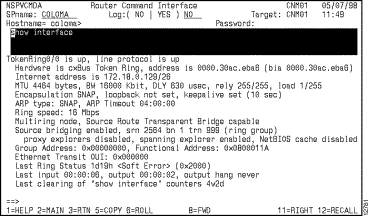
You can run the show interface command for a selected interface on the Interfaces Type panel by pressing F10. The Router Command Interface panel is displayed (Figure 6-12).
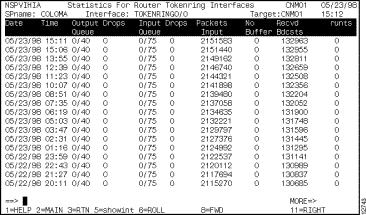
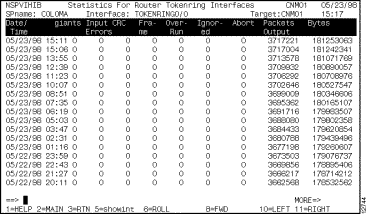
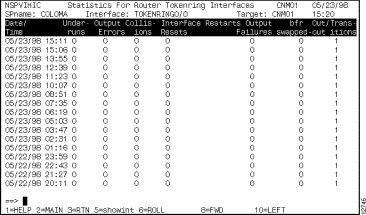
You can view history statistics for a particular interface in a router from the Interfaces Type panel by positioning the cursor on the interface and pressing F11. The history statistics records logged for the selected interface are displayed on the Statistics for Router Interface panels (Figure 6-13, Figure 6-14, Figure 6-15). To display additional panels of statistics, press F11.
For information about the statistics on these panels, press F1 for Help.
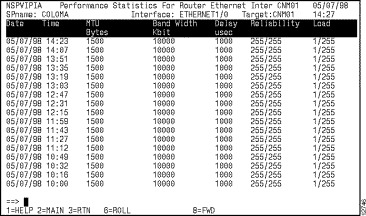
You can view performance statistics for a particular interface in a router from the Interfaces Type panel by positioning the cursor on the interface and pressing F12. The performance statistic records logged for the selected interface are displayed on the Performance Statistics for Router Interface panel (Figure 6-16).
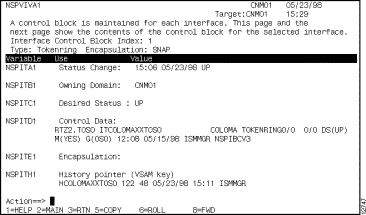
You can view the internal variables used by ISM to perform interface management from the ISM Interface Administration panel (Figure 6-6) by pressing F9. This information can be used if you need to troubleshoot an ISM operational problem (Figure 6-17).
|
|