|
|

This chapter describes how to start ISM and configure the setup options for the ISM application, which is stage four of the ISM installation process. It provides information on the following topics:
For the MVS systems programmer responsible for installing ISM Release 3.0 on the mainframe, complete the following tasks before you configure the ISM software:
If you have converted your configuration data from NSP Release 2.0, then your NSP Release 2.0 data will appear in the ISM Release 3.0 setup panels. However, the setup options that are new to ISM Release 3.0 still need to be defined. For more information about converting your NSP Release 2.0 data, see the chapter "Migrating from NSP Release 2.0."
If you want to convert your existing router configurations and ISM configuration information, then you should convert your NSP Release 2.0 data before continuing with this chapter to configure ISM.
If you are a new ISM Release 3.0 site, you must configure the ISM setup options and user profiles.
Configuring ISM includes specifying the following options:
Configuring ISM for the first time involves the following tasks:
A set of full-screen panels is displayed to take you through the implementation process. Once you start the process, ISM is automatically implemented with default options and parameters (unless you have migrated data from NSP Release 2.0). Further full-screen panels are then displayed so that you can review the options and parameters that have been implemented.
The implementation process is complete when the ISM : Initial Implementation Complete panel is displayed. See the "Completing the Initial Implementation" section for information about the tasks that can be performed at the end of the implementation process.
The implementation panel descriptions start in the "Implementing ISM for the First Time" section.
 | Tips |
If you need more information about using an ISM panel, press F1 to access online help.
After you have completed the implementation process, you can return to the panels and change any of the information by using the Administration Menu. For information about the administration menu, see the "Setting Up Your ISM Environment" chapter in the CiscoWorks Blue Internetwork Status Monitor for SOLVE:Netmaster User Guide.
You can press Enter at any time to validate the fields you have specified on any panel.
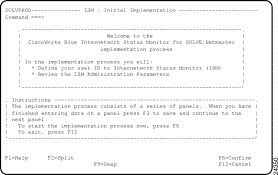
To access ISM from the Select Option ===> prompt of the SOLVE : Primary Menu enter N.S.10 and press Enter. If you are the first user to log on to ISM, the ISM: Initial Implementation panel is displayed (see Figure 5-1).

This panel introduces the implementation process and provides basic instructions on how to complete the panels that follow.
 | Tips |
If you need more information about using an ISM panel, press F1 to access online help.
To start the implementation process, press F6 (Confirm).
The implementation process starts. It completes the following system tasks:
Completed initialize of Initial User
Implementation is now complete. However, for your convenience, the administration panels for the following parameters are displayed (in the following sequence):
This allows you to review the default values set for each parameter, and to change them if required for your environment. When each panel is complete, press F3 (File) to file the information from that panel and access the next implementation panel.
For details of these implementation panels, see the "Setting Up the ISM Environment" chapter in the CiscoWorks Blue Internetwork Status Monitor for SOLVE:Netmaster User Guide.
If you do not want to complete the implementation process immediately, press F12 (Cancel) to exit from the implementation.
 | Caution If you cancel at any time during the implementation process, your ISM product is not fully functional. Make sure you complete the implementation process before using the product. |
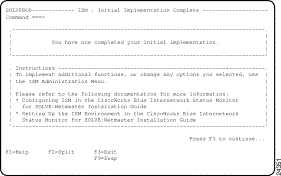
When you press F3 to file your changes on the last of the panels in the implementation review process (the ISM : DSPU Management Parameters panel), the ISM : Initial Implementation Complete panel (Figure 5-2) is displayed.

Press F3 on this panel to return to the ISM : Primary Menu.
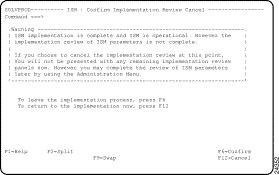
If you do not want to complete the implementation review immediately, press F12 (Cancel) to exit from your current Parameter Administration panel. The ISM : Confirm Implementation Review Cancel panel (Figure 5-3) is displayed.

Once you have installed and configured ISM Release 3.0 (and converted the NSP Release 2.0 data files, if applicable), you can start ISM and set up the user profiles and router definitions.
The ISM user profile management function provides two user types. Each of these operator types dictates the actions a user can perform using ISM. The two basic types of ISM users are:
Each of these types can be further qualified as enabled or disabled. An enabled user has the ability to issue Cisco IOS software enable commands---a disabled user does not have this authority.
A disabled ISM administrator can perform the following tasks:
A disabled ISM operator can perform the following tasks:
In addition to the tasks that any ISM administrator or operator can perform, an enabled ISM administrator or operator can perform the following tasks:
An enabled user is defined by Enable in the Router Enable Authority option on the ISM : User Details panel. A disabled administrator is defined by Display in the Router Enable Authority option on the ISM : User Administration panel.
For details on creating, changing, and deleting user profiles, see the "Setting Up the ISM Environment" chapter in the CiscoWorks Blue Internetwork Status Monitor for SOLVE:Netmaster User Guide.
Now that you have installed and configured ISM on your mainframe, the next step is to add your router definitions and begin monitoring them using ISM. For detailed information about adding router definitions and using ISM to manage your Cisco routers, see the "Monitoring Routers" chapter in the CiscoWorks Blue Internetwork Status Monitor for SOLVE:Netmaster User Guide.
If you have NSP Release 2.0 installed at your site and you have converted your router definitions using the Migration facility, then your current router definitions are available in ISM Release 3.0. You can access your existing router resource definitions and update them from ISM Release 3.0.
![]()
![]()
![]()
![]()
![]()
![]()
![]()
![]()
Posted: Tue Aug 24 08:43:53 PDT 1999
Copyright 1989-1999©Cisco Systems Inc.