|
|

Table Of Contents
Editing a Netmask Sticky Group
Managing Sticky Groups
Sticky connections limit traffic to individual servers by allowing multiple connections from the same client to stick to the same real server using source IP addresses, source IP subnets, cookies, and the secure socket layer (SSL) or by redirecting these connections using HTTP redirect messages.
Configuring a sticky group involves configuring the attributes of that group and associating it with a policy. This ensures that connections from the same client matching the same policy use the same real server.
The default sticky time value is 1440 minutes (24 hours).
This section contains the following topics:
•
Viewing Cookie Sticky Groups
–
–
•
–
–
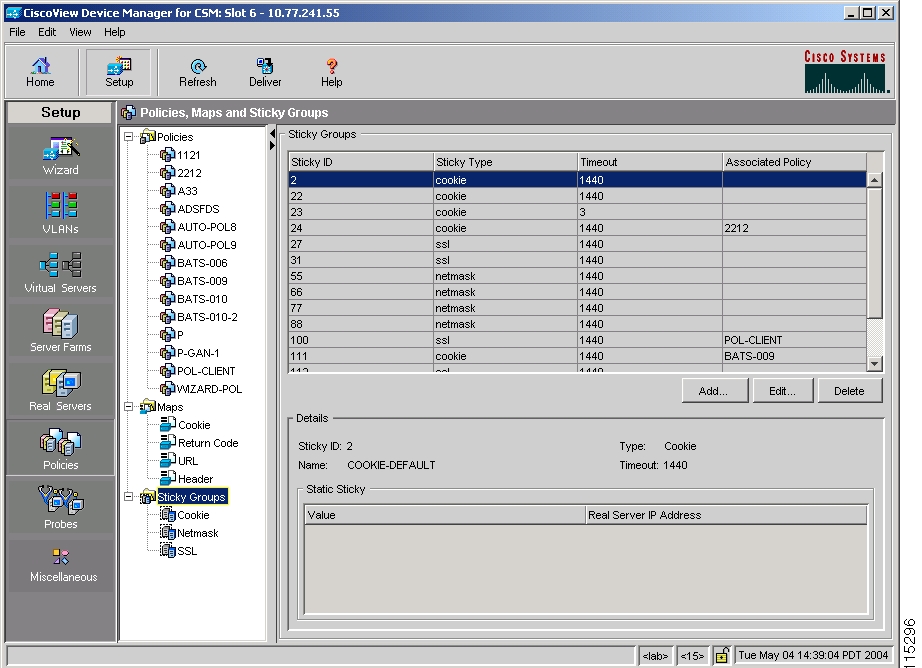
Viewing Sticky Groups
Figure 9-1 Sticky Groups Page
You can view the existing configuration details in the configuration dialog and edit the specified fields.
To view the Sticky Groups:
Step 1
Step 2
Step 3
Or:
Step 1
Step 2
The following fields appear:
Step 3
Step 4
From the main Sticky Group page, you can access functions to do the following:
•
•
•
•
Adding a Sticky Group
To add a new Sticky Group:
Step 1
Step 2
Step 3
Or:
Step 1
Step 2
Step 3
The following fields appear:
From this page, you can access functions to do the following:
•
•
Editing a Sticky Group
To edit the configuration values of a selected Sticky Group:
Step 1
Step 2
Step 3
Or:
Step 1
Step 2
Step 3
•
•
Step 4
To edit a Netmask Sticky Group, see "Editing a Netmask Sticky Group" section.
To edit an SSL Sticky Group, see "Editing an SSL Sticky Group" section.
From this page, you can access functions to do the following:
•
•
Viewing Cookie Sticky Groups
To view the Cookie Sticky Groups:
Step 1
Step 2
Step 3
Or:
Step 1
Step 2
The following fields appear:
Step 3
From the main Cookie Sticky Group page, you can access functions to do the following:
•
•
•
Adding a Cookie Sticky Group
To add a Cookie Sticky Group:
Step 1
Step 2
Step 3
Step 4
Or:
Step 1
Step 2
Step 3
The following fields appear:
From this page, you can access functions to do the following:
•
•
Editing a Cookie Sticky Group
To edit a Cookie Sticky Group:
Step 1
Step 2
Step 3
Step 4
Or:
Step 1
Step 2
Step 3
The following fields appear:
From this page, you can access functions to do the following:
•
•
Viewing Netmask Sticky Groups
To view Netmask Sticky Groups:
Step 1
Step 2
Step 3
Or:
Step 1
Step 2
The following fields appear:
Step 3
From this page, you can access functions to do the following:
•
•
•
Adding a Netmask Sticky Group
To add a Netmask Sticky Group:
Step 1
Step 2
Step 3
Step 4
Or:
Step 1
Step 2
Step 3
The following fields appear:
From this page, you can access functions to do the following:
•
•
Editing a Netmask Sticky Group
To edit a Netmask Sticky Group:
Step 1
Step 2
Step 3
Step 4
Or:
Step 1
Step 2
Step 3
The following fields appear:
From this page, you can access functions to do the following:
•
•
Viewing SSL Sticky Groups
To view the SSL Sticky Groups:
Step 1
Step 2
Step 3
Or:
Step 1
Step 2
The following fields appear:
Step 3
From the main SSL Sticky Group page, you can access functions to do the following:
•
•
•
Adding an SSL Sticky Group
To create an SSL Sticky Group:
Step 1
Step 2
Step 3
Step 4
Or:
Step 1
Step 2
Step 3
The following fields appear:
From this page, you can access functions to do the following:
•
•
Editing an SSL Sticky Group
To edit an SSL Sticky Group:
Step 1
Step 2
Step 3
Or:
Step 1
Step 2
Step 3
The following fields appear:
From this page, you can access functions to do the following:
•
•
![]()
![]()
![]()
![]()
![]()
![]()
![]()
![]()
Posted: Thu Oct 6 22:43:29 PDT 2005
All contents are Copyright © 1992--2005 Cisco Systems, Inc. All rights reserved.
Important Notices and Privacy Statement.