cc/td/doc/product/rtrmgmt/cvdmcsm
hometocprevnextglossaryfeedbacksearchhelp
PDF

Table Of Contents

Managing Maps

Viewing Maps

Adding a Map

Viewing Cookie Maps

Adding a Cookie Map

Viewing Return Code Maps

Adding a Return Code Map

Adding Match Conditions for a Return Code Map

Editing Match Conditions for a Return Code Map

Viewing URL Maps

Adding a URL Map

Viewing Header Maps

Adding a Header Map


Managing Maps


You can configure maps to define multiple URLs, cookies, HTTP headers, and return codes as groups that can be associated with a policy when configured.

This section contains the following topics:

Viewing Maps

Adding a Map

Viewing Cookie Maps

Viewing Return Code Maps

Viewing URL Maps

Viewing Header Maps

Viewing Maps

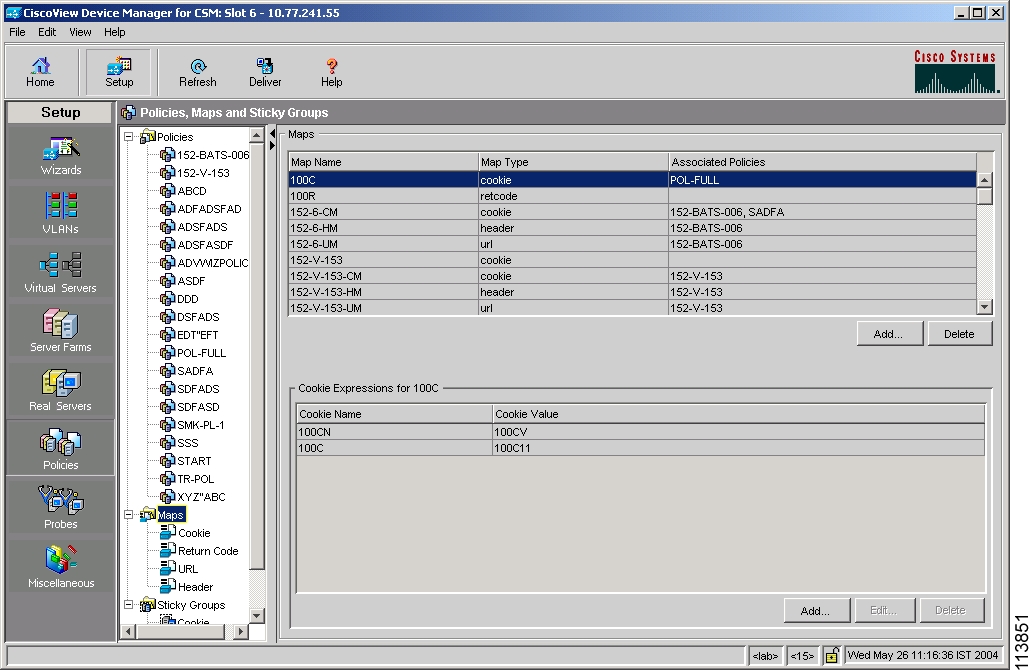
Figure 8-1 Maps Page

You can view information about all Maps on the device.

To view the maps:


Step 1 Click Home at the top of the window

Step 2 Click Policies under Services Dashboard.

Step 3 Click Maps. A table with details of all configured Maps appears.

Or:


Step 1 Click Setup from the task bar.

Step 2 Click Policies > Maps, the screen is displayed on the right pane.

Step 3 Click Maps. A table with details of all configured Maps appears.

The following fields are displayed:

Field
Description

Map Name

Displays the map name.

Map Type

Displays the type for the corresponding map name.

Associated Policies

Displays the associated policies for the map type.

Add

Click this button to add new map names and map types. For more information, see the "Adding a Map" section.

Delete

Select the Map Name you wish to delete and click on this button to delete the existing map type.


The lower pane of the Map window displays the various match conditions of the selected map.

The match conditions will differ according to the type of map that you select in the table.

1. If you choose Cookie Map, the following fields appear:

Field
Description

Cookie Name

Name of the cookie.

Cookie Value

Value of the cookie.


From this section, you can access functions to do the following:

Click Add to add cookie match conditions by entering the cookie name and value.

Click Edit to edit cookie match conditions.

Select a match condition, then click Delete to delete the cookie match conditions.

2. If you choose Return Code Map, the following fields appear:

Field
Description
Match Conditions

Lowest Return Code

The lowest return code.

Highest Return Code

The highest return code.

Action for Return Codes

Action for the return code.

Return Code Instances

Instances of the return code.

Reset Time after Threshold

Time for the reset.


From this section, you can access functions to do the following:

Click Add to add match conditions. For more information, see "Adding Match Conditions for a Return Code Map" section.

Click Edit to edit cookie match conditions.

Select a match condition, then click Delete to delete the match condition.

3. If you choose URL Map, the following fields appear:

Field
Description
URL Method

The URL method to be used.

URL

The URL associated with the map.


From this section, you can access functions to do the following:

Click Add to add URL expressions by entering the URL method and URL.

Click Edit to edit URL expressions.

Select a URL expression, then click Delete to delete it.

4. If you choose Header Map, the following fields appear:

Field
Description
Header Name

Name of the header.

Header Value

Value of the header.


From this section, you can access functions to do the following:

Click Add to add header match conditions by entering the cookie name and value.

Click Edit to edit header match conditions.

Select a header match condition, then click Delete to delete the match condition.

From the main Maps page, you can access functions to do the following:

Click Add to add a new Map. For more information, see "Adding a Map" section.

Select a row and click Delete to delete a Map.

View a Cookie Map. For more information, see "Viewing Cookie Maps" section.

View a Return Code Map. For more information, see "Viewing Return Code Maps" section.

View a URL Map. For more information, see "Viewing URL Maps" section.

View a Header Map. For more information, see "Viewing Header Maps" section.

Adding a Map

To add a map:


Step 1 Click Home at the top of the window

Step 2 Click Policies under Services Dashboard.

Step 3 Click Maps. A table with details of all configured Maps appears.

Step 4 Click Add. The Add Map dialog box appears.

Or:


Step 1 Click Setup from the task bar.

Step 2 Click Policies, the Policies screen is displayed in the right pane.

Step 3 Click Maps. A table with details of all configured Maps appears

Step 4 Click Add. The Add Map dialog box appears.

The following fields are displayed:

Field
Description

Map Type

Specify the map type. The map types are, Cookies, Header, URL, and Return Code.

Map Name

Enter the map name.


The fields will differ according to the type of map that you select in the table.

For more information on adding a Cookie Map, see "Adding a Cookie Map" section.

For more information on adding a Return Code Map, see "Adding a Return Code Map" section.

For more information on adding a URL Map, see "Adding a URL Map" section.

For more information on adding a Header Map, see "Adding a Header Map" section.


Viewing Cookie Maps

To view Cookie maps:


Step 1 Click Setup from the task bar.

Step 2 Click Policies, the Policies screen is displayed in the right pane.

Step 3 Click Maps. A table with details of all configured Maps appears.

Step 4 Select Cookie Maps from the object selector.

The following fields appear:

Field
Description

Map Name

Enter the map name.

Associated Policies

The policy associated to the Cookie Map.


From the main Cookie Map page, you can access functions to do the following:

Click Add to add a new Cookie Map. For more information, see "Adding a Cookie Map" section.

Select a row and click Delete to delete a Cookie Map.

Step 5 Select one of the map names from the table.

The following information is displayed:

Field
Description
Cookie Expressions

Cookie Name

The name of the cookie map.

Cookie Value

The value of the cookie map.


From this section, you can access functions to do the following:

Click Add to add cookie match condition to enter the Cookie Name and Value. For more information see the table below Step 6 in "Adding a Cookie Map" section.

Click Edit to edit the cookie value.

Select a Cookie Name, then click Delete to delete a Cookie.

Adding a Cookie Map

To add a new Cookie Map:


Step 1 Click Home at the top of the window.

Step 2 Click Policies under Services Dashboard.

Step 3 Click Maps. A table with details of all configured Maps appears.

Step 4 Select Cookie Maps from the object selector.

Step 5 Click the Add button provided at the end of the table to add a new Cookie Map.

Or:


Step 1 Click Setup from the task bar.

Step 2 Click Policies, the Policies screen is displayed in the right pane.

Step 3 Click Maps. A table with details of all configured Maps appears.

Step 4 Select Cookie Maps from the object selector.

Step 5 Click the Add button provided at the end of the table. The Add Cookie Map page is displayed and the following fields appear:

Field
Description

Cookie Map Name

Enter the cookie map name.


Step 6 To add a cookie name and value click the Add button provided at the end of the table. The Match Conditions page is displayed and the following fields appear.


Note The Cookie Map can have a maximum of five match conditions.


Field
Description

Cookie Name

Enter a name for the cookie.

Cookie Value

Enter a value for the cookie.


From this page, you can access functions to do the following:

Select a row and click Delete to delete a Cookie Map.

Viewing Return Code Maps

To view Return Code Map:


Step 1 Click Home at the top of the window

Step 2 Click Policies under Services Dashboard.

Step 3 Click Maps. A table with details of all configured Maps appears

Step 4 Select Return Code Map from the object selector.

Or:


Step 1 Click Setup from the task bar.

Step 2 Click Policies, the Policies screen is displayed in the right pane.

Step 3 Click Maps. A table with details of all configured Maps appears

Step 4 Select Return Code Map from the object selector.

The following fields appear:

Field
Description

Map Name

Name of the map

Associated Server Farms

Server Farms associated with the map.


From the main Return Code Map page, you can access functions to do the following:

Click Add to add a new Return Code Map. For more information, see "Adding a Return Code Map" section.

Select a row and click Delete to delete a Return Code Map.

Step 5 Select one of the maps from the table.

The following details appears below:

Field
Description
Match Conditions

Lowest Return Code

The lowest return code.

Highest Return Code

The highest return code.

Action for Return Codes

Action for the return code.

Return Code Instances

Instances of the return code.

Reset Time after Threshold

Time for the reset.


From this section, you can access functions to do the following:

Click Add to add match conditions. For more information, see "Adding Match Conditions for a Return Code Map" section.

Click Edit to edit match conditions. For more information, see "Editing Match Conditions for a Return Code Map" section.

Select a match condition, then click Delete to delete the match condition.

Adding a Return Code Map

To add a new Return Code:


Step 1 Click Home at the top of the window

Step 2 Click Policies under Services Dashboard.

Step 3 Click Maps. A table with details of all configured Maps appears.

Step 4 Select Return Code Map from the object selector.

Step 5 Click Add. The Add Return Code Map dialog box appears.

Or:


Step 1 Click Setup from the task bar.

Step 2 Click Policies, the Policies screen is displayed in the right pane.

Step 3 Click Maps. A table with details of all configured Maps appears.

Step 4 Select Return Code Map from the object selector.

Step 5 Click Add. The Add Return Code Map dialog box appears.

The following fields appear:

Field
Description

Map Name

Enter a map name. Then click Add to add match conditions. For more information, see "Adding Match Conditions for a Return Code Map" section.

Lowest Return Code

The lowest return code for the map.

Highest Return Code

The highest return code for the map.

Action for Return Codes

The action for the return code.

Return Code Instances

This feature is enabled depending on the Action for Return Code.

Enter the instances of the return code.

Reset Time after Threshold

The time for the reset.


From this page, you can access functions to do the following:

Click Add to add match conditions. For more information, see "Adding Match Conditions for a Return Code Map" section.

Select a row and click Delete to delete a match condition.

Adding Match Conditions for a Return Code Map

To add match conditions for a Return Code Map:


Step 1 Click Home at the top of the window.

Step 2 Click Policies under Services Dashboard.

Step 3 Click Maps. A table with details of all configured Maps appears.

Step 4 Select Return Code Map from the object selector.

Step 5 Click Add. The Add Return Code Map dialog box appears.

Step 6 Click Add in the dialog box to add match condition for the selected type of Return Code Map.

Or:


Step 1 Click Setup from the task bar.

Step 2 Click Policies. The Policies screen is displayed in the right pane.

Step 3 Click on Maps. A table with details of all configured Maps appears.

Step 4 Select Return Code Map from the object selector.

Step 5 Click Add. The Add Return Code Map dialog box appears.

Step 6 Click Add in the dialog box to add match condition for the selected type of Return Code Map.

The following field appears:

Field
Description
Match Conditions

Lowest Return Code

Enter the lowest return code.


Note Overlapping return codes cannot be configured.


Highest Return Code

Enter the highest return code. Maximum no. of return codes that can be configured is 100.


Note Overlapping return codes cannot be configured.


Example: If you have 100-116,200-216 already, you cannot configure more than (100 - (116-100+1) - (216-200+1) ) = 66. So, you can have 300 -365. If you add 300-366, an error message will popup.

Action for Return Codes

Action for the return code.

You can choose from Count, Log, and Remove. The return code instance and return code reset fields will be enabled only when you choose Remove or Log.

Return Code Instances

Enter the instances of the return code.


Note This field is disabled if the Action for the Return Code is Count.


Return Code Reset

Select this check box to enable reset time after threshold.


Note This field is disabled if the Action for the Return Code is Count.


Reset Time after Threshold

Enter the time for the reset.


Editing Match Conditions for a Return Code Map

To edit match conditions for a Return Code Map:


Step 1 Click Home at the top of the window.

Step 2 Click Policies under Services Dashboard.

Step 3 Click Maps. A table with details of all configured Maps appears.

Step 4 Select Return Code Map from the object selector.

Step 5 Click Add. The Add Return Code Map dialog box appears.

Step 6 Click Edit to edit match conditions for the selected Return Code Map.

Or:


Step 1 Click Setup from the task bar.

Step 2 Click on Policies, the Policies screen is displayed in the right pane.

Step 3 Click on Maps. A table with details of all configured Maps appears.

Step 4 Select Return Code Map from the object selector.

Step 5 Click Add. The Add Return Code Map dialog box appears.

Step 6 Click Edit to edit match conditions for the selected Return Code Map.

The following field appears:

Field
Description
Match Conditions

Lowest Return Code

Modify the lowest return code.


Note Overlapping return codes cannot be configured.


Highest Return Code

Modify the highest return code.


Note Overlapping return codes cannot be configured.


Example: If you have 100-116,200-216 already, you cannot configure more than (100 - (116-100+1) - (216-200+1) ) = 66. So, you can have 300 -365. If you add 300-366, an error message will popup.

Action for Return Codes

Action for the return code.

You can choose from Count, Log, and Remove. The return code instance and return code reset fields will be enabled only when you choose Remove or Log.

Return Code Instances

Modify the instances of the return code.


Note This field is disabled if the Action for the Return Code is Count.


Return Code Reset

Select the check box to reset the time after threshold.


Note This field is disabled if the Action for the Return Code is Count.


Reset Time after Threshold

Modify the time for the reset.


Viewing URL Maps

To view the URL Maps:


Step 1 Click Home at the top of the window

Step 2 Click Policies under Services Dashboard.

Step 3 Click Maps. A table with details of all configured Maps appears.

Step 4 Select URL Maps from the object selector.

Or:


Step 1 Click Setup from the task bar.

Step 2 Click Policies, the Policies screen is displayed in the right pane.

Step 3 Click Maps. A table with details of all configured Maps appears.

Step 4 Select URL Maps from the object selector.

The following fields appear:

Field
Description

Map Name

The name of the map

Associated Policies

Policies associated with the map.


From the main URL Map page, you can access functions to do the following:

Click Add to add a new URL Map. For more information, see "Adding a URL Map" section.

Select a row and click Delete to delete a URL Map.

Step 5 Select one of the maps from the table.

The following information is displayed:

Field
Description
Match Conditions

URL Method

URL Method to be used.

URL

URL associated with the map.


From this section, you can access functions to do the following:

Click Add to add match condition to enter the URL method and URL. For more information see the table below Step 6 in "Adding a URL Map" section.

Click Edit to edit the match conditions to edit the URL.

Select a URL expression, then click Delete to delete a match condition.

Adding a URL Map

To add a new URL Map:


Step 1 Click Home at the top of the window

Step 2 Click Policies under Services Dashboard.

Step 3 Click Maps. A table with details of all configured Maps appears

Step 4 Select URL Maps from the object selector.

Step 5 Click the Add button provided at the end of the table to add a new URL Map.

Or:


Step 1 Click Setup from the task bar.

Step 2 Click Policies, the Policies screen is displayed in the right pane.

Step 3 Click Maps. A table with details of all configured Maps appears

Step 4 Select URL Maps from the object selector.

Step 5 Click the Add button provided at the end of the table. The Add URL Map page is appears and the following field is displayed:

Field
Description

URL Map Name

Enter the URL Map Name.


Step 6 To add a URL Method and URL, click the Add button provided at the end of the table. The Match Conditions page is displayed and the following fields appear.

Field
Description

URL Method

Click and from the list select a URL Method or enter the URL Method to be used.

URL

Enter the URL associated with the map.


Viewing Header Maps

To view the Header Maps:


Step 1 Click Home at the top of the window

Step 2 Click Policies under Services Dashboard.

Step 3 Click Maps. A table with details of all configured Maps appears.

Step 4 Select Header Maps from the object selector.

Or:


Step 1 Click Setup from the task bar.

Step 2 Click Policies, the Policies screen is displayed in the right pane.

Step 3 Click Maps. A table with details of all configured Maps appears.

Step 4 Select Header Maps from the object selector.

The following fields appear:

Field
Description

Map Name

The name of the map.

Associated Policies

The policies associated with the map.


From the main Header Map page, you can access functions to do the following:

Click Add to add a new Header Map. For more information, see "Adding a Header Map" section.

Select a map and click Delete to delete a Header Map.

Step 5 Select one of the maps from the table.

The following fields appear below:

Field
Description
Match Conditions

Header Name

The header name of the map.

Header Value

The header value of the map.


From this section, you can access functions to do the following:

Click Add to add match condition to enter the Header name and value. For more details see the table below Step 6 in "Adding a Header Map" section.

Click Edit to edit the match conditions to edit the Header Value.

Select a match condition, then click Delete to delete a match condition.

Adding a Header Map

To add a new Header Map:


Step 1 Click Home at the top of the window

Step 2 Click Policies under Services Dashboard.

Step 3 Click Maps. A table with details of all configured Maps appears

Step 4 Select Header Maps from the object selector.

Step 5 Click Add. The Add Header Map dialog box appears.

Or:


Step 1 Click Setup from the task bar.

Step 2 Click Policies, the Policies screen is displayed in the right pane.

Step 3 Click Maps. A table with details of all configured Maps appears

Step 4 Select Header Maps from the object selector.

Step 5 Click Add. The Add Header Map dialog box appears and the following field is displayed:

Field
Description

Header Map Name

Click and from the list and select a Header name or enter a header name.


Step 6 To add a Header Name and Value, click the Add button provided at the end of the table. The Match Conditions page is displayed and the following fields appear.


Note The Header Map can have a maximum of five match conditions.


Field
Description

Header Name

Click and from the list select a Header Name or enter the Header Name to be used.

Header Value

Enter the value for the Header Map.


hometocprevnextglossaryfeedbacksearchhelp

Posted: Thu Oct 6 22:44:10 PDT 2005
All contents are Copyright © 1992--2005 Cisco Systems, Inc. All rights reserved.
Important Notices and Privacy Statement.