|
|

Table Of Contents
F81 View Optical STM-N PM Parameters
F82 Refresh PM Counts for a Selected Port and VC4
F83 Refresh PM Counts at Fifteen-Minute Intervals
F84 Refresh PM Counts at One-Day Intervals
F85 Monitor Near-End PM Counts
F89 Set Auto-Refresh Interval for Displayed PM Counts
Monitor Performance
This chapter explains how to enable and view performance monitoring statistics for the CiscoONS15600SDH. Performance monitoring (PM) parameters are used by service providers to gather, store, threshold, and report performance data for early detection of problems. For more PM information, details, and definitions, refer to the CiscoONS15600SDH Reference Manual.
Before You Begin
Before performing any of the following procedures, investigate all alarms and clear any trouble conditions. Refer to the CiscoONS15600 SDH Troubleshooting Guide as necessary.
This section lists the chapter procedures (NTPs). Turn to a procedure for applicable tasks (DLPs).
1.
F58 Enable Intermediate-Path Performance Monitoring—Complete as needed.
2.
Note
NTP-F58 Enable Intermediate-Path Performance Monitoring
Purpose
This procedure enables intermediate path performance monitoring (IPPM), which allows you to monitor VC4 traffic through intermediate nodes in a circuit path.
Tools/Equipment
None
Prerequisite Procedures
F42 Create an Automatically Routed Optical Circuit or F43 Create a Manually Routed Optical Circuit or F44 Create a Unidirectional Optical Circuit with Multiple Drops
Required/As Needed
As needed
Onsite/Remote
Onsite or remote
Security Level
Provisioning or higher
Note
Step1
Step2
The Cisco ONS 15600 SDH has the following optical (traffic) cards:
•
•
•
•
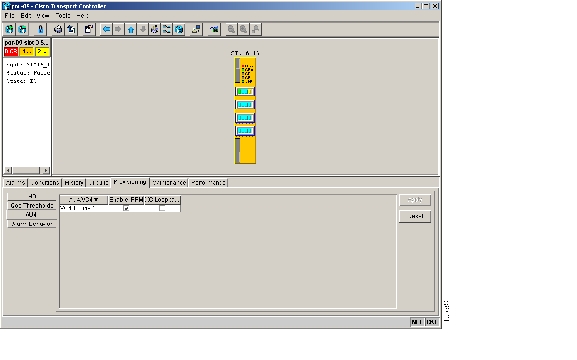
Step3
Figure 8-1 AU4 Tab for Enabling IPPM
Step4
Step5
Step6
Stop. You have completed this procedure.
NTP-F59 Monitor Optical Performance
Purpose
The Performance tab window allows you to view node near-end or far-end performance on a selected card and port at specified time intervals to detect possible performance problems.
Tools/Equipment
None
Prerequisite Procedures
F42 Create an Automatically Routed Optical Circuit or F43 Create a Manually Routed Optical Circuit or F44 Create a Unidirectional Optical Circuit with Multiple Drops
Required/As Needed
As needed
Onsite/Remote
Onsite
Security Level
Retrieve or higher
Step1
Step2
Step3
•
•
•
•
•
•
•
•
Stop. You have completed this procedure.
DLP-F81 View Optical STM-N PM Parameters
Step1
Step2
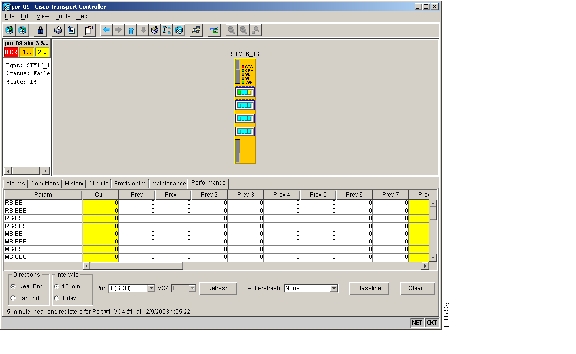
Note
Figure 8-2 Viewing Optical STM-N Performance Monitoring Information
Step3
Step4
DLP-F82 Refresh PM Counts for a Selected Port and VC4
Step1
Step2
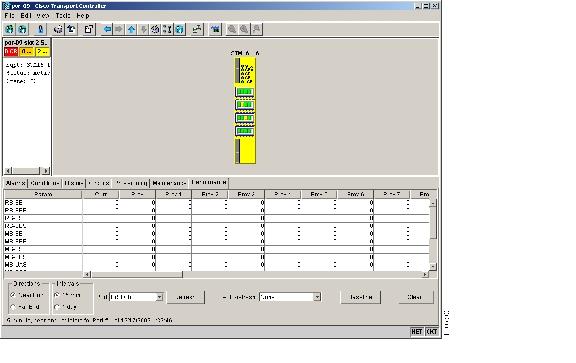
Step3
Figure 8-3 Port Menu on the Card View Performance Tab
Step4
Step5
DLP-F83 Refresh PM Counts at Fifteen-Minute Intervals
Step1
Step2
Step3
Step4
Step5
Each monitored performance parameter has corresponding threshold values for the current time period. If the value of the counter exceeds the threshold value for a particular 15-minute interval, a threshold crossing alert (TCA) is raised. The number represents the counter value for each specific performance monitoring parameter.
Step6
Note
Step7
DLP-F84 Refresh PM Counts at One-Day Intervals
Step1
Step2
Step3
Step4
Step5
Each monitored performance parameter has corresponding threshold values for the current time period. If the value of the counter exceeds the threshold value for a particular one-day interval, a TCA is raised. The number represents the counter value for each specific performance monitoring parameter.
Step6
Note
Step7
DLP-F85 Monitor Near-End PM Counts
Step1
Step2
Step3
Step4
Step5
DLP-F86 Monitor Far-End PM Counts
Step1
Step2
Step3
Step4
Step5
DLP-F87 Reset Current PM Counts
Step1
Step2
Step3
Note
Step4
Step5
DLP-F88 Clear Selected PM Counts
Caution
Step1
Step2
Step3
Step4
•
•
•
•
Step5
Step6
Step7
DLP-F89 Set Auto-Refresh Interval for Displayed PM Counts
Step1
Step2
Step3
•
•
•
•
•
•
Step4
Depending on the selected autorefresh interval, the PM counts shown automatically update when each refresh interval is complete. If the autorefresh interval is set to None, the PM counts are not updated unless you click the Refresh button.
Step5
![]()
![]()
![]()
![]()
![]()
![]()
![]()
![]()
Posted: Thu Feb 26 17:18:09 PST 2004
All contents are Copyright © 1992--2004 Cisco Systems, Inc. All rights reserved.
Important Notices and Privacy Statement.