|
|

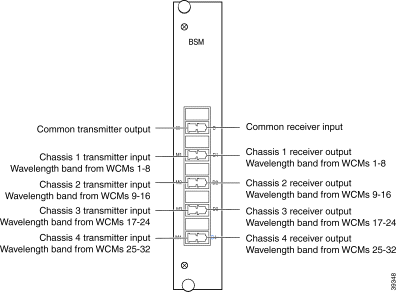
The Cisco Metro 1500 series system uses an architecture of four channel groups consisting of eight channels of data communication. The band splitter module (BSM) serves as combiner and splitter of the groups of multiplexed optical channels. It is a passive high performance module. The group signals from the MUX modules are combined and routed to the input ports then multiplexed for data transmission through one fiber to the BSM at the remote side of the link. Simultaneously the BSM receives the combined signal at its remote input from the remote side of the link . This mixed signal is split into four groups for demultiplexing in the DMX modules.
The BSM has up to ten optical connectors:
All connectors are of the MiniSC type (also called MUPC). Figure 7-1 shows the front panel of the BSM. Connecting the BSM is described in the "Adding and Replacing a BSM" section and in "Installation."
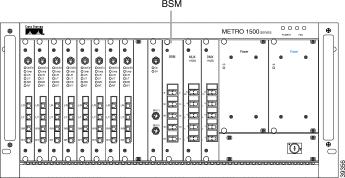
To add or replace a BSM to extension chassis A (Figure 7-2), follow these steps:
 |
Warning Only trained and qualified personnel should be allowed to install, replace, or service this equipment. |
 |
Note Before connecting the fiber cable, remove the dust covers and blind plugs and clean the fiber ferules. The minimum bend radius of optical fiber cables is about 30-50 mm. Avoid tight or pressed fibers. |
Step 2 Disconnect all jumpers and protect the connectors with dust covers (jumpers) and blind plugs (BSM).
Step 3 Loosen the two screws from the front panel of BSM or the blank filler module.
Step 4 Take the new BSM from the shipping container and apply dry and oilfree air to blow out any dust particles.
Step 5 Carefully insert the BSM into the chassis slots while guiding the upper and lower edges of the card into the corresponding slot tracks. A force of up to 4.5 Newton (1 lb.) is required to push the card completely into the chassis.
 |
Caution It is critical to insert the card gently. If a force greater than 4.5 Newton (1 lb.) is needed to push the WCM in, stop immediately. Inspect the module. If the module is not damaged repeat the insertion procedure. |
Step 6 Follow this step only if you are adding a BSM. Connect a MiniSC jumper to the "M*" labeled connector of the MUX (for example, "M1" for the MUX in the primary chassis).
Step 7 Connect the other end of the jumper to the "M*" labeled connector of the BSM (for example, "M1" if the MUX of the primary chassis should be routed) as shown in Figure 7-3.
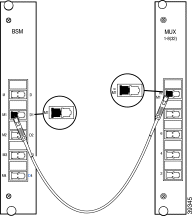
Step 8 Follow this step only if you are adding a BSM. Connect a MiniSC jumper to the "D*" labeled connector of the DMX (for example, "D1" for the DMX in the primary chassis).
Step 9 Connect the other end of the jumper to the "D*" labeled connector of the BSM (for example, "D1" if the DMX of the primary chassis should be routed) as shown in Figure 7-4.

Step 10 Repeat step 6 to step 9 with all other MUXs and DMXs in the unit.
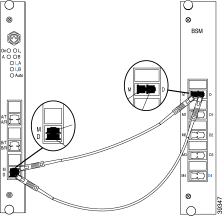
Step 11 Connect the MiniSC plug of the "Remote Transmission Fiber" labeled line to the "M" labeled connector of the BSM as shown in Figure 7-5.
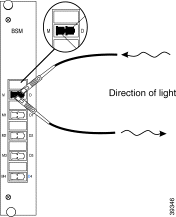
Step 12 Connect the MiniSC plug of the "Remote Receiver Fiber" labeled line to the "D" labeled connector of the BSM as shown in Figure 7-5.
Step 13 Connect a MiniSC jumper to the "M" labeled connector of the BSM.
Step 14 Connect the other end of the jumper to the "M" labeled connector of the RSM as shown in Figure 7-6.
Step 15 Connect a MiniSC jumper to the "D" labeled connector of the BSM.
Step 16 Connect the other end of the jumper to the "D" labeled connector of the RSM as shown in Figure 7-6.
Step 17 Place the fiberoptic cables in the cable holder of the extension chassis A and in the cable holder of the rack at the side of the chassis.
Step 18 Mount the cover in front of the chassis.
If you have any problems which result in a deviation from the installation described above, please contact your Service Representative immediately.
![]()
![]()
![]()
![]()
![]()
![]()
![]()
![]()
Posted: Tue Jan 23 11:22:56 PST 2001
All contents are Copyright © 1992--2001 Cisco Systems, Inc. All rights reserved.
Important Notices and Privacy Statement.