|
|

This chapter describes how to install and test the Cisco Metro 1500 series system. The equipment is generally installed during normal working hours. It is usually connected to active CPU channels or control units after working hours.
To install each system, follow these steps:
Step 2 Fill out the form in "Unit Maintenance and Network Record."
Step 3 Mount each unit in a cabinet or a rack.
Step 4 Power up each unit.
Step 5 Run online tests as described in the "Running Online Tests" section.
Step 6 Connect the fiber-optic link between sites using the remote channel.
Step 7 Connect applications using the local channels.
Step 8 Test system online to verify operation.
Step 9 Skip the following steps if a NEMI is not installed.
Step 10 Connect to the serial port. Refer to the Cisco Metro 1500 Series Management Guide.
Step 11 Change default passwords. See "Unit Maintenance and Network Record," and refer to the Cisco Metro 1500 Series Management Guide.
Step 12 Log in as root and define network settings. See "Unit Maintenance and Network Record," and refer to the Cisco Metro 1500 Series Management Guide.
Step 13 Change the SNMP configuration. Refer to the Cisco Metro 1500 Series Management Guide.
Step 14 Reboot the unit.
 |
Warning Only trained and qualified personnel should be allowed to install, replace, or service this equipment. |
The Cisco Metro 1500 series is delivered with the following standard items:
The Cisco Metro 1500 series units are thoroughly inspected before shipment. If any damage has occurred during transportation or if any item is missing, notify Cisco immediately.
Upon receipt, inspect the equipment as follows:
Compare the equipment inside with the packing slip and the equipment list provided by Customer Service. If there are any discrepancies, notify the Customer Service Center.
Step 2 Check for external damage.
Visually check all components and immediately report any shipping damage to your Customer Service Representative. Have the following information ready:
Fill out all the required information in "Unit Maintenance and Network Record" in order to have a record of all of your hardware, configuration options, and network settings.
The unit is designed for rack-mounting in a cabinet. We recommend mounting the unit on chassis runners or telescopic slides. Use star-type lock washers on the rack screws to ensure a good conductive connection between the unit and the rack. For further information about the installation of the units in a customer cabinet, see the instructions from the cabinet manufacturer.
The system is equipped with two power supplies and two power cords. Connect both power cords to the back of the system (Figure 2-7).
 |
Warning The plug-socket combination must be accessible at all times because it serves as the main disconnecting device. |
The power must be turned on by the power key switch (AC powered version only). The key switch is secured against rotation and the key can be removed in either the on or off position. A key for powering up the system is provided with each system.
When the power is on, all of the green power supply LEDs should be on for each PSM and WCM installed. The display panel provides all important system information to the user.
 |
Warning This unit might have more than one power cord. To reduce the risk of electric shock, disconnect the two power supply cords before servicing the unit. |
Warm up the units for 30 minutes before laser power testing or application connection.
 |
Caution If powered down, wait at least 10 seconds before you switch the unit on again. |
Basic grounding of each chassis is done by connecting the power cords. Each chassis should also be connected to the rack by an earthing cable. Use the earth contact on the right side of the chassis to make the grounding connection.
Follow these steps to make the earth grounding:
Step 2 Connect the other end of the wire to the rack.
Dirty fiber connectors are a common source of light loss, especially for 9- micrometer core single-mode fibers. Keep the connectors clean at all times and keep the dust cover installed when not in use.
Before installing any type of cable or connector, use a lint-free alcohol pad from a cleaning kit to clean the ferrule (the protective white tube around the fiber) and the end-face surface of the fiber.
As a general rule, whenever there is a significant, unexplained light loss, clean the connectors.
 |
Caution Use extreme care when removing or installing connectors so you do not damage the connector housing or scratch the end-face surface of the fiber. Always install protective covers on unused or disconnected components to prevent contamination. Always clean fiber connectors before installing them. |
Use a swab saturated with isopropyl alcohol to clean the end-surfaces. Use compressed air after applying the isopropyl alcohol.
Follow these steps to clean the optical connectors:
Step 2 Blow dry with canned, dry, oil-free, compressed air.
Step 3 Inspect the ferrule.
 |
Note If the surface is not clean or does not have a uniform shine, repeat the process using a fresh surface of the alcohol pad. |
Remove the acrylic cover from the front of each chassis.
This section includes the following connection procedures:
To connect a WCM to MUX and DMX modules, follow these steps:
Step 2 Remove the dust cover from the other end of the jumper and the blind plug from the corresponding MUX connector. For example, if you interconnect the seventh WCM, remove the blind plug from the MUX connector labeled 7 (Figure 4-1).

Step 3 Remove the blind plug from the WCM connector labeled R/R (remote receive) and the dust cover from one end of a short jumper. Connect the MiniSC plug to the open connector.
Step 4 Remove the dust cover from the outer end of the jumper and the blind plug from the corresponding DMX connector. For example, if you interconnect the seventh WCM, remove the blind plug from the DMX connector labeled 7 (Figure 4-1).
Step 5 Place the fiber-optic cables in the cable holder at the bottom of the chassis.
Repeat above steps with all other WCMs of the main chassis and all WCMs of the extension chassis if applicable.
To connect a BSM to MUX and DMX modules, follow these steps:
Step 2 Remove the dust cover from other end of the jumper and the blind plug from the M* labeled connector of the BSM (i.e. M1 if the MUX of the main chassis should be routed). Connect the plug to the open connector of the MUX as shown in Figure 4-2.
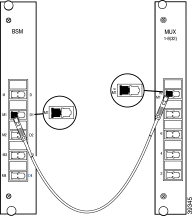
Step 3 Remove the blind plug from the D* labeled connector of the DMX (i.e. D1 for the DMX in the primary chassis) and the dust cover from one end of a jumper. Connect the MiniSC plug to the open connector.
Step 4 Remove the dust cover from other end of the jumper and the blind plug from the D* labeled connector of the BSM (i.e. D1 if the DMX of the primary chassis should be routed). Connect the plug to the open connector of the DMX as shown in Figure 4-3.

Step 5 Place the fiber-optic cables in the cable holder of the primary chassis and the extension chassis and in the cable holder of the rack at the side of both chassis.
If there is no RSM, skip the next section and continue with the "Connecting Remote Lines to a BSM" section.
To connect an optional RSM to a BSM, follow these steps:
Step 2 Remove the dust cover from the other end of the jumper and the blind plug from the M labeled connector of the RSM. Connect the plug to the open connector of the RSM as shown in Figure 4-4.
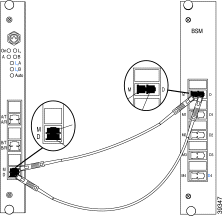
Step 3 Remove the blind plug from the D labeled connector of the BSM and the dust cover from one end of a jumper. Connect the MiniSC plug to the open connector.
Step 4 Remove the dust cover from other end of the jumper and the blind plug from the D labeled connector of the RSM. Connect the plug to the open connector of the RSM as shown in Figure 4-4.
Step 5 Place the fiber-optic cables in the cable holder at the bottom of the chassis front.
Skip the next section and continue with "Connecting Remote Lines to a RSM" section.
To connect remote lines to a BSM, follow these steps:
Step 2 Remove the blind plug from the M labeled connector of the BSM. Connect the cleaned plug to the open connector of the BSM as shown in Figure 4-5.
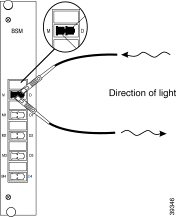
Step 3 Remove the dust cover from the MiniSC plug of the Remote Receiver Fiber labeled line and clean the fiber as described in the "Cleaning the Connectors" section.
Step 4 Remove the blind plug from the D labeled connector of the BSM. Connect the cleaned plug to the open connector of the BSM as shown in Figure 4-5.
Step 5 Place the fiber-optic cables in the cable holder of extension chassis A and in the cable holder of the rack at the side of the chassis.
Skip the next section and continue with "Connecting Local Lines to a WCM" section.
To connect remote lines to a RSM, follow these steps:
Step 2 Remove the blind plug from the A/T labeled connector of the RSM. Connect the cleaned plug to the open connector of the RSM as shown in Figure 4-6.

Step 3 Remove the dust cover from the MiniSC plug of the Receiver Fiber of Line A labeled remote line, and clean the fiber as described in "Cleaning the Connectors" section.
Step 4 Remove the blind plug from the A/R labeled connector of the RSM. Connect the cleaned plug to the open connector of the RSM as shown in Figure 4-6.
Step 5 Remove the dust cover from the MiniSC plug of the Transmission Fiber of Line B labeled remote line, and clean the fiber as described in "Cleaning the Connectors" section.
Step 6 Remove the blind plug from the B/T labeled connector of the RSM. Connect the cleaned plug to the open connector of the RSM as shown in Figure 4-6.
Step 7 Remove the dust cover from the MiniSC plug of the Receiver Fiber of Line B labeled remote line, and clean the fiber as described in "Cleaning the Connectors" section.
Step 8 Remove the blind plug from the B/R labeled connector of the RSM. Connect the cleaned plug to the open connector of the RSM as shown in Figure 4-6.
Step 9 Place the fiber-optic cables in the cable holder of the primary chassis and in the cable holder of the rack at the side of the chassis.
To connect local lines to a WCM, follow these steps:
Step 2 Remove the blind plug from the L/R labeled connector of the WCM. Connect the cleaned plug to the open connector of the WCM as shown in Figure 4-7.
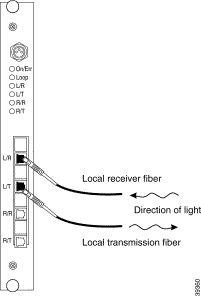
Step 3 Remove the dust cover from the MiniSC plug of Local Transmission Fiber labeled line, and clean the fiber as described in "Cleaning the Connectors" section.
Step 4 Remove the blind plug from the L/T labeled connector of the WCM. Connect the cleaned plug to the open connector of the WCM as shown in Figure 4-7.
Step 5 Place the fiber-optic cables in the cable holder of the primary chassis and in the cable holder of the rack at the side of the chassis.
Mount the acrylic cover at the front of all the chassis of the unit.
When connecting a Fiber Channel or Gigabit Ethernet port to a high-speed transparent wavelength channel module (WCM) on the Cisco Metro 1500 series system, you must ensure that the optical power levels from the Fiber Channel or Gigabit Ethernet transmitter do not overdrive the Local Receive (L/R) port on the WCM. To avoid an overdrive condition, insert an optical attenuation of 5 dB between the Fiber Channel or Gigabit Ethernet transmitter and the L/R port on the WCM. This attenuation can be implemented either with an attenuating single-mode patch cable assembly or an attenuating coupler, as described in the following sections.
An attenuating single-mode patch cable, shown in Figure 4-8, is a 3-meter
(9.84 ft) fiber optic jumper cable with a built-in attenuation of 5 dB.

The attenuating single-mode patch cable assembly should contain Corning SMF-28 or equivalent single-mode fiber.
As an alternative to the attenuating single-mode patch cable, a 5 dB attenuating coupler can be used, as shown in Figure 4-9.

Figure 4-9 shows a conventional mini-SC to SC patch cable plus the attenuating coupler, which achieves the same effect as the attenuating single-mode patch cable assembly with the built-in attenuator.
The Cisco Metro 1500 series optical isolator (OI) allows direct transmission from a wavelength channel module (WCM) over a remote (or trunk) fiber. The OI enables a WCM to bypass the multiplexing/demultiplexing (MUX/DMX) module in the Cisco Metro 1500 series chassis. By connecting the WCM to the OI through fiber jumpers, you can transmit directly over the remote fiber and obtain an additional 3 dB to 5 dB for use in your optical budget.
The OI minimizes optical back reflection. Optical back reflection is common in fiber-based transmissions. Back reflection is a small amount of light that is reflected back towards the transmitting optical component. The OI absorbs this reflected light so that the transmitting optical component operates with minimal interference.
The OI is connected directly to a jumper that extends from the remote connection of the WCM. The OI sits between the WCM and the remote (or trunk) fiber. See Figure 4-10.

To connect the OI, follow these guidelines:
Table 4-1 lists the specifications of the OI.
| Category | Value |
|---|---|
Wavelength band | 1520 - 1620 nm |
Typical peak isolation | 53 dB (min.) |
Minimum isolation | 32 dB (min.) |
Typical insertion loss | 0.7 dB |
Maximum insertion loss | 1.2 dB (max.) |
Return loss | 58 dB (min.) |
PDL | 0.15 dB (max.) |
PMD | 0.07 ps (max.) |
Maximum optical power | 300 mW |
Maximum tensile load | 5 N |
Operating temperature | - 20 to + 60 C |
Storage temperature | - 40 to + 85 C |
Fiber length | 1 m |
This section covers the removal and replacement of the power supply module (PSM).
 |
Warning Only trained and qualified personnel should be allowed to install, replace, or service this equipment. |
The Cisco Metro 1500 series system has two identical, fully redundant PSMs. Each PSM is able to take over the power needs of the entire system. These PSMs provide 5V and 30A to the system. Full input-to-output, input-to-case, and output-to-output isolation is provided.
 |
Caution If powered down, please wait at least 10 seconds before you switch the unit on again. |
Turn the power on or off using the key switch (refer to Figure 4-11). This switch supplies power to the redundant power supplies. You can only move the switch to on or off. Two keys are shipped with each unit and all units use the same key. The key can be removed in either the 1 or 0 position.

The status of power on and off is indicated on the display panel in front of the chassis and can be observed using network management at the NEMI. Refer to the Cisco Metro 1500 Series Management Guide for more information about power supply observation using network management and the NEMI.
If the green LED on a power supply is off while the unit is powered on, and the power cable is plugged in the corresponding power socket, either the cable is faulty or the power supply itself has failed. First, check the power cable to make sure that it is securely plugged into the unit. If the cable is correctly attached, replace the power supply. During this procedure, the system will keep running with its remaining power supply. The redundant power supply continues to provide uninterrupted service but you should check and replace the failed unit as soon as possible.
 |
Note The power socket labeled "Power 1" supplies current to the left power supply labeled "Power Supply 1" (refer to Figure 4-12). The power socket labeled "Power 2" supplies current to the right power supply labeled "Power Supply 2." |
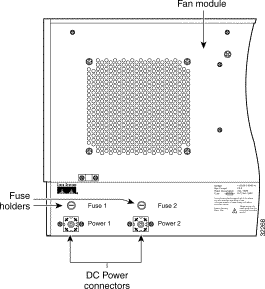
All PSMs are hot-swappable and can be replaced while the system is in service. To replace a PSM, complete these steps:
Step 2 Pull out the malfunctioning module.
Step 3 Slide in the spare module.
Step 4 Reconnect the power cord.
Step 5 Note that the green LED is on.
Step 6 Tighten the four panel screws.
 |
Note The power levels cannot be checked because of the automatic laser shutdown (ALS). |
System checkout and online testing are usually performed during working hours and must be coordinated between the customer and Cisco.
Online testing varies from site to site depending on the CPU, operating systems in use, and the local channels being connected.
Test jobs must be set up and tested by the customer prior to the actual installation of the unit.
If trouble occurs during installation, Table 4-2 describes troubleshooting tips. If the solution is not in the table, contact your Cisco Service Representative.
| Problem | Probable Cause | Solution |
|---|---|---|
No power | No power from the outlet. | Turn on power. |
Power cables are loose. | Check and reseat cables. | |
Power supply modules are not engaged. | Fully engage modules. | |
Power alarm | No power from one outlet. | Turn on power. |
One power cable is loose. | Check and reseat cables. | |
Power fuse supply is blown. | Check and replace fuse. | |
Not receiving local data | Local channel is not online. | Place local channel online. |
Loose fiber-optic connectors. | Check and reseat connectors. | |
Tx-Rx connectors are not matched. | Switch Tx-Rx connectors. | |
Connectors dirty or blown. | Clean or replace connectors. | |
Local cables not properly seated. | Trace and properly connect cables. | |
Local link power exceeds budget. | Troubleshoot and retest local link. | |
Channel card not connected. | Connect all required optical fiber cables to the channel card. | |
Fiber links dirty or blown. | Clean or replace fiber cables. | |
Not receiving remote data | Loose fiber-optic connectors. | Check and reseat connectors. |
Tx-Rx connectors are not matched. | Switch Tx-Rx connectors. | |
Remote cables not properly seated. | Trace and properly connect cable. | |
Remote link power exceeds budget. | Troubleshoot and retest remote link. | |
Channel card not connected. | Connect all required optical fiber cables to the channel card. | |
Fiber links dirty or blown. | Clean or replace fiber cables. | |
Inactive line is not in standby mode | Link is not connected. | Connect all required optical fiber cables of the line to the channel card. |
Remote link power exceeds budget. | Troubleshoot and retest remote link. | |
Fiber links dirty or blown. | Clean or replace fiber cables. | |
No password prompt after entering a proper login name | A non-supported adapter is being used to connect to the Metro 1500 serial port. | Use the supplied DB-9 to RJ-45 adapter or an adapter that includes DCD/DTR flow control and RTS/CTS flow control. |
![]()
![]()
![]()
![]()
![]()
![]()
![]()
![]()
Posted: Tue Jan 23 11:22:45 PST 2001
All contents are Copyright © 1992--2001 Cisco Systems, Inc. All rights reserved.
Important Notices and Privacy Statement.