Ethernet Interface Dialog OSM GE-WAN Interface Dialog OSM PoS Interface Dialog OSM Channelized SONET Interface Dialog OSM Serial Subinterface Dialog OSM PoS Subinterface Dialog
The C6576M Network Element dialog box provides monitoring and management information for properties related to the Catalyst 6000 family switch or Cisco 7600 series Internet Router. These properties include the Telnet and Enable passwords, global performance logging, and SNMP properties for the entire switch. This dialog box can be launched from a Network Element object within the Network, Physical, or Manager containment views.
The Network Element object list (left-hand side of the dialog box) allows multiple objects to be selected, so that configuration changes can be applied to multiple Network Element objects at the same time.
Configuration Tab
Figure 6-1 shows the Configuration tab of the C6576M Network Element dialog box.
Figure 6-1 Configuration Tab of the C6576M Network Element Dialog Box
System Area
The System area of the C6576M Network Element dialog box provides the following information:
IP Address—IP address used to access the switch or router.
System Name—Fully qualified name of the switch or router.
Default Gateway—All packets destined to subnets other than the ones directly connected to the switch or router, or subnets with valid entries in the routing table, are directed to the Default Gateway as specified by this IP address. If no default gateway is set on the switch or router, this value is empty.
CLI Passwords Area
The CLI Passwords area of the C6576M Network Element dialog box provides the following information:
Telnet Password—Password used to allow the C65/76M to access the Network Element using a Telnet connection.
Enable Password—Password used to allow the C65/76M to access the enable level of the Network Element using a Telnet connection.
Note If the above passwords are incorrect, some dialog box values may report as
ERROR.
Reset System Area
The Reset System area of the C6576M Network Element dialog box provides the following information:
Last Restart Reason—Text message displaying why the switch or router was restarted.
Reset button—Button used to reset the switch or router. This action power cycles the switch or router. If clicked, a pop-up is displayed asking if you really want to reset the switch or router (see Figure 6-2).
Note Only users with administrative privileges can use the Reset button.
Note Any changes to the running configuration will be saved automatically when
the switch or router is reset using the Reset button.
Figure 6-2 Confirmation Reset Window for a Network Element
Actions Area
The Actions area of the C6576M Network Element dialog box provides the following information:
Commission button— Commissions the object manually. You can commission the object only if the object is in a decommissioned state. Clicking this button forces a subchassis discovery to be executed, and propagates the commissioned status to all subobjects.
Decommission button—Decommissions the object manually and propagates the decommissioned status to all subobjects. In the decommissioned state, the properties of the object are not monitored. As a result, data displayed in the configuration window is not guaranteed to be current.
Performance Logging Area
The Performance Logging area of the C6576M Network Element dialog box provides the following information:
Start—Turns performance data logging on for the entire switch or router. The switch or router enters the performance state, in which statistics are collected at the specified interval. This state is propagated to all the children objects.
Stop—Turns performance data logging off for the entire switch or router.
Note The logged data is available to you through the CEMF Performance Manager.
Refer to the Cisco Element Management Framework User Guide for more
information about the Performance Manager.
Status Field
The display-only Status field located at the bottom of the window indicates the current state of the object. This field has the following values:
decommissioned—CEMF is not actively monitoring the object attributes.
discovery—CEMF is trying to determine the contents and configuration of the switch/router.
normal—Presence polling is performed periodically.
normallostcomms—CEMF has lost communication with the device from the normal state.
discoverylostcomms—CEMF lost communication with the device during discovery, which occurs if the SNMP read community is incorrect.
mismatched—The network element for the given IP address does not corrspond to a Catalyst 6000 family switch or Cisco 7600 series Internet Router.
System Information Tab
Figure 6-3 shows the System Information tab of the C6576M Network Element dialog box.
The System Information tab provides the following information:
System Up Time—The duration of time indicating how long the system has been running. This attribute is read-only.
System Services—List of OSI layers supported by the switch or router. This attribute is read-only.
System Location—Displays the location of the switch or router.
System Contact—Displays the name of the person who is the contact for this switch/router.
System Description—A multiline text description of the switch/router. This attribute is read-only.
Cisco Contact Information—Details on how to contact Cisco Systems. This attribute is read-only.
Figure 6-3 System Information Tab of the C6576M Network Element Dialog Box
SNMP Tab
Figure 6-4 shows the SNMP tab of the C6576M Network Element dialog box.
Figure 6-4 SNMP Tab of the C6576M Network Element Dialog Box
SNMP Area
The SNMP area of the C6576M Network Element dialog box provides the following information:
SNMP Version—The version of the SNMP agent running on the switch or router. The version is one of these values:
SNMPv1
SNMPv2c
SNMPv3—Not supported by the Catalyst 6000 family switches or the Cisco 7600 series Internet Routers
SNMP v1 Read Community—The v1 community string used to read data from the agent.
SNMP v2c Read Community—The v2c community string used to read data from the agent.
Last Authentication Failure Address—The IP address of the last host that caused an SNMP authentication failure to occur.
SNMP v1 Write Community—The v1 community string used to write data to the agent.
SNMP v2c Write Community—The v2c community string used to write data to the agent.
SNMP Trap Area
The SNMP Trap area of the C6576M Network Element dialog box provides the following information:
Trap Client IP Table—IP address table to which SNMP traps generated by the switch or router are sent.
Trap Client IP—The IP address to which SNMP traps are sent.
Client Community—The community string used within the SNMP trap.
Note The IP address of the CEMF server host should be in this list at all times. If it
is not, then CEMF will not receive any traps from the switch or router, which
might result in an event being reported in an untimely fashion or an event
being missed.
Trap Generation
SNMP Trap Enabled—Enables or disables all SNMP trap generation from the switch or router.
Configure button—Displays the subdialog box, shown in Figure 6-5, for modifying the Trap Client list.
SNMP Trap Client Address—The IP address to which SNMP traps are sent.
SNMP Trap Client Community String—The community string used within the SNMP trap.
Add Client button—Adds a client to the client list.
Remove Client button—Removes the client from the client list.
Note An error is reported if a nonexistent client is removed or if an existing client
is added.
Figure 6-5 Configure Trap Client List Popup Window
Additional Notes Tab
Figure 6-6 shows the Additional Notes tab of the C6576M Network Element dialog box.
Figure 6-6 Additional Notes Tab of the C6576M Network Element Dialog Box
Notes Area
The Notes area is a text box that allows you to type in additional notes. For example, this information can include text indicating why global performance logging is turned on.
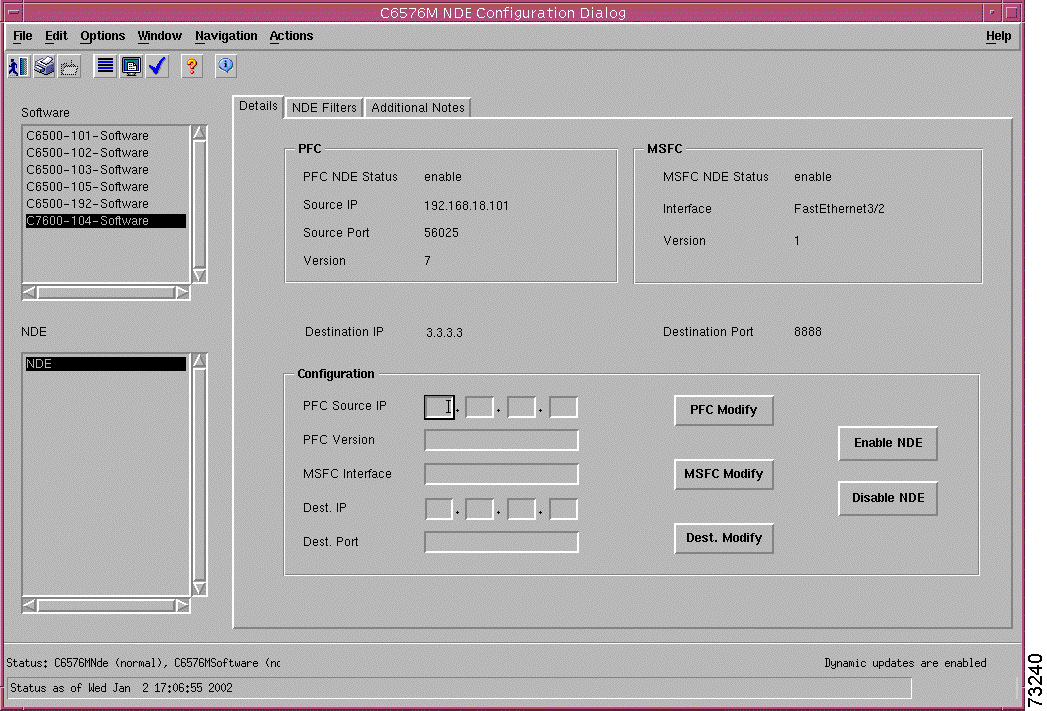
C6576M Software Dialog Box
This dialog box provides information on the IOS image and configuration of the switch or router. This dialog box is launched from a Network Element object within the Network, Physical, or Manager containment views and the Software object in the Manager containment view.
You can choose only one software object at a time from the object list on the left side of the dialog box.
IOS Image Tab
Figure 6-7 shows the IOS Image tab of the C6576M Software dialog box.
Figure 6-7 IOS Image Tab of the C6576M Software Dialog Box
IOS Image Area
The IOS Image area of the C6576M Software dialog box provides the following information:
Image Name—Name of the IOS image currently executing on the switch or router.
Version—Version of the currently executing IOS image.
Image Source Location—The list of files (in order) that are used to boot the switch or router.
Backup/Restore IOS Image Area
The Backup/Restore IOS Image area of the C6576M Software dialog box provides the following information:
TFTP Host—The IP address or hostname of the TFTP server that the IOS image was downloaded from or uploaded to.
Backup Status—Status of the last image upload operation. The Backup Status has the following values:
Ok—The upload operation completed without errors.
Failed—The upload operation failed.
Not executed—A upload has not been executed.
Backup Source—The IOS image file to upload. Specify the full path to the image (for example, "slot0:c6sup12-jsv-mz.121-6.E.bin").
Backup Destination—The destination filename on the TFTP Host to which the image will be uploaded.
Restore Status—Status of the last image download operation. The Restore Status has the following values:
Ok—The download operation completed without errors.
Failed—The download operation failed.
Not executed—A download has not been executed.
Restore Source—The filename of the IOS image that will be copied from the TFTP Host to the switch or router.
Restore Destination—The filename of the destination file that will be copied from the switch or router to the TFTP Host. The file attribute can include the file system as well as the filename; for example: Slot0:/c6sup22jsv.bin.
Backup button—Uploads the IOS image specified in the Backup Source attribute to the file specified in the Backup Destination attribute on the TFTP Host.
Restore button—Downloads an IOS image. Copies the Restore Source file from the TFTP Host to the Restore Destination location/file.
Note The Switch or router needs to be reset in order to run with the new IOS image.
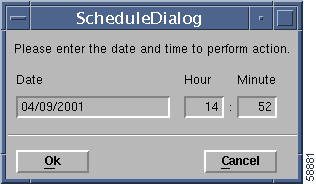
Scheduled Restore button—Schedules the upload operation of an IOS image file (from the TFTP server to the device). Launches the dialog box shown in Figure 6-8:
Date—The date when the restore will start. The format is MM/DD/YYYY.
Hour—The hour when the restore will start. It is a 24-hour clock.
Minute—The minute when the restore will start.
Figure 6-8 Scheduled Restore IOS Image Dialog Box
Note An alarm is generated if the Backup Status and Restore Status attributes are
set to Failed. (See
"Alarms and
Alarm Management.")
Status Field
The Status display-only field located at the bottom of the window indicates the current state of the object. This field has the following values:
decommissioned—CEMF is not actively monitoring the object attributes.
discovery—CEMF is trying to determine the contents and configuration of the Chassis object.
normal—Presence polling of the object.
normallostcomms—CEMF has lost communication with the device from the normal state.
discoverylostcomms—CEMF lost communication with the device during discovery.
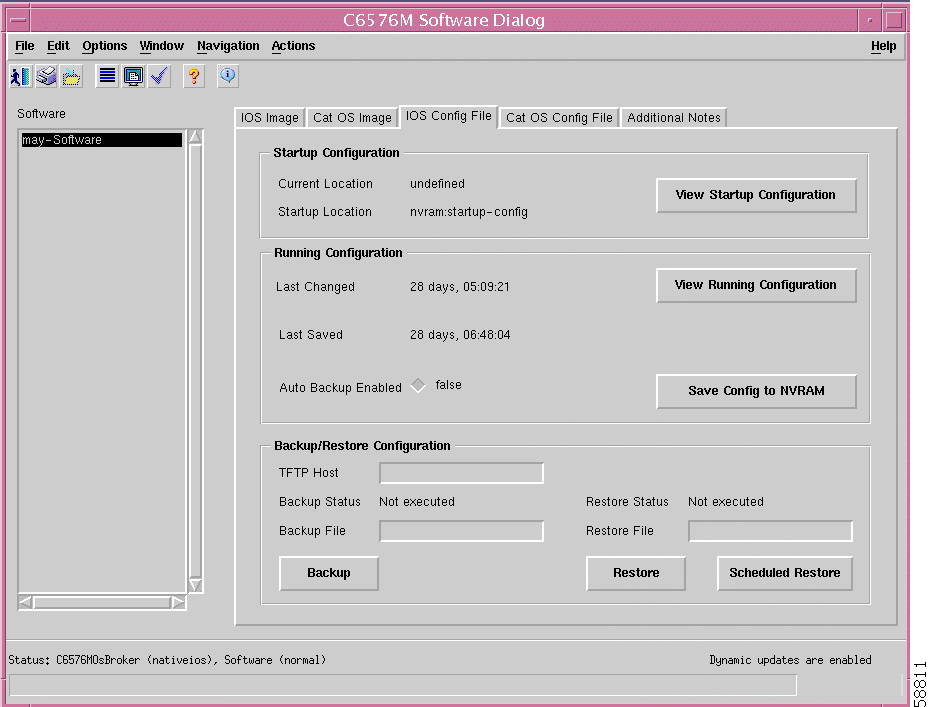
Configuration File Tab
Figure 6-9 shows the Configuration File tab of the C6576M Software dialog box.
Figure 6-9 IOS Configuration File Tab of the C6576M Software Dialog Box
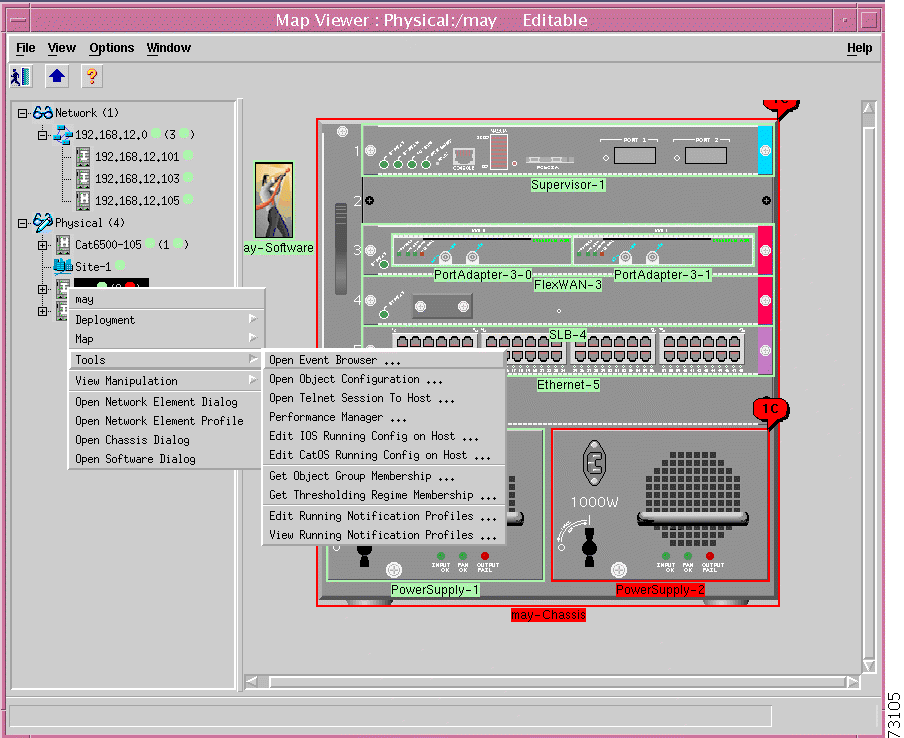
The running configuration file can be edited by selecting the pop-up menu option of the network element object, shown in Figure 6-10.
Figure 6-10 Pop-up Menu Option to Edit the Running Configuration File
Startup Configuration Area
The Startup Configuration area of the C6576M Software dialog box provides the following information:
Current Location—The location of the startup configuration file that will be used on the next restart. If this location is not set, then undefined is displayed. This attribute is read-only.
Startup Location—The location of the startup configuration file that was used the last time the system was booted up. This attribute is read-only.
View Startup Configuration button—Displays the startup configuration in a text box (see Figure 6-11). This attribute is read-only.
The Backup/Restore Configuration area of the C6576M Software dialog box provides the following information:
TFTP Host—The IP address or hostname of the TFTP server that the startup or running configurations were backed up to or restored from.
Note The TFTP Host field must be configured in order to back up and restore the
configuration. The TFTP Host must be accessible from the managed device,
and there must be sufficient disk space on the host to store the device's startup
configuration.
Backup Status—Status of the last backup action. This attribute (read-only) hashas the following values:
Ok—The backup completed successfully.
Failed—The backup failed.
Not executed—The backup operation was not executed.
Backup File—The name of the file to which the startup configuration will be copied.
Note If the TFTP server is not the CEMF server, then the file specified by the
Backup File field must already exist. If it does not, the backup action will fail.
If the TFTP server is the CEMF server, the file will be automatically created.
Backup button—Backs up the current startup configuration to the TFTP server. The backup filename is specified by the Backup File attribute.
Auto Backup Enabled—The backup action is executed automatically whenever the Save Running Configuration action is executed.
Restore Status—Status of the last restore action. This attribute (read-only) has the following values:
Ok—The restore operation completed successfully.
Failed—The restore operation failed.
Not executed—The restore operation was not executed.
Restore File—The name of the configuration file that will be restored.
Restore button—Restores the file specified in the Restore File attribute from the TFTP Host to the startup configuration.
Scheduled Restore—Schedules the restore operation. It will launch the dialog box shown in Figure 6-13.
Note The switch or router needs to be reset for the new configuration to
take effect.
The Scheduled Restore Configuration dialog box provides the following information:
Date—The date when the restore will start. The format is MM/DD/YYYY.
Hour—The hour when the restore will start. It is a 24-hour clock.
Minute—The minute when the restore will start.
Tip The configuration Backup/Restore actions are used to upload the switch or router startup configuration to a server. The configuration can then be edited on the server and downloaded back to the switch or router.
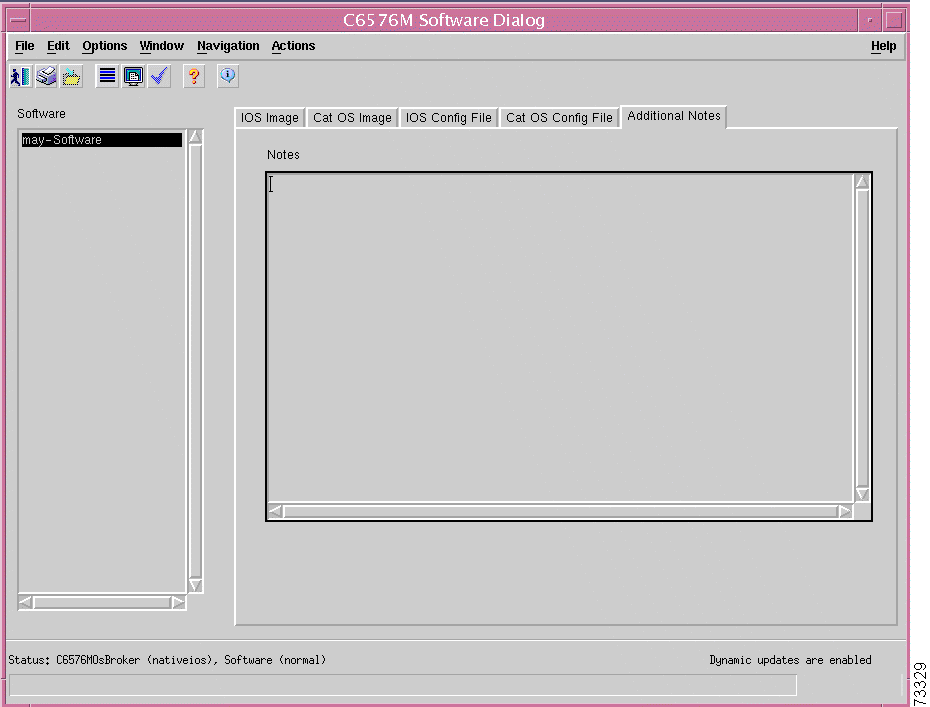
Additional Notes Tab
Figure 6-14 shows the Additional Notes tab of the C6576M Software dialog box.
Figure 6-14 Additional Notes Tab of the C6576M Software Dialog Box
Notes Area
The Notes area is a text box that allows you to type in additional notes for the object.
C6576M Syslog Dialog Box
This dialog box displays attributes for the system log messages on the switch or router. This dialog box can be launched from a Software object or Syslog object within the Manager containment view.
You can choose more than one Software object at a time from the object list on the left side of the dialog box.
Details Tab
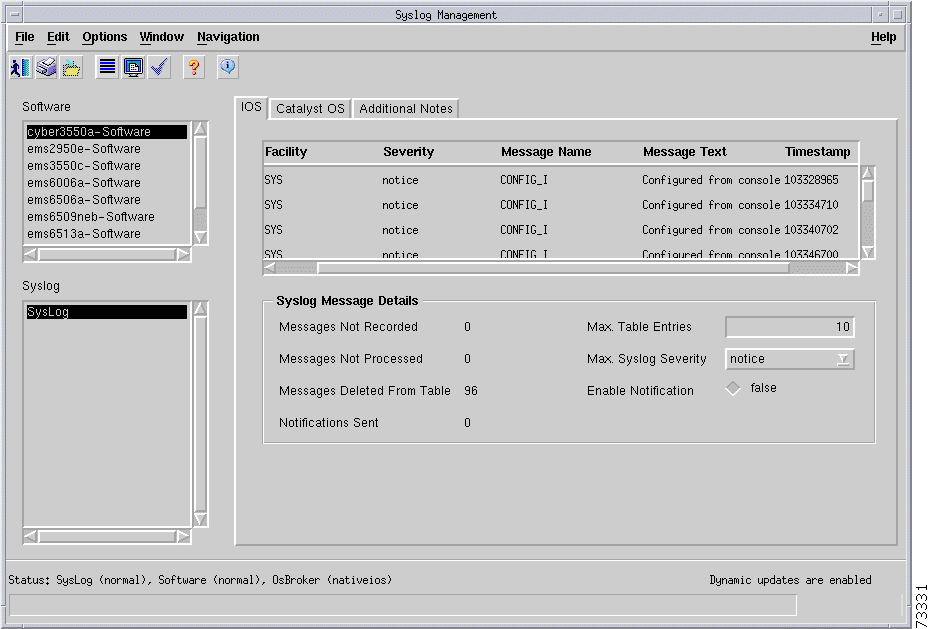
Figure 6-15 shows the Details tab of the C6576M Syslog dialog box.
The Details tab provides the following information:
Facility—The facility that generated the syslog message.
Severity—The severity of the message.
Message Name—Identifies the message type. The Message Name and Facility together uniquely identify a message type.
Message Text—The text of the message. If the message text exceeds 255 characters, the message is truncated to 254 characters and an asterisk (*) is appended to the text to indicate that the message has been truncated.
Timestamp—The timestamp when the message was generated.
Figure 6-15 Details Tab of the C6576M Syslog Dialog Box
Syslog Message Details Area
The Syslog Message Details area of the C6576M Syslog dialog box provides the following information:
Messages Not Recorded—The number of syslog messages not recorded. A message is not recorded if it has a severity value greater than the Max. Syslog Severity attribute. This attribute is read-only.
Messages Not Processed—The number of messages that were not processed due to a lack of system resources. This attribute is read-only.
Messages Deleted From Table—The number of messages that were deleted from the table in order to make room for new messages. The maximum number of messages kept in the table is dependent on the Max. Table Entries attribute. This attribute is read-only.
Notifications Sent—The number of syslog notifications sent. This attribute is read-only.
Max. Table Entries—The maximum number of messages in the syslog table. When this limit has been reached, the oldest messages are deleted to make room for newer messages.
Max. Syslog Severity—The maximum severity that will be recorded. Messages with a higher numeric value of severity will not be recorded. This attribute has one of the following values (listed in ascending order of severity):
emergency (1)
alert (2)
critical (3)
error (4)
warning (5)
notice (6)
info (7)
debug (8)
Note The greatest severity state has the smallest numeric value of severity. For
example, the emergency state has a value of (1) and is more severe than the
info state, which has a value of (7). If you set Max. Syslog Severity to 7, then
all states except debug will be recorded. This is because the debug state has a
value of (8), which is greater than the value of the Max. Syslog Severity
attribute.
Enable Notifications—SNMP syslog notifications are sent whenever a new syslog message is generated and recorded.
true—Notifications enabled.
false—Notifications disabled.
Status Field
The Status display-only field located at the bottom of the window indicates the current state of the object. This field has the following values:
decommissioned—CEMF is not actively monitoring the object attributes.
normal—Presence polling of the object.
normallostcomms—CEMF has lost communication with the device from the normal state.
Additional Notes Tab
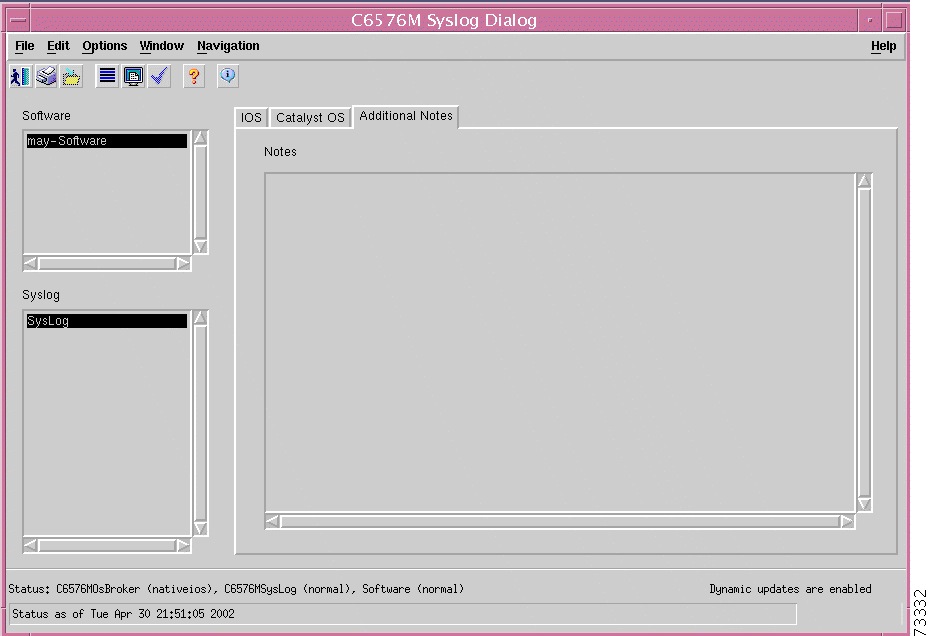
Figure 6-16 shows the Additional Notes tab of the C6576M Syslog dialog box.
Figure 6-16 Additional Notes Tab of the C6576M Syslog Dialog Box
Notes Area
The Notes area is a text box that allows you to type in additional notes for the object.
C6576M VTP Dialog Box
The VTP dialog box allows you to configure VTP domains on the switch or router. This dialog box can be launched from a Software object or VTP object within the Manager containment view.
You can choose more than one Software object at a time from the object list on the left side of the dialog box.
Details Tab
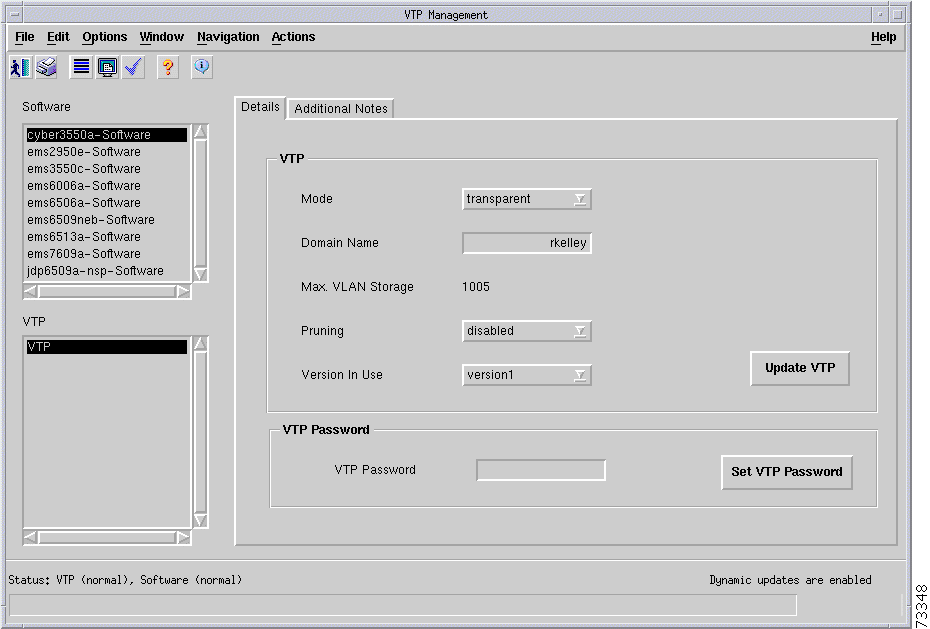
Figure 6-17 shows the Details tab of the C6576M VTP dialog box.
Figure 6-17 Details Tab for the C6576M VTP Dialog Box
VTP Area
The VTP area of the C6576M VTP dialog box provides the following information:
Mode—An indication of whether the local system is acting as a VTP Client or as a VTP server in this management domain. The value "transparent".
client—Users cannot create, edit, or delete VLANs.
server—Users can create, delete, and edit VLANs for this management domain.
transparent—Indicates that a device is not supporting VTP for this VTP management domain.
Note It is not possible to configure VLANs on a device where Mode is equal to
client.
Domain Name—The name of the management domain in which this switch or router is participating.
Max. VLAN Storage—Estimate of the maximum number of VLANs about which the local system can recover complete VTP information after a reboot. If the number of defined VLANs is greater than this value, then the system cannot act as a VTP Server. For a device that has no means to calculate the estimated number, this value is -1. This attribute is read-only.
Pruning—An indication of whether VTP pruning is enabled or disabled in this management domain. This value can only be modified by local/network management when the Mode is server.
Version—The current version of the VTP that is in use by this management domain.
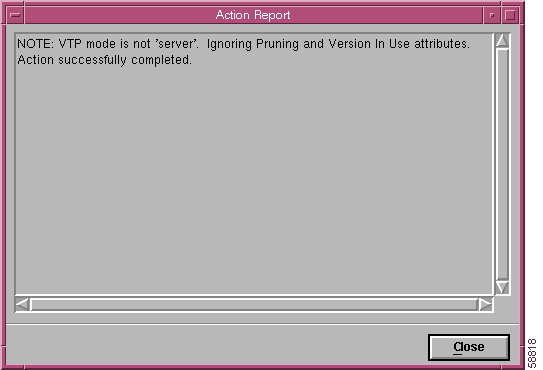
Update button—Updates any configuration changes made in this dialog box (see Figure 6-18).
Note The Update button must be used to save configuration changes to the VTP
dialog box. The save icon has been removed from the icon bar from the top of
the dialog box.
Note The Mode must be set to server or transparent in order to save all configuration
changes (Mode, Domain Name, Pruning, Version) to the VTP dialog box.
Note If the Mode is not set to server and the Update button is used, a message is
displayed indicating that changes to the "Pruning" and "Version in Use"
attributes are ignored
(Figure 6-18).
These values can only set when the Mode is set to server.
Figure 6-18 Update Button Selected in Client Mode Message
Status Field
The Status display-only field located at the bottom of the window indicates the current state of the object. This field has the following values:
decommissioned—CEMF is not actively monitoring the object attributes.
normal—Presence polling of the object.
normallostcomms—CEMF has lost communication with the device from the normal state.
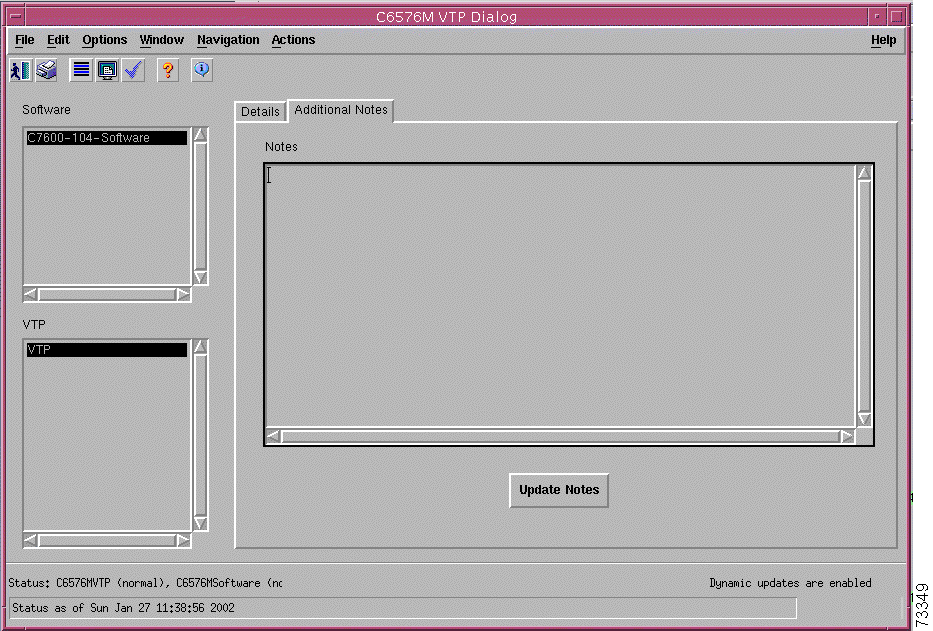
Additional Notes Tab
Figure 6-19 shows the Additional Notes tab of the C6576M VTP dialog box.
Figure 6-19 Additional Notes Tab of the C6576M VTP Dialog Box
Notes Area
The Notes area is a text box that allows you to type in additional notes for the object.
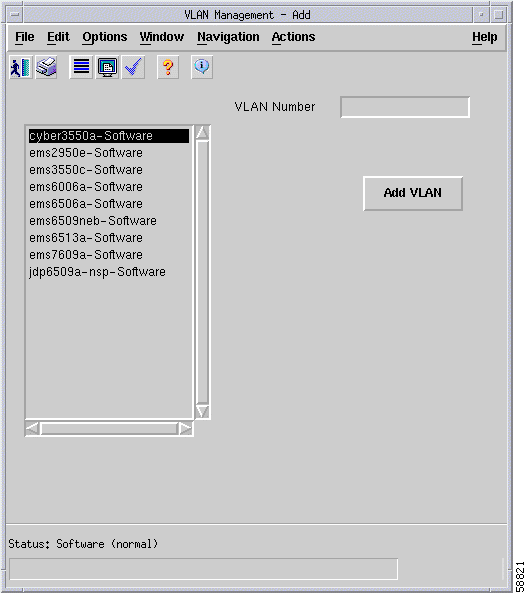
C6576M VLAN Dialog Box
This dialog box provides attributes for VLAN configurations. This dialog box can be launched from the Software object or VLAN object within the Manager containment view.
You can choose only one Software object and one VLAN object at a time from the object list on the left side of the dialog box.
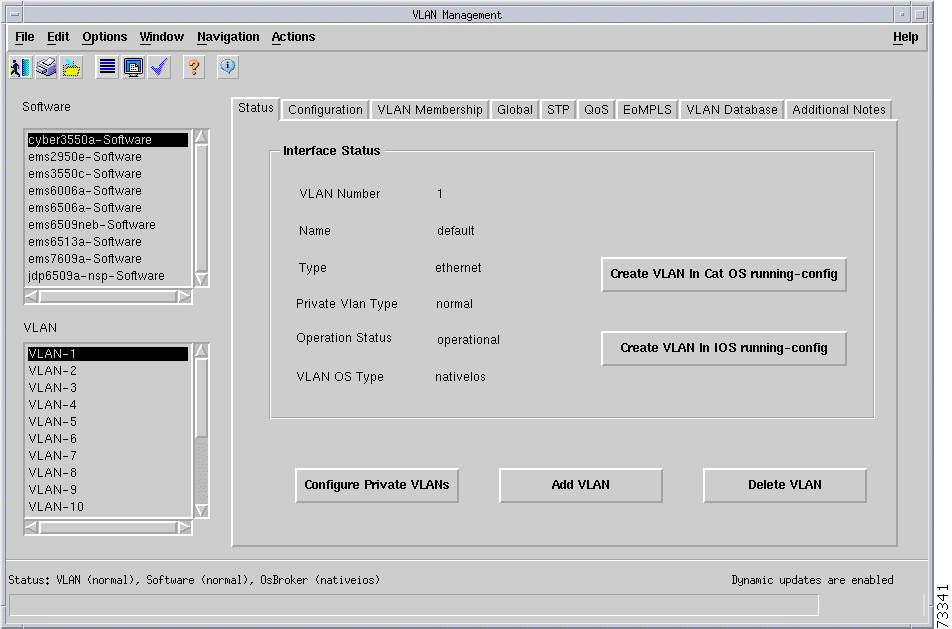
Status Tab
Figure 6-20 shows the Status tab of the C6576M VLAN dialog box.
Figure 6-20 Status Tab for the C6576M VLAN Dialog Box
Interface Status Area
The Details area of the C6576M VLAN dialog box provides the following information:
VLAN Number—The number of the VLAN.
Name—The VLAN identification name.
Type—The type of VLAN. This value is always Ethernet.
Operational Status—The state of this VLAN. This attribute has one of the following values:
operational
suspended
mtuTooBigForDevice—Indicates that this device cannot participate in this VLAN because the VLAN's MTU is larger than the device can support.
mtuTooBigForTrunk—Indicates that while this VLAN's MTU is supported by this device, it is too large for one or more of the device's trunk ports.
Add VLAN button—Adds a VLAN. Launches the subdialog box shown in Figure 6-21.
Specify the VLAN number to be added and click the Add VLAN button. The string VLAN- will prepended to the VLAN number specified.
Note The newly added VLAN will not appear automatically in the VLAN
object list (bottom left of
Figure
6-20). To refresh the VLAN list, reselect the appropriate Software
object.
Figure 6-21 Add VLAN Subdialog Box
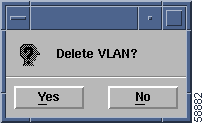
Delete VLANbutton—Deletes the currently selected VLAN. If you click this button, you are asked to confirm deletion of the current VLAN (see Figure 6-22).
Figure 6-22 Delete VLAN Subdialog Box
Status Field
The Status display-only field located at the bottom of the window indicates the current state of the object. This field has the following values:
decommissioned—CEMF is not actively monitoring the object attributes.
normal—Presence polling of the object.
normallostcomms—CEMF has lost communication with the device from the normal state.
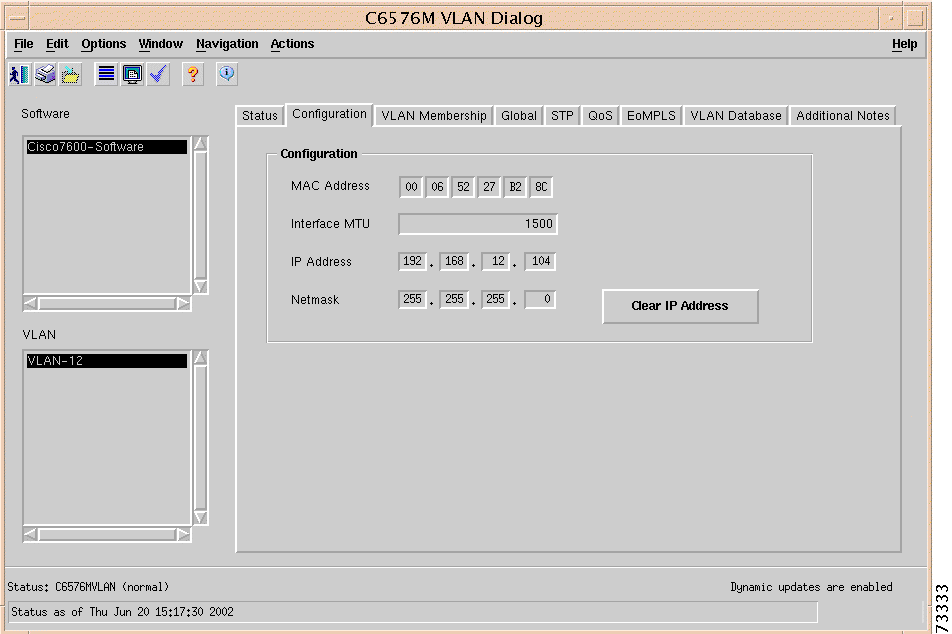
Configuration Tab
Figure 6-23 shows the Configuration tab of the C6576M VLAN dialog box.
Figure 6-23 Configuration Tab for the C6576M VLAN Dialog Box
Configuration Area
Interface MTU—Layer 2 (link layer) maximum transmission unit on Ethernet VLAN. This determines the maximum size of Ethernet frames transmitted on the VLAN interface. The value is read-only on Ethernet and FastEthernet VLANs. The value is read-write on GigabitEthernet VLANs.
VTP VLAN MTU—Layer 3 maximum transmission unit. The size of the largest network datagram that can be sent and received on the interface. This cannot exceed the size of the largest Layer 2 datagram on the interface.
Note IOS 12.1(8a)E5 caveat: Jumbo frame support is incompatible with the
IS-IS routing protocol. Leave the MTU size at the default value on any
interface where IS-IS provides routing.
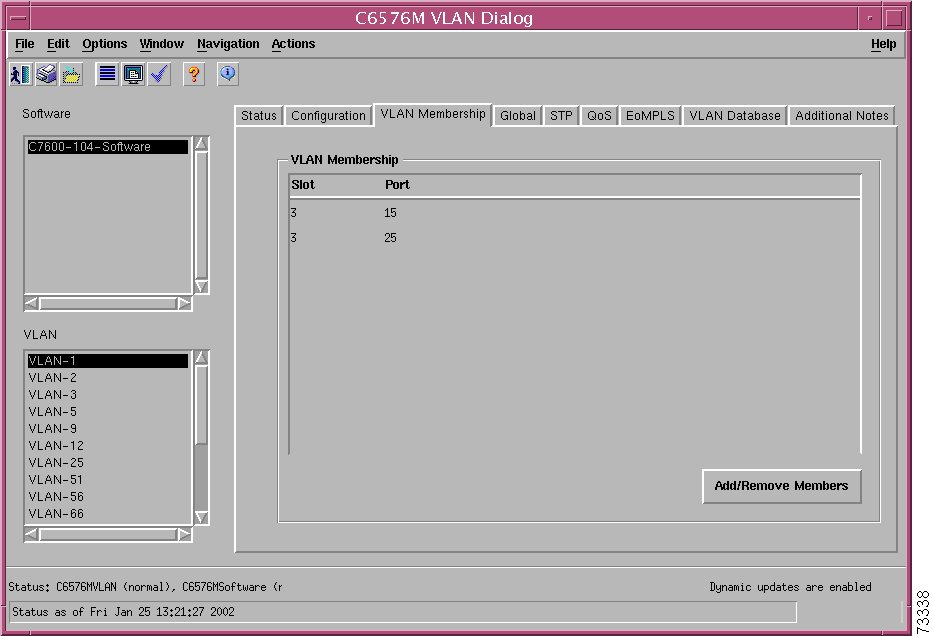
VLAN Membership Tab
Figure 6-24 shows the VLAN Membership tab of the C6576M VLAN dialog box.
Figure 6-24 VLAN Membership Tab for the C6576M VLAN Dialog Box
VLAN Membership Area
The VLAN Membership area displays the members of this VLAN.
VLAN Membership Table—Members are identified by the slot and port numbers in the table.
Add/Remove Membersbutton—Adds or removes a VLAN member. Launches the subdialog box, shown in Figure 6-25.
Specify the slot and port number of the interface that you want to add to the VLAN or delete from the VLAN.
Figure 6-25 Add/Remove VLAN Members Subdialog Box
Global Tab
Figure 6-26 shows the Global tab of the C6576M VLAN dialog box.
Figure 6-26 Global Tab of the C6576M VLAN Dialog Box
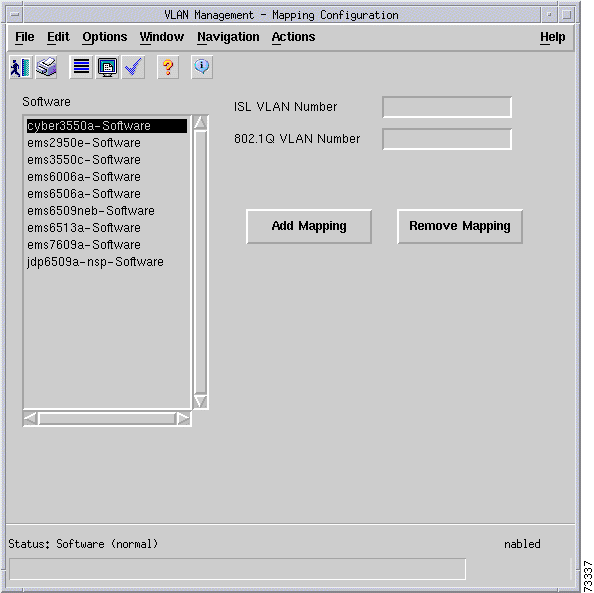
802.1Q Trunk Remapped VLANs Area
This area lists the mappings between 802.1Q and ISL VLANs. The information in this area is common to all VLAN objects for a particular switch or router:
802.1Q Trunk Remapped VLANs Table—This table lists the following:
802.1Q VLANNumber—The 802.1Q VLAN number to be mapped.
ISL VLAN Number—The ISL VLAN to which the 802.1Q VLAN number is to be mapped.
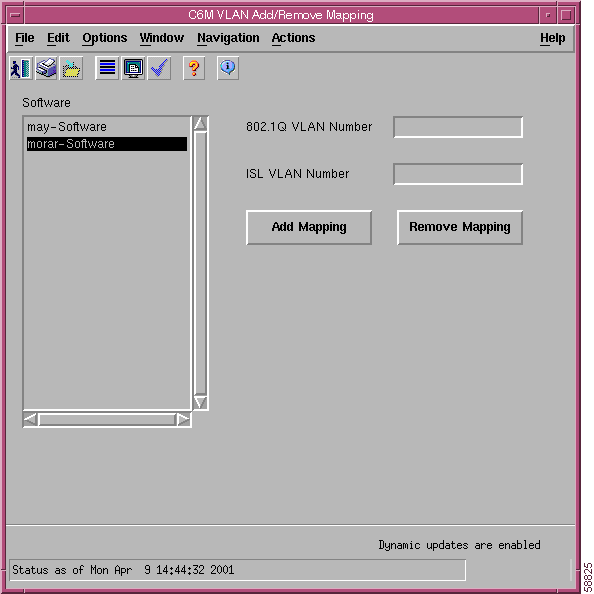
Add/Remove Mappingbutton—Adds or removes a mapping. Launches the subdialog box shown in Figure 6-27.
Note A maximum of eight mappings are supported by the Catalyst 6000 family
switch and the Cisco 7600 series Internet Router.
Enter the 802.1Q VLAN and ISL VLAN numbers for which a mapping is to be added or removed.
Note The valid range for 802.1Q VLAN numbers is 1001 to 4095. The valid range
of ISL VLAN numbers is 1 to 1000.
Figure 6-27 Add/Remove VLAN Mapping Subdialog Box
802.1Q VLANNumber—The 802.1Q VLAN number to be mapped.
ISL VLAN Number—The ISL VLAN to which the 802.1Q VLAN number is to be mapped.
Add Mappingbutton—Adds mapping of 802.1Q and ISL VLANs specified by the 802.1Q VLAN Number and ISL VLAN Number fields.
Add/Remove Mappingbutton—Removes mapping of 802.1Q and ISL VLANs specified by the 802.1Q VLAN Number and ISL VLAN Number fields.
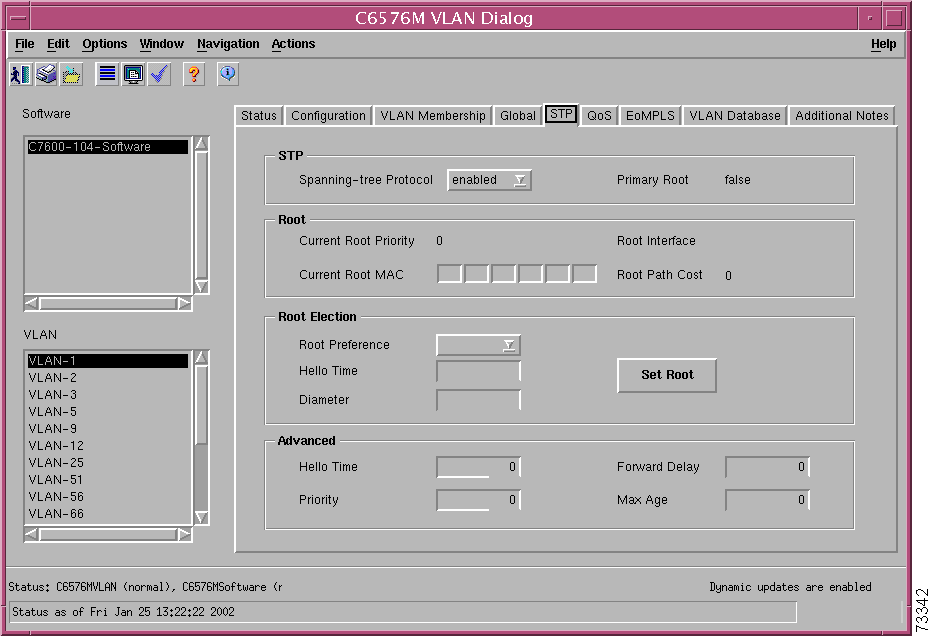
STP Tab
Figure 6-28 shows the VLAN STP tab of the C6576M VLAN dialog box.
Figure 6-28 VLAN STP Tab for the C6576M VLAN Dialog Box
STP Area
The STP area of the C6576M VLAN dialog provides the following information:
Spanning Tree Protocol—Configures whether or not Spanning Tree Protocol is enabled for this virtual LAN. This attribute has one of the following values:
enabled
disabled
notApplicable
Primary Root—Configures whether or not the switch is the root node in the STP instance. If there is no spanning tree instance for the VLAN, the value is nil.
Root Area
The Root area of the C6576M VLAN dialog provides the following information:
Current Root Priority—Bridge priority of the current root switch in the spanning tree instance. If there is no spanning tree instance for the VLAN, the value is nil. This attribute is read-only.
Root Interface—If this switch is not the root of the spanning tree, indicates the local port used to reach the root node. This is a local port that is a member of the VLAN. This value should match the Name field in the Interface dialog box corresponding to the root port (for example, "FastEthernet 2/5"). If the switch is currently the root or there is no spanning tree instance for the VLAN, the value is nil. This attribute is read-only.
Current Root MAC—Bridge identifier address. This is the MAC address of the VLAN on the root bridge in the STP instance. If there is no spanning tree instance for the VLAN, the value is nil. This attribute is read-only.
Root Path Cost—If this is not the root of the spanning tree, indicates the path cost to the root (this is the path cost of the root port). If the switch is currently the root or there is no spanning tree instance for the VLAN, the value is nil. This attribute is read-only.
Root Election Area
The Root Election area of the C6576M VLAN dialog provides the following information:
Root Preference—STP root priority. This attribute may has following values:
no (0)
primary (1)
secondary (2)
Hello Time—Hello-time in seconds.
Diameter—Specifies the network diameter (maximum number of bridges between two end nodes). If specified, the switch will calculate the optimal hello-time, forward-time, and max-age. User may optionally specify an explicit hello-time.
Set Root button—Configures the root priority of the device in the VLAN STP instance. This action will set the VLAN STP bridge-priority and reset the hello-time, forward-delay, and max-age timers. This action does not guarantee that the switch will be elected the STP root, it only sets these values.
Advanced Area
The Advanced area of the C6576M VLAN dialog box allows you to configure the attributes described in this section. While these attributes are configurable, this is not the recommended method for configuring them. Alternately, if you specify a network diameter but no hello time, forward-delay timer, or max-age timer, using the Set Root button (in the Root Election Area) causes the switch to automatically calculate the optimal hello time, forward-delay timer, and max-age timer for that diameter.
Hello Time—Indicates how often the switch broadcasts hello messages to other switches in the STP domain. If there is no spanning tree instance for the VLAN, value is nil. You can optionally provide a diameter and hello-time to override the calculated value. If no diameter or hello-time are provided, the switch will use the default hello time of 2 seconds.
Priority—Spanning tree bridge priority. If there is no spanning tree instance for the VLAN, the value is nil.
Forward Delay—Forward delay timer for STP state transitions. Determines how long each of the listening and learning states will last before the interface begins forwarding. If there is no spanning tree instance for the VLAN, the value is nil. If no diameter is specified, the switch will use the default delay of 15 seconds.
Max Age—Describes the amount of time that STP protocol information received by a switch is stored before it expires. If there is no spanning tree instance for the VLAN, the value is nil. If no diameter is specified, the switch will use the default duration of 20 seconds.
QoS Tab
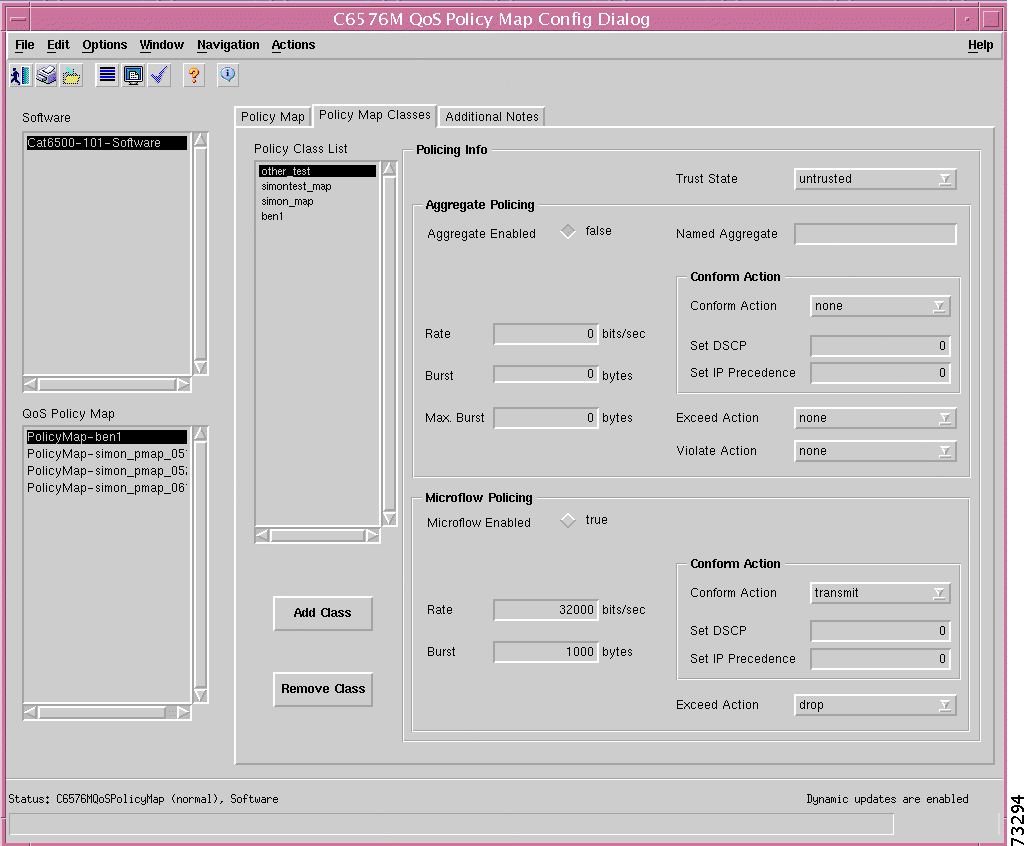
Figure 6-29 shows the QoS tab of the C6576M VLAN dialog box.
Figure 6-29 QoS Tab of the VLAN Dialog Box
QoS Area
The QoS area allows you to enable or disable QoS on the VLAN, and attach or detach service policies to VLAN interfaces.
Note To enable QoS, the managed device must be a VTP server or operating in VTP
transparent mode.
Bridged QoS—Indicates whether or not QoS is enabled on the VLAN.
Input Service Policy—Indicates the QoS policy map applied to the VLAN.
Enable button—Enables bridged QoS on the VLAN and enables VLAN-based QoS on each of the VLAN's member interfaces.
Disable button—Disables bridged QoS on the VLAN and disables VLAN-based QoS on each of the VLAN's member interfaces.
Modify Policy button—Attaches an input QoS policy map to the VLAN interface. This action may fail if the policy map is not suitable for use with an Ethernet VLAN.
Note The policy map name must identify an existing policy map on the device.
Remove Policy button—Detaches an input QoS policy map from the VLAN interface.
EoMPLS Tab
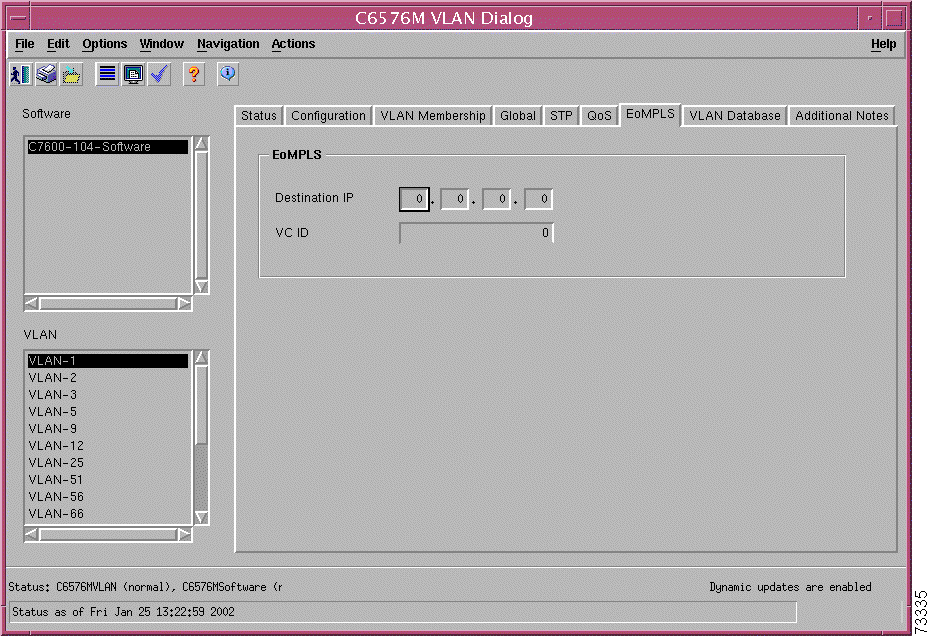
Figure 6-30 shows the EoMPLS tab of the C6576M VLAN dialog box.
Figure 6-30 EoMPLS Tab of the C6576M VLAN Dialog Box
EoMPLS Area
This area contains the followng information:
Destination IP—Describes where packets are to be sent.
VC IC—Label applied to packets entering the tunnel.
VLAN Database Tab
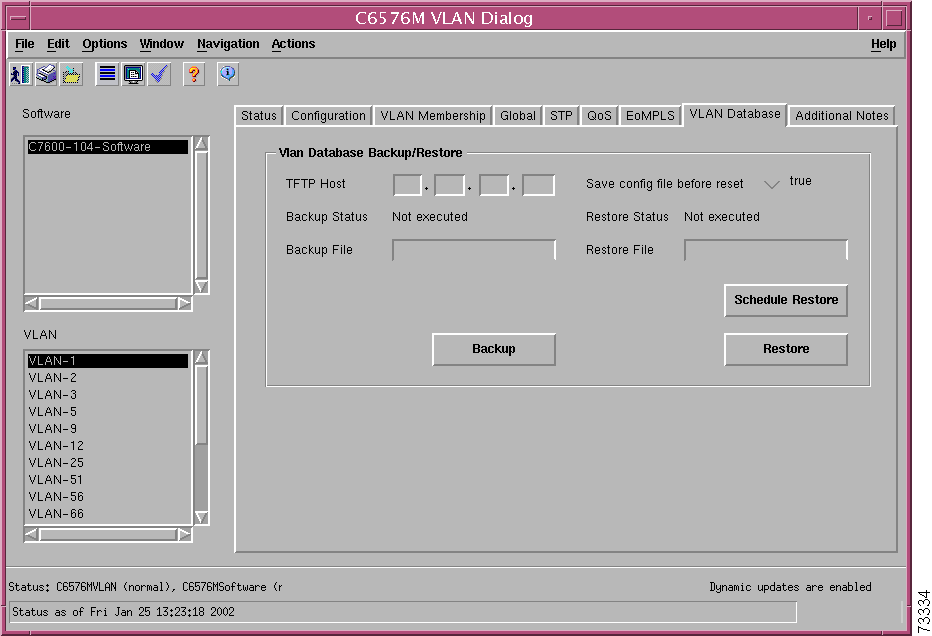
Figure 6-31 shows the VLAN Database tab of the C6576M VLAN dialog box.
Figure 6-31 VLAN Database Tab of the C6576M VLAN Dialog Box
VLAN Database Backup/Restore Area
The VLAN Database Backup/Restore area of the C6576M VLAN dialog box allows you to back up and restore the VLAN configuration to a remote TFTP server.
TFTP Host—The IP address of the TFTP server to which the VLAN configuration is backed up or restored from.
Backup Status—Status of the last VLAN configuration backup operation. The Backup Status has the following values:
Ok—The backup operation completed without errors.
Failed—The backup operation failed.
Not executed—A backup has not been executed.
Backup File—Name of the file on the TFTP server to which the VLAN configuration will be copied to.
Save config file before reset— "true" indicates that the VLAN configuration file will be saved before switch reset.
Restore Status—Status of the last VLAN configuration restore operation. The Restore Status has the following values:
Ok—The restore operation completed without errors.
Failed—The restore operation failed.
Not executed—A restore has not been executed.
Restore File—Name of the file on the TFTP server to which the VLAN configuration will be restored from.
Backup button—Backs up the VLAN configuration to the file specified in the Backup File field on the TFTP Host.
Restore button—Restores a VLAN configuration backup or loads a new VLAN configuration. Copies the file specified by the Restore File field from the TFTP Host to the switch or router.
Caution The Restore and Schedule Restore buttons will cause the switch to be reset after the VLAN database restoration process is complete.
Schedule Restore button—Schedules the restore operation. Launches the dialog box shown in Figure 6-32.
Note An alarm is generated if the Backup Status and Restore Status attributes are
set to Failed. (See
"Alarms and
Alarm Management.")
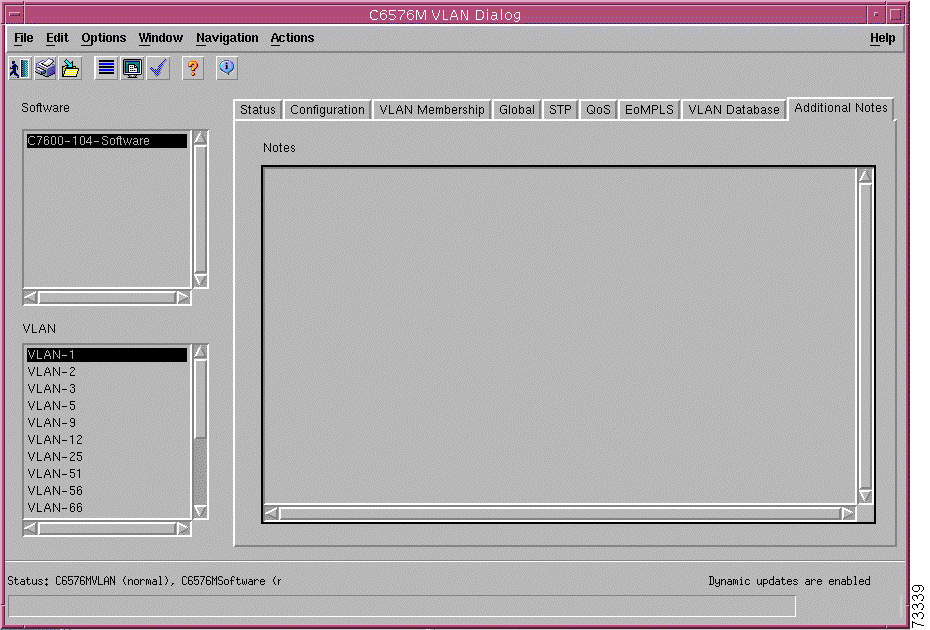
Additional Notes Tab
Figure 6-33 shows the Additional Notes tab of the C6576M VLAN dialog box.
Figure 6-33 Additional Notes Tab of the C6576M VLAN Dialog Box
Notes Area
The Notes area is a text box that allows you to type in additional notes for the object.
C6576M EtherChannel Dialog Box
This dialog box provides attributes for EtherChannel configurations. This dialog box can be launched from the Software object or EtherChannel objects within the Manager containment views.
Status Tab
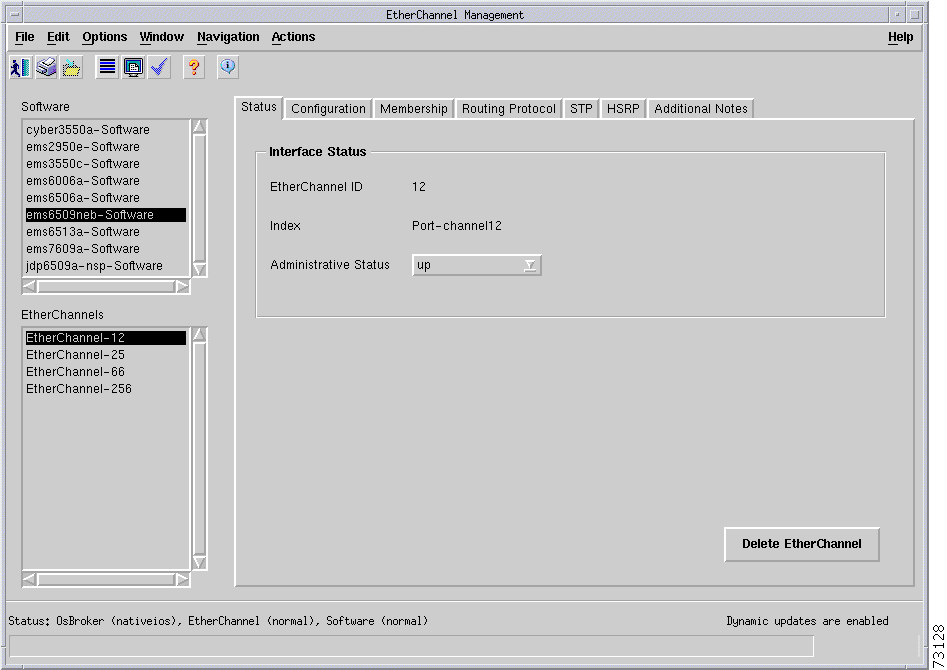
Figure 6-34 shows the Status tab of the C6576M EtherChannel dialog box.
Figure 6-34 Status Tab of the C6576M EtherChannel Dialog Box
Interface Status Area
The Details area of the C6576M EtherChannel dialog box provides the following information:
EtherChannel ID—The EtherChannel number.
Description—Description of the EtherChannel.
Administrative Status—The desired state of the EtherChannel interface. The status has the following values:
testing—Indicates that no operational packets can be passed.
up
down
Note When a managed system initializes, all interfaces start with Administrative
Status in the down state. As a result of either explicit management action or
per configuration information retained by the managed system, Administrative
Status is then changed to either the up(1) or testing(3) states (or remains in the
down(2) state).
Delete EtherChannel button—Deletes the EtherChannel instance selected in the EtherChannels object selection list. All interface members of this EtherChannel must be removed before the EtherChannel instance can be deleted.
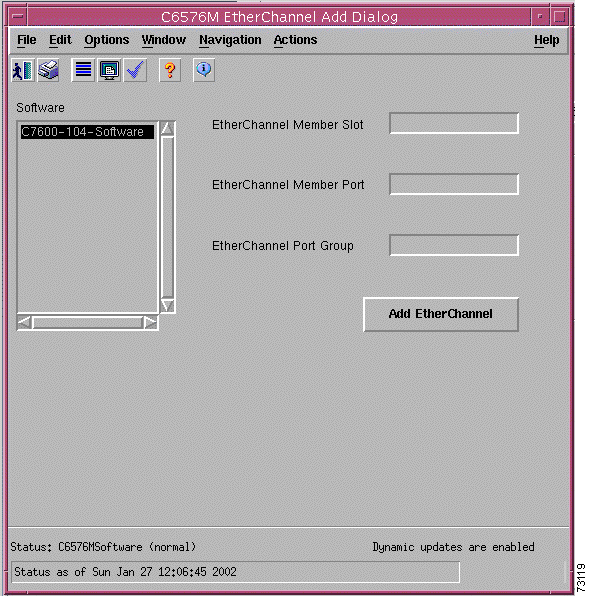
Add EtherChannel button—Adds a new EtherChannel object. Launches the subdialog box in Figure 6-35. The following items are shown in this subdialog box:
EtherChannel Member Slot
EtherChannel Member Port
EtherChannel Port Group
To create an EtherChannel, an interface must be assigned to it. You must specify the slot and port number of an interface in addition to the EtherChannel number when creating an EtherChannel. The mode of the EtherChannel is determined by the first interface assigned to it. To create a Layer 2 EtherChannel, assign an Layer 2 interface when it is created. To create a Layer 3 EtherChannel, assign a Layer 3 interface when it is first created.
Note A newly created EtherChannel will not appear automatically in the
EtherChannels object list (bottom left corner in
Figure 6-34). To
refresh this list, reselect the appropriate Software object from the Software
object list (top left corner in
Figure 6-34).
Figure 6-35 Dialog Box to Add an EtherChannel Object
Status Field
The Status display-only field located at the bottom of the window indicates the current state of the object. This field has the following values:
decommissioned—CEMF is not actively monitoring the object attributes.
normal—Presence polling of the object.
normallostcomms—CEMF has lost communication with the device from the normal state.
Configuration Tab
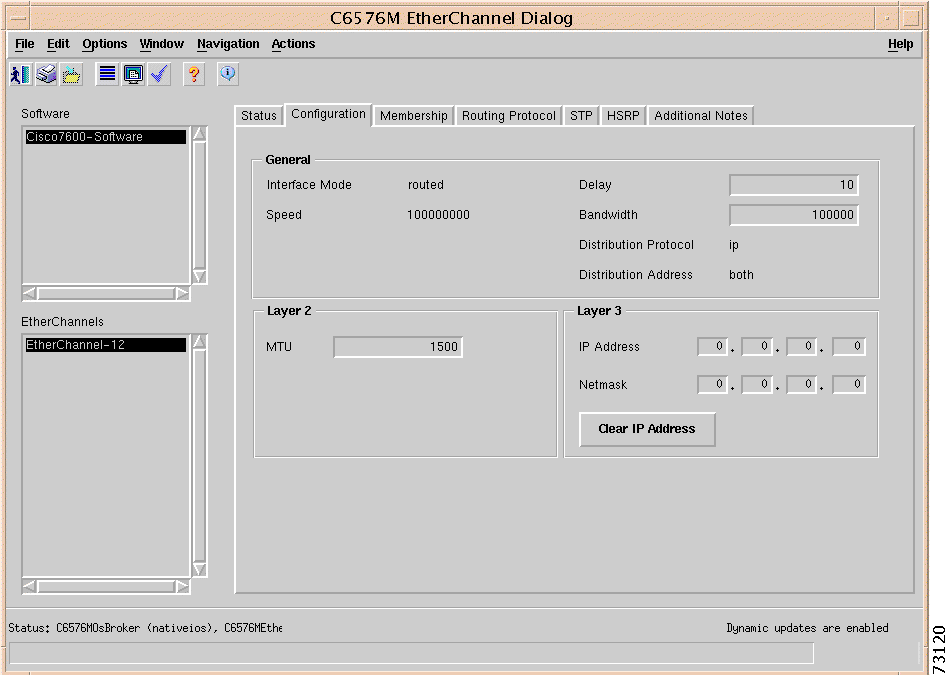
Figure 6-36 shows the Configuration tab of the C6576M EtherChannel dialog box.
Figure 6-36 Configuration Tab of the C6576M EtherChannel Dialog Box
General Area
The General area provides the following information:
Interface Mode—The current operational mode of the interface. This field has the following values:
switchport—Layer 2.
routed—Layer 3.
Speed—The transmission speed in bits per second of the EtherChannel interface.
Bandwidth—Overwrites default bandwidth in kilobits per second.
Note The Bandwidth attribute is an informational parameter used only to
communicate the current bandwidth to the higher-level protocols (such as
IGRP, EIGRP and OSPF); you cannot adjust the actual bandwidth of an
interface with this command.
Delay—Specifies the delay in tens of microseconds for an interface or network segment.
Note The Delay attribute is an informational parameter used only to communicate
the current bandwidth to the higher-level protocols (such as IGRP, EIGRP);
you cannot adjust the actual delay of an interface with this command.
Distribution Protocol—Protocol used for load balancing on the EtherChannel. This field has the following values:
ip—IP address.
mac—MAC address.
Distribution Address—Address used for load balancing on the EtherChannel. This field has the following values:
source
destination
both
Layer 2 Area
The Layer 2 area contains the following information:
MTU—The size of the largest datagram (frame) which can be sent or received on the EtherChannel, specified in octets. This is also the maximum size of Layer 3 datagrams sent on the EtherChannel.
Layer 3 Area
The Layer 3 area contains the following information:
IP MTU—Layer 3 MTU. The size of the largest network datagram that can be sent or received on the interface. Cannot exceed the size of the largest Layer 2 datagram on the interface. If the Layer 2 MTU is updated, the Layer 3 MTU must be adjusted so that it does not exceed the new Layer 2 MTU.
IP Address—IP address of the EtherChannel interface.
Netmask—The subnet mask associated with the EtherChannel IP Address. The value of the mask is in the format of an IP address with all the network bits set to 1 and all the host bits set to 0.
Membership Tab
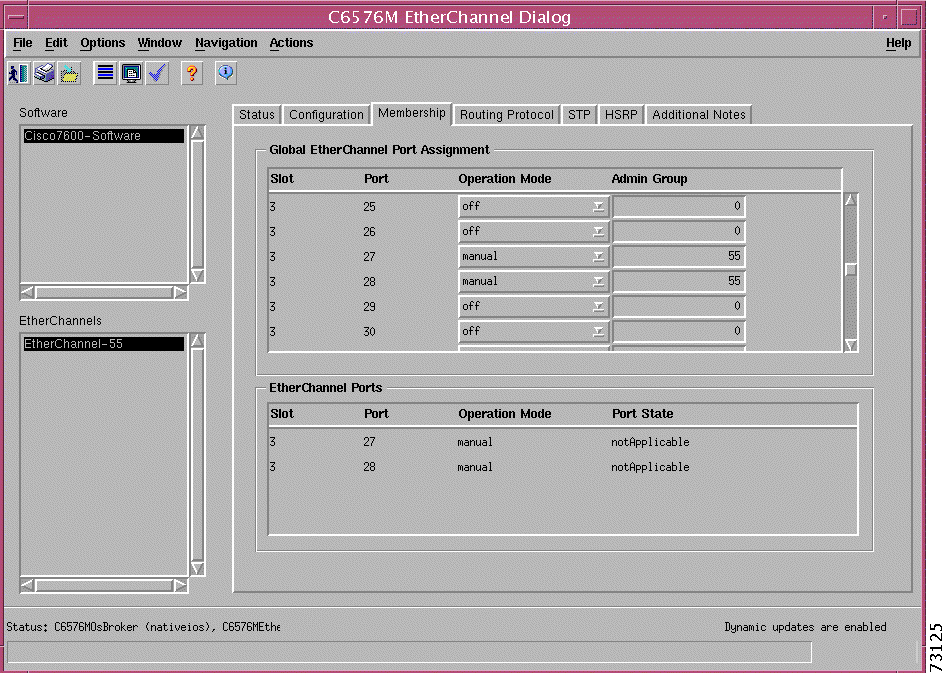
Figure 6-37 shows the Membership tab of the C6576M EtherChannel dialog box.
Figure 6-37 Membership Tab of the C6576M EtherChannel Dialog Box
EtherChannel Ports Area
The EtherChannel Ports area lists the interfaces that belong to the selected EtherChannel:
Slot—Slot number of the interface.
Port—Port number of the interface.
Operation Mode—The PAgP operational mode of the component interface. This field has one of the following values:
desirable—PAgP packets sent on interface. If no data packets are received, the interface is never attached to a portchannel and cannot be used for data.
desirableSilent—PAgP packets sent on interface. If no data packets received after some timeout, the interface is attached by itself, to a portchannel and can be used for data.
automatic—PAgP packets are not sent on interface until at least one PAgP packet is received which indicates the sender is operating in desirable or desirableSilent mode. If no data packets received, the interface is never attached to a portchannel and cannot be used for data.
automaticSilent—PAgP packets are not sent on interface until at least one PAgP packet is received which indicates the sender is operating in desirable or desirableSilent mode. If no data packets received after some timeout, the interface is attached by itself, to a portchannel and can be used for data.
Port State—State of the PAgP state machine on this interface. The state has the following values:
portDown—The current operational state of the interface is not up.
portUp—The current operational state of the interface is up, no packets yet received.
dataReceived—Data packets, but no PAgP packets, have been received.
upData—Interface is aggregated, but no PAgP packets have been received.
pagpReceived—One or more PAgP packets have been received.
biDirectional—Interface has passed PAgP packets in both directions.
upPagp—Interface is aggregated by means of PAgP.
upMult—Interface is aggregated to an agport, but connects to more than one external device.
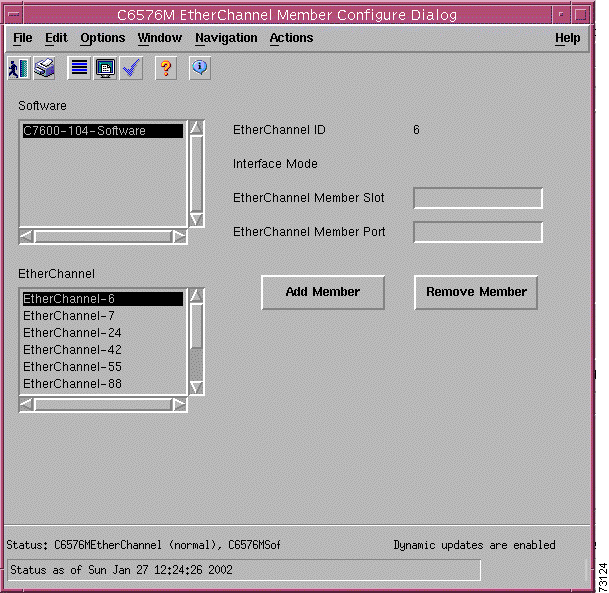
Add/Remove Member—Modifies the EtherChannel interface membership list. Launches the dialog box shown in Figure 6-38.
Specify the interface slot and port number to be added or removed from the current EtherChannel.
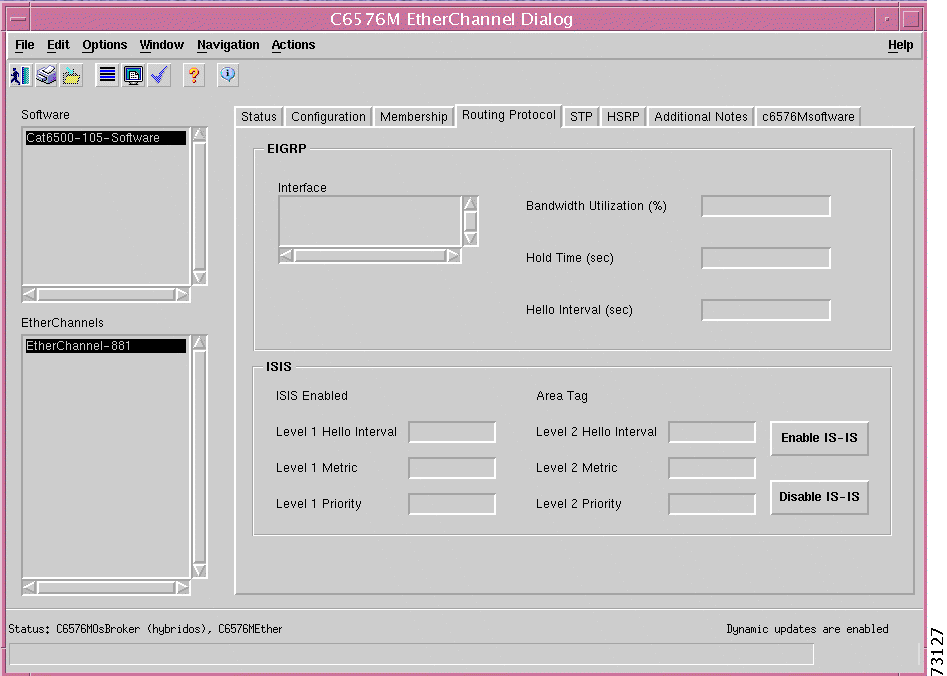
Figure 6-39 shows the Routing Protocol tab of the C6576M EtherChannel dialog box.
Figure 6-39 Routing Protocol Tab of the C6576M EtherChannel Dialog Box
EIGRP Area
The EIGRP area of the C6576M EtherChannel dialog box provides the following information:
EIGRP Interface Table—A list of the EIGRP processes. The following attributes can be configured for a EIGRP process:
Bandwidth Utilization (%)—Percentage of the EtherChannel interface bandwidth that the EIGRP protocol can use.
Hold Time (sec)—Length of time in seconds that neighbors should consider the sender valid.
Hello Interval (sec)—Interval in seconds between hello packets.
ISIS Area
The ISIS area of the C6576M Ethernet Interface dialog box provides the following information:
ISIS Enabled—Indicates whether or not IS-IS routing is enabled on the interface. This attribute is read-only.
true—IS-IS routing is enabled.
false—IS-IS routing is disabled.
Area Tag—The IS-IS routing area in which the interface participates. If mutli-area IS-IS is configured on the device, the IS-IS area must be named. Otherwise, this value may be an implicit null tag. This attribute is read-only.
Level 1 Hello Interval—Length of time between hello packets generated on the interface for level 1 routing.
Level 2 Hello Interval—Length of time between hello packets generated on the interface for level 2 routing.
Level 1 Metric—Cost of the interface for IS-IS level 1 (intra-area) route calculation.
Level 2 Metric—Cost of the interface for IS-IS level 2 (inter-area) route calculation.
Level 1 Priority—Determines which router on a LAN will be the designated router or Designated Intermediate System (DIS).
Level 2 Priority—Determines which router on a LAN will be the designated router or Designated Intermediate System (DIS).
Enable button—Enables IS-IS routing on the interface.
Disable button—Disables IS-IS routing on the interface.
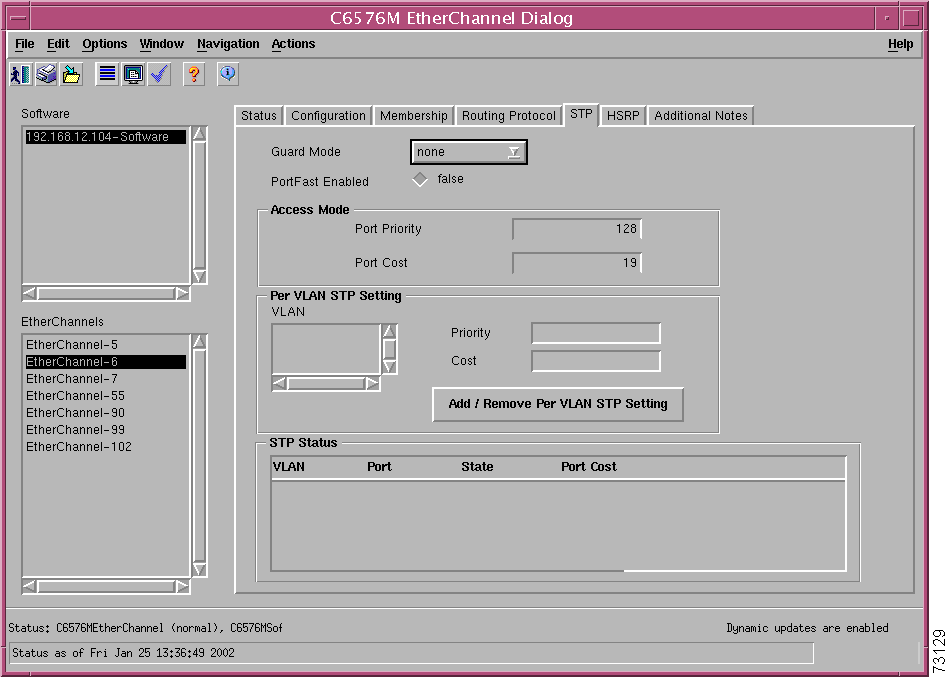
STP Tab
Figure 6-40 shows the STP tab of the C6576M EtherChannel dialog box.
Figure 6-40 STP Tab for the C6576M EtherChannel Dialog Box
The area at the top of the STP tab provides the following information:
Guard Mode—Indicates whether or not STP guard mode is enabled on an interface. The possible values are:
root
none
PortFast Enabled—Indicates whether or not an interface is enabled to move directly to the forwarding state on link up. This is a read-only attribute. Portfast can be configured on a trunking interface, but it only has an effect when the interface is in access mode. The following are possible values:
true
false
Access Mode Area
The Access Mode area of the C6576M Ethernet Interface dialog box provides the following information:
Port Priority—Describes the STP port priority of this interface. This is a metric used to represent the location of an interface in a network topology. It is used to determine which port will be placed in a blocking state when two or more ports are part of a loop.
Note IOS 12.1.6.x and 12.1.7.x support port priorities only in multiples
of 8. All other IOS versions support port priorities in multiples of 4.
Port Cost—Describes the STP port cost for this interface. The port cost is a metric used to represent the speed of the interface. STP will use this value in determining the preferred path when a loop is detected in the network.
Per VLAN STP Setting Area
The Per VLAN STP Setting area in the STP tab of the C6576M Ethernet Interface dialog box provides the following information:
STP VLAN Table—Describes the STP per-VLAN configurations of a trunking interface. There is one entry for each explicit per-VLAN spanning tree configuration on the interface.
Note The VLAN STP instance does not have to be currently carried on the trunk in
order to configure the per-VLAN STP settings. The settings will take effect
when the interface actually begins trunking the VLAN traffic.
Priority—Describes the STP VLAN port priority of this interface. The VLAN port priority is used on trunking interfaces. On any switch port that is not in trunking mode, the STP port priority is used instead.
Cost—Describes the STP VLAN path cost of this interface. The VLAN path cost is only used on trunking interfaces. On any switch port that is not in trunking mode, the STP port path cost is used instead.
Note Default values for priority and cost will be used if you do not provide one of
these arguments. You must provide a nondefault value for at least one of these
arguments, otherwise the action will fail.
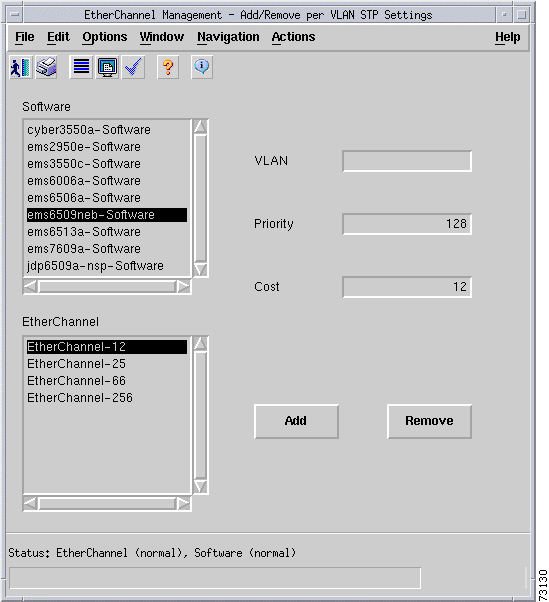
Add/Remove Per VLAN STP Setting button—Launches a subdialog box to add and remove an explicit STP VLAN configuration to the interface. The configuration will only have an effect if the interface is in trunking mode and the VLAN has an associated STP instance. The interface does not currently need to be configured as a trunking port, nor does the VLAN or the VLAN STP instance need to exist. Figure 6-41 shows the subdialog box that is displayed when the Add/Remove Per VLAN STP Setting button is selected. The subdialog box contains the following items:
VLAN—Idenifies the VLAN STP instance. This is the numeric identifier of the access mode VLAN or a VLAN that is carried on the trunk.
Priority—Describes the STP VLAN port priority of this interface.
Cost—Describes the STP VLAN path cost of this interface.
Add button—Adds an explicit STP VLAN configuration to the interface.
Remove button—Removes an explicit STP VLAN configuration to the interface.
The STP Status area of the C6576M Ethernet Interface dialog box provides the following information:
STP VLAN Status Table—Describes the status of the active STP VLAN port configurations of the interface. Data is displayed in the following columns:
VLAN—Idenifies the VLAN STP instance that this status applies to. This is the numeric identifier of the access mode VLAN or a VLAN that is carried on the trunk.
Port—Unique port identifier for the interface in the STP instance. This identifier is unique for that port across all devices in the STP management domain.
State—Describes the interface state in the STP instance.
Port Cost—Indicates the current calculated port path cost of the interface in the STP instance.
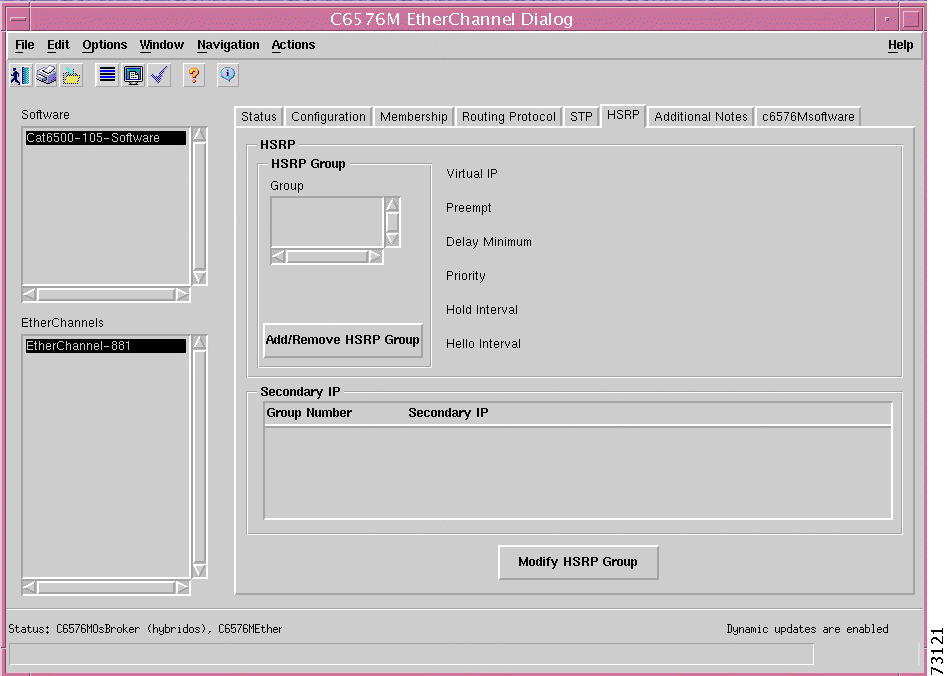
HSRP Tab
Figure 6-42 shows the HSRP tab of the C6576M EtherChannel dialog box.
Figure 6-42 HSRP Tab for the C6576M EtherChannel Dialog Box
HSRP Area
The HSRP area of the C6576M Ethernet Interface dialog box provides the following information:
HSRP Group Table—Describes HSRP groups deployed on an interface.
Note There may be multiple groups deployed on an interface. Using a group
number on one logical or physical interface does not preclude using it on
another.
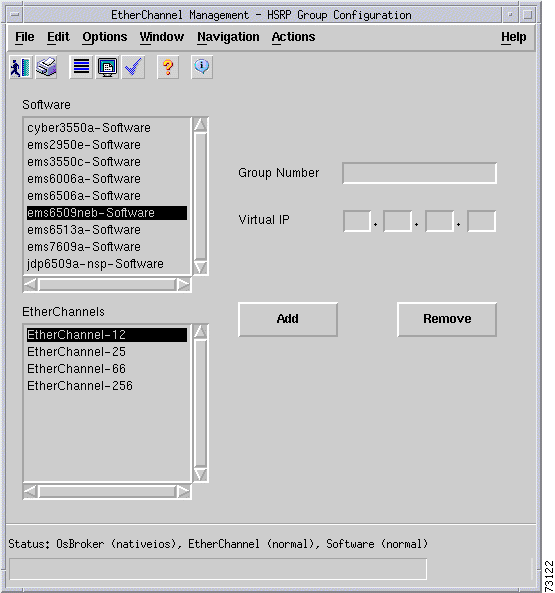
Virtual IP—Primary virtual IP address of the HSRP group. If this address is not configured, the agent will attempt to discover the virtual address through a discovery process which scans the hello messages.
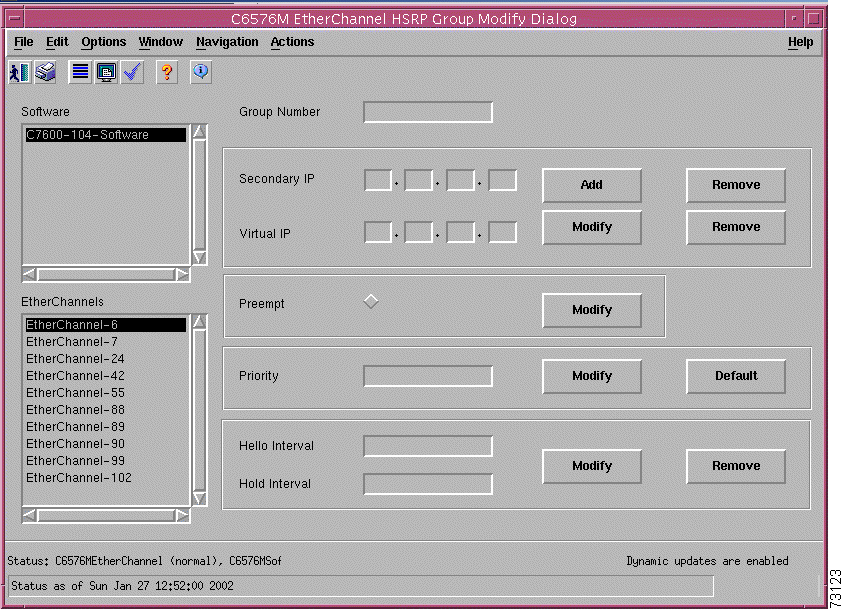
Preempt—If enabled, the current router will attempt to overthrow a lower priority active router and attempt to become the active router. If disabled, this router will become the active router only if there is no such router or the active router fails.
true—Preempt enabled.
false—Preempt disabled.
Delay Minimum—Time difference (in seconds) between a router power up and the time it can start preempting the currently active router. This value is only applicable when preemption is enabled.
Priority—Priority value that prioritizes a potential hot standby router. The range is 1 to 255, where 1 indicates the lowest priority and 255 indicates the highest priority. The default priority value is 100. The router in the HSRP group with the highest priority value becomes the active router.
Hello Interval—Hello interval in milliseconds. If this value is not configured, it can be learned from the active router.
Hold Interval—Hold interval in milliseconds. If this value is not configured, it can be learned from the active router.
Configure button—Enable HSRP for IP on an interface. This action deploys an HSRP group on the interface. The HSRP group may optionally be assigned a primary IP address. If no address is explicitly assigned, the device will attempt to discover the virtual IP address from the active server using hello messages. Figure 6-43 shows the subdialog box that is displayed when you click the Add/Remove button.
Figure 6-43 HSRP Group Configure Subdialog Box
Secondary IP Area
The Secondary IP area of the C6576M Ethernet Interface dialog box provides the following information:
HSRP Secondary Address Table—Describes secondary IP addresses of HSRP groups deployed on the interface. Data is displayed in the following columns:
Group Number—Unique identifier of an HSRP group.
Secondary IP—Secondary IP address of HSRP group.
Modify button—Figure 6-44 shows the subdialog box that is displayed when the Modify button is clicked. This subdialog box is used to modify the following C6576M Ethernet Interface attributes of a given HSRP group:
Secondary IP
Virtual IP
Preempt
Delay Minimum
Priority
Hello Interval
Hold Interval
Figure 6-44 HSRP Secondary IP Modify Subdialog Box
Additional Notes Tab
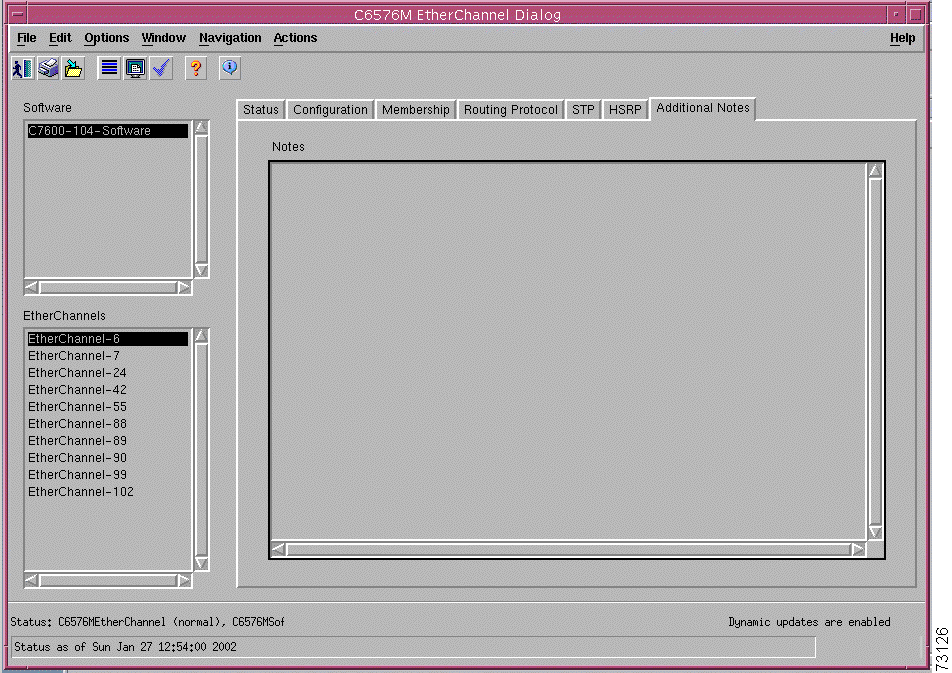
Figure 6-45 shows the Additional Notes tab of the C6576M EtherChannel dialog box.
Figure 6-45 Additional Notes Tab of the C6576M EtherChannel Dialog Box
Notes Area
The Notes area is a text box that allows you to type in additional notes for the object.
C6576M BGP Dialog Box
The C6576M BGP dialog box provides information for the IOS Border Gateway Protocol (BGP). This dialog box can be launched from the Software object or BGP object within the Manager containment view.
BGP Tab
Figure 6-46 shows the BGP tab of the C6576M BGP dialog box.
Figure 6-46 BGP Tab of the C6576M BGP Dialog Box
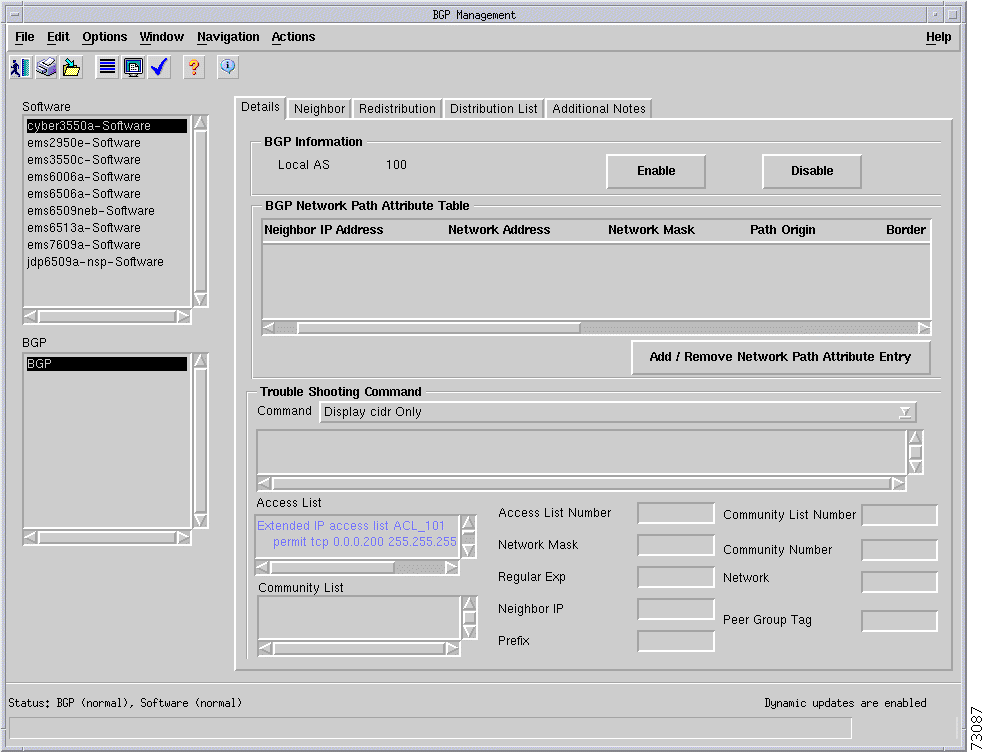
BGP Information Area
The BGP Information area of the C6576M BGP dialog box provides the following information:
Local AS ID—Autonomous system number for the local BGP process. This attribute has a value of 0 if BGP is disabled on the switch or router.
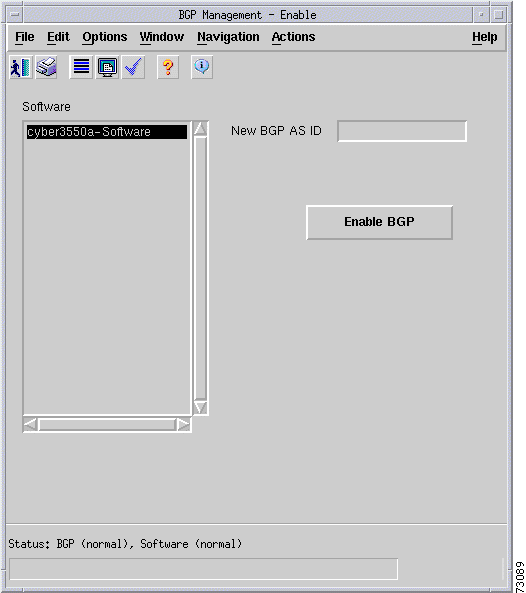
Enable button—Enables BGP on the switch or router. Launches the dialog box shown in Figure 6-47.
To enable BGP on the switch or router, specify the BGP autonomous system number and then click Enable BGP. An error will be reported if BGP is already enabled on the switch or router.
Disable button—Disables BGP on the switch or router.
Figure 6-47 BGP Enable Dialog Box
BGP Network Path Attribute Table Area
The BGP Network Path Attribute Table area contains information about paths to destination networks received from all BGP peers. This area contains the following columns:
Peer IP Address—IP address of the peer from which the path information was learned. This address is 0.0.0.0 if this information was learned internally.
IP Address—IP address of the destination network.
Network Mask—Length of the destination network IP adddress prefix in the Network Layer Reachability Information field.
Path Origin—Ultimate origin of the path information. This has the following values:
igp—Interior Gateway Protocol advertised with a network router configuration command.
egp—Exterior Gateway Protocol.
incomplete—Unknown origin. Usually, a router that is distributed into BGP from an IGP.
Border Router IP Address—Address of the border router that should be used for the destination network.
Multiple Exit Point Discriminate Metric—Metric used to discriminate between multiple exit points to an adjacent autonomous system. A value of -1 indicates the absence of this attribute.
Degree of Preference—Degree of preference for an advertised route. A value of -1 indicates an absence of this attribute.
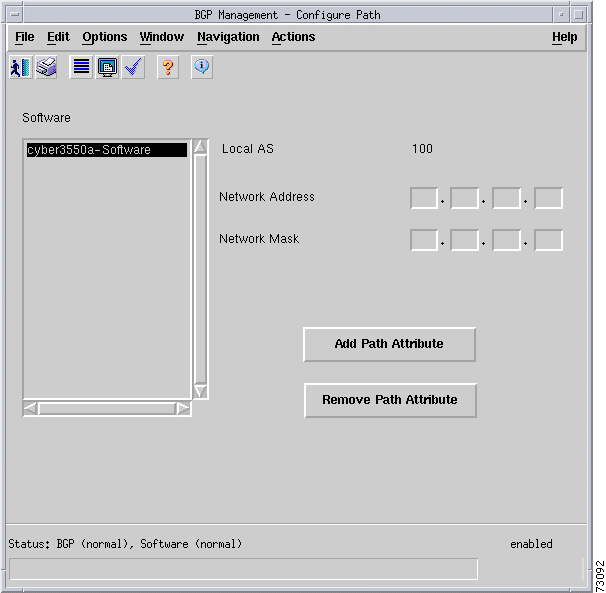
Add/Remove Network Path Attribute Entry button—Adds or removes specific network(s) to be advertised (or not to be advertised) by the Border Gateway Protocol (BGP). Launches the dialog box shown in Figure 6-48.
Specify the IP and network mask of the network to be added or removed from the BGP process.
Figure 6-48 Add or Remove BGP Path Attributes Dialog Box
Status Field
The Status display-only field located at the bottom of the window indicates the current state of the object. This field has the following values:
decommissioned—CEMF is not actively monitoring the object attributes.
normal—Presence polling of the object.
normallostcomms—CEMF has lost communication with the device from the normal state.
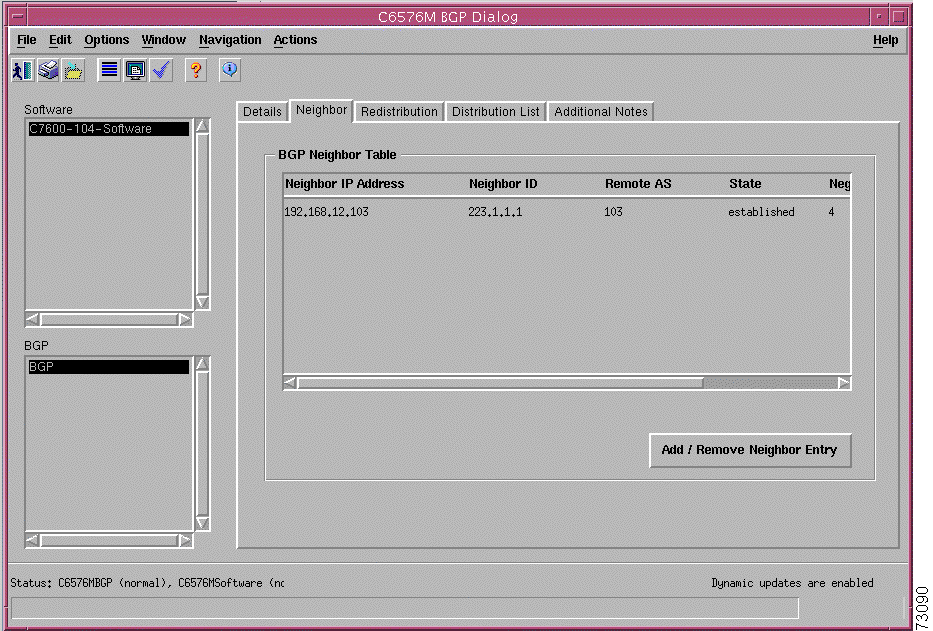
Neighbor Tab
Figure 6-49 shows the Neighbor tab of the C6576M BGP dialog box.
Figure 6-49 Neighbor Tab of the C6576M BGP Dialog Box
BGP Neighbor Table Area
This area lists the BGP neighbors of the local BGP process:
Neighbor IP Address—Remote IP address of this entry's BGP neighbor.
Neighbor ID—IP address of the neighbor.
Remote AS—Autonomous system number of the neighbor.
State—Operational state of the connection between the neighbor and local BGP process. This field has the following values:
idle
connect
active
opensent
openconfirm
established
Negotiated Version—Negotiated version of BGP running between the two neighbors.
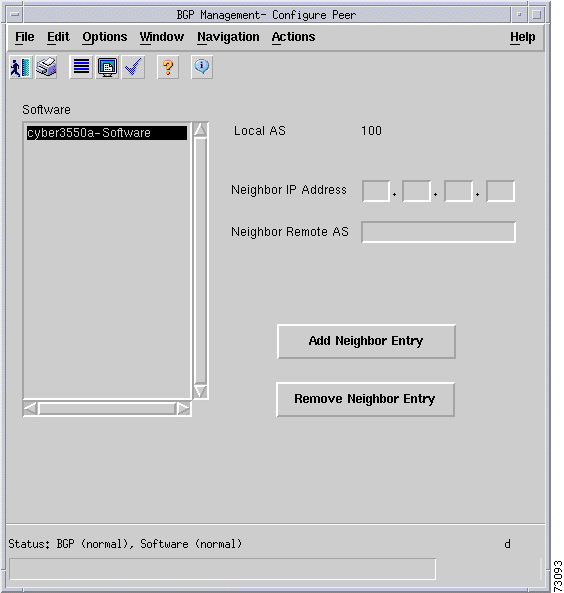
Add/Remove Neighbor Entry button—Adds or removes BGP neighbors from this table. Launches the dialog box shown in Figure 6-50.
Specify the neighbor IP address and remote AS number to add or remove the neighbor from the local BGP neighbor table.
Figure 6-50 Add or Remove BGP Peers Dialog Box
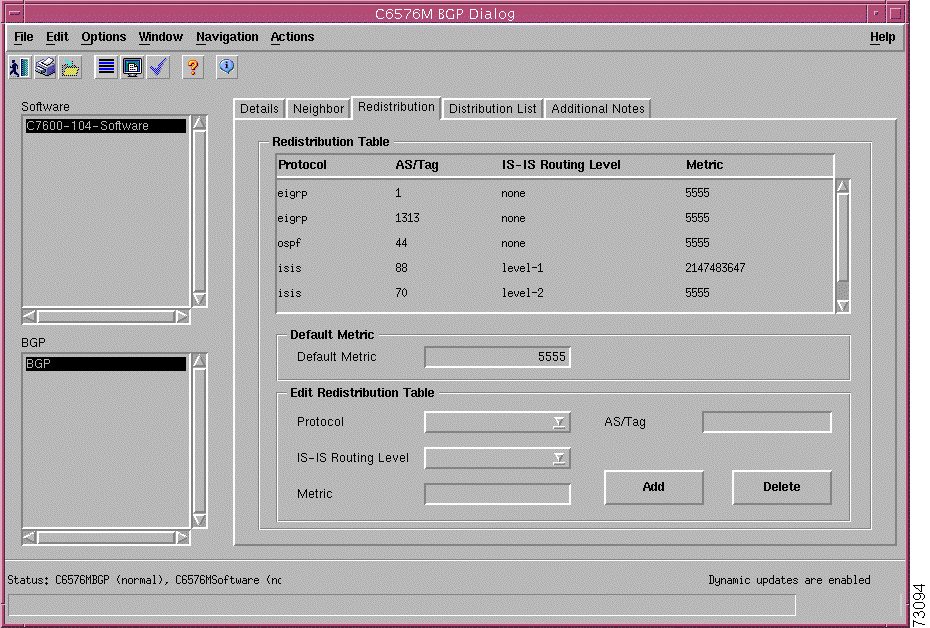
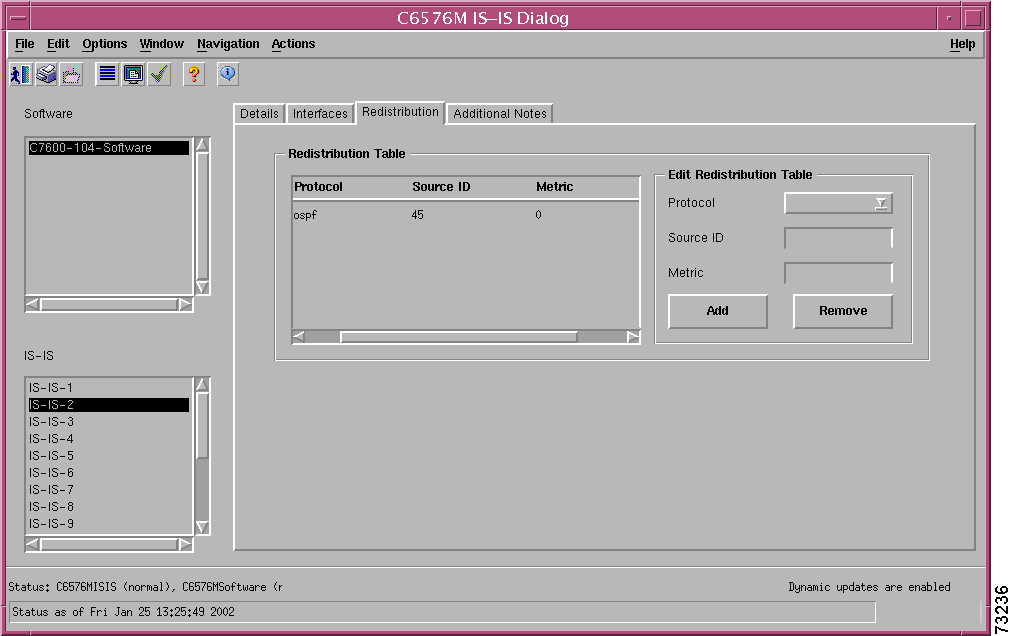
Redistribution Tab
Figure 6-51 shows the Redistribution tab of the C6576M BGP dialog box.
Figure 6-51 Redistribution Tab of the C6576M BGP Dialog Box
Redistribution Table Area
This area describes the route redistribution configuration of the BGP routing process. Routes learned from other interior and exterior routing protocols may be redistributed into the BGP routing domain.
Protocol—Source protocol from which routes are being distributed into BGP.
IS-IS
EIGRP
OSPF
AS/Tag—The autonomous system tag identifying the BGP routing domain.
IS-IS Routing Level—Indicates IS-IS route level redistribution. This field has the following values:
none—For protocols other than IS-IS.
level-1—Local area/intra-area dedistribution.
level-1-2—Redistribution for both inter and intra-area routing.
Metric—BGP metric used to weigh the redistributed route. If no value is specified for Default Metric (in the BGP tab), this value defaults to 0.
Default Metric Area
This area has one attribute:
Default Metric—Default metric used for route redistribution. This metric is used when and explicit metric is not given during route redistribution process.
Edit Redistribution Table Area
This area allows changes to be made to the Redistribution Table:
Protocol—Source protocol from which routes are being distributed. This attribute along with Source ID uniquely identifies a source of network paths to be redistributed through BGP. There may be, at most, one redistribution entry for a given source of network path information.
AS/Tag—The autonomous system tag identifying the BGP routing domain.
IS-IS Routing Level—Indicates IS-IS route level redistribution. This field has the following values:
none—For protocols other than IS-IS.
level-1—Local area/intra-area dedistribution.
level-1-2—Redistribution for both inter and intra-area routing.
Metric—BGP metric used to weigh the redistributed route. If no value is specified for Default Metric (in the BGP tab), this value defaults to 0.
Add button—Enables route redistribution from another IP routing process into the BGP routing domain. Routes may be learned from an IS-IS, EIGRP, or OSPF routing process.
Delete button—Disables route redistribution from another IP routing process into the BGP routing domain.
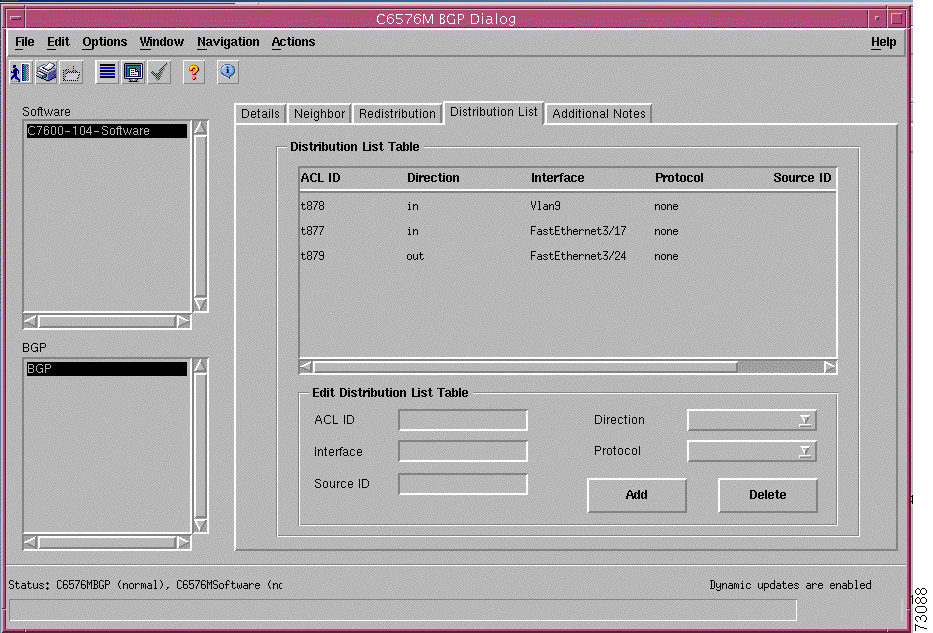
Distribution List Tab
Figure 6-52 shows the Distribution List tab of the C6576M BGP dialog box.
Figure 6-52 Distribution List Tab of the C6576M BGP Dialog Box
Distribution List Table Area
This area describes filtering of routing updates sent or received by the routing process.
ACL ID—Unique identifer of an ACL for filtering routing updates sent or received by a routing process. The ACL specifies which network routes will be permitted or denied in routing updates. This field has the following values:
<1-199>—Standard access list number.
<1300-2699>—Expanded access list number.
alphanumeric—Named access list.
Direction—Indicates whether the filter will be applied against routing updates received by the routing process or advertised by the routing process.
in—Applies to updates received.
out—Applies to updates advertised.
Interface—Identifies a particular interface that the filter is applied to. For an incoming filter, suppresses routing updates received on a specific interface; if not specified, routing updates are suppressed on all interfaces. For an outgoing filter, suppresses routes from being advertised on a particular interface; if not specified, route advertisements are suppressed on all interfaces.
Null 0
FastEthernet <slot>/<port>
GigabitEthernet <slot>/<port>
GE-WAN <slot>/<port>
POS <slot>/<port>
ATM <slot>/<subslot>/<port>
Port-channel <n>
VLAN <n>
Protocol—Identifies the routing protocol source of network routes.
Source ID—Identifies the routing process from which routes are being distributed. This field may have the following values:
IS-IS—This is either an implicit null tag or the tag of a named IS-IS routing process.
EIGRP—This is a 16-bit autonomous system ID in the range of 1 to 65535
OSPF—This is a 16-bit OSPF process ID in the range of 1 to 65535
ACL ID—Unique identifer of an ACL for filtering routing updates sent/received by a routing process.
Direction—Indicates whether the filter will be applied against routing updates received by the routing process or advertised by the routing process.
Interface—Identifies a particular interface that the filter is applied to.
Protocol—Identifies a protocol source of network routes.
Source ID—Identifies a specific routing process instance that redistributed routes are derived from.
Add button—Specifies a filter for suppressing or allowing distribution of network routes through BGP.
Delete button—Removes a filter for suppressing or allowing distribution of network routes through BGP.
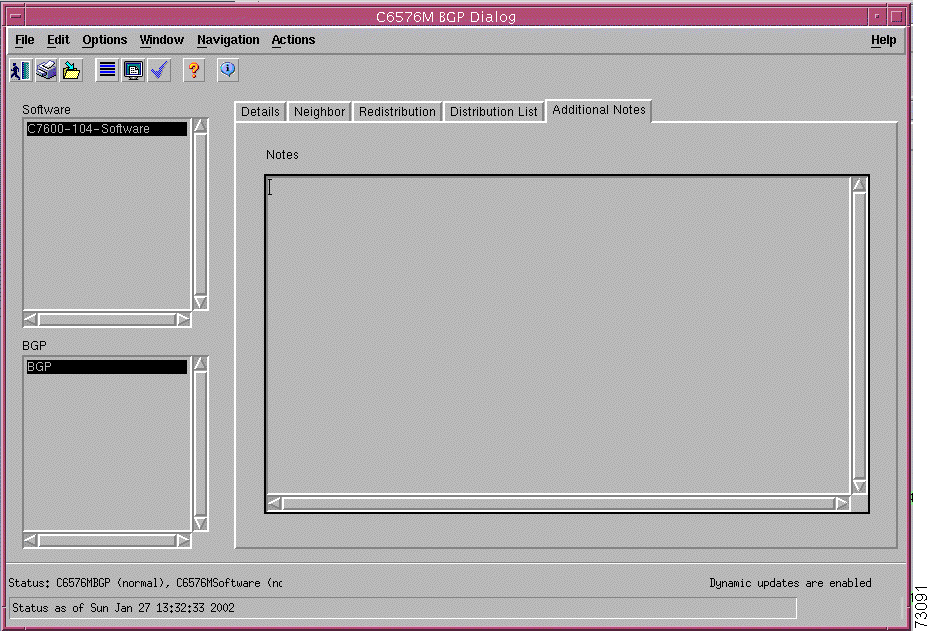
Additional Notes Tab
Figure 6-53 shows the Additional Notes tab of the C6576M BGP dialog box.
Figure 6-53 Additional Notes Tab of the C6576M BGP Dialog Box
Notes Area
The Notes area is a text box that allows you to type in additional notes for the object.
C6576M OSPF Dialog Box
The C6576M OSPF dialog box provides information for all IOS Open Shortest Path First (OSPF) routing protocol processes. This dialog box can be launched from the Software object or OSPF objects within the Manager containment view.
Details Tab
Figure 6-54 shows the Details tab of the C6576M OSPF dialog box.
Figure 6-54 Details Tab of the C6576M OSPF Dialog Box
OSPF Area
The OSPF area of the C6576M OSPF dialog box describes the OSPF area configurations:
Process ID—Process number of this OSPF process.
Router ID—Unique identifier of the router in the autonomous system. By convention, to ensure uniqueness this defaults to the value of one of the router's IP interface addresses.
Administrative Status—Administrative status of this OSPF router process. The enabled value denotes that the OSPF process is active on at least one interface; the disabled value indicates that all interfaces are disabled.
Area Border Router—Flag to note whether or not this router is an area border router.
AS Border Router—Flag to note whether or not this router is configured as an autonomous system border router.
Add button—Adds an OSPF process to the switch or router. Launches the dialog box shown in Figure 6-55.
Note The Catalyst 6000 family switches and the Cisco 7600 series Internet
Routers support only three OSPF processes.
Specify the OSPF Process ID (number only) and click Add to create the OSPF process on the switch or router. The string "OSPF-" will be prepended automatically to the process ID.
Note A newly created OSPF process will not automatically be listed in the
OSPF object list (bottom left of
Figure
6-54). To list the new process, reselect the current Software object
from the Software object list (top left of
Figure
6-54).
Remove button—Deletes the currently selected OSPF process.
Figure 6-55 Add OSPF Processes Dialog Box
Status Field
The Status display-only field located at the bottom of the window indicates the current state of the object. This field has the following values:
decommissioned—CEMF is not actively monitoring the object attributes.
normal—Presence polling of the object.
normallostcomms—CEMF has lost communication with the device from the normal state.
Area Tab
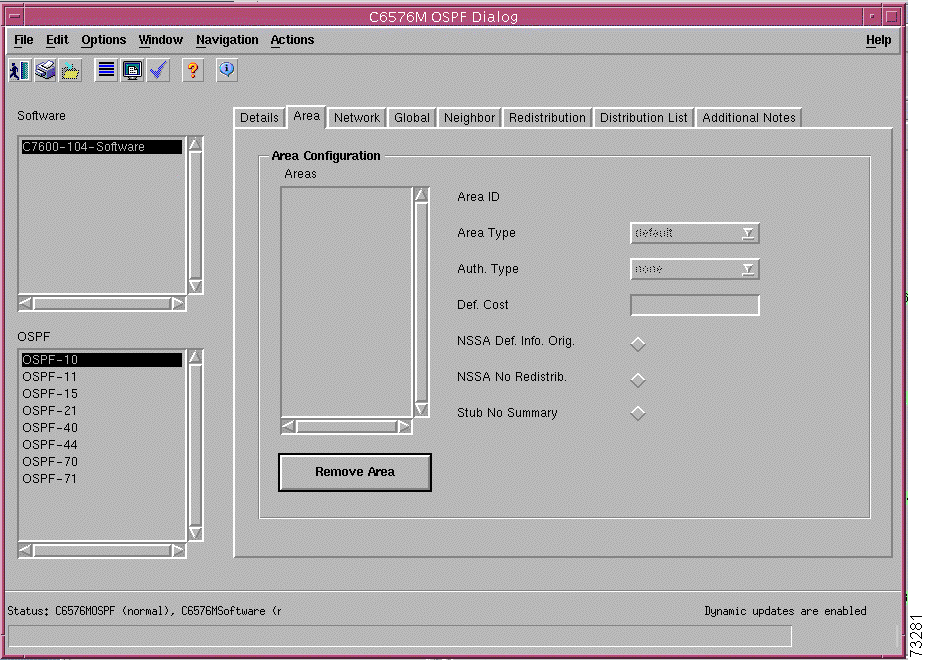
Figure 6-56 shows the Area tab of the C6576M OSPF dialog box.
Figure 6-56 Area Tab of the C6576M OSPF Dialog Box
Area Configuration Area
This describes OSPF NSSA and stub area configurations. The information for a particular area can be displayed by selecting the desired area from the Areas list. When you select an area, the following information is provided:
Area ID—Identifies a stub or NSSA area adjacent to the router. The identifier can be specified as either a decimal value or as an IP address.
Area Type—Type of area. The type has the following values:
default—Not a stub or NSSA area.
stub—Information on external routes are not sent to stub areas.
nssa—Similar to a stub area but autonomous system external routes can be imported into the area.
Auth. Type—Authentication type for the area. The authentication type must be the same for all routers and access servers in an area. The authentication password for all OSPF routers on a network must be the same if they are to communicate with each other using OSPF. The Authentication type has the following values:
none—The area does not enforce any authentication.
simple—Simple password authentication is used.
md5—MD5 authentication is enabled for the area.
Def. Cost—Default cost for the area. Use this value only on an area border router attached to a stub area. It provides a metric for the summary default route generated by the area border router into the stub area.
NSSA Def. Info. Orig.—Generates a Type 7 default into the NSSA area. This argument takes effect only on an NSSA area border router or an NSSA AS border router.
NSSA No Redistrib.—Used when the router is a NSSA area border router and routes are to be imported only into the normal areas, but not into the NSSA area.
Stub No Summary—Indicates that an area border router is sending summary link advertisements into the stub area.
Remove Area—Removes an explicit NSSA or stub area configuration to the OSPF routing process. The action can only be used on an area border router attached to a stub or NSSA area.
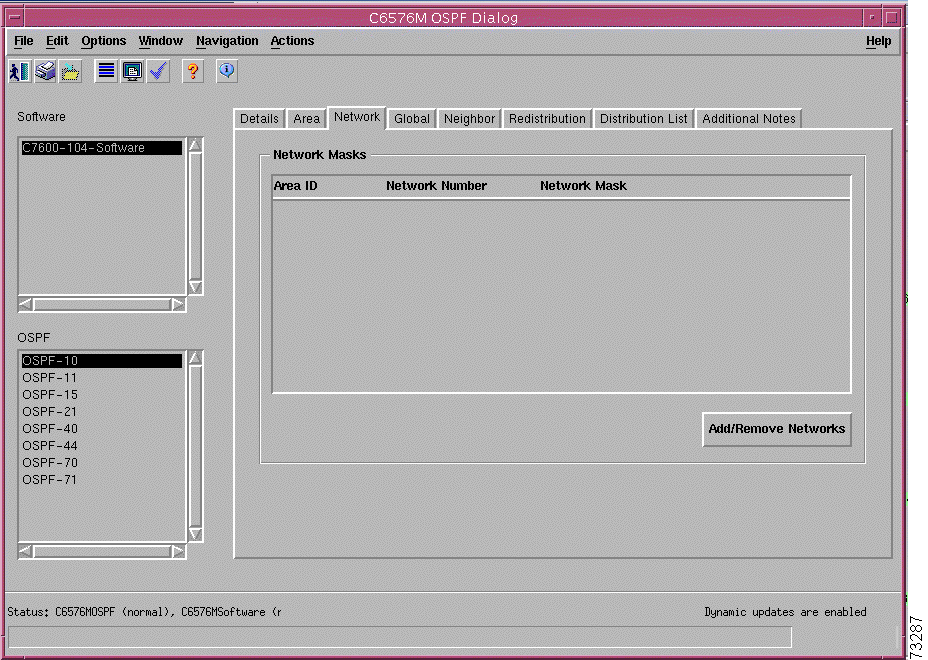
Network Tab
Figure 6-57 shows the Network tab of the C6576M OSPF dialog box.
Figure 6-57 Network Tab of the C6576M OSPF Dialog Box
Network Masks Area
The table in this area displays the networks associated with the selected OSPF process. This table contains the following information:
Area ID—Area ID assigned to the networks and subnets.
Network Number—IP address of the network.
Network Mask—Netmask associated with the IP address.
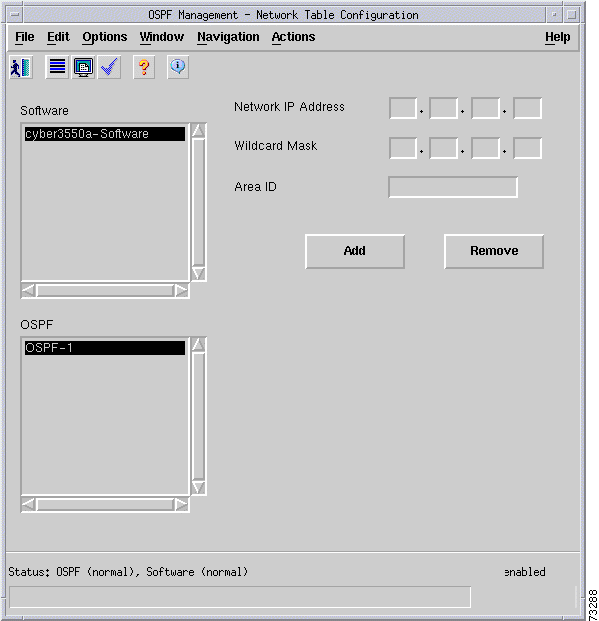
Add/Remove Networks—Adds or removes networks from the OSPF process. Launches the dialog box shown in Figure 6-58.
Specify the Network IP Address, Wildcard Mask, and the Area ID to be added or removed from the OSPF process.
Figure 6-58 Add or Remove OSPF Networks Dialog Box
Global Tab
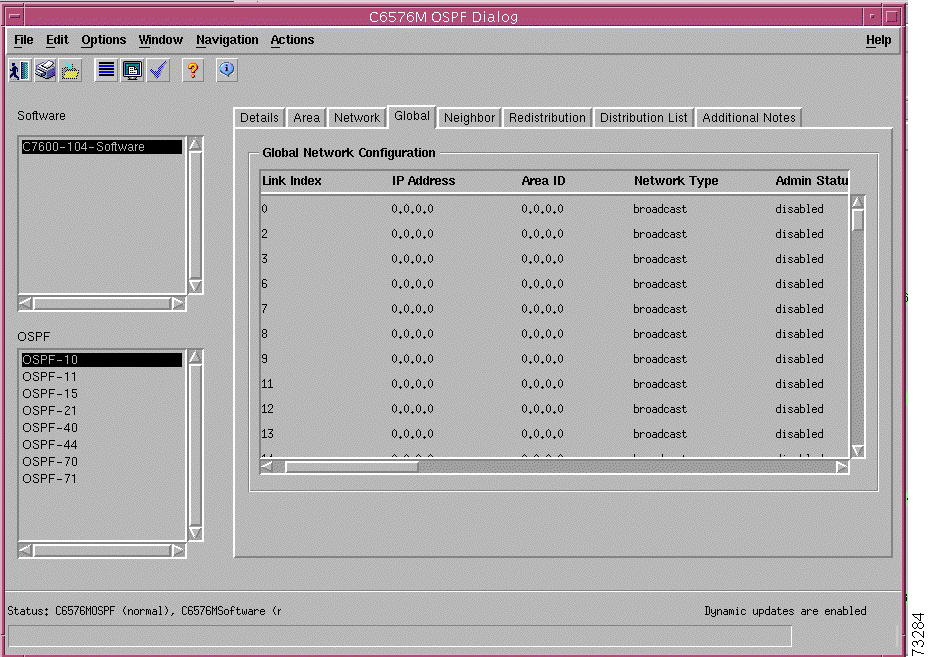
Figure 6-59 shows the Global tab of the C6576M OSPF dialog box.
Figure 6-59 Global Tab of the C6576M OSPF Dialog Box
Global Network Configuration Table
This describes the OSPF view of all interfaces on the router. This table contains the following columns:
Link Index—Unique identifier of an interface on the router. This value is equal to the unique identifier of the interface if this is a Layer 2 (address-less) interface. If the interface is a Layer 3 (addressed) interface, this value is 0. This identifier is dynamic, it may change over the lifetime of an interface.
IP Address—IP address of the interface.
Area ID—Unique identifier of the area to which the interface connects. An Area ID of 0.0.0.0 is used for the OSFP backbone.
Network Type—OSPF interface type. OSPF network type can be NBMA even on a broadcast media such as Ethernet. This column has the following values:
enabled—Indicates that neighbor relationships can be formed on the interface, and the interface will be advertised as an internal route to some area.
disabled—Indicates that the interface is external to OSPF.
Trans. Priority—The priority of this interface. Used in multiaccess networks, this field is used in the designated router election algorithm. The value 0 signifies that the router is not eligible to become the designated router on this particular network. If more than one router has the same value, the routers use their router ID as a tie breaker.
Trans. Delay (sec)—The estimated number of seconds it takes to transmit a link state update packet over this interface.
Retrans. Interval (sec)—The number of seconds between link-state advertisement retransmissions for adjacencies belonging to this interface. This value is also used when retransmitting database description and link-state request packets.
Hello Interval (sec)—The length of time, in seconds, between the hello packets that the router sends on the interface. This value must be the same for all routers attached to a common network.
Trans. Dead (sec)—The number of seconds that a router's hello packets have not been seen before its neighbors declare the router down. This should be some multiple of the hello interval. This value must be the same for all routers attached to a common network.
Polling Interval (sec)—The larger time interval, in seconds, between the hello packets sent to an inactive nonbroadcast multiaccess neighbor.
State—The OSPF interface state.
Designated Router—IP address of the designated router.
Backup Designated Router—IP address of the backup designated router.
Authentication Key—Password to be used by neighboring OSPF routers on a network segment that is using OSPF simple password authentication. Ignored if ospfAuthType is not "simple".
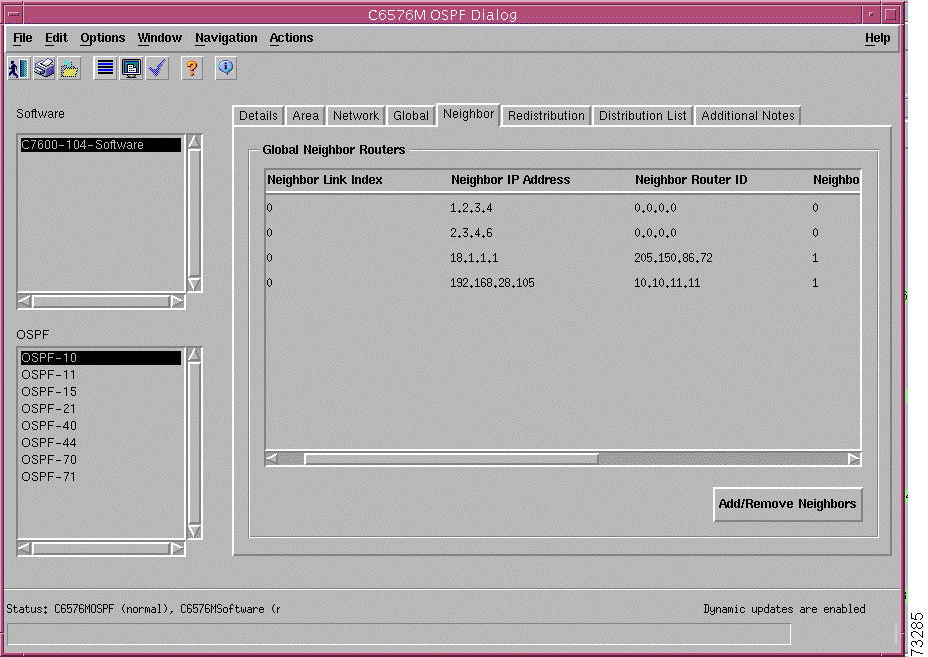
Neighbor Tab
Figure 6-60 shows the Neighbor tab for the C6576M OSPF dialog box.
Figure 6-60 Neighbor Tab of the C6576M OSPF Dialog Box
Global Neighbor Routers Area
This area lists all OSPF neighbors for all OSPF processes. This area consists of the following columns:
Neighbor Link Index—Unique identifier of the interface on which the neighbor can be reached. This value is set to 0 if the interface has an IP address.
Neighbor IP Address—IP address of the neighbor. On links without addresses, this address will not be 0.0.0.0, but the address of another of the neighbor's interfaces.
Neighbor Router ID—IP address uniquely identifying the neighbor router in the autonomous system.
Neighbor Priority—Priority of this neighbor in the designated router election algorithm. The value 0 signifies that the neighbor is not eligible to become the designated router on this particular network.
Neighbor State—The state of the relationship with this Neighbor. This column may have the following values:
down
attempt
init
twoWay
exchangeStart
exchange
loading
full
Neighbor Entry Status—This variable displays the status of the entry. Setting the variable to "invalid" can make it inoperative.
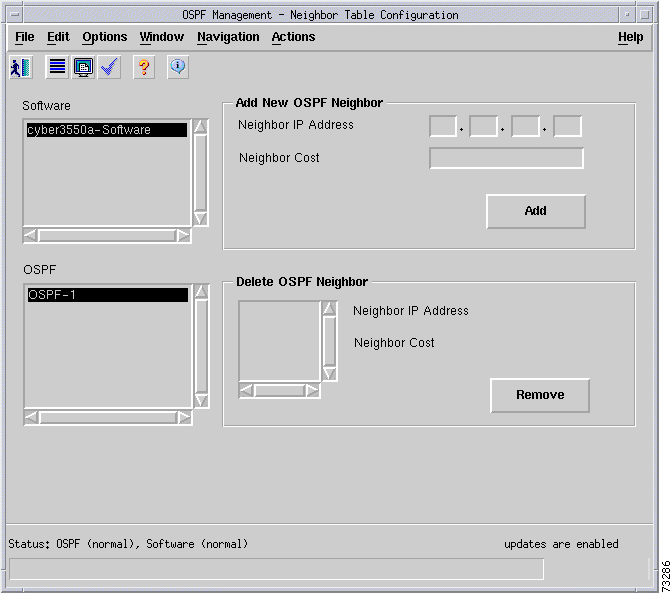
Add/Remove Neighbors—Adds or removes neighbors. Launches the dialog box shown in Figure 6-61.
When adding a new neighbor, specify the neighbor router's IP address and the cost associated for this neighbor, and click the Add button.
To remove a neighbor, choose the neighbor in the Neighbor Table and click the Remove button. The Neighbor IP Address and Cost are displayed for the neighbor selected.
Figure 6-61 Add or Remove OSPF Neighbors Dialog Box
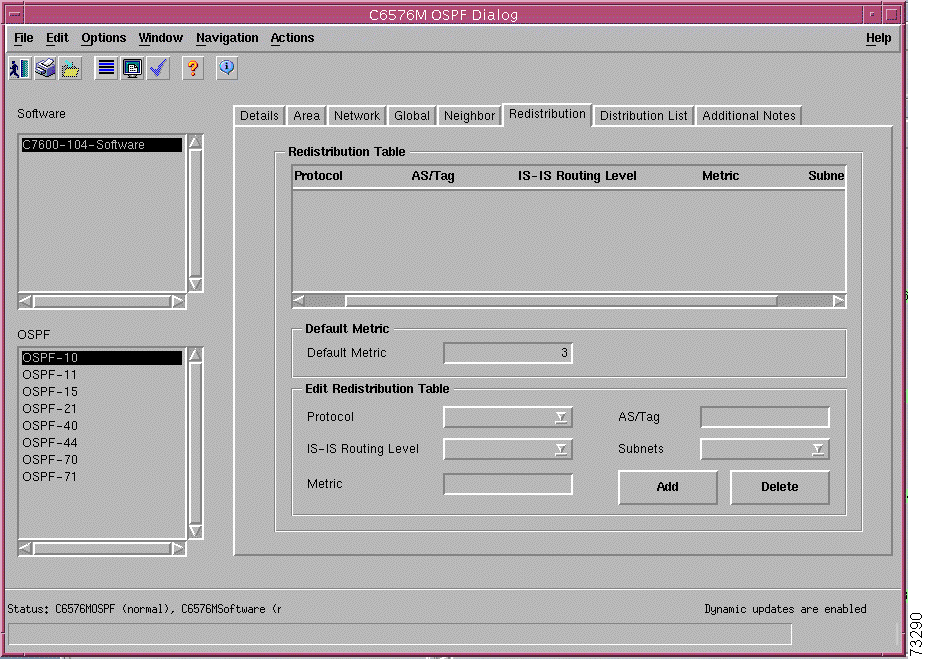
Redistribution Tab
Figure 6-62 shows the Redistribution tab of the C6576M OSPF dialog box.
Figure 6-62 Redistribution Tab of the C6576M OSPF Dialog Box
Redistribution Table Area
This area describes the route redistribution configuration of the OSPF routing process. Routes learned from other interior and exterior routing protocols may be redistributed into the OSPF routing domain.
Protocol—Source routing protocol from which routes are being distributed into OSPF.
IS-IS
EIGRP
BGP
AS/Tag—The autonomous system tag identifying the BGP routing domain.
IS-IS Routing Level—Indicates IS-IS route level redistribution. This field has the following values:
none—For protocols other than IS-IS.
level-1—Local area/intra-area dedistribution.
level-1-2—Redistribution for both inter and intra-area routing.
Metric—OSPF metric used to weigh the redistributed route. If no value is specified for Default Metric (in the General tab), this value defaults to 0.
Subnets—Indicates whether or not subnets will be considered for redistribution into OSPF. This column has the value of either `true' or `false'.
Default Metric Area
Default Metric—Default OSPF metric used for redistributed routes. This metric is used when an explicit metric is not given in the Metric entry of the Redistribution tab. A value of 0 indicates that no default metric has been specified.
Edit Redistribution Table Area
This area allows changes to be made to the attributes in the Redistribution Table. These attributes are discussed in detail in the "Redistribution Table Area" section.
Protocol—Source routing protocol from which routes are being distributed into OSPF.
AS/Tag—The autonomous system tag identifying the BGP routing domain.
Metric—OSPF metric used to weigh the redistributed route.
Subnets—Indicates whether or not subnets will be considered for redistribution into OSPF.
Add button—Enables route redistribution from another IP routing process into the OSPF routing domain. Routes may be learned from an IS-IS, EIGRP, or BGP routing process.
Delete button—Disables route redistribution from another IP routing process into the BGP routing domain.
Distribution List Tab
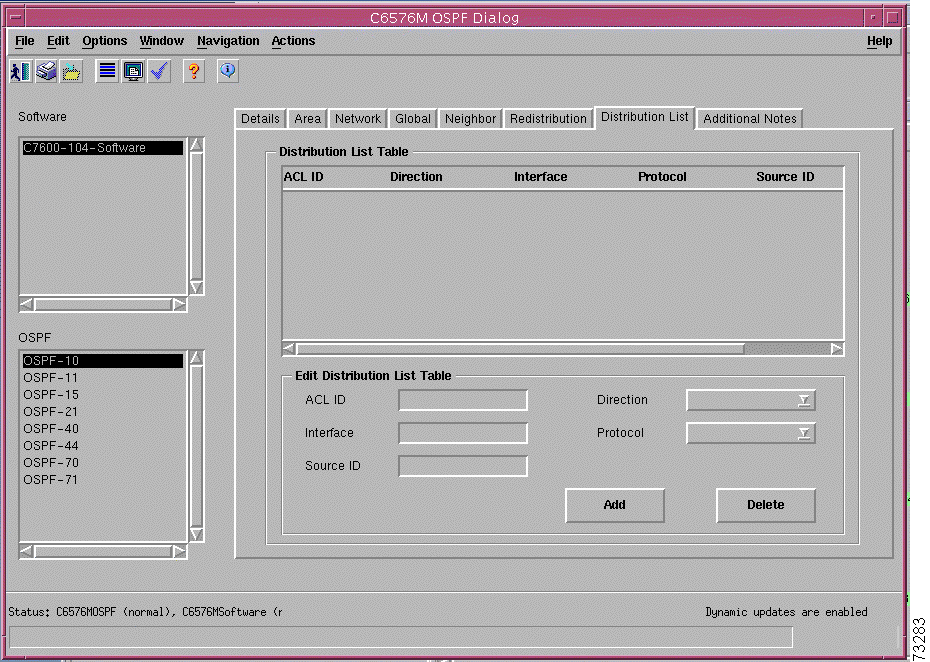
Figure 6-63 shows the Distribution List tab of the C6576M OSPF dialog box.
Figure 6-63 Distribution List Tab of the C6576M OSPF Dialog Box
Distribution List Table Area
This area describes filtering of routing updates sent or received by the routing process.
ACL ID—Unique identifer of an ACL for filtering routing updates sent or received by a routing process. The ACL specifies which network routes will be permitted or denied in routing updates. This field has the following values:
<1-199>—IP standard access list number.
<1300-2699>—IP expanded access list number.
alphanumeric—Named access list.
Direction—Indicates whether the filter will be applied against routing updates received by the routing process or advertised by the routing process.
in—Applies to updates received.
out—Applies to updates advertised.
Interface—Identifies a particular interface that the filter is applied to. For an incoming filter, suppresses routing updates received on a specific interface; if not specified, routing updates are suppressed on all interfaces. For an outgoing filter, suppresses routes from being advertised on a particular interface; if not specified, route advertisements are suppressed on all interfaces.
Null 0
FastEthernet <slot>/<port>
GigabitEthernet <slot>/<port>
GE-WAN <slot>/<port>
POS <slot>/<port>
ATM <slot>/<subslot>/<port>
Port-channel <n>
VLAN <n>
Protocol—Source routing protocol from which routes are being distributed into OSPF.
Source ID—Identifies a specific routing process instance that redistributed routes are derived from.
Edit Distribution Table Area
This area allows changes to be made to the Distribution Table:
ACL ID—Unique identifer of an ACL for filtering routing updates sent or received by a routing process.
Direction—Indicates whether the filter will be applied against routing updates received by the routing process or advertised by the routing process.
Interface—Identifies a particular interface that the filter is applied to.
Protocol—Source routing protocol from which routes are being distributed into OSPF.
Source ID—Identifies a specific routing process instance that redistributed routes are derived from.
Add button—Specifies a filter for suppressing or allowing distribution of network routes through OSPF routing process.
Delete button—Removes a filter for suppressing or allowing distribution of network routes through OSPF routing process.
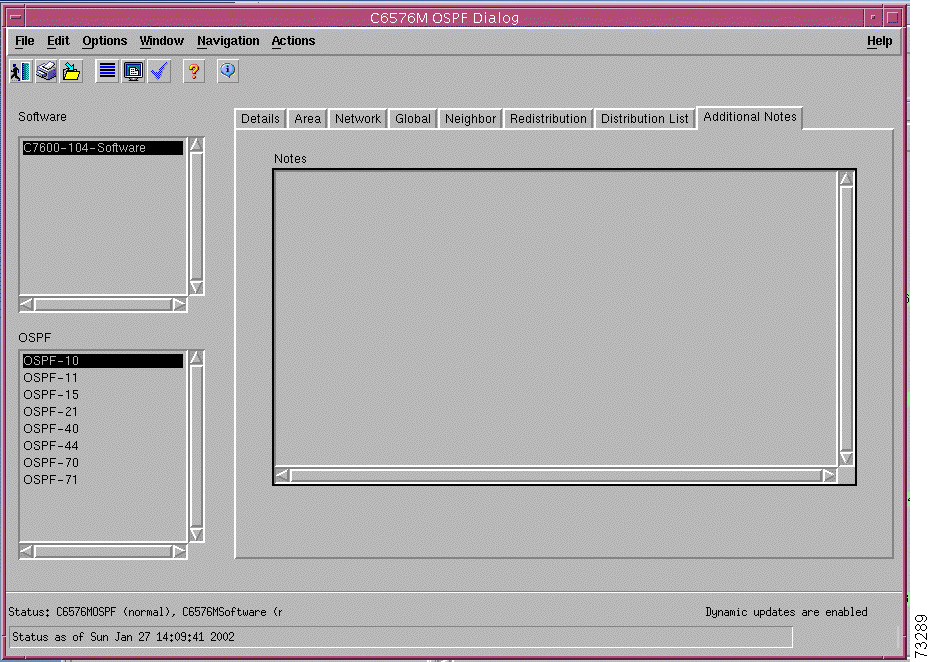
Additional Notes Tab
Figure 6-64 shows the Additional Notes tab of the C6576M OSPF dialog box.
Figure 6-64 Additional Notes Tab of the C6576M OSPF Dialog Box
Notes Area
The Notes area is a text box that allows you to type in additional notes for the object.
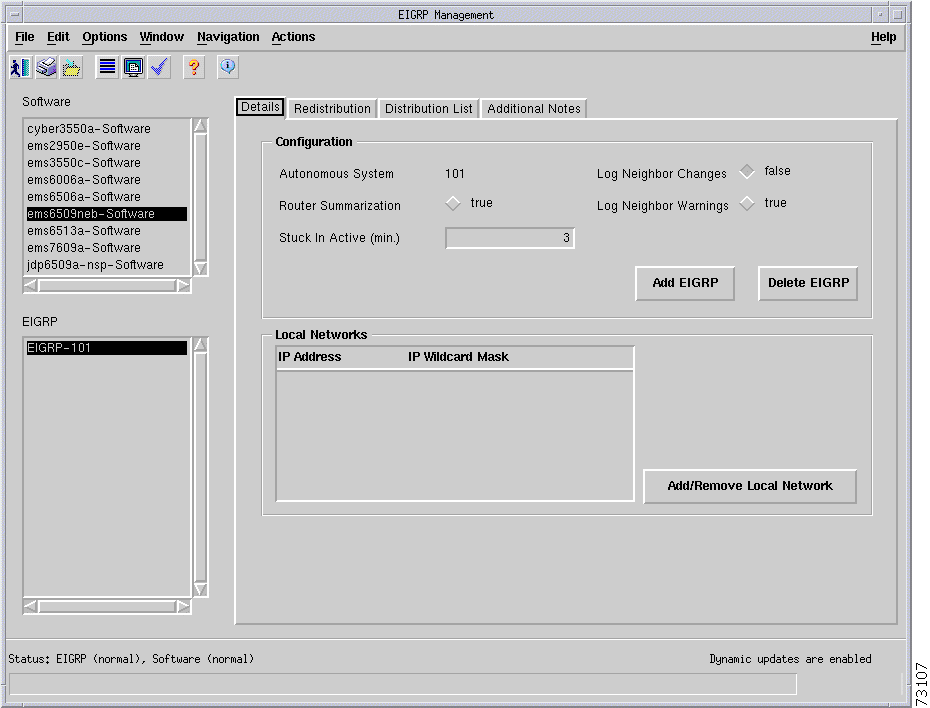
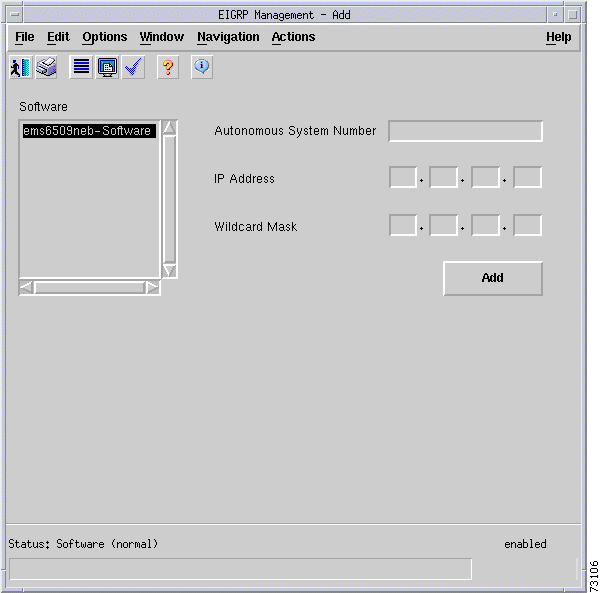
C6576M EIGRP Dialog Box
The C6576M EIGRP dialog box provides information on the Enhanced Interior Gateway Routing Protocol (EIGRP) enabled in IOS. This dialog box is launched from the Software object or EIGRP objects within the Manager containment view.
Note All information in this dialog box is retrieved or set using IOS commands. If
the IOS Telnet or the Enable password specified in the Network Element
dialog box is incorrect, attributes in this dialog box might be displayed as
ERROR.
Details Tab
Figure 6-65 shows the Details tab of the C6576M EIGRP dialog box.
Figure 6-65 Details Tab of C6576M EIGRP Dialog Box
Configuration Area
The Configuration area of the C6576M EIGRP dialog box provides the following information:
Autonomous System—Autonomous system number for this EIGRP process.
Router Summarization—If true, subnet routes are summarized automatically into network-level routes. Automatic summarization is performed when there are two or more networks associated with the EIGRP process.
Stuck In Active—Length of time (in minutes) that a route stays active. This value determines the maximum period of time that an EIGRP router will wait for replies to its queries. If this value is set too low, there might not be enough time for all the neighboring routers to send their replies to the active router.
Log Neighbor Changes—If true, changes to neighbor adjacencies are logged. This can be useful to monitor the stability of the routing system and help detect problems.
Log Neighbor Warnings—If true, neighbor warning messages are logged.
Delete EIGRP button—Deletes the currently selected EIGRP process from the switch or router.
Add EIGRP button—Adds EIGRP processes to the switch or router. Launches the dialog box shown in Figure 6-66. Specify the following attributes and click Add to add an EIGRP process to IOS:
Autonomous System Number—Autonomous system number for this EIGRP process.
IP Address—IP address of a local network. A local network must be specified to add an EIGRP process.
IP Wildcard Mask—Mask to be used with the IP address.
Figure 6-66 Add EIGRP Processes Dialog Box
Local Networks Area
This area describes the networks supported by EIGRP. EIGRP will send routing updates on the interfaces in the networks. If the network of an interface is not specified, it will not be advertised by EIGRP. This area consists of the following columns:
IP Address—IP address of an interface or a range of interfaces in a network supported by the EIGRP routing process.
IP Wildcard Mask—Network wildcard bitmask. Enabled bits indicate wildcard bits in the IP address. This allows multiple interfaces to be specified in a single network entry.
Add/Remove Local Network button—Defines or disables the interfaces that an EIGRP process will run on. EIGRP sends updates to the interfaces in the specified networks. Also, if the network of an interface is not specified, it will not be advertised in any IGRP or Enhanced IGRP update. The wildcardmask can be used to specify a range of interfaces supported by the EIGRP routing process. Launches the dialog box shown in Figure 6-67.
Specify the IP address and IP mask of the entry to be added or removed from the local network table.
Figure 6-67 Add or Remove Networks to the EIGRP Process Dialog Box
Status Field
The Status display-only field located at the bottom of the window indicates the current state of the object. This field has the following values:
decommissioned—CEMF is not actively monitoring the object attributes.
normal—Presence polling of the object.
normallostcomms—CEMF has lost communication with the device from the normal state.
Redistribution Tab
Figure 6-68 shows the Redistribution tab of the C6576M EIGRP dialog box.
Figure 6-68 Redistribution Tab of the C6576M EIGRP Dialog Box
Redistribution Table Area
This area describes the route redistribution configuration of the EIGRP routing process. Routes learned from other interior and exterior routing protocols may be redistributed into the EIGRP routing domain.
Protocol—Source routing protocol from which routes are being distributed into EIGRP.
IS-IS
BGP
OSPF
Source ID—Identifies the routing process from which routes are being distributed. This field may have the following values:
IS-IS—This is either an implicit null tag or the tag of a named IS-IS routing process.
BGP—This is a 16-bit autonomous system ID in the range of 1..65535
OSPF—This is a 16-bit OSPF process ID in the range of 1..65535
IS-IS Routing Level—Indicates IS-IS route level redistribution. This field has the following values:
none—For protocols other than IS-IS.
level-1—Local area/intra-area dedistribution.
level-1-2—Redistribution for both inter- and intra-area routing.
Bandwidth—Bandwidth metric. This redistribution metric must be specified for protocols other than EIGRP if the Default Metric in the Details tab is nil.
Delay—Delay metric. This redistribution metric must be specified if the Default Metric is nil.
Reliability—Reliability metric. 0 is least reliable, 255 is 100 percent reiliable. This redistribution metric must be specified if the default metric is nil.
Loading—Loading metric. This indicates the effective bandwidth of the network paths where 0 is least loaded and 255 is 100 percent loaded. This redistribution metric must be specified if the Default Metric is nil.
MTU—Maximum transmission unit of the path metric. This redistribution metric must be specified if the Default Metric is nil.
Metric Default Area
Default Metric—Default metric used for route redistribution. This metric is used when and explicit metric is not given during route redistribution process.
Edit Redistribution Table Area
This area allows changes to be made to the attributes shown in the Redistribution Table. These attributes are discussed in detail in the "Redistribution Table Area" section.
Protocol—Source routing protocol from which routes are being distributed into EIGRP.
Source ID—Identifies the routing process from which routes are being distributed.
Bandwidth—Bandwidth metric.
Reliability—Reliability metric.
MTU—Maximum transmission unit of the path metric.
Add button—Enables route redistribution from another IP routing process into the EIGRP routing domain. Routes may be learned from an IS-IS, OSPF, or BGP routing process.
Delete button—Disables route redistribution from another IP routing process into the EIGRP routing domain.
Distribution List Tab
Figure 6-69 shows the Distribution List tab of the C6576M EIGRP dialog box.
Figure 6-69 Distribution List Tab of the C6576M EIGRP Dialog Box
Distribution List Table Area
This area describes filtering of routing updates sent or received by the routing process.
ACL ID—Unique identifer of an ACL for filtering routing updates sent or received by a routing process. The ACL specifies which network routes will be permitted or denied in routing updates. This field has the following values:
<1-199>—IP standard access list number.
<1300-2699>—IP expanded access list number.
alphanumeric—Named access list.
Direction—Indicates whether the filter will be applied against routing updates received by the routing process or advertised by the routing process.
in—Applies to updates received.
out—Applies to updates advertised.
Interface—Identifies a particular interface that the filter is applied to. For an incoming filter, suppresses routing updates received on a specific interface; if not specified, routing updates are suppressed on all interfaces. For an outgoing filter, suppresses routes from being advertised on a particular interface; if not specified, route advertisements are suppressed on all interfaces.
Null 0
FastEthernet <slot>/<port>
GigabitEthernet <slot>/<port>
GE-WAN <slot>/<port>
POS <slot>/<port>
ATM <slot>/<subslot>/<port>
Port-channel <n>
VLAN <n>
Protocol—Source routing protocol from which routes are being distributed into EIGRP.
Source ID—Identifies a specific routing process instance that redistributed routes are derived from.
Edit Distribution List Table Area
This area allows changes to be made to the Distribution Table:
ACL ID—Unique identifer of an ACL for filtering routing updates sent/received by a routing process.
Interface—Identifies a particular interface that the filter is applied to.
Protocol—Source routing protocol from which routes are being distributed into EIGRP.
Direction—Indicates whether the filter will be applied against routing updates received by the routing process or advertised by the routing process.
Source ID—Identifies a specific routing process instance that redistributed routes are derived from.
Add button—Specifies a filter for suppressing or allowing distribution of network routes through EIGRP routing process.
Delete button—Removes a filter for suppressing or allowing distribution of network routes through EIGRP routing process.
Additional Notes Tab
Figure 6-70 shows the Additional Notes tab of the C6576M EIGRP dialog box.
Figure 6-70 Additional Notes Tab of the C6576M EIGRP Dialog Box
Notes Area
The Notes area is a text box that allows you to type in additional notes for the object.
C6576M IS-IS Dialog Box
The C6576M IS-IS dialog box provides information on the OSI Intermediate System to Intermediate System (IS-IS) routing process on a Catalyst 6000/6500 series switch or Cisco 7600 series Internet Router. This dialog box is launched from the Software object or IS-IS objects within the Manager containment view.
Details Tab
Figure 6-71 shows the Details tab of the C6576M IS-IS dialog box.
Figure 6-71 Details Tab of C6576M IS-IS Dialog Box
Global Area
The Global area of the C6576M IS-IS dialog box provides the following information:
CLNS Enabled—Indicates whether or not CLNS routing is enabled on the device. CLNS routing must be enabled for the IS-IS routing process to function. If CLNS routing is disabled, some attributes of the IS-IS object may not be accessible.
IS-IS Area
The IS-IS area of the C6576M IS-IS dialog box provides the following information:
Area Tag—IS-IS routing process area tag. Mandatory if configuring multiarea IS-IS; otherwise, it is optional. If no tag is specified, the default null tag is assumed.
Level—Describes whether the routing process performs Layer 1, Layer 1 and Layer 2, or Layer 2 only routing. By default, the first IS-IS routing process created on a device is set to perform Layer 1 and Layer 2 routing; any other processes created will by default be configured to perform Layer 1 routing only.
Note There may be, at most, one process on the device performing Layer 2 routing;
this process can also perform Layer 1 routing. There may be up to 29
additional routing processes performing Layer 1 only routing.
Configuring IS-IS Area
The Configuring IS-IS area allows you to create an IS-IS routing process on the managed device and deploy an instance of the IS-IS object in the element manager.
New Area Tag—IS-IS routing process area tag. Mandatory if configuring multiarea IS-IS; otherwise, it is optional. If no tag is specified, the default null tag is assumed.
Add New IS-IS button—Creates an IS-IS routing process on the managed device.
Remove IS-IS button—Deletes the currently selected IS-IS object.
Network Area
The Network area of the C6576M IS-IS dialog box provides the following information:
Network Table—Describes the Network Entity Titles for an IS-IS routing process. The NETs define the area addresses for the IS-IS area and the system ID of the router. There must be at least one entry in this table in order for the IS-IS routing process to be functional. This table displays the following columns:
AFI—Authority and Format Identifier (AFI). This is the first byte in the IS-IS NSAP Area Identifier.
Area Address—Area Address of the NET. Identifies the IS-IS routing area that the routing process participates in.
System-ID—System ID of the NET. Unique identifier of the device in the routing area.
N-Selector—n-selector portion of the NET. Occupies the last byte of NET. Value is always 00.
Edit Network Table Subarea
This subarea allows you to modify the Network Table. The Add and Remove buttons adds a NET address and removes a NET address from the IS-IS routing process, respectively. The following parameters must be specified.
AFI
Area Address
System ID
Status Field
The Status display-only field located at the bottom of the window indicates the current state of the object. This field has the following values:
decommissioned—CEMF is not actively monitoring the object attributes.
normal—Presence polling of the object.
normallostcomms—CEMF has lost communication with the device from the normal state.
Interfaces Tab
Figure 6-72 shows the Interfaces tab of the C6576M IS-IS dialog box.
Figure 6-72 Interfaces Tab of C6576M IS-IS Dialog Box
Interface List Area
The Interface List area of the C6576M IS-IS dialog box lists the interfaces supported by a given IS-IS routing process. This table will be empty if CLNS routing is not enabled on the managed device. The table contains one column:
Description—Identifies the supported interface. The interface may be an Ethernet, FastEthernet, or GigabitEthernet. The interface may also be an Ethernet portchannel group or virtual LAN.
Redistribution Tab
Figure 6-73 shows the Interfaces tab of the C6576M IS-IS dialog box.
Figure 6-73 Redistribution Tab of C6576M IS-IS Dialog Box
Redistribution Table Area
The Redistribution Table area of the C6576M IS-IS dialog box describes the route redistribution configuration of an IS-IS routing process.
Protocol—Source routing protocol from which routes are learned and redistributed into the IS-IS area.
Source ID—This identifies the routing process.
BGP—An autonomous system number, which is a 16-bit decimal number.
EIGRP—Same as BGP.
OSPF—An appropriate OSPF process ID from which routes are to be redistributed. This value takes the form of a non-zero decimal number.
Metric—IS-IS metric used for the redistributed route.
Edit Redistribution Table Area
The Edit Redistribution Table area of the C6576M IS-IS dialog box allows you to enable or disable route redistribution from another IP routing process into the IS-IS area. The following parameters must be given:
Protocol
Source ID
Metric
The Add and Remove buttons enable and disable route redistribution from another IP routing process into the IS-IS area, respectively.
Note Explicit route redistribution from another IS-IS process is not allowed,
however, routes may be learned from a BGP, EIGRP, or OSPF routing process.
Additional Notes Tab
Figure 6-74 shows the Additional Notes tab of the C6576M IS-IS dialog box.
Figure 6-74 Additional Notes Tab of the C6576M IS-IS Dialog Box
Notes Area
The Notes area is a text box that allows you to type in additional notes for the object
C6576M NDE Configuration Dialog Box
The C6576M NDE Configuration dialog box provides information on the Netflow Data Export (NDE) configuration on a Catalyst 6000 family switch or a Cisco 7600 series Internet Router. There is only one instance of this class per managed device.
NDE makes traffic statistics available for analysis by an external data collector. You can use NDE to monitor all Layer 3 switched and all routed IP unicast traffic.
This dialog box is launched from the Software object or the NDE object within the Manager containment view.
Details Tab
Figure 6-75 shows the Details tab of the C6576M NDE dialog box. The following attributes are shown in this tab:
Destination IP—IP address of destination Netflow Collector where NDE packets are sent to.
Destination Port—UDP port number of destination Netflow Collector where NDE packets are delivered to.
Figure 6-75 Details Tab of C6576M NDE Dialog Box
PFC Area
The PFC area of the C6576M NDE dialog box provides the following information:
PFC NDE Status—Indicates whether or not NDE is enabled for the export of statistics on Layer 3-switched traffic collected in the PFC cache.
Source IP—Source IP address in the NDE packets delivered by the PFC to the Netflow Collector. These packets deliver statistics on the Layer 3-switched traffic.
Source Port—Egress port on the router used to export Layer 3-switched traffic statistics from the PFC cache.
Version—NDE version supported by the PFC for collected traffic statistics. NDE uses NDE version 7 to export the statistics captured on the PFC for Layer 3-switched traffic.
MSFC Area
The MSFC area of the C6576M NDE dialog box provides the following information:
MSFC NDE Status—Indicates whether or not NDE is enabled for the export of statistics on routed traffic flows from the MSFC cache.
Interface—Interface used as the source of the NDE packets containing statistics from the MSFC. These statistics describe the routed flows. The source interface must have an IP address. It may be a loopback interface.
Version—NDE version used for collection of routed traffic flow statistics on the MSFC. NDE can use NDE version 1, 5, or 6 to export the statistics captured on the MSFC for routed traffic.
Configuration Area
The Configuration area of the C6576M NDE dialog box allows you to modify the following attributes:
PFC Source IP—The NDE source IP address must be an unused address from the subnet of a router interface, and cannot be an address currently used by the interface. You cannot use an address from a subnet on a loopback interface.
PFC Version—NDE version supported by the PFC for collected traffic statistics.
MSFC Interface—Interface used as the source of the NDE packets containing statistics from the MSFC.
Dest. IP—IP address of destination Netflow Collector where NDE packets are sent to.
Dest. Port—UDP port number of destination Netflow Collector where NDE packets are delivered to.
The configuration attributes are modified by clicking the following buttons:
PFC Modify button—Modifies the source address used in the NDE packets containing statistics from the PFC.
MSFC Modify button—Modifies the source interface for NDE packets containing statistics on routed flows exported from the MSFC cache.
Dest. Modify button—Modifies the NDE destination host IP address and UDP port.
Enable NDE button—Enables the export of traffic statistics on Layer 3-switched and routed flows that have expired or been purged from the MSFC and PFC caches.
Note To enable NDE, several parameters must be configured: the source interface
for NDE packets containing statistics on routed flows exported from the
MSFC cache; the desination address and port of the Netflow Collector; and an
IP route cache on the MSFC source interface.
Disable NDE button—Disables NDE flow export on Layer 3-switched and routed flows.
Status Field
The Status display-only field located at the bottom of the window indicates the current state of the object. This field has the following values:
decommissioned—CEMF is not actively monitoring the object attributes.
normal—Presence polling of the object.
normallostcomms—CEMF has lost communication with the device from the normal state.
NDE Filters Tab
Figure 6-76 shows the NDE Filters tab of the C6576M NDE Configuration dialog box.
Figure 6-76 NDE Filters Tab of C6576M NDE Configuration Dialog Box
Include Area
This area allows you to specify include parameters for the NDE flow filters. This area consists of the following parameters:
Source IP—Include flow filter source host IP address.
Source Mask—Include flow filter source IP wildcard mask.
Source Port—Include flow filter source port.
Dest. IP—Include flow filter destination host IP address.
Dest. Mask—Include flow filter destination IP wildcard mask.
Dest. Port—Include flow filter destination port.
Protocol—Include flow filter protocol.
Exclude Area
This area allows you to specify exclude parameters for the NDE flow filters. This area consists of the following parameters:
Source IP—Exclude flow filter source host IP address.
Source Mask—Exclude flow filter source IP wildcard mask.
Source Port—Exclude flow filter source port.
Dest. IP—Exclude flow filter destination host IP address.
Dest. Mask—Exclude flow filter destination IP wildcard mask.
Dest. Port—Exclude flow filter destination port.
Protocol—Exclude flow filter protocol.
Configuration Area
This area allows you to modify all the parameters for the NDE flow filter, or to remove the filter.
Source IP
Source Mask
Source Port
Dest. IP
Dest. Mask
Dest. Port
Filter Type—Choose from the drop-down menu:
include
exclude
Protocol—Choose the flow filter protocol:
none
tcp
udp
The following buttons implement the configuation changes:
Modify Filter—Applies the NDE configuration changes.
Remove Filter—Removes a configured NDE Include or Exclude Flow Mask filter.
Additional Notes Tab
Figure 6-77 shows the Additional Notes tab of the C6576M NDE Configuration dialog box.
Figure 6-77 Additional Notes Tab of the C6576M NDE Configuration Dialog Box
Notes Area
The Notes area is a text box that allows you to type in additional notes for the object
C6576M STP Dialog Box
The C6576M STP dialog box provides information on the global Spanning Tree Protocol configuration on a managed Catalyst 6000 family switch or Cisco 7600 series Internet Router. This dialog box is launched from the Software object or STP object within the Manager containment view.
Details Tab
Figure 6-78 shows the Details tab of the C6576M STP dialog box.
Figure 6-78 Details Tab of C6576M STP Dialog Box
Details Area
The Details area of the C6576M STP dialog box provides the following information:
BackboneFast Enabled—Indicates whether or not the BackboneFast capability is enabled on the device. Applies to all STP instances running on the device.
UplinkFast Enabled—Indicates whether or not the UplinkFast capability is enabled on the device. Applies to all STP instances running on the device.
PortFast BPDU Guard Enabled—Indicates whether or not the PortFast BPDU guard is enabled on the device. Applies to all STP instances running on the device.
STP Cost Mode—Indicates the type of spanning tree path cost mode configured on the device. Applies to all STP instances running on the device. When the value is changed, the path cost of all ports will be reassigned to the default path cost values based on the new spanning tree path cost mode and ports' speed. This attribute may have the following values:
short
long
Station-Learning Generating Rate—The maximum number of station-learning frames that the device will generate in each 100-milisecond period after an UplinkFast transition. Applies to all STP instances running on the device.
Status Field
The Status display-only field located at the bottom of the window indicates the current state of the object. This field has the following values:
decommissioned—CEMF is not actively monitoring the object attributes.
normal—Presence polling of the object.
normallostcomms—CEMF has lost communication with the device from the normal state.
Additional Notes Tab
Figure 6-79 shows the Additional Notes tab of the C6576M STP dialog box.
Figure 6-79 Additional Notes Tab of the C6576M STP Dialog Box
Notes Area
The Notes area is a text box that allows you to type in additional notes for the object.
C6576M ACL Configuration Dialog Box
The C6576M ACL dialog box describes a numbered or named access control list (ACL) on a Catalyst 6000/6500 series switch or Cisco 7600 series Internet Router. The C65/76M Controller supports standard and extended, named or numbered ACLs.
Details Tab
Figure 6-80 shows the Details tab of the C6576M ACL dialog box.
Figure 6-80 Details Tab of C6576M ACL Dialog Box
The Details tab of the C6576M ACL dialog box displays the following:
ACL—Numeric or string identifier of an ACL. This attribute, along with Type attribute below, makes up the unique identifier of the ACL on the managed device.
Type—Indicates the type of ACL: standard or extended.
Remove Current ACL button—Deletes the currently selected ACL object and remove the referenced ACL from the managed device. The filters defined in the ACL will automatically be disabled against the incoming/outgoing routing updates of any routing process that references the ACL in its route distribution list.
Add New ACL button—Displays the subdialog box, shown in Figure 6-81, which allows you to create a named or numbered, standard or extended Access Control List on the managed device and deploy an instance of the ACL object in the element manager.
The ACL instance will be deployed with the object name "ACL-<id>". The following fields are displayed in the ACL Add subdialog box:
ACL—Numeric or string identifier of an ACL.
Type—Indicates the type of ACL: standard or extended.
Remark—Mandatory comment that describes the access list entry, up to 100 characters long.
Figure 6-81 ACL Add Dialog Box
Filter Table Area
The Filter Table area of the C6576M ACL dialog box describes permit/deny filters or remark entries of an ACL. The order of entries in the list is relevant; filters are applied in the order they appear in the list.
Note Removing the last entry from a numbered ACL deletes the ACL on the
managed device.
The list of filters is shown in the text box. Selecting one of the entries in the text box displays a description of the filter to the right of the box.
A permit entry defines a filter for permitting a traffic flow. Filter entries are structured according to the syntax defined for standard or extended ACLs.
A deny entry defines a filter for blocking a traffic flow.
A remark entry is a free-form text entry up to 100 characters. It is generally a comment describing the ACLs entries which follow it sequentially in the ACL.
Filters can be configured using the following buttons:
Remove Permit/Deny Filter—Removes an entry from a named or numbered, standard or extended ACL. The entry may be a permit or deny filter. Entries may be removed from the ACL in any order.
Add Filter button—Launches the Add Filter subdialog box, shown in Figure 6-82, to append a permit or deny filter to an ACL. On a standard ACL, a filter may only be defined against traffic flows originating from a source host or range of hosts. On an extended ACL, filters may be defined against specific traffic types, against the source or destination of a traffic flow, and against specific source or destination TCP or UDP ports.
Figure 6-82 Add Filter Dialog Box
The following fields are displayed in this Add Filter subdialog box:
Criteria—filter type:
permit—Filter allows packets in a traffic flow if the filter conditions are met.
deny—Filter blocks packets in a traffic flow if the filter conditions are met.
Protocol—Name or number of an IP protocol to apply an extended ACL filter to. To match any Internet protocol (including ICMP, TCP, and UDP) use the keyword "ip". This argument is not applicable when creating standard ACL filters, and mandatory for extended ACL filters.
Source IP—Number of the network or host from which the packet is being sent.
Source Mask—Bitmask used in combination with Source IP to specify a host address or a range of addresses to apply filter. Place ones in the bit positions you want to ignore.
Source Operand—Comparison operator for source TCP or UDP ports. The range operator requires two source ports, all others require a single port. This is an optional argument that is only applicable when creating extended ACL filters against TCP or UDP traffic. The following values are available:
none
lessThan
equal
greaterThan
notEqual
range
Source Port—The decimal number or name of a source TCP or UDP port. TCP port names can only be used when filtering TCP. UDP port names can only be used when filtering UDP.
Destination IP—Number of the network or host to which the packet is being sent.
Destination Mask—Bitmask used in combination with Destination IP to specify a host address or a range of addresses to apply filter.
Destination Operand—Comparison operator for destination TCP or UDP ports.
Destination Port—The decimal number or name of a destination TCP or UDP port.
Remark—Comment that describes the access list entry, up to 100 characters long.
Add Filter button—Appends a permit or deny filter to an ACL.
Status Field
The Status display-only field located at the bottom of the window indicates the current state of the object. This field has the following values:
decommissioned—CEMF is not actively monitoring the object attributes.
normal—Presence polling of the object.
normallostcomms—CEMF has lost communication with the device from the normal state.
Additional Notes Tab
Figure 6-83 shows the Additional Notes tab of the C6576M ACL dialog box.
Figure 6-83 Additional Notes Tab of the C6576M ACL Configure Dialog Box
Notes Area
The Notes area is a text box that allows you to type in additional notes for the object
C6576M Loopback Dialog Box
The C6576M Loopback dialog box describes the deployment of all loopback interfaces on a Catalyst 6000/6500 series or Cisco 7600 series Internet Router. This dialog box is launched from the Software object or Loopback object within the Manager containment view.
Configuration Tab
Figure 6-84 shows the Configuration tab of the C6576M Loopback dialog box.
Figure 6-84 Configuration Tab of C6576M Loopback Dialog Box
Loopback Area
The Loopback area of the C6576M Loopback dialog box provides the following information:
Loopback Interface Table—Lists the loopback interfaces that have been deployed on the device. The following attribute is displayed in this table:
Index—Free index. Unique identifier of a Loopback interface in the device.
Description—Description of the interface corresponding to the index selected in the Loopback Interface Table.
Layer 3 Subarea
IP Address—IP address of the interface. A value of 0.0.0.0 indicates that no IP address has been configured on the interface.
Netmask—IP subnet mask of the interface. The value of the mask is an IP address with all the network bits set to 1 and all the host bits set to 0.
Routing Protocol Subarea
ISIS Area Tag—Identifies the IS-IS routing area that the Loopback participates in. If mutli-area IS-IS is configured on the device, the IS-IS area must be named. Otherwise, this value may be an implicit null tag. This attribute is only valid if the IS-IS Enabled attribute is true (1).
ISIS Enabled—Indicates whether or not IS-IS routing is enabled on the interface. IS-IS routing can only be enabled if the loopback interface has been assigned an IP address.
Create Loopback Subarea
Loopback Index—Unique identifier of a new loopback interface to be deployed on the device.
Create button—Deploys on the managed device a loopback interface identified by the Loopback Index field. The newly added loopback interface will be displayed in the Loopback Interface Table.
Additional Notes Tab
Figure 6-85 shows the Additional Notes tab of the C6576M Loopback dialog box.
Figure 6-85 Additional Notes Tab of the C6576M Loopback Dialog Box
Notes Area
The Notes area is a text box that allows you to type in additional notes for the object.
C6576M QoS Dialog Box
The C6576M QoS dialog box describes the global quality of service (QoS) engine process on a Catalyst 6000/6500 series or Cisco 7600 series Internet Router. This dialog box is launched from the Software object or QoS objects within the Manager containment view.
Details Tab
Figure 6-86 shows the Details tab of the C6576M QoS dialog box.
Figure 6-86 Details Tab of C6576M QoS Dialog Box
Details Area
The Details area of the C6576M QoS dialog box provides the following information:
QoS Enabled—Indicates whether or not QoS is enabled on the device. By default, enabling QoS globally also enables QoS on each physical and logical IP interface unless explicitly disabled on the individual interfaces. These are the possible values for this attribute:
true—QoS is enabled.
false—QoS is not enabled.
Microflow Enabled—Indicates whether or not Microflow policing is enabled on the device. This enables QoS policing against Layer 3 switched traffic flows. This feature can only be enabled when QoS is enabled. By default, it will be automatically enabled if global QoS is enabled. These are the possible values for this attribute:
true—Microflow is enabled.
false—Microflow is not enabled.
Add Policy Map button Launches a subdialog box, shown in Figure 6-87, to create a policy map on the managed device. A policy map defines trust states and policers to enforce QoS parameters against traffic selected by defined class map criteria. The following attribute is shown in this subdialog box:
Policy Name—Unique identifier of the new policy map to be deployed on the device.
Add Policy button—Creates a policy map on the managed device.
Figure 6-87 Add Policy Map Subdialog Box of the C6576M QoS Dialog Box
Named Aggregate Tab
Figure 6-88 shows the Named Aggregate tab of the C6576M QoS dialog box.
Figure 6-88 Named Aggregate Tab of C6576M QoS Dialog Box
Named Aggregate Area
The Named Aggregate area of the C6576M QoS dialog box describes the named aggregate policers defined globally on the device. This tab contains the following information attributes:
Named Policers table—Lists by aggregate name the named aggregate policers defined globally on the device. This table displays the following:
Aggregate Name—Unique identifier of a named aggregate policer on the managed device.
Rate—Maximum transmission rate (in bits per second) to enforce against policed traffic.
Burst—Normal burst size in bytes to enforce against policed traffic.
Max. Burst—Maximum burst size in bytes to enforce against policed traffic. A value of 0 indicates that a maximum burst size has not been specified.
Note The Max. Burst feature is not supported in 12.1(6)E and earlier.
Conform Action Area
The Named Aggregate area of the C6576M QoS dialog box describes the named aggregate policers defined globally on the device. This tab contains the following information:
Conform Action—Action to be taken when traffic conforms to QoS parameters. This attribute has one of the following values:
Drop—Drops packet
Transmit—Transmits packet
Set DSCP—Assigns DSCP value to packet before it is transmitted.
Set Precedence—Assigns IP Precedence value to packet before it is transmitted.
Set DSCP—Integer DSCP value assigned to packets of conforming ingress traffic before transmitting on egress interfaces. This value is only relevant and will only be set in the running configuration of the device if the Conform Action attribute is Set DSCP.
Set IP Precedence—IP Precedence integer value assigned to packets of conforming ingress traffic before transmitting on egress interfaces. This value is only relevant and will only be set in the running configuration of the device if Conform Action is Set Precedence.
Exceed Action—Action to be taken when traffic exceeds QoS parameters. This atttribute has one of the following values:
Drop—Drops packet.
Policed DSCP Transmit—Changes the DSCP as per the policed DSCP map before transmitting.
Transmit—Transmits packet.
A value of none (0) indicates an exceed action has not been specified.
Violate Action—Action to be taken when traffic violates QoS parameters. This atttribute has one of the following values:
Drop—Drops packet.
Policed DSCP Transmit—Changes the DSCP as per the policed DSCP map before transmitting.
Transmit—Transmits packet.
A value of none (0) indicates that a violate action has not been specified.
Note The Violate Action feature is not supported in IOS 12.1(6)E and earlier.
New Policer button—Creates an aggregrate policer on the managed device with the specified rate, burst, and max-burst values.
Remove button—Deletes one or more aggregrate policers on the managed device selected in the Named Policers Table.
Class Maps Tab
Figure 6-89 shows the Class Maps tab of the C6576M QoS dialog box.
Figure 6-89 Class Maps Tab of C6576M QoS Dialog Box
Class Maps Area
The Class Maps area of the C6576M QoS dialog box describes globally defined class maps on the device. Class maps identify a selected stream of IP traffic based on a defined set of matching criteria. This tab contains the following information:
Class Maps Table—Lists globally defined class maps on the device.
Class Map Name—Unique identifier of a class map on the managed device.
Type—Indicates whether the class map can be used on Ethernet interfaces or not. The C65/76M EMS will discover class maps that are not suitable for use with Ethernet interfaces, however you cannot add, remove, or configure these class maps. They are listed in the table only to indicate that the class map names are in use. This attribute has one of the following values:
ethernet—The class map can be used on Ethernet interfaces.
other—Indicates that a class map contains more than one match entry or it contains a match criteria that is unsupported on Ethernet interfaces.
empty—Indicates a class map with no match entries. An empty class map cannot be applied to an Ethernet interface, however you may modify it.
Match Condition—Specifies whether to match all criteria in the class map or any criteria in the list.
Match IP Precedence—Specifies IP Precedence values to match. Up to eight values may be specified. If no values are specified, IP Precedence matching criteria is disabled. This attribute may only have a value if the Type attribute is ethernet (1) and both Match DSCP and Match ACL attributes are nil.
Match DSCP—Specifies DSCP values to match. Up to eight values may be specified. If no values are specified, DSCP matching criteria is disabled. This attribute may only have a value if the Type attribute is ethernet and both Match IP Precedence and Match ACL attributes are nil.
Match ACL—Identifier of a named or numbered (standard or extended) ACL. In no identifier is specified, the ACL matching criteria is disabled. The named or numbered ACL must be configured on the device before this class map can be associated with an interface. The device will not detect an invalid class map until you associate the class map with an Ethernet interface. This attribute may only have a value if the Type attribute is ethernet and both Match IP Precedence and Match DSCP attributes are nil.
Add New button—Launches a subdialog box, shown in Figure 6-90, to create a class map on the managed device. The subdialog box contains the following attribute:
Class Map Name—Unique identifier of the class map to be added on the device.
Add button—Creates the class map specified by the Class Map Name attribute.
Figure 6-90 Add Class Map Subdialog Box of the C6576M QoS Dialog Box
Remove button—Deletes from the managed device one or more class maps selected in the Class Map Table. The C65/76M will only allow an Ethernet class map to be removed.
Additional Notes Tab
Figure 6-91 shows the Additional Notes tab of the C6576M QoS dialog box.
Figure 6-91 Additional Notes Tab of the C6576M QoS Dialog Box
Notes Area
The Notes area is a text box that allows you to type in additional notes for the object.
C6576M QoS Policy Map Dialog Box
The C6576M QoS Policy Map dialog box describes a quality of service (QoS) policy map on a Catalyst 6000/6500 series or Cisco 7600 series Internet Router. A policy map consists of one or more traffic filters defined by class maps. This dialog box is launched from the Software object or QoS Policy Map objects within the Manager containment view.
Policy Map Tab
Figure 6-92 shows the Policy Map tab of the C6576M QoS Policy Map dialog box.
The Details area of the C6576M QoS Policy Map dialog box provides the following information:
Policy Map Name—Unique identifier of the policy map on the device.
Create Policy Map button—Launches the Policy Map Add subdialog box, shown in Figure 6-93, to create a policy map class entry in the referenced policy maps and defines at least one policer for the entry. The following is shown in this subdialog box:
Policy Map Name—Unique identifier of the policy map on the device.
Add button—Adds the Policy Map specified by Policy Map Name.
Remove Policy Map button—Deletes from the managed device one or more policy maps selected in the object list of the QoS Policy Map dialog. A subdialog box is launched asking you to confirm the delete action.
The Policy Class List area of the C6576M QoS Policy Map dialog box provides the following information:
Policy Class List Table—Describes the policy map class entries. The following attributes are displayed in this table:
Policy Class Map Name—Unique identifier of a class map on the device. The class map defines the criteria for filtering traffic that the policers will enforce QoS parameters against.
Remove Class button—Removes one or more class map entries from a policy map. This also removes the trust state and policers associated with the class map entries.
Add Class button—Launches the Policy Map Add subdialog box, shown in Figure 6-95, to create a policy map class entry in the referenced policy maps and defines at least one policer for the entry.
Figure 6-95 Policy Map Add Class Subdialog Box of C6576M QoS Policy Map Dialog Box
The following is shown in this subdialog box.
Class Name Area
ClassName Table—Lists the classes by the Class Map Name.
Class Map Name—Unique identifier of the policy map class on the device.
Type—Indicates whether the selected class map can be used on Ethernet interfaces or not. The C65/76M EMS will discover class maps that are not suitable for use with Ethernet interfaces, however you cannot add, remove, or configure these class maps. They are listed in the table only to indicate that the class map names are in use. This attribute has one of the following values:
ethernet—The class map can be used on Ethernet interfaces.
other—Indicates that a class map contains more than one match entry or it contains a match criteria that is unsupported on Ethernet interfaces.
empty—Indicates a class map with no match entries. An empty class map cannot be applied to an Ethernet interface, however you may modify it.
Aggregate Policer
Aggregate Enabled— Indicates whether or not an explicit policer is defined for the policy map class. This enables QoS policing against Layer-3 switched traffic flows.
Named Aggregate—Unique string identifier of an aggregate policer on the device. This value is nil if an explicit aggregate policer is defined within this policy map class.
Rate—Maximum transmission rate, in bits per second, to enforce against policed traffic. This value is mandatory when defining an explicit policer. A value of 0 is returned on read if an explicit policer is not defined for the policy map class.
Burst—Normal burst size, in bytes, to enforce against policed traffic. This value is mandatory when defining an explicit policer. A value of 0 is returned on read if an explicit policer is not defined for the policy map class.
Microflow Policer
Microflow Enabled—Indicates whether or not a Microflow policer is defined for the policy map class. This enables QoS policing against Layer-3 switched traffic flows. This attribute may have one of the following values:
true
false
Rate—Maximum transmission rate, in bits per second, to enforce against policed traffic. This value is mandatory when defining an explicit policer. A value of 0 is returned on read if an explicit policer is not defined for the policy map class.
Burst—Normal burst size, in bytes, to enforce against policed traffic. This value is mandatory when defining an explicit policer. A value of 0 is returned on read if an explicit policer is not defined for the policy map class.
Add button—Adds the class map onto the device.
Policing Info Area
The Policing Info area of the C6576M QoS Policy Map dialog box provides the following information:
Trust State—Trust state associated with the traffic selected by the class map criteria. If no trust state is defined, the trust state configured on the ingress interface is used instead. The possible values of this attribute are:
untrusted
dscp
cos
ip-precedence
Aggregate Policing Subarea
Aggregate Enabled— Indicates whether or not an explicit policer is defined for the policy map class. This enables QoS policing against Layer-3 switched traffic flows.
Named Aggregate—Unique string identifier of an aggregate policer on the device. This value is nil if an explicit aggregate policer is defined within this policy map class.
Rate—Maximum transmission rate, in bits per second, to enforce against policed traffic. This value is mandatory when defining an explicit policer. A value of 0 is returned on read if an explicit policer is not defined for the policy map class.
Burst—Normal burst size, in bytes, in bytes to enforce against policed traffic. This value is mandatory when defining an explicit policer. A value of 0 is returned on read if an explicit policer is not defined for the policy map class.
Max. Burst—Maximum burst size, in bytes, in bytes to enforce against policed traffic.A value of 0 is returned on read if an explicit policer is not defined for the policy map class.
Note The Max. Burst attribute is not supported in 12.1(6)E and earlier.
Exceed Action—Action to be taken when policed traffic exceeds QoS parameters.
Drop—Drops packet.
Policed DSCP Transmit—Changes the DSCP as per the policed DSCP map before transmitting.
Transmit—Transmits packet.
A value of none (0) is returned on read if an explicit policer is not defined for the policy map class.
Violate Action—Action to be taken when policed traffic violates QoS parameters.
Drop—Drops packet.
Policed DSCP Transmit—Changes the DSCP as per the policed DSCP map before transmitting.
Transmit—Transmits packet.
A value of none (0) is returned on read if an explicit policer is not defined for the policy map class or a violate action has not been explicitly configured for the policy map class.
Note The Policy Violate Action is not supported in IOS 12.1(6)E and earlier.
Conform Action Subarea
Conform Action—Action to be taken when Policed traffic conforms to QoS parameters. This attribute may have one of the following values:
Drop—Drops packet
Transmit—Transmita packet
Set DSCP—Assigns DSCP value to packet before it is transmitted.
Set Precedence—Assigns IP Precedence value to packet before it is transmitted.
A value of none (0) is returned on read if an explicit policer is not defined for the policy map class.
Set DSCP—DSCP value assigned to packets of conforming ingress traffic before transmitting on egress interfaces.This value is only relevant and will only be set in the running configuration of the device if the Policy Conform Action is Set DSCP. A value of 0 is returned on read if an explicit policer is not defined for the policy map class or the conform action is not Set DSCP.
Set IP Precedence—IP Precedence value assigned to packets of conforming ingress traffic before transmitting on egress interfaces. This value is only relevant and will only be set in the running configuration of the device if the Policy Conform Action is Set Precedence. A value of 0 is returned on read if an explicit policer is not defined for the policy map class or the conform action is not Set Precedence.
Microflow Policing Subarea
Microflow Enabled—Indicates whether or not a Microflow policer is defined for the policy map class. This enables QoS policing against Layer 3 switched traffic flows. This attribute may have one of the following values:
true
false
Rate—Maximum transmission rate, in bits per second, to enforce against policed traffic. This value is mandatory when defining an explicit policer. A value of 0 is returned on read if an explicit policer is not defined for the policy map class.
Burst—Normal burst size, in bytes, to enforce against policed traffic. This value is mandatory when defining an explicit policer. A value of 0 is returned on read if an explicit policer is not defined for the policy map class.
Exceed Action—Action to be taken when policed traffic exceeds QoS parameters.
Drop—Drops packet.
Policed DSCP Transmit—Changes the DSCP as per the policed DSCP map before transmitting.
Transmit—Transmits packet.
A value of none (0) is returned on read if an explicit policer is not defined for the policy map class.
Conform Action Subarea
Conform Action—Action to be taken when Policed traffic conforms to QoS parameters. This attribute may have one of the following values:
Drop—Drops packet
Transmit—Transmits packet
Set DSCP—Assigns DSCP value to packet before it is transmitted.
Set Precedence—Assigns IP Precedence value to packet before it is transmitted.
A value of none (0) is returned on read if an explicit policer is not defined for the policy map class.
Set DSCP—DSCP value assigned to packets of conforming ingress traffic before transmitting on egress interfaces.This value is only relevant and will only be set in the running configuration of the device if the Policy Conform Action is Set DSCP. A value of 0 is returned on read if an explicit policer is not defined for the policy map class or the conform action is not Set DSCP.
Set IP Precedence—IP Precedence value assigned to packets of conforming ingress traffic before transmitting on egress interfaces. This value is only relevant and will only be set in the running configuration of the device if the Policy Conform Action is Set Precedence. A value of 0 is returned on read if an explicit policer is not defined for the policy map class or the conform action is not Set Precedence.
Additional Notes Tab
Figure 6-96 shows the Additional Notes tab of the C6576M QoS Policy Map dialog box.
Figure 6-96 Additional Notes Tab of the C6576M QoS Policy Map Dialog Box
Notes Area
The Notes area is a text box that allows you to type in additional notes for the object.