|
|

 |
Warning Before you install, operate, or service the system, read the Site Preparation and Safety Guide. This guide contains important safety information you should know before working with the system. |
This chapter provides installation and verification procedures for the Catalyst 5000 family supervisor engine. This chapter contains the following sections:
The following sections describe how to remove and install the Catalyst 5000 family supervisor engine:
 |
Note Catalyst 5500 series switches—When two supervisor engines are installed, hot swapping allows you to remove and replace one of the supervisor engines without turning off the system power. |
 |
Caution The supervisor engine is a required system component. If only one supervisor engine is present, removing a supervisor engine while the system is operating causes the system to halt. |
|
Caution To avoid erroneous failure messages, note the current configuration of all interfaces before you remove or replace another switching module, and allow at least 15 seconds for the system to reinitialize after a module has been removed or replaced. |
Use a flat-blade screwdriver to remove any filler (blank) modules and to tighten the captive installation screws that secure the modules in their slots. When you handle modules, use a wrist strap or other grounding device to prevent electrostatic discharge (ESD) damage. Refer to the Site Preparation and Safety Guide for ESD safety information. Refer to the Catalyst 5000 Family Installation Guide for ESD details including the locations of the ESD connectors on the Catalyst 5000 family switches.
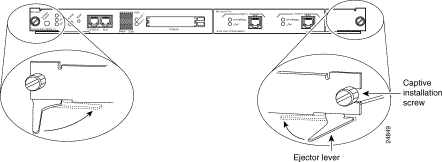
The ejector levers on the supervisor engine and switching modules align and seat the module connectors in the backplane (see Figure 3-1). If you fail to use the ejector levers to insert the module, you can disrupt the order in which the pins contact the backplane. Follow the removal and replacement instructions carefully.
When removing a module, use the ejector levers to ensure that the module connector pins disconnect from the backplane properly. Any supervisor engine or switching module that is only partially connected to the backplane can disrupt the system. Detailed instructions for removing and installing switching modules are described in the Catalyst 5000 Family Module Installation Guide.

Before you remove a supervisor engine, you should first upload the current configuration to a server. This saves time when bringing the module back online. You can recover the configuration by downloading it from the server to the nonvolatile memory of the supervisor engine.
|
Note When you install a new supervisor engine, check the factory default configuration; you might need to reconfigure the system to your requirements. You can do this manually, or if you previously uploaded the original configuration to a server, you can download it to the new supervisor engine. To download the current configuration, enter the download command. For additional information, refer to the Software Configuration Guide for your switch. |
To remove a supervisor engine, perform these steps:
Step 2 Use a screwdriver to loosen the captive installation screws at the left and right sides of the module.
Step 3 Grasp the left and right ejector levers; simultaneously pull the left lever to the left and the right lever to the right to release the module from the backplane connector.
Step 4 As you pull the module out of the slot, place one of your hands under the carrier to support it. Avoid touching the module itself.
Step 5 Carefully pull the module straight out of the slot, keeping one hand under the carrier to guide it. Keep the module at a 90-degree orientation to the backplane (horizontal to the floor).
Step 6 Place the removed module on an antistatic mat or antistatic foam.
Step 7 If the slot is to remain empty, install a module filler plate to keep dust out of the chassis and to maintain airflow through the module compartment.
|
Caution Always install a switching module filler plate in empty switching module slots to allow the air to flow across the modules. |
|
Note When you remove and replace the redundant supervisor engine, the system displays status messages on the console screen. The messages are for information only. Enter the show system and show module commands to view specific information. For additional information, refer to the Software Configuration Guide and Command Reference for your switch. |
When installing the supervisor engine, you must install it in a specific slot as follows:
|
Caution To prevent ESD damage, handle switching modules by the carrier edges only. |
|
Caution When removing or inserting a switching module, always wear an ESD wrist strap connected to the Catalyst 5000 family switch ESD wrist strap connector. |
To install the supervisor engine, follow these steps:
Step 2 To install the supervisor engine, hold the front panel with one hand, and place your other hand under the carrier to support the supervisor engine. Do not touch the printed circuit boards or connector pins.
Step 3 Align the edges of the supervisor engine carrier with the slot guides on the sides of the switch chassis.
Step 4 Pivot the two module ejector levers out away from the faceplate. The ejector levers are shown pivoted out in Figure 3-2.
Step 5 Placing one hand under the carrier to guide the supervisor engine, and carefully slide it into the slot on the Catalyst 5000 family switch until the ejector levers click into place on the chassis. Be sure to keep the module horizontal to the backplane and avoid touching any of the components on the module.
Step 6 Using the thumb and forefinger of each hand, simultaneously pivot in both ejector levers (see Figure 3-2) to fully seat the switching module in the backplane connector.
|
Caution Always use the ejector levers when installing or removing switching modules. A module that is partially seated in the backplane will cause the system to shut down and subsequently crash. |
Step 7 Use a screwdriver to tighten the captive installation screws at the left and right sides of the module.
This section describes how to remove and replace Supervisor Engine II G and III uplink modules. If you have a Supervisor Engine II G or III with an uplink module already installed and you are replacing the uplink module, use the procedure in the "Removing and Replacing an Uplink Module" section. If you are installing an uplink module into a supervisor engine with no uplink module, use the procedure in the "Installing an Uplink Module" section.
|
Note The uplink ports in the Supervisor Engine III G are not removable. |
Use this procedure to remove and replace an uplink module:
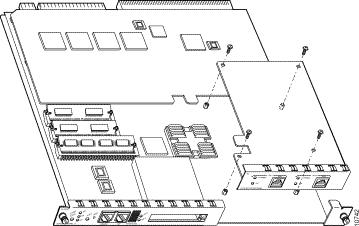
Step 2 Use a Phillips-head screwdriver to remove the four screws securing the uplink module to the supervisor engine, as shown in Figure 3-3.
Step 3 Carefully pull the uplink module up and out of the supervisor engine. Note that the rear of the uplink module connects to the supervisor engine through connectors on the bottom of the uplink module. Use care when unseating the uplink module from these connectors.
Step 4 Place the removed uplink module in an antistatic bag.
Step 5 Remove the new uplink module from its antistatic bag and install it in the supervisor engine. Use care when seating the rear of the uplink module into the connectors.
Step 6 Ensure that the uplink module is seated securely in the supervisor engine.
|
Caution Ensure that the module is seated securely before you install and tighten the securing screws. Using the screws to seat the module could warp the module. |
Step 7 Use a Phillips-head screwdriver to install the four screws that secure the uplink module to the supervisor engine.
Step 8 Install the supervisor engine into the Catalyst 5000 family switch by following the procedure in the "Installing the Supervisor Engine" section.
Use this procedure to install an uplink module in a supervisor engine with no uplink module:
Step 2 Use a Phillips-head screwdriver to remove the two screws securing the blank uplink module filler plate from the supervisor engine. Set the screws in a secure place because you will reuse them later.
Step 3 Use a Phillips-head screwdriver to remove the two screws from the two standoffs that will secure the rear of the uplink module. Set the screws in a secure place because you will reuse them later.
Step 4 Remove the new uplink module from its antistatic bag and install it in the supervisor engine. Use care when seating the rear of the uplink module into the connectors.
Step 5 Ensure that the uplink module is seated securely in the supervisor engine.
|
Caution Ensure that the module is seated securely before you install and tighten the securing screws. Using the screws to seat the module could warp the module. |
Step 6 Use a Phillips-head screwdriver to install the four screws that secure the uplink module to the supervisor engine (see Figure 3-3).
Step 7 Install the supervisor engine into the Catalyst 5000 family switch by following the procedure in the "Installing the Supervisor Engine" section.
The following sections describe how to install the NetFlow Feature Card (NFFC), NetFlow Feature Card II (NFFC II), and Route Switch Feature Card (RSFC). Feature cards are optional cards that you can install on your supervisor engine. The NFFC and NFFC II can be installed on the Supervisor Engine III. The RSFC can be installed on the Supervisor Engine II G and III G.
This section describes how to remove the existing EARL card on your Supervisor Engine III and replace it with the NFFC or NFFC II.
|
Caution The NFFC is supported in supervisor engine software release 4.1 and later. The NFFC II is supported in supervisor engine software release 4.3 and later. |
After you install the NFFC or NFFC II, you must boot to Catalyst 5000 family supervisor engine software release 4.1(1) or later for the NFFC or the Catalyst 5000 family supervisor engine software release 4.3(1a) for the NFFC II. We suggest that you perform the upgrade as follows:
Step 2 Set the boot environment variable to the new image using the set boot system flash command.
Step 3 Perform the hardware upgrade procedure.
Step 4 Reboot the system to the new image.
|
Note To support redundant operation, both Supervisor Engine III modules must have the NFFC or both Supervisor Engine III modules must have the NFFC II. |
|
Caution Use a wrist strap or other grounding device to prevent ESD damage. Refer to the Catalyst 5000 Family Installation Guide for ESD details including the locations of the ESD connectors on the Catalyst 5000 family switches. |
To remove the existing EARL card and install the NFFC or NFFC II in the Supervisor Engine module, follow this procedure:
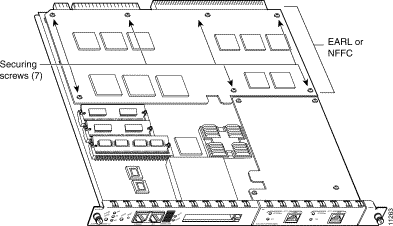
Step 2 Use a Phillips-head screwdriver to remove the seven screws securing the EARL card to the supervisor engine standoffs. See Figure 3-4 for screw locations.
Set the screws in a secure place so you can reuse them in Step 7.
Step 3 Carefully pull the EARL card up and out of the supervisor engine.
Note that the bus connectors on the bottom of the EARL card provide the interface to the supervisor engine. Be careful when unseating the EARL card from these connectors.
Step 4 Place the removed EARL card in an antistatic bag.
Step 5 Remove the NFFC or NFFC II from its antistatic bag and install it on the supervisor engine.
Be careful when seating the NFFC or NFFC II bus connectors to the supervisor engine; otherwise they can become damaged.
Step 6 Ensure that the NFFC or NFFC II is securely seated in the supervisor engine.
Step 7 Use a Phillips-head screwdriver to install the seven screws that secure the NFFC or NFFC II to the supervisor engine standoffs.
Step 8 Install the supervisor engine into the Catalyst 5000 family switch (refer to the Catalyst 5000 Family Installation Guide for installation instructions).
This section describes how to install the RSFC in your Supervisor Engine II G or III G.
|
Note To support redundant operation, both supervisor engines must be either Supervisor Engine II Gs or Supervisor Engine III Gs. |
|
Caution Use a wrist strap or other grounding device to prevent ESD damage. Refer to the Catalyst 5000 Family Installation Guide for ESD details including the locations of the ESD connectors on the Catalyst 5000 family switches. |
To install the RSFC in the supervisor engine, follow this procedure:
Step 2 Place the supervisor engine on an antistatic mat or bag.
Step 3 Remove the RSFC from its antistatic bag and install it on the supervisor engine (see Figure 3-5).
Be careful when seating the RSFC connectors to the supervisor engine; otherwise they can become damaged.
Step 4 Ensure that the RSFC is securely seated in the supervisor engine.
Step 5 Use a Phillips-head screwdriver to install the eight screws that secure the RSFC to the supervisor engine standoffs (see Figure 3-5 for screw and standoff locations).
Step 6 Install the supervisor engine into the Catalyst 5000 family switch (see the "Installing the Supervisor Engine" section for instructions).

|
Note For detailed information on configuring the Supervisor Engine III to boot from Flash memory, refer to the Software Configuration Guide for your switch. |
The Flash PC card slots on the front panel of Supervisor Engine III are for additional Flash memory. The Flash PC cards are available in two sizes: 16 and 20 MB. You can use this Flash memory to store and run software images, configuration files, or to serve as an I/O device.
The Supervisor Engine III has two Flash PC card slots:
The installation procedure is generic and can be used for a Flash PC card in either slot position.
|
Note You can insert and remove the Flash PC card with the power on. |
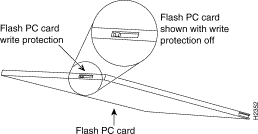
Before you install a Flash PC card, verify that the card is set with write protection off. The write-protect switch is located on the front edge of the card with the printing right side up and the edge connector end away from you. See Figure 3-6 for the switch location.
Use this procedure for installing and removing a Flash PC card:
Step 2 Insert the card into the appropriate slot until the card completely seats in the connector at the back of the slot and the eject button pops out toward you.
The card does not insert all the way inside the slot; a portion of the card remains outside the slot.
|
Note Do not attempt to force the card past this point. You might damage the card. |
Step 3 To eject a card, press the ejector button until the card is free of the connector at the back of the slot.
Step 4 Remove the card from the slot and place it in an antistatic bag.
|
Note For Flash PC card formatting instructions, refer to the Software Configuration Guide for your switch. |
This section describes how to connect a terminal to the supervisor engine console port. See "Cabling Specifications and Compliance Information," for port pinouts.
|
Note Supervisor Engines I and II do not support modem control or hardware flow control. |
The console port, located on the front panel of Supervisor Engines I and II, is shown in Figure 3-7.

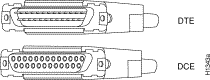
The console port is a DCE DB-25 receptacle, which supports a DCE EIA/TIA-232 interface. EIA/TIA-232 supports unbalanced circuits at signal speeds up to 64 kbps.
Use a null-modem cable to connect the switch to a remote DCE device, such as a modem or data service unit (DSU). Use a straight-through cable to connect the switch to a DTE device, such as a terminal or PC. See Figure 3-8 for DCE and DTE cable connectors.
See the "Connecting a Terminal to the Console Port" section for port configuration details.
|
Note The Supervisor Engine III AUX port is currently not supported. |
Supervisor Engines III has console and AUX ports. Supervisor Engines II G and III G have console and RSFC console ports.
The console and AUX ports, which are located on the front panel of the Supervisor Engine III and III F, are shown in Figure 3-9. The console and RSFC console ports, which are located on the front panel of the Supervisor Engine II G and III G, are shown in Figure 3-10 and Figure 3-11, respectively.
On the Supervisor Engine II G and III G, the Console Port Mode switch affects the operation of the console port. To connect a terminal to the console port using a console cable and DTE adapter or to connect a modem to the console port using a DCE adapter (labeled "Modem"), set the switch to the in position. To connect a terminal to the console port using the Supervisor Engine III console cable, set the switch to the out position. For more information, see the "Console Port Mode Switch (Supervisor Engines II G and III G Only)" section.


The console ports are EIA/TIA-232 asynchronous serial ports with RJ-45 connectors and have full-featured DTE connections with hardware flow control.
Connect the terminal using a thin, flat, RJ-45-to-RJ-45 cable (looks like a telephone cable) and an RJ-45-to-DB-9, RJ-45-to-D-subminiature female, or RJ-45-to-D-subminiature male adapter.
|
Note An RJ-45-to-RJ-45 cable and adapters are provided in the console port accessories kit shipped with your Catalyst 5000 family switch. |
See the "Connecting a Terminal to the Console Port" section for port configuration details.
|
Note The console port is an asynchronous serial port; any device connected to this port must be capable of asynchronous transmission. |
Before connecting the console port, check the terminal documentation to determine the baud rate. The baud rate of the terminal must match the default baud rate (9600 baud) of the console port. Set up the terminal as follows:
|
Note For module-specific cabling procedures, refer to the Catalyst 5000 Family Module Installation Guide. |
This section provides connection procedures for the following supervisor engine interface ports:
Interface cables and equipment should already be in place. If necessary, refer to the Catalyst 5000 Family Installation Guide for specific requirements.
The RJ-45 MDIX port cable connector is shown in Figure 3-12. The 40-pin MII cable connector is shown in Figure 3-13.
|
Note The MDIX ports are crossed over internally. For an MDI-to-MDI or MDIX-to-MDIX connection, use a crossover cable. For an MDI-to-MDIX connection, use a straight-through cable, which allows the TX pins to connect with the RX pins. |

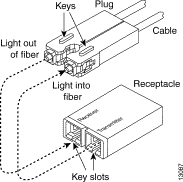
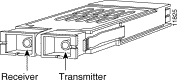
Use SC fiber-optic connectors (Figure 3-14) to connect to the 100BASE-FX (two port), 1000BASE-SX, and 1000BASE-LX/LH ports. Use MT-RJ fiber-optic connectors (Figure 3-15) to connect to the 100BASE-FX ports. Always keep caps and plugs on the fiber-optic connectors on the cable and the switch when they are not in use.
Supervisor Engine III G and the dual-port GBIC uplink module for Supervisor Engine II G and Supervisor Engine III have Gigabit Ethernet ports that you can configure with any combination of shortwave (SX) or longwave/long-haul (LX/LH) GBICs. A GBIC, shown in Figure 3-16, is a hot-swappable input/output device that plugs into the module, linking the module with the fiber-optic network. GBIC types are listed in Table 3-1.
| GBIC | Product Number |
|---|---|
1000BASE-SX | WS-G5484 |
1000BASE-LX/LH | WS-G5486 |
1000BASE-ZX | WS-G5487 |
|
Note Cisco 1000BASE-LX/LH interfaces fully comply with the IEEE 802.3z 1000BASE-LX standard. However, the 1000BASE-LX/LH has a higher optical quality, allowing link distances of 10 km over SMF compared to 5 km specified in the standard. |
|
Note A maximum of 12 1000BASE-ZX GBICs can be installed in a switch chassis. |
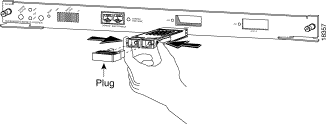
The GBIC slides through an opening in the front of the Gigabit Ethernet module and mates with a connector on the module. See Figure 3-17.
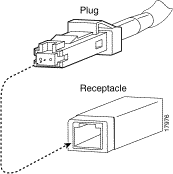
Use an SC-type fiber-optic connector, shown in Figure 3-14, to connect the Gigabit Ethernet module ports with the external network. Connect the Gigabit Ethernet interface cables to the appropriate Ethernet network connector.
When using the LX/LH GBIC with 62.5-micron diameter MMF, you must install a mode-conditioning patch cord (Cisco product number CAB-GELX-625 or equivalent) between the GBIC and the MMF cable on both the transmit and receive ends of the link. The patch cord is required for link distances greater than 984 feet (300 m). See the "Patch Cord (1000BASE-LX/LH Uplink Port Only)" section for more information.
|
Note The mode-conditioning patch cord is required to comply with IEEE standards. The IEEE found that link distances could not be met with certain types of fiber-optic cable due to a problem in the center of some fiber-optic cable cores. The solution is to launch light from the laser at a precise offset from the center by using the mode-conditioning patch cord. At the output of the patch cord, the LX/LH GBIC is compliant with IEEE 802.3z standard for 1000BASE-LX. |
|
Note Supervisor Engine III—You can modify the configuration register boot field to specify the method that the switch uses to load a system image upon startup. Instead of using the default system image to start up, you can specify a particular system image for the switch to use. For detailed information, refer to the Software Configuration Guide for your switch. |
When all interfaces are connected, check all connections, and then perform the following steps to power on the system and verify that it is operational:
a. The power supply switches should be off. Do not connect the Catalyst 5002 power at this point.
b. Each module is inserted all the way into its slot, and all the captive installation screws are tightened.
c. All interface cable connections are secured.
d. Each power supply is inserted all the way into its bay, and the captive installation screws are tightened (does not apply to Catalyst 5002 switch).
e. All power supply cords are securely connected to each power supply. Do not connect the Catalyst 5002 power at this point.
f. At the power-source end of the power cord, make sure the connector is installed securely in a grounded outlet and that the source power is within the range labeled on the back of the switch. When two power supplies are present, make sure that the second cord is connected to a separate line from the first, if possible.
|
Note Catalyst 5500 switch only—Each AC-input power supply operating at 120 VAC requires a dedicated 20A service and 20A plug and receptacle. It is not acceptable to power the Catalyst 5500 switch from a 15A line cord because of the safety ratings under which the Catalyst 5500 switch has been certified. |
Step 2 Check the console terminal and make sure it is on.
Step 3 Turn the power supplies on (connect the power to the Catalyst 5002 switch).
Step 4 Verify the LEDs on the power supplies are green (does not apply to Catalyst 5002 switch). Verify that the appropriate PS1 and PS2 LEDs on the supervisor engine front panel are green.
Step 5 Listen for the system fans; ensure that the FAN LED on the supervisor engine module is green.
Step 6 While the system initializes, check that the SYSTEM STATUS LED on the supervisor engine is orange until the boot is complete.
Some interface LEDs might go on or blink for a short time. Some LEDs, such as the LINK LED, stay on during the entire boot process. If an interface is already configured, the LEDs might be on steadily as they detect traffic on the line. Wait until the system boot is complete before attempting to verify the switching module LED indications.
|
Note Catalyst 5500 series switches—If you have a redundant supervisor engine, refer to the Software Configuration Guide for your switch for a detailed description of supervisor engine operation in a redundant configuration. By default, the supervisor engine in slot 1 is the active supervisor engine; the second supervisor engine in slot 2 is the redundant supervisor engine. |
|
Note Many of the switching module LEDs are not on until you configure the interfaces. |
Step 7 When the system boot is complete (it takes a few seconds), the supervisor engine begins to initialize the switching modules.
During this initialization, the LEDs on each switching module behave differently (most flash on and off). The SYSTEM STATUS LED on each switching module goes on when initialization is complete, and the console screen displays a script and system banner.
If the system does not complete this verification process, refer to the Catalyst 5000 Family Installation Guide for troubleshooting procedures.
|
Note When switching module LEDs are on, this does not necessarily mean that the interface ports are functional or enabled. Although the LEDs for many interface types go on at the initial system startup, they do not indicate an accurate status until the interface is configured. For detailed module-specific LED descriptions, refer to the Catalyst 5000 Family Module Installation Guide. |
|
Note Catalyst 5500 switch only—The ATM switch processor (ASP), ATM port adapter carrier, and ATM adapter module LEDs are described in the LightStream 1010 ATM Switch Hardware Installation Guide. This publication is available on the Cisco Connection Documentation CD and in print. |
Step 8 Your hardware installation is now complete.
Refer to the Software Configuration Guide for your switch for default configuration information for the supervisor engine and switching modules, and commands to change the default configuration. Refer to the Software Configuration Guide and Command Reference for your switch for complete software configuration instructions.
![]()
![]()
![]()
![]()
![]()
![]()
![]()
![]()
Posted: Tue Oct 3 18:55:38 PDT 2000
Copyright 1989-2000©Cisco Systems Inc.