|
|

 |
Warning Before you install, operate, or service the system, read the Site Preparation and Safety Guide. This guide contains important safety information you should know before working with the system. |
 |
Note The information in this chapter applies to all Catalyst 5000 family switches unless otherwise noted. |
This chapter describes how to install the Catalyst 5000 family switch in a rack. For first-time installations, perform the procedures in the following sections in the order listed:
For information on installing the supervisor engines and verifying switch operation, see Chapter 3, "Installing the Supervisor Engine," in the Catalyst 5000 Family Supervisor Engine Installation Guide.
|
Note Before starting the installation procedures in this chapter, use the site planning checklist in "Site Planning," to verify that all site planning activities were completed. |
|
Note Do not discard the shipping container when you unpack the switch. Flatten the shipping cartons and store them with the pallet (supplied with the Catalyst 5509 and Catalyst 5500 switches). You will need these containers if you need to move or ship the switch in the future. Repacking instructions are provided in "Repacking a Switch." |
To check the contents of the shipping container, follow these steps:
Step 2 Check the switching modules in each slot. Ensure that the configuration matches the packing list and that all the specified interfaces are included.
Step 3 To begin installation, proceed to the "Rack-Mounting the Switch" section.
A standard rack-mount kit is included for mounting the switch in a standard 19-inch (48.3 cm) equipment rack with two unobstructed outer posts, with a minimum depth (between the front and rear mounting posts) of 19.25 inches (48.9 cm) and a maximum depth of 32 inches (81.3 cm). This kit is not suitable for use with racks with obstructions (such as a power strip) that could impair access to switch field-replaceable units (FRUs).
 |
Caution Before installing the chassis in a rack, read the "Checking the Contents" section to familiarize yourself with the proper site and environmental conditions. Failure to read and follow these guidelines could lead to an unsuccessful installation and possible damage to the system and components. |
Before rack-mounting the switch, ensure the following:
Two people are required to lift a Catalyst 5000, Catalyst 5505, Catalyst 5509, or Catalyst 5500 chassis. Whenever you lift the chassis or any heavy object, follow these guidelines:
The chassis is not intended to be moved frequently. Before you install the switch, ensure that your site is properly prepared so that you can avoid moving the chassis later to accommodate power sources and network connections.
The following tools and equipment are required to install the chassis:
The following tools and equipment are required to install the chassis in a rack:
Proceed to the rack-mount installation procedure for the type of switch you are installing:
Use this procedure to install the Catalyst 5002 switch in a rack:
|
Note The procedures are the same for both the AC-input and DC-input power supply models. The figures shown in this section reflect the AC-input power supply model. |
a. Place the chassis on the floor or on a sturdy table as close as possible to the rack. Leave enough clearance to allow you to move around the chassis.
b. Use a tape measure to measure the depth of the rack. Measure from the outside of the front mounting posts to the outside of the rear mounting strip. The depth must be at least 19.25 inches (48.9 cm) but not greater than 32 inches (81.3 cm).
c. Measure the space between the inner edges of the left front and right front mounting posts to ensure that it is 17.75 inches (45.09 cm) wide. (The chassis is 17.25 inches [43.8 cm] wide and must fit between the mounting posts.)
d. Open the rack-mount kit and see the component checklist in Table 4-1 to verify that all parts are included.
| Quantity | Part Description | Received |
|---|---|---|
2 | L brackets |
|
4 | M4 Phillips pan-head screws |
|
6 | 12-24 x 3/4-inch Phillips binder-head screws |
|
|
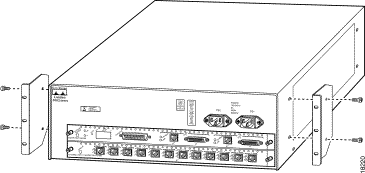
Note Figure 4-1 illustrates how to attach the front of the switch to the rack. You can also attach the rear of the switch to the rack, depending on the configuration of your rack. |
Step 2 Note that the L brackets connect the chassis to the rack. You can mount the L brackets to the front or rear mounting holes of the chassis, depending on which end is in the front of the rack.
|
Note Some equipment racks provide a power strip along the length of one of the rear posts. If your rack has this feature, consider the position of the strip when planning fastener points. Before you install the L brackets on the chassis, determine whether you will install the chassis from the front or the rear of the rack. |
Attach the left and right L brackets using the four M4 Phillips pan-head screws provided in the rack-mount kit. (See Figure 4-1.)
Step 3 Install the chassis in the rack as follows:
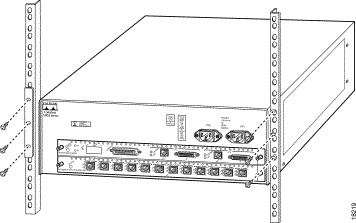
a. Position the chassis in the rack as follows (see Figure 4-2):
b. Align the mounting holes in the L bracket with the mounting holes in the equipment rack.
c. Secure the chassis using six (three per side) 12-24 x 3/4-inch screws through the elongated holes in the L bracket and into the threaded holes in the mounting post.
d. Use a tape measure and level to ensure that the chassis is installed straight and level.
Step 4 From the rear of the chassis, do the following:
a. Check the ejector levers to ensure that the supervisor engine and the switching module are installed securely.
b. Tighten any loose captive installation screws on the supervisor engine and switching module.
Step 5 Note that the Catalyst 5002 switch powers up when you connect the power supply cords (do not power up the supplies at this point).
Use this procedure to install the Catalyst 5000 switch or Catalyst 5505 switch in a rack:
a. Place the chassis on the floor or on a sturdy table as close as possible to the rack. Leave enough clearance to allow you to move around the chassis.
b. Use a tape measure to measure the depth of the rack. Measure from the outside of the front mounting posts to the outside of the rear mounting strip. The depth must be at least 19.25 inches (48.9 cm) but not greater than 32 inches (81.3 cm).
c. Measure the space between the inner edges of the left front and right front mounting posts to ensure that it is 17.75 inches (45.09 cm) wide. (The chassis is 17.25 inches [43.8 cm] wide and must fit between the mounting posts.)
d. Open the rack-mount kit and use the checklist in Table 4-2 to verify that all parts are included.
| Quantity | Part Description | Received |
|---|---|---|
2 | L brackets (left and right) |
|
6 | M4 Phillips countersunk-head screws |
|
8 | 12-24 x 3/4-inch Phillips binder-head screws |
|
8 | 10-32 x 3/4-inch slotted binder-head screws |
|
Step 2 Note that the L brackets connect the chassis to the rack. Install the L brackets as follows:
a. Remove the six screws from either the front or rear of the switch side cover panels, depending on which end of the chassis will be at the front of the rack.
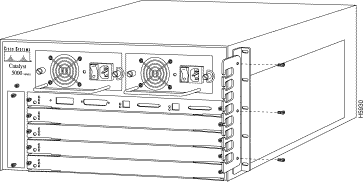
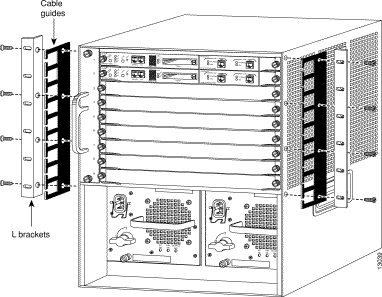
b. Attach the L brackets to the left and right sides of the chassis using the six M4 Phillips countersunk-head screws provided in the rack-mount kit. (See Figure 4-3.)

c. Attach the cable guide, if needed, using the M3 screws provided in the cable management kit. The cable guide attaches to the L bracket. Attach the cable guide to the right side of the switch to prevent the cables from obscuring module LEDs. (See Figure 4-4.)
Step 3 Install the chassis in the rack as follows:
|
Note You should have a third person on hand to assist in this step. |
a. With a person standing at each side of the chassis, grasp the bottom edge of the chassis with one hand near the front and the other near the back. Slowly lift the chassis in unison. Avoid sudden twists or moves to prevent injury.
b. Position the chassis in the rack as follows (see Figure 4-5):
c. Align the five L bracket mounting holes with the five front mounting post mounting holes.
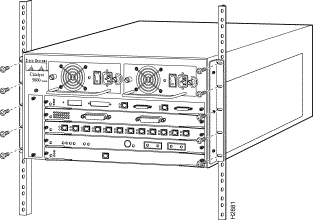
d. A third person should install the 10-32 x 3/4-inch slotted binder-head mounting screws through the elongated holes in the L bracket and into the threaded holes in the mounting post.
e. Use a tape measure and level to ensure that the chassis is installed straight and level.
Step 4 From the rear of the chassis, do the following:
a. Check the ejector levers to ensure that the supervisor engine and all switching modules are securely installed.
b. Tighten any loose captive installation screws on the supervisor engine and switching modules.
Step 5 Connect the power supplies to the site power following the procedures in the "Removing and Replacing the Power Supply" section. (Do not turn on the power supplies at this point.)
Use this procedure to install the Catalyst 5509 switch in a rack:
a. Place the chassis on the floor or on a sturdy table as close as possible to the rack. Leave enough clearance to allow you to move around the chassis.
b. Install the power supplies in the chassis by following the procedures in the "Removing and Replacing the Power Supply" section. (Do not connect the power cords at this point.)
c. Use a tape measure to measure the depth of the rack. Measure from the outside of the front mounting posts to the outside of the rear mounting strip. The depth must be at least 19.25 inches (48.9 cm) but not greater than 32 inches (81.3 cm).
d. Measure the space between the inner edges of the left front and right front mounting posts to ensure that it is 17.75 inches (45.09 cm) wide. (The chassis is 17.25 inches [43.8 cm] wide and must fit between the mounting posts.)
e. Open the rack-mount kit and use the checklist in Table 4-3 to verify that all parts are included.
| Quantity | Part Description | Received |
|---|---|---|
2 | L brackets |
|
8 | M4 Phillips countersunk-head screws |
|
8 | 12-24 x 3/4-inch Phillips binder-head screws |
|
8 | 10-32 x 3/4-inch Phillips binder-head screws |
|
2 | Shelf brackets |
|
1 | Crossbar bracket |
|
2 | M3 Phillips pan-head screws |
|
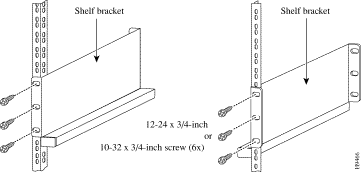
Step 2 Note that the two shelf brackets support the weight of the chassis in the rack. Install the shelf brackets as follows:
|
Caution If the rack is on wheels, ensure that the brakes are engaged or that the rack is otherwise stabilized. |
a. Position the shelf brackets in the rack. (See Figure 4-6.)
b. Secure the shelf brackets by using six (three per side) 12-24 x 3/4-inch or 10-32 x 3/4-inch screws.
c. Attach the crossbar bracket to the back of the shelf brackets using two M3 screws.
|
Note No shelf is required with this assembly; the shelf brackets support the chassis in the rack. |
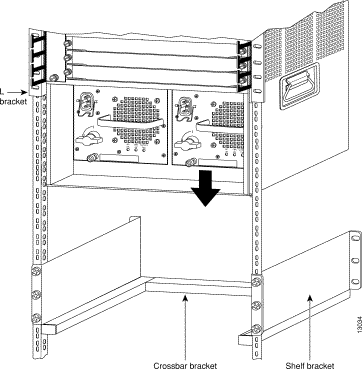
Step 3 Note that the L brackets connect the chassis to the rack. Install the L brackets by attaching the left and right L brackets using the eight M4 Phillips countersunk-head screws provided in the rack-mount kit. (See Figure 4-7.)
|
Note Some equipment racks provide a power strip along the length of one of the rear posts. If your rack has this feature, consider the position of the strip when planning fastener points. Before you install the L brackets on the chassis, determine whether you will install the chassis from the front or the rear of the rack. |
|
Note If you are installing cable guides, place the cable guides inside the L brackets, between the L bracket and the chassis. Secure the cable guides to the chassis using the same screws (and chassis holes) as the L brackets. (See Figure 4-7.) The cable guides and screws are provided in the cable management kit. |
Step 4 Install the chassis in the rack as follows:
|
Note You should have a third person available to assist in this step. |
a. With a person standing at each side of the chassis, grasp the bottom edge of the chassis with one hand near the front and the other near the back. Slowly lift the chassis in unison. Avoid sudden twists or moves to prevent injury.
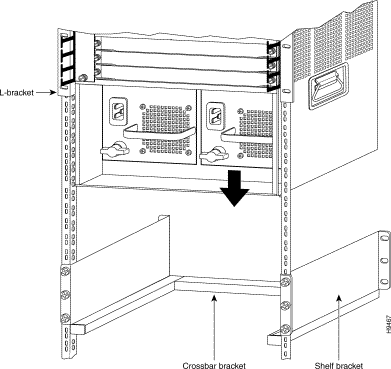
b. Position the chassis in the rack as follows (see Figure 4-8):
c. Place the chassis on the shelf brackets.
d. Align the mounting holes in the L bracket with the mounting holes in the equipment rack.
e. A third person should install the eight (four per side) 12-24 x 3/4-inch or 10-32 x 3/4-inch screws through the elongated holes in the L bracket and into the threaded holes in the mounting post.
f. Use a tape measure and level to ensure that the chassis is installed straight and level.
Step 5 Check the ejector levers to ensure that the supervisor engine and all switching modules are installed securely.
Step 6 Tighten any loose captive installation screws on the supervisor engine and switching modules.
Step 7 Connect the power supplies to the site power by following the procedures in the "Removing and Replacing the Power Supply" section. (Do not turn on the power supplies at this point.)
Use this procedure to install the Catalyst 5500 switch in a rack:
a. Place the chassis on the floor or on a sturdy table as close as possible to the rack. Leave enough clearance to allow you to move around the chassis.
b. Install the power supplies in the chassis by following the procedures in "Removing and Replacing the Power Supply" section. (Do not connect the power cords at this point.)
c. Use a tape measure to measure the depth of the rack. Measure from the outside of the front mounting posts to the outside of the rear mounting strip. The depth must be at least 19.25 inches (48.9 cm) but not greater than 32 inches (81.3 cm).
d. Measure the space between the inner edges of the left front and right front mounting posts to ensure that it is 17.75 inches (45.09 cm) wide. (The chassis is 17.25 inches [43.8 cm] wide and must fit between the mounting posts.)
e. Open the rack-mount kit and use the checklist in Table 4-4 to verify that all parts are included.
| Quantity | Part Description | Received |
|---|---|---|
2 | L brackets |
|
10 | M4 Phillips countersunk-head screws |
|
10 | 12-24 x 3/4-inch Phillips binder-head screws |
|
10 | 10-32 x 3/4-inch Phillips binder-head screws |
|
2 | Shelf brackets |
|
1 | Crossbar bracket |
|
2 | M3 Phillips pan-head screws |
|
Step 2 Note that the two shelf brackets support the weight of the chassis in the rack. Install the shelf brackets as follows:
|
Caution If the rack is on wheels, ensure that the brakes are engaged or that the rack is otherwise stabilized. |
a. Position the shelf brackets in the rack (see Figure 4-9).
b. Secure the shelf brackets by using six (three per side) 12-24 x 3/4-inch or 10-32 x 3/4-inch screws.
c. Attach the crossbar bracket to the back of the shelf brackets using two M3 screws.
|
Note No shelf is required with this assembly; the shelf brackets support the chassis in the rack. |
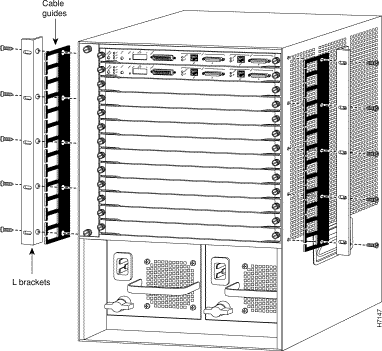
Step 3 Note that the L brackets connect the chassis to the rack. Install the L brackets by attaching the left and right L brackets using the ten M4 Phillips countersunk-head screws provided in the rack-mount kit. (See Figure 4-10.)
|
Note Some equipment racks provide a power strip along the length of one of the rear posts. If your rack has this feature, consider the position of the strip when planning fastener points. Before you install the L brackets on the chassis, determine whether you will install the chassis from the front or the rear of the rack. |
|
Note If you are installing cable guides, place the cable guides inside the L brackets, between the L bracket and the chassis. Secure the cable guides to the chassis using the same screws (and chassis holes) as the L brackets. (See Figure 4-10.) The cable guides and screws are provided in the cable management kit. |
Step 4 Install the chassis in the rack as follows:
|
Note You should have a third person available to assist in this step. |
a. With a person standing at each side of the chassis, grasp the bottom edge of the chassis with one hand near the front and the other near the back. Slowly lift the chassis in unison. Avoid sudden twists or moves to prevent injury.
b. Position the chassis in the rack as follows (see Figure 4-11):
c. Place the chassis on the shelf brackets.
d. Align the mounting holes in the L bracket with the mounting holes in the equipment rack.
e. A third person should install the ten (five per side) 12-24 x 3/4-inch or 10-32 x 3/4-inch screws through the elongated holes in the L bracket and into the threaded holes in the mounting post.
f. Use a tape measure and level to ensure that the chassis is installed straight and level.
Step 5 Check the ejector levers to ensure that the supervisor engine and all switching modules are installed securely.
Step 6 Tighten any loose captive installation screws on the supervisor engine and switching modules.
Step 7 Connect the power supplies to the site power by following the procedures in the "Removing and Replacing the Power Supply" section. (Do not turn on the power supplies at this point.)
![]()
![]()
![]()
![]()
![]()
![]()
![]()
![]()
Posted: Tue Sep 26 10:36:23 PDT 2000
Copyright 1989-2000©Cisco Systems Inc.