|
|

 |
Warning Before you install, operate, or service the system, read the Site Preparation and Safety Guide. This guide contains important safety information you should know before working with the system. |
 |
Note The information in this chapter applies to all Catalyst 5000 family switches unless otherwise noted. |
This chapter describes how to prepare your site for the installation of the switch and contains the following sections:
For detailed information about cabling requirements, refer to the "Cabling Requirements" section in Chapter 3, "Installing the Supervisor Engine," in the Catalyst 5000 Family Supervisor Engine Installation Guide.
For module-specific network connections, refer to the Catalyst 5000 Family Module Installation Guide.
|
Note A site planning checklist is provided at the end of this chapter to help ensure that you complete all site planning activities before you install the switch. |
Planning a proper location for the switch and the layout of your equipment rack or wiring closet is essential for successful system operation. You should install the switch in an enclosed, secure area, ensuring that only qualified personnel have access to the switch and control of the environment. Equipment placed too close together or inadequately ventilated can cause system overtemperature conditions. In addition, poor equipment placement can make chassis panels inaccessible and difficult to maintain.
The switch operates as a standalone system mounted in a rack in a secure wiring closet. It requires a dry, clean, well-ventilated, and air-conditioned environment. To ensure normal operation, maintain ambient airflow. If the airflow is blocked or restricted, or if the intake air is too warm, an overtemperature condition can occur. The switch environmental monitor can then shut down the system to protect the system components.
To ensure normal operation and avoid unnecessary maintenance, plan your site configuration and prepare your site before installation. After installation, make sure the site maintains an ambient temperature of 0 to 40ºC (32 to 104ºF). It is essential to keep the area around the chassis as free from dust and foreign conductive material (such as metal flakes from nearby construction activity) as is possible. For a description of the environmental monitor and status levels, see Chapter 1, "Product Overview," in the Catalyst 5000 Family Supervisor Engine Installation Guide.
Multiple switches can be rack-mounted with little or no clearance above and below the chassis. However, when mounting a switch in a rack with other equipment, or when placing it on the floor near other equipment, ensure that the exhaust from other equipment does not blow into the intake vent of the chassis.
Cooling air is drawn in through the right side of the chassis. Keep the right side clear of obstructions, including dust and foreign conductive material, and away from the exhaust ports of other equipment.
"Specifications," lists the operating and nonoperating environmental site requirements for the switches. To maintain normal operation and ensure high system availability, maintain an ambient temperature and clean power at your site. The environmental ranges listed in Appendix A are those within which the switch will continue to operate; however, a measurement that approaches the minimum or maximum of a range indicates a potential problem. You can maintain normal operation by anticipating and correcting environmental anomalies before they exceed the maximum operating range.
|
Note All Catalyst 5002 models have two nonremovable AC-input or DC-input power supplies. |
This section provides site power requirements for the Catalyst 5000 family switches. You should verify site power before installing the switch. Power requirements vary for each Catalyst 5000 family switch—ensure that you verify the site power for the type of switch you are installing. This section consists of the following sections:
Follow these requirements when preparing your site for the switch installation:
 |
Caution The total maximum load on each AC-input or DC-input power circuit must be within the rating of the wiring and breaker. An overload of input power can result if this requirement is not met. |
|
Note In Germany only, the electrical rating is 240 VAC and 16A. |
Each Catalyst 5500 AC-input power supply operating at 120 VAC requires a dedicated 20A service and 20A plug and receptacle.
|
Note It is not acceptable to power the Catalyst 5500 switch from a 15A line cord because of the safety ratings under which the Catalyst 5500 switch has been certified. |
Use the information in this section to estimate the power requirements and heat dissipation of a Catalyst 5000 family switch based on a given configuration of the switch. The power requirements might be useful for planning the power distribution system needed to support the switch. Heat dissipation is an important consideration for sizing the air conditioning requirements for an installation.
The power and heat associated with a Catalyst 5000 family switch varies based upon the following considerations:
Table 3-1 lists the power requirements and heat dissipation information for the Catalyst 5000 family switches. Unless otherwise noted, the information in Table 3-1 assumes worst-case conditions. Typical numbers are approximately 30 percent below the numbers listed here. For modules that are not listed in Table 3-1, use the numbers for the WS-X5010 module as a worst-case estimate. See Table 3-2 for a sample calculation of a switch configuration.
| Model Number/ Module Type | DC-Output Power (Watts) | AC-Input Power (Watts) | Heat Diss. (BTU/HR) | Input Current at 90 VAC (Amps) | Input Current at 120 VAC (Amps) | Input Current at 180 VAC (Amps) | Input Current at 240 VAC (Amps) |
|---|---|---|---|---|---|---|---|
Catalyst 5002 chassis (with fans) | 16 | 42 | 144 | 0.47 | 0.35 | 0.23 | 0.18 |
Catalyst 5000 and 5505 chassis (with fans) | 16 | 42 | 144 | 0.47 | 0.35 | 0.23 | 0.18 |
Catalyst 5509 chassis (with fans) | 35 | 75 | 256 | 0.85 | 0.63 | 0.42 | 0.32 |
Catalyst 5500 chassis (with fans) | 50 | 105 | 357 | 1.16 | 0.87 | 0.58 | 0.44 |
WS-X5005 supervisor, SMF1 | 44 | 70 | 240 | 0.78 | 0.59 | 0.39 | 0.29 |
WS-X5006 supervisor, MMF2 | 38 | 60 | 205 | 0.67 | 0.50 | 0.33 | 0.25 |
WS-X5009 supervisor, UTP3 | 43 | 69 | 234 | 0.76 | 0.57 | 0.38 | 0.29 |
WS-X5010 10BT, 24P, Telco | 59 | 94 | 322 | 1.05 | 0.79 | 0.52 | 0.39 |
WS-X5011 10BFL, 12P | 47 | 74 | 252 | 0.82 | 0.62 | 0.41 | 0.31 |
WS-X5012 10BT, 48P, Telco | 45 | 72 | 246 | 0.80 | 0.60 | 0.40 | 0.30 |
WS-X5013 10BT, 24P, RJ45 | 57 | 90 | 308 | 1.00 | 0.75 | 0.50 | 0.38 |
WS-X5014 | 49 | 77 | 264 | 0.86 | 0.64 | 0.43 | 0.32 |
WS-X5015 | 40 | 63 | 217 | 0.71 | 0.53 | 0.35 | 0.26 |
WS-X5020 10BT, 4x12RPTR, 48P | 22 | 35 | 120 | 0.39 | 0.29 | 0.20 | 0.15 |
WS-X5101 FDDI4, MMF | 35 | 56 | 191 | 0.62 | 0.46 | 0.31 | 0.23 |
WS-X5103 CDDI5 | 35 | 56 | 191 | 0.62 | 0.46 | 0.31 | 0.23 |
WS-X5104 FDDI, SMF | 37 | 58 | 199 | 0.65 | 0.49 | 0.32 | 0.24 |
WS-X5111 100BFX, 12P | 70 | 112 | 381 | 1.24 | 0.93 | 0.62 | 0.46 |
WS-X5113 100BTX, 12P | 63 | 100 | 340 | 1.11 | 0.83 | 0.55 | 0.41 |
WS-X5114 100BFX, 12P | 63 | 100 | 343 | 1.12 | 0.84 | 0.56 | 0.42 |
WS-X5153 ATM, 1PHY, UTP | 29 | 46 | 158 | 0.52 | 0.39 | 0.26 | 0.19 |
WS-X5154 ATM, 1PHY, SMF | 31 | 50 | 170 | 0.55 | 0.41 | 0.28 | 0.21 |
WS-X5155 ATM, 1PHY, MMF | 30 | 47 | 161 | 0.52 | 0.39 | 0.26 | 0.20 |
WS-X5156 ATM, 2PHY, UTP | 31 | 49 | 167 | 0.54 | 0.41 | 0.27 | 0.20 |
WS-X5157 ATM, 2PHY, SMF | 34 | 53 | 182 | 0.59 | 0.44 | 0.30 | 0.22 |
WS-X5158 ATM, 2PHY, MMF | 32 | 51 | 173 | 0.56 | 0.42 | 0.28 | 0.21 |
WS-X5201 100BFX, BNDL, 12P | 67 | 106 | 363 | 1.18 | 0.89 | 0.59 | 0.44 |
WS-X5203 10/100 BTX, BNDL, 12P | 67 | 106 | 363 | 1.18 | 0.89 | 0.59 | 0.44 |
WS-X5213A 10/100 BTX,12P | 65 | 104 | 355 | 1.15 | 0.87 | 0.58 | 0.43 |
WS-X5223 100BTX, 3x8RPTR, 24P | 70 | 111 | 378 | 1.23 | 0.92 | 0.62 | 0.46 |
WS-X5224 10/100 BTX, 24P, RJ45 | 71 | 112 | 384 | 1.25 | 0.94 | 0.62 | 0.47 |
WS-X5225R | 57 | 90 | 308 | 1.00 | 0.75 | 0.50 | 0.38 |
WS-X5234-RJ45 | 57 | 91 | 311 | 1.01 | 0.76 | 0.51 | 0.38 |
WS-X5236R | 64 | 102 | 347 | 1.13 | 0.85 | 0.56 | 0.42 |
WS-X5403 | 41 | 65 | 223 | 0.72 | 0.54 | 0.36 | 0.27 |
WS-X5410 | 98 | 156 | 531 | 1.73 | 1.30 | 0.87 | 0.65 |
WS-X5505 supervisor, SMF | 45 | 71 | 243 | 0.79 | 0.59 | 0.40 | 0.30 |
WS-X5506 supervisor, MMF | 37 | 59 | 202 | 0.66 | 0.49 | 0.33 | 0.25 |
WS-X5509 supervisor, UTP | 43 | 68 | 232 | 0.75 | 0.57 | 0.38 | 0.28 |
WS-X5540 supervisor With WS-U5533- With WS-U5538- | 43 44 27 | 69 70 44 | 234 239 149 | 0.76 0.78 0.48 | 0.57 0.58 0.36 | 0.38 0.39 0.24 | 0.29 0.29 0.18 |
WS-X5550 supervisor | 65 | 103 | 352 | 1.14 | 0.86 | 0.57 | 0.43 |
WS-X5302 RSM | 79 | 126 | 431 | 1.40 | 1.05 | 0.70 | 0.53 |
Supervisor Engine III (WS-X5530) WS-U5531 | 90 | 143 | 490 | 1.59 | 1.19 | 0.80 | 0.60 |
| 1SMF = single mode fiber-optic 2MMF = multimode fiber-optic 3UTP = unshielded twisted pair 4FDDI = fiber-distributed data interface 5CDDI = copper distributed data interface |
Table 3-2 provides a sample calculation of power and heat dissipation for the following switch configuration:
| Model Number/ Module Type | DC-Output Power (Watts) | AC-Input Power (Watts) | Heat Diss. (BTU/HR) | Input Current at 90 VAC (Amps) | Input Current at 120 VAC (Amps) | Input Current at 180 VAC (Amps) | Input Current at 240 VAC (Amps) |
|---|---|---|---|---|---|---|---|
Catalyst 5500 chassis (with fans) | 50 | 105 | 357 | 1.16 | 0.87 | 0.58 | 0.44 |
WS-X5010 10BT, 24P, Telco | 178 | 283 | 967 | 3.15 | 2.36 | 1.57 | 1.18 |
WS-X5213A 10/100BTX, 12P | 262 | 415 | 1419 | 4.62 | 3.46 | 2.31 | 1.73 |
WS-X5509 supervisor, UTP | 87 | 137 | 469 | 1.53 | 1.14 | 0.76 | 0.57 |
Total | 490 | 941 | 3212 | 10.45 | 7.84 | 5.23 | 3.92 |
|
Note The System Ground Connection must be connected to a suitable ground. The power supply ground connection must also be connected to a suitable ground. |
This section describes how to connect a system (earth) ground to the Catalyst 5000 family switches. Two grounding holes are provided on the chassis frame. See Figure 3-1 for the grounding hole location.
|
Note The earth ground should be used on both AC- and DC-powered systems. |
To connect the switch to an earth ground, you need the following tools and materials:
|
Note Materials are not provided; contact any commercial cable vendor for the required parts. |
You must complete this procedure before connecting system power or turning on the Catalyst 5000 family switch.
To attach the grounding lug and cable to the grounding pad, perform these steps:
Step 2 Insert the stripped end of the grounding wire into the open end of the grounding lug.
Step 3 Use a crimping tool to secure the grounding wire in place in the grounding lug.
Step 4 Locate the grounding pad on the switch (see Figure 3-1).
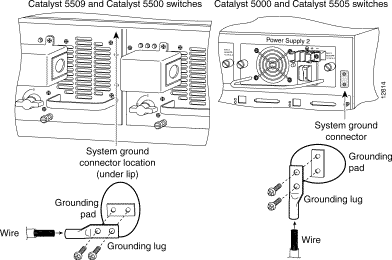
Step 5 Remove the label that covers the grounding pad.
Step 6 Place the grounding lug against the grounding pad.
Step 7 Insert two screws through the holes in the grounding lug and the grounding pad. Ensure that the grounding lug will not interfere with other switch hardware or rack equipment.
Step 8 Install the locking washers and nuts; tighten them to secure the grounding lug to the grounding pad.
Step 9 Prepare the other end of the grounding wire and connect it to an appropriate grounding point in your site to ensure adequate earth ground for the switch.
This section provides the guidelines for connecting Catalyst 5000 family AC power supplies to the site power source.
For a list of the nominal and acceptable voltage ranges for source AC power, see "Specifications."
Figure 3-2 shows the different styles of AC-input power plugs that are available for North America and various international locales for Catalyst 5000 series switches, and Catalyst 5002, 5505, and 5509 switches. Figure 3-3 shows the different styles of AC-input power plugs that are available for North America and various international locales for Catalyst 5500 switches.
Table 3-3 lists the AC-input power cord options and Cisco product numbers for Catalyst 5000 series switches, and Catalyst 5002, 5505, and 5509 switches. Make sure you have the correct power cord for your site. Table 3-4 lists the AC-input power cord options and Cisco product numbers for Catalyst 5500 switches.
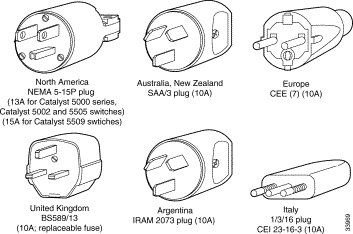
| Locale | Description | Product Number |
|---|---|---|
North America | 125V@13A | CAB-7KAC= |
Australia, New Zealand | 250V@10A | CAB-7KACA= |
Continental Europe | 250V@10A | CAB-7KACE= |
Italy | 250V@10A | CAB-7KACI= |
United Kingdom | 250V@10A | CAB-KACU= |
Argentina | 250V@10A | CAB-KACR= |
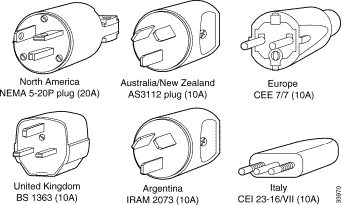
| Locale | Description | Product Number |
|---|---|---|
North America | 125V@20A | CAB-7513AC= |
Australia, New Zealand | 250V@10A | CAB-7513ACA= |
Continental Europe | 250V@10A | CAB-7513ACE= |
Italy | 250V@10A | CAB-7513ACI= |
United Kingdom | 250V@10A | CAB-7513ACU= |
Argentina | 250V@10A | CAB-7513ACR= |
Table 3-5 lists the site planning activities that you should perform before installing the Catalyst 5000 family switch. Complete each activity to ensure a successful switch installation.
| Task No. | Planning Activity | Verified By | Time | Date |
|---|---|---|---|---|
1 | Space evaluation: Space and layout |
|
|
|
2 | Environmental evaluation: Ambient temperature |
|
|
|
3 | Power evaluation: Input power type |
|
|
|
4 | Grounding evaluation: Circuit breaker size |
|
|
|
5 | Cable and interface equipment evaluation: Cable type |
|
|
|
6 | EMI evaluation: Distance limitations for signaling |
|
|
|
![]()
![]()
![]()
![]()
![]()
![]()
![]()
![]()
Posted: Tue Sep 26 10:35:19 PDT 2000
Copyright 1989-2000©Cisco Systems Inc.