|
|

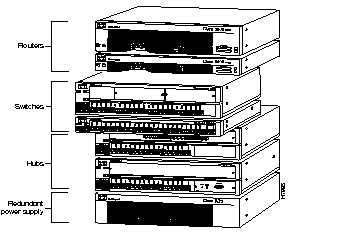
The EtherSwitch 1420 and EtherSwitch 1220 are members of the NetBeyond extended network system of modular, stackable products that are manageable from a central location. The routers, switches, and hubs that make up the NetBeyond system can increase your LAN performance and provide both local and remote users with secure access to data files and the Internet.
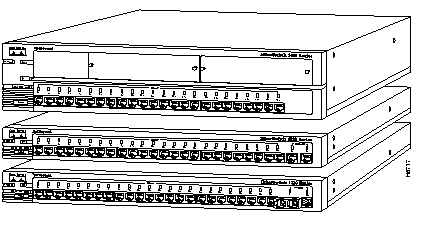
The EtherSwitch 1420 and EtherSwitch 1220 (shown in Figure 1-2) are Ethernet switches that provide high-speed configuration flexibility for workgroup applications. With
25 switched Ethernet ports for individual workstations and 10BaseT hubs and either
2 high-speed expansion slots or 2 fixed high-speed ports for servers and backbones, these switches provide Ethernet switching to 100BaseT, Fiber Distributed Data Interface (FDDI), and future Asynchronous Transfer Mode (ATM) networks.
CiscoPro product documentation and additional literature are available on a CD called Cisco Connection Documentation, CiscoPro Solutions. The CD is updated and shipped monthly, so it might be more current than printed documentation. To order the Cisco Connection Documentation, CiscoPro Solutions CD in North America, contact your local reseller; international customers, contact your local Cisco sales office. The CD is available both as a single CD and as an annual subscription. You can also access CiscoPro product documentation on the World Wide Web URL http://www.cisco.com.
The EtherSwitch 1420 and EtherSwitch 1220 offer the following features:
See the "Concepts" chapter for more information about these features. To implement them via out-of-band management or Telnet, refer to the "Out-of-Band Management" chapter for more information. If you are using SNMP, the in-band capabilities of the switch are described in the "Standard MIBs and MIB Extensions" section in the "In-Band Management" chapter.
The EtherSwitch 1420 and 1220 have the following ports:
The 10BaseT ports shown in Figure 1-3 use RJ-45 connectors to connect to single workstations, 10BaseT hubs, or any 10BaseT-compatible device. The attached devices use standard 10BaseT adapters and wiring. Port 25, located on the back panel, supports an alternative AUI connection for attachment to a thick coaxial, thin coaxial, or a fiber-optic media transceiver.
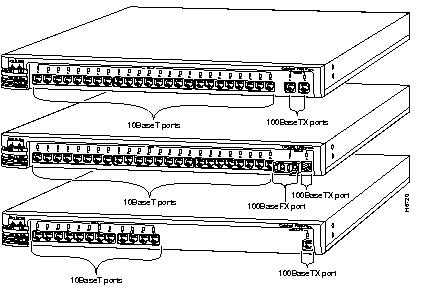
The EtherSwitch 1220, as shown in Figure 1-3, has two 100BaseTX ports for server or backbone connectivity. One or both of these can be set to CollisionFree full-duplex mode for full-duplex operation. Each 100BaseTX port is internally switched to the other EtherSwitch 1220 ports. Connections are with RJ-45 connectors.
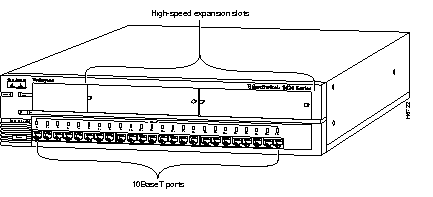
The EtherSwitch 1420, shown in Figure 1-4, has two high-speed expansion slots that are compatible with EtherSwitch 1420 hot-swappable modules and provide high-bandwidth connections to backbones, servers, and other high-performance devices. Each expansion slot is internally switched to all other EtherSwitch 1420 ports.
The EtherSwitch 1420 and EtherSwitch 1220 LEDs enable you to easily monitor network activity and performance. Figure 1-5 and Figure 1-6 show the location of the LEDs.
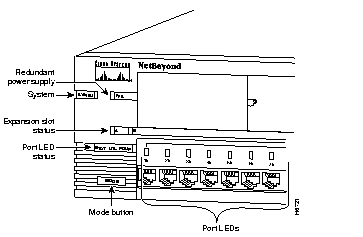
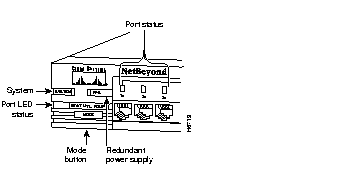
This LED indicates whether the system is receiving power and functioning properly. Table 1-1 provides a description of the LED colors and the meaning of the three states.
| Visual Indication | System Status |
|---|---|
| Off | System is not powered up. |
| Green | System is operating normally. |
| Amber | System is receiving power but is not functioning properly. |
The redundant power supply (RPS) LED shows the RPS status, as shown in Table 1-2. When the RPS is in use, turn off the local power supply by unplugging the AC power cord.
| Visual Indication | RPS Status |
|---|---|
| Off | Off or not installed. |
| Green | RPS operational. |
| Flashing green | The RPS and the local power supply are both powered on. Only one power source can be supplying power to a unit. If you are using the RPS, the local power cord of the switch must not be plugged in. If you are using the local power supply, the RPS can be connected but must be powered down. |
| Amber | RPS not operational. |
These LEDs show the status of an inserted module, as shown in Table 1-3. Check the LEDs on the module itself for the module port status. The A and B LEDs correspond to the left and right expansion slots, respectively.
| Visual Indication | Expansion Slot Status |
|---|---|
| Off | No module is in the slot. |
| Green | Module is operational. |
| Flashing green | Module is running POST. |
| Amber | Module failed POST and is not operational. |
Port LEDs indicate one of the following, depending on the setting you selected using the Mode button:
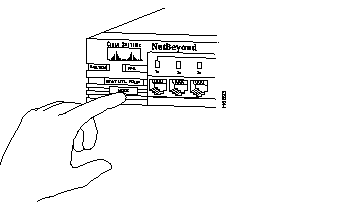
To change the mode being displayed by the port LEDs, press the Mode button, shown in Figure 1-7, to highlight in sequence each of the possibilities: STAT (port status), UTL (bandwidth utilization), and FDUP (full-duplex status). When the correct mode is lit, release the button to make the change. As long as you hold the button down, the mode does not change. The selected mode remains lit for 30 seconds before returning to the default mode of port status.
This LED mode shows the status of switched ports, as shown in Table 1-4.
| Visual Indication | Port Status |
|---|---|
| Off | No link. |
| Green | Link present. |
| Flashing green | Activity: port is transmitting or receiving data. |
| Alternating green-amber | Link fault. Error frames can affect connectivity, and errors such as excessive collisions, CRC errors, and alignment and jabber errors are monitored for a link-fault indication. |
| Amber | Port is not forwarding. For example, this could be because the port was disabled by management, suspended due to an address violation, or suspended by STP due to the presence of network loops. |
A port configured for full-duplex operation must be connected to another full-duplex port. You can display the full-duplex status of a port, as shown in Table 1-5, by pressing the Mode button and releasing it when FDUP is highlighted.
| Visual Indication | Full-Duplex Status |
|---|---|
| Off | Half duplex is operational. |
| Green | Full duplex is operational. |
Utilization LEDs show the current and peak bandwidth utilization of the switch. The peak utilization is recorded in the bandwidth-capture interval. The default setting for this interval is 24 hours; it is recorded each night at midnight.
You can change to the utilization mode by pressing the Mode button and releasing it when UTL is highlighted. Current bandwidth is shown with a series of lit LEDs topped by a rapidly blinking one. Peak bandwidth is indicated by the right-most solidly lit LED.
Change the bandwidth-capture interval with the Bandwidth Usage Report described in the "Out of Band Management" chapter.
Table 1-6 shows the bandwidth utilization scale. Note that LED 1 indicates any traffic from 0 to 0.2 Mbps.
| Port LEDs | Mbps |
|---|---|
| 1 to 8 | 0.1 to 5 |
| 9 to 16 | 6 to 100 |
| 12 to 24 | 120 to 280 |
The rear panels, shown in Figure 1-8 and Figure 1-9, contain the following components:
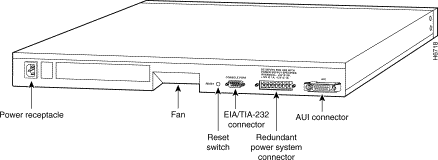
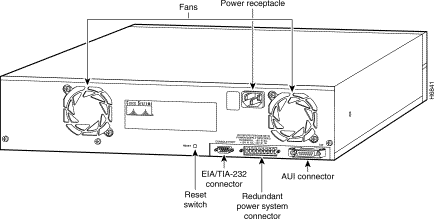
Use the reset switch only if the EtherSwitch 1420 or 1220 does not respond to network management or if packet forwarding has stopped. Insert a pointed object into the hole to press the switch and start the reset. Resetting the switch has the same effect as turning the unit off and on. The reset switch is located on the rear panel, as shown in Figure 1-8 and Figure 1-9.
You can configure and manage a EtherSwitch 1420 or 1220 using any SNMP-compatible management station, or you can connect an ASCII terminal to the switch via the EIA/TIA-232 (RS-232) port and use the management console. The management console is also accessible via Telnet. SMT-compatible workstations can support installed EtherSwitch 1420 FDDI modules.
The management console provides a menu-driven interface for configuring and monitoring your network. The application is password-protected and locks out a user who fails to enter the password within a definable number of attempts. In such a case, the network administrator can be alerted via in-band management.
Most of the statistics and information generated by the switch are available through the management console. You can continue to use it even when the network is down.
The EtherSwitch 1420 and EtherSwitch 1220 are fully manageable by any SNMP-compatible management station.
The products support all pertinent SNMP MIB II variables, the 802.1d bridge MIB, and a comprehensive set of MIB extensions designed for maximum support of the switch's hub and switching capabilities. The EtherSwitch 1420 also supports the FDDI MIB and the MIB supporting EtherSwitch 1420 modules.
The EtherSwitch 1420 and 1220 SNMP MIBs are supplied in ASCII format for compiling into any SNMP network management system using a general MIB browser. You can display switch information from the following network management platforms.
The EtherSwitch 1420 and 1220 must be configured for SNMP management. To do this, you need to assign an IP address to the switch using the menu described in the "IP Configuration" section in the "Out-of-Band Management" chapter. You can also use the Bootstrap protocol (BOOTP) described in the "Configuring the Switch for SNMP Management with BOOTP" section in the "In-Band Management" chapter.
You can use the CiscoView graphical user interface to configure your EtherSwitch 1420 and EtherSwitch 1220 switches and to generate the same statistics that are available through the management console.
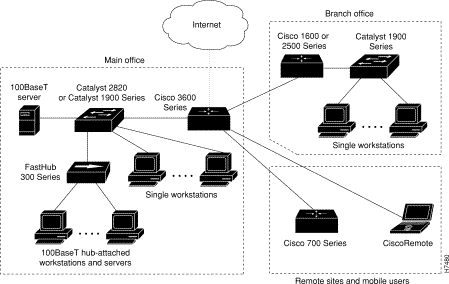
NetBeyond routers, switches, and hubs can be combined to create a high-performance network that extends beyond the main office LAN to connect the company network to the Internet and to mobile users. Figure 1-10 shows an example of a NetBeyond system.
|
|