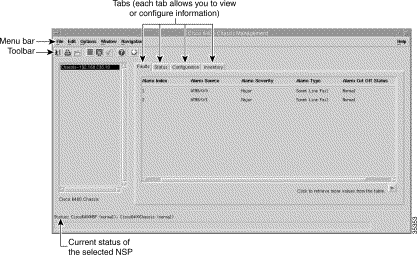
The Alarm Information table displays the following information:
Alarm Index--An arbitrary integer value to uniquely identify an alarm information entry.
Alarm Source--Indicates the source of the alarm. The variable displays a string in one of the following formats:
Chassis--Chassis alarms
Submodule--Submodule alarms
port@slot#/subslot#/port#'--Port alarms
Alarm Severity--Indicates the severity (minor, major or critical) of the alarm.
Alarm Type--Indicates the type of alarm, which can be one of the following:
coreTemp--The core temperature limit has been exceeded
inletTemp--Inlet temperature limit has been exceeded
totalFanFail--Total fan failure
partialFanFail--Fan tray failure
fanMissing--A fan is missing
pem0Fail--Power module 0 failure
pem1Fail--Power module 1 failure
sonetLineFail--SONET line failure
cardOIRAlarm--Card OIR alarm for removal or wrong type insertion alarm
cardFail--Card failure alarm for non-redundant card failure, redundant primary card
cardPartialFail--Card partial failure alarm for redundancy secondary card failure
Alarm Cut Off Status--Indicates whether the audible or visible local alarm relay is cut off locally for the particular alarm source. When the Alarm Cut Off Status is normal, the alarm in the entry has closed the local audible or visible alarm relay contacts. When the Alarm Cut Off Status is cut off, the alarm in the entry initially closed the local relay contacts, but was suppressed by a local user pressing the external ACO button on the Cisco 6400 NSP.
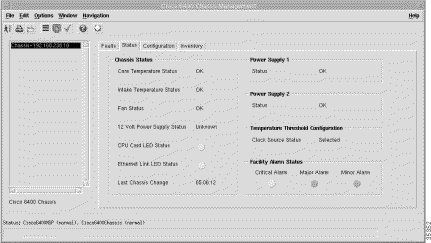
The Status tab (see Figure 6-2) displays five panels: Chassis Status, Power Supply 1, Power Supply 2, Temperature Threshold Configuration, and Facility Alarm Status.
The Temperature Threshold Configuration panel (see Figure 6-2) displays the Clock Source Status. Notification signifies that the agent detects a change in the system clock source status. Notification is generated when the status value changes.
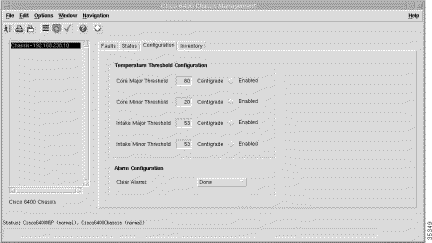
The Alarm Configuration panel (see Figure 6-3) allows you to view and configure the Clear Alarms chassis configuration information. Clear Alarms allows you to specify whether to clear all, major, or minor alarms indication and reset the alarm contacts. You can set Clear Alarms to All, Minor, Major, Critical or Done.
Note When the Clear Alarms option is set, the alarm is still present in the table but the alarm status displayed in the Alarm Cut Off Status column (displayed in the alarm table in the Faults tab) is set to Cut-Off.
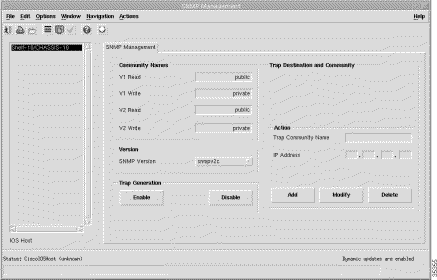
The Community Names provide a security mechanism for SNMP communications. The device holds its own community names, so the correct community names must be used in order to get or set attributes from the device.
V1 Read--This is the community string used when retrieving attributes from a device using the SNMPv1 protocol.
V1 Write--This is the community string used when setting attributes on a device using the SNMPv1 protocol.
V2 Read--This is the community string used when retrieving attributes from a device using the SNMPv2c protocol.
V2 Write--This is the community string used when setting attributes on a device using the SNMPv2c protocol.
Enable--Click Enable to enable trap generation for the selected chassis. Traps generated by the selected chassis are sent to the IP Addresses listed in the Trap Destination and Community table.
Disable--Click Disable to disable trap generation for the selected chassis. No traps generated by the selected chassis are sent to the IP Addresses listed in the Trap Destination and Community table.
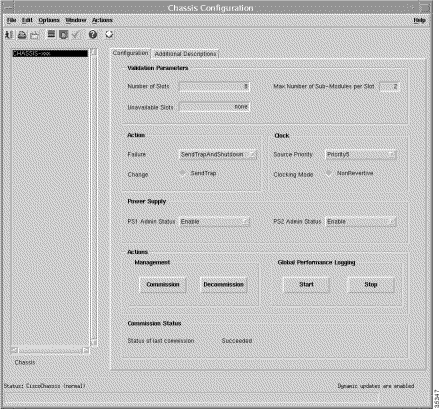
The Validation Parameters panel contains attributes that describe the population characteristics of a chassis and are used to validate module deployment:
Number of Slots--Displays the number of slots in the chassis for plug-in modules.
Unavailable Slots--Displays a comma separated list of slots that modules cannot be deployed into.
Max Number of Sub-Modules per Slot--Defines the maximum number of sub-modules that can be deployed into each slot for the selected chassis.
The Actions panel allows you to take action whenever a failure or change in the chassis is detected:
Failure--Allows you to configure the action to be taken when a chassis failure occurs (that is, a power supply, voltage, temperature or fan failure). From the Cisco-Rhino-MIB: ciscoLS1010ChassisFailureAction.
Change--Allows you to configure the action to be taken when a chassis change occurs (that is, a power supply, voltage, fan or board change). From the Cisco-Rhino-MIB: ciscoLS1010ChassisChangeAction.
The Clock panel allows you to view and change the following information:
Source Priority--Allows you to specify the highest priority at which the "system" is configured as a network clock source. You can set the Source Priority to Priority 1, Priority 2, Priority 3, Priority 4 or Priority 5.
Clocking Mode--Allows you to set the clocking mode of the system to:
Revertive--The clock changes to a higher priority clock when one is available.
Non Revertive--The clock sticks to the current priority, even though a higher priority clock is available.
The Management panel allows you to commission or decommission the selected chassis. Click Commission to force a discovery of the contents of the selected chassis.
Note A chassis can be commissioned quickly (without opening the Chassis Configuration window) by right clicking on the chassis map in the Map Viewer window (in the c6400Manager view) and selecting the Cisco 6400 UAC, Chassis, State, Commission option. Selecting the Commission option commissions the chassis and the cards within the chassis. The state of the chassis and the cards within the chassis changes to Normal.
To commission a chassis (from the Chassis Configuration window), follow these steps:
Commission--Click Commission to commission the selected chassis.
Decommission--Click Decommission to commission the selected chassis.
Global Performance Logging
The Global Performance Logging panel allows you to start or stop global performance logging. Global Performance Logging is off by default.
Start--Click Start to begin global performance logging.
Stop--Click Stop to stop global performance logging.
The Cisco 6400 NRP Management window displays four tabs: Faults, Status, Configuration, and Inventory.
Caution The User Name, Login Password, and Exec Password (set in the Management Information window in the IOS /Command Line Security tab) must be identical to the CLI Passwords set in the Cisco 6400 NSP Management window (Configuration tab). See this section and the "Management Information Window" section for further details on setting the User Name, Login Password, and Exec Password. IOS Image Download and Backup/Restore will fail when the user name and passwords are not identical.
The Status tab (see Figure 6-9) is divided into four panels: Status, System Configuration File, Host Configuration File, and Network Configuration File.
The System Configuration panel allows you to configure the following information:
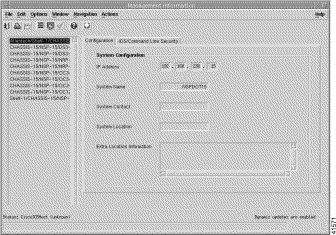
System Name--Allows you to specify a name for the managed node. By convention, the System Name is the node's fully-qualified domain name. The field is blank when the System Name is unknown.
System Contact--Allows you to specify the contact person for the managed node, together with information on how to contact the person. When contact information is unknown, the field is blank.
System Location--Allows you to specify the physical location of the node. The System Contact field is blank when the location is unknown.
IP Address--Allows you to specify the IP address of the selected chassis.
Administration Status--The Administration Status option allows you to enable, disable or reset the module. You can set the Administration Status option to:
The CLI Password panel allows you to configure the following information.
[Username] Password--Allows access to the command line interface.
Note According to the device configuration, enter either <password> or <username><space><password>. For example, joe mypassword. The <username> is optional.
Enable Password--The Enable (or Exec) password is required to enter Cisco IOS configuration mode.
The System Inventory panel displays the following information:
Host Name--Represents the name of the host in printable ASCII characters.
Domain Name--Displays the domain portion of the domain name of the host.
Hardware Version--Displays the hardware version of the module.
Module Type--Displays the type of module installed.
ROM ID--Displays the System Bootstrap description and version identification.
Module Description--Displays a descriptive string used by the agent to describe the module.
System Description--Displays a description of the entity. The System Description value should include the full name and version identification of the system's hardware type, software operating-system, and networking software.
BootImage Host--Displays the IP address of the host that supplied the current software.
Serial Number--Displays the serial number of the selected module.
Software Version--Displays the software version of the selected module.
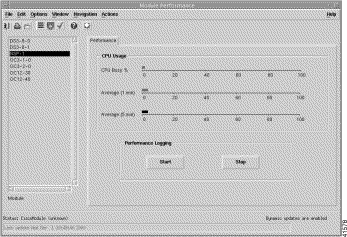
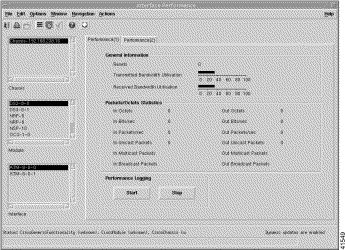
The Performance tab (see Figure 6-13) displays two panels: CPU Usage, and Performance Logging. The CPU Usage, and Performance Logging panels show "real-time" performance statistics.
The Performance Logging panel allows you to start or stop performance logging for the selected module:
Start--Click Start to begin performance logging.
Stop--Click Stop to stop global performance logging.
Note Performance logging logs data that can be displayed using the Performance Manager application. Figure 6-13 displays "real-time" performance statistics. Historical performance information can be viewed using Performance Manager. "Performance Management and Historical Data," provides further information on the Performance Manager application.
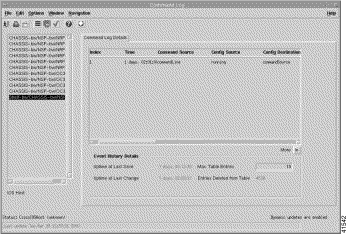
The Command Log Details table (see Figure 6-14) displays the following information:
Index--An arbitrary integer value to uniquely identify the listed events. When it reaches the maximum value, the agent wraps the value back to 1 and may flush existing entries
Event Time--The value of sysUpTime when the event occurred.
Command Source--The source of the command that instigated the event. You will see either command Line or SNMP.
Config Source--The configuration data source for the event.
Config Destination--The configuration data destination for the event.
Terminal Type--When Command Source is set to commandLine, the terminal type appears (unknown, console, terminal, virtual or auxiliary), otherwise notApplicable appears.
Terminal Number--When Command Source is set to commandLine, the terminal number appears. When the terminal is no available or not applicable, -1 appears.
Terminal User--When Command Source is set to commandLine, the name of the logged in user appears. When the terminal type is not available or not applicable nothing appears in the field.
Terminal Location--When Command Source is set to commandLine, the hard-wired location of the terminal or the remote host for an incoming connection appears. When the terminal type is not available or not applicable nothing appears in the field.
Command Source Address--When Terminal Type is set to virtual, the internet address of the connected system appears. When Command Source is set to SNMP, the internet address of the requester appears.
Virtual Host Name--When Terminal Type is set to virtual, the host name of the connected system appears. When the terminal type is not available or not applicable nothing appears in the field.
Config Filename--When Config Source or Config Destination is set to networkTftp or networkRcp, the configuration file name at the storage file server appears.
RCP User--When Config Source or Config Destination is set to networkRcp, the remote user name appears.
The Event History Details panel (see Figure 6-14) displays the following information:
Uptime at Last Save--Displays the amount of time the system had been up for, when the running configuration was last saved (written).
Uptime at Last Change--Displays the amount of time the system had been up from when the running configuration was last changed.
Note When the value of Uptime at Last Change is greater than Uptime at Last Save, the configuration has been changed but not saved.
Uptime at Last Startup Change--Displays the amount of time the system had been up for, when the startup configuration was last written to. In general the Uptime at last Startup Change is the default configuration used when cold starting the system. It may have been changed by a save of the running configuration or by a copy from elsewhere.
Maximum Table Entries--The maximum number of entries that can be held in the table.
Entries Deleted from Table--The number of times the oldest entry was deleted to make room for a new entry.
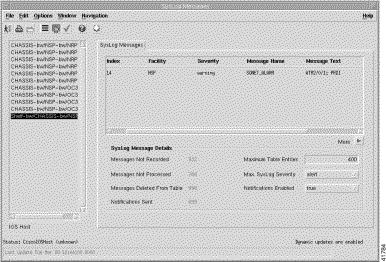
The SysLog Messages table (see Figure 6-15) displays the following information:
Index--An arbitrary integer value to uniquely identify the listed messages. When it reaches the maximum value the agent flushes the table and wraps the value back to 1.
Facility--Name of the facility that generated the Facility message.
Severity--Displays the severity of the message.
Message Name--A textual identification for the message type. A facility name in conjunction with a message name uniquely identifies a message type.
Message Text--Displays the text of the message. When the text of the message exceeds 255 bytes, the message is truncated to 254 bytes and a '*' character is appended, indicating that the message has been truncated.
Time Stamp--Displays the time the system has been running (when the message was generated).
The SysLog Message Details panel (see Figure 6-15) displays the following information:
Messages Not Recorded--Displays the number of syslog messages that were ignored.
Messages Not Processed--Displays the number of messages which could not be processed due to lack of system resources.
Messages Deleted From Table--The number of entries that have been removed to make room for new entries.
Notifications Sent--Displays the number of notifications sent.
Maximum Table Entries--Displays the upper limit on the number of entries that the table may contain.
Maximum SysLog Severity--Any message with a severity less than this one will be ignored by the agent. The Maximum SysLog Severity can be set to emergency, alert, critical, error, warning, notice, info, or debug.
Notifications Enabled--Displays whether notifications are enabled or not enabled.
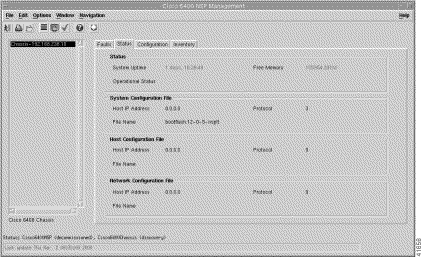
The Status tab (see Figure 6-17) is divided into four panels: Status, System Configuration File, Host Configuration File, and Network Configuration File.
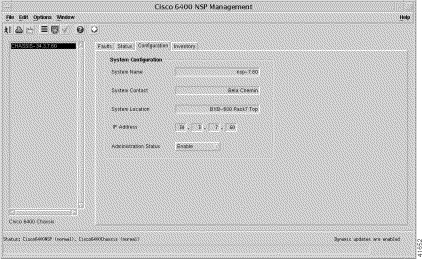
The System Configuration panel (see Figure 6-18) allows you to configure the following information:
System Name--Allows you to specify a name for the managed node. By convention, it is the node's fully-qualified domain name. When the name is unknown it is left blank.
System Contact--Allows you to specify the contact person for the managed node, together with information on how to contact them. When no contact information is known the field is left blank.
System Location--Allows you to specify the physical location of the node. The field is left blank when the location is unknown.
IP Address--Allows you to specify the IP address of the selected NRP.
Administration Status--The Administration Status option allows you to enable, disable or reset the module. You can set the Administration Status option to:
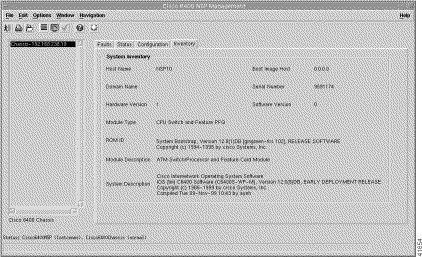
The System Inventory panel (see Figure 6-19) displays the following information:
Host Name--Displays the name of the host in printable ASCII characters.
Domain Name--Displays the domain portion of the domain name of the host.
Hardware Version--Displays the hardware version of the module.
Module Type--Displays the type of module installed.
ROM ID--Displays the System Bootstrap description and version identification.
Module Description--Displays a descriptive string used by the agent to describe the module.
System Description--Displays a description of the entity. The System Description should include the full name and version identification of the system's hardware type, software operating-system, and networking software.
BootImage Host--Displays the IP address of the host which supplied the current software.
Serial Number--Displays the serial number of the selected module.
Software Version--Displays the software version number of the selected module.
The SSG Parameters panel (see Figure 6-20) are a prerequisite for setting NRP SSG features. The SSG Parameters panel displays the following information:
Transparent Passthrough--When enabled traffic can transparently pass through the NRP-SSG device.
Cisco Express Forwarding--When Enabled will use CEF, if Disabled will use fast switching. Cisco Express Forwarding should only be set to Enabled when using Cisco IOS version 12.0(5) and later.
Default Network IP Address--IP address of the default network.
Default Network Subnet Mask--Subnet mask of the default network. A subnet mask is a 32 bit number used to separate the network and host sections of an IP address.
Service Password--This password must be the same as the passwords set in the IP Uplink service configuration window.
The Layer 3 Parameters panel (see Figure 6-20) allows you to enable service selection dashboard access and layer 3 services. The Layer 3 Parameters panel displays the following information:
SSG Auth-Port--Authentication port for the SSG. Defaults to 1645.
SSG Acct-Port--Accountancy port for the SSG. Defaults to 1646.
Shared Secret--This is the shared password between the SSG and SSD.
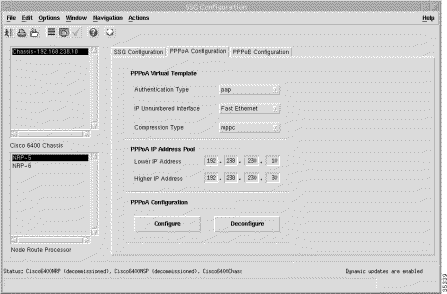
Note Before connecting a subscriber to a PTA-MD service using PPPoA, the corresponding parameters on the PPPoA Configuration tab should be configured. For example, the parameters in the PPPoA Virtual Template and PPPoA IP Address Pool should be set and configured to connect a subscriber to a PTA-MD service using PPPoA.
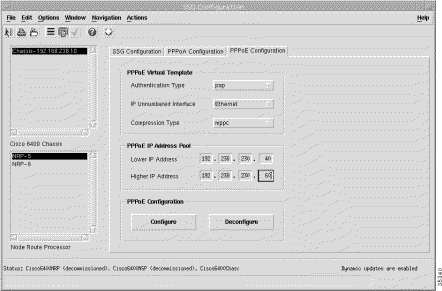
Note Before connecting a subscriber to a PTA-MD service using PPPoE the corresponding parameters on the PPPoE Configuration tab should be configured. For example, the parameters in the PPPoE Virtual Template and PPPoE IP Address Pool should be set and configured to connect a subscriber to a PTA-MD service using PPPoE.
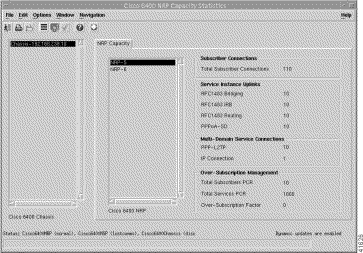
The NRP Capacity tab (see Figure 6-23) displays four panels: Subscriber Connections, Service Instance Uplinks, Multi-Domain Service Connections, and Over-Subscription Management.
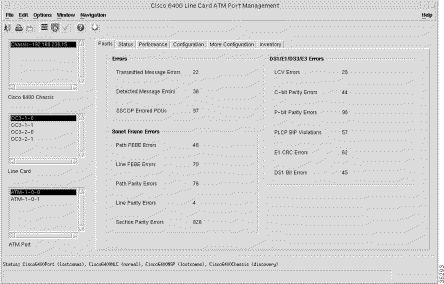
The Errors panel (see Figure 6-24) displays the following error information:
Transmitted Message Errors--Displays the number of incorrect messages detected on the interface. The Incorrect Messages Counter reflects any sort of incorrect information in a message.
Detected Message Errors--Displays the number of incorrect messages detected on the interface. The incorrect messages counter reflects any sort of incorrect information in a message.
SSCOP Error PDUs--Displays the sum of Invalid PDUs plus the PDUs that result in MAA error codes and are discarded.
Invalid PDUs are defined in SSCOP and consist of PDUs with incorrect length (MAA-ERROR code U), undefined PDU type code or not 32-bit aligned. PDUs that result in MAA error codes are discarded.
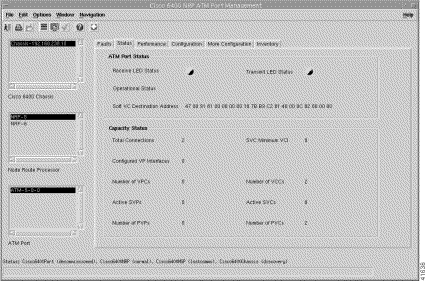
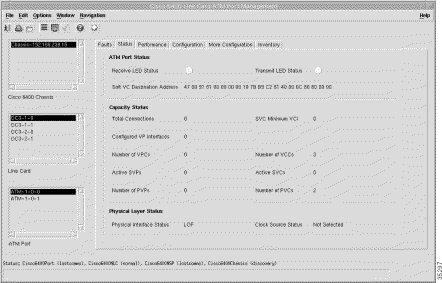
The ATM Port Status panel displays the following information:
Receive LED Status--Displays the receive LED color of the port. It can be one of the following: off, steadyGreen, steadyYellow, steadyRed, flashGreen, flashYellow or flashRed.
Transmit LED Status--Displays the transmit LED color of the port. It can be one of the following: off, steadyGreen, steadyYellow, steadyRed, flashGreen, flashYellow or flashRed.
Soft VC Destination Address--Displays the 20 byte ATM address of the destination ATM interface for soft ATM PVC/PVP.
The Capacity Status panel displays the following information:
Total Connections--Displays the total number of existing connections at the interface.
Configured VP Interfaces--Displays the number of configured VP interfaces at the physical interface.
Number of VPCs--Displays the number of VPCs (PVCs and SVCs) configured for use at the ATM interface. At the ATM UNI, the configured number of VPCs (PVCs and SVCs) can range from 0 to 256 only.
Active SVPs--Displays the number of active switched virtual paths at the interface.
Number of PVPs--Displays the number of permanent virtual paths at the interface.
SVC Minimum VCI--Displays the minimum of the range of values from which VCIs are assigned to new SVC connections. When the value is larger, more VCIs are reserved for setting up PVCs. It applies to every VPI of the physical interface and every logical port.
Number of VCCs--Displays the number of VCCs (PVCs and SVCs) configured for use at the ATM interface.
Active SVCs--Displays the number of active switched virtual channels at the interface.
Number of PVCs--Displays the number of permanent virtual channels at the interface.
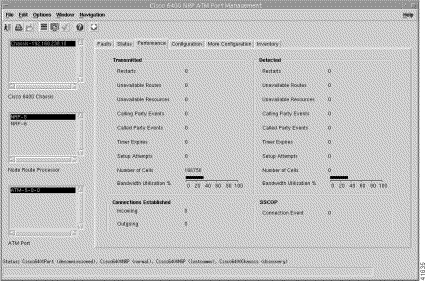
The Transmitted panel (see Figure 6-26) displays the following information:
Restarts--Displays the number of restart activity errors transmitted from the interface. The restart activity counter provides a count of host, switch, or network restart activity. The counter is incremented when transmitting a RESTART message.
Unavailable Routes--Displays the number of route unavailability transmitted from the interface. The counter is incremented when a RELEASE, RELEASE COMPLETE (only when not preceded by a RELEASE mesg for the same call), ADD PARTY REJECT, or STATUS message that contains one of the following cause code values is transmitted (Cause values apply to both UNI 3.0 and UNI 3.1):
Table 6-1: Unavailable Routes Cause Code Values
Cause Value
Meaning
1
unallocated (unassigned) number
1
no route to specified transit network
3
no route to destination
Note RELEASE COMPLETE messages that are a reply to a previous RELEASE message and contain the same cause value, are redundant (for counting purposes) and should not be counted for the counter.
Unavailable Resources--Displays the number of Resource Unavailability transmitted from the interface. The counter is incremented when a RELEASE, RELEASE COMPLETE (only when not preceded by a RELEASE message for the same call), ADD PARTY REJECT, or STATUS message that contains one of the following cause code values is received:
Table 6-2: Unavailable Resources Cause Code Values
Cause Value
Meaning
17
user busy
18
no user responding
21
call rejected
22
number changed
23
user rejects all calls with calling line ID restriction (CLIR)
27
destination out of order
31
normal, unspecified
88
incompatible destination
Note Cause values apply to both UNI 3.0 and UNI 3.1.
Calling Party Events--Displays the number of Calling Party Events transmitted from the interface. The counter monitors error events that occur due to the originating user doing something wrong. The counter is incremented when a RELEASE, RELEASE COMPLETE (only when not preceded by a RELEASE message for the same call), ADD PARTY REJECT, or STATUS message that contains one of the following cause code values is transmitted:
Table 6-3: Calling Parity Events Cause Code Values
Cause Value
Meaning
28
invalid number format (address incomplete)
43
access information discarded
57
bearer capability not authorized
65
bearer capability not implemented
73
unsupported combination of traffic parameters
78
AAL parameters cannot be supported (UNI 3.1 only)
91
invalid transit network selection
93
AAL parameters cannot be supported (UNI 3.0 only)
Note Cause values apply to both UNI 3.0 and UNI 3.1.
Called Party Events--Displays the number of Called Party Responsible For Unsuccessful Call transmitted from the interface. The counter is incremented when a RELEASE, RELEASE COMPLETE (only when not preceded by a RELEASE message for the same call), ADD PARTY REJECT, or STATUS message that contains one of the following cause code values is transmitted.
Table 6-4: Called Party Events Cause Code Values
Cause Value
Meaning
17
user busy
18
no user responding
21
all rejected
22
number changed
23
user rejects all calls with calling line ID restriction (CLIR)
27
destination out of order
31
normal, unspecified
88
incompatible destination
Note Cause values apply to both UNI 3.0 and UNI 3.1.
Timer Expires--Displays the number of Timer Expiries transmitted from the interface. The Timer Expiries counter provides a count of network timer expiries, and to some extent, host or switch timer expiries.The conditions for incrementing the Timer Expires counter are:
Expiry of any network timer
Receipt of a RELEASE or RELEASE COMPLETE message with Cause #102, "recovery on timer expiry".
Setup attempts--Displays the number of call set up attempts (both successful and unsuccessful) transmitted on the interface.
Number of Cells--Displays the number of cells transmitted on the interface, including p2p and p2mp cells.
Bandwidth Utilization--Displays the utilized bandwidth as a percentage of the maximum bandwidth supported by the port.
Note Receive and Transmit Utilization gauges are displayed from a subscriber's point of view, that is, the Transmit Utilization value shows the number of cells per second the subscriber is transmitting and the Receive Utilization value shows the number of cells per second the subscriber is receiving.
The Detected panel (see Figure 6-26) displays the following performance information:
Restarts--Displays the number of Restart Activity errors detected on the interface. The Restart Activity Counter provides a count of host, switch, or network restart activity. The counter is incremented when receiving a RESTART message.
Unavailable Routes--Displays the number of Route Unavailability detected on the interface. The counter is incremented when a RELEASE, RELEASE COMPLETE (only when not preceded by a RELEASE message for the same call), ADD PARTY REJECT, or STATUS message that contains one of the following cause code values is received:
Table 6-5: Unavailable Routes Cause Codes
Cause Value
Meaning
1
unallocated (unassigned) number
1
no route to specified transit network
3
No route to destination
88
incompatible destination
Note Cause values apply to both UNI 3.0 and UNI 3.1.
Unavailable Resources--Displays the number of Resource Unavailability detected on the interface. The Unavailable Resources counter incremented when a RELEASE, RELEASE COMPLETE (only when not preceded by a RELEASE message for the same call), ADD PARTY REJECT, or STATUS message that contains one of the following cause code values is received:
Table 6-6: Unavailable Resources Cause Codes
Cause Value
Meaning
35
requested VPCI/VCI not available
37
user cell rate not available (UNI 3.1 only)
38
network out of order
41
temporary failure
45
no VPCI/VCI available
47
resource unavailable, unspecified
49
Quality of Service unavailable
51
user cell rate not available (UNI 3.0 only)
58
bearer capability not presently available
63
Service or option not available, unspecified
92
too many pending add party requests
Note Cause values apply to both UNI 3.0 and UNI 3.1 unless otherwise stated.
Calling Party Events--Number of Calling Party Events detected on the interface. The counter monitors error events that occur due to the originating user doing something wrong. The counter is incremented when a RELEASE, RELEASE COMPLETE (only when not preceded by a RELEASE message for the same call), ADD PARTY REJECT, or STATUS message that contains one of the following cause code values is received:
Table 6-7: Calling Party Events Cause Codes
Cause Value
Meaning
28
invalid number format (address incomplete)
43
access information discarded
57
bearer capability not authorized
65
bearer capability not implemented
73
unsupported combination of traffic parameters
78
AAL parameters cannot be supported (UNI 3.1 only)
91
invalid transit network selection
93
AAL parameters cannot be supported (UNI 3.0 only)
Note Cause values apply to both UNI 3.0 and UNI 3.1.
Called Party Events--Displays the number of Called Party Responsible For Unsuccessful Call detected on the interface. The counter is incremented when a RELEASE, RELEASE COMPLETE (only when not preceded by a RELEASE message for the same call), ADD PARTY REJECT, or STATUS message that contains one of the following cause code values is received:
Table 6-8: Called Party Events Cause Codes
Cause Value
Meaning
17
user busy
18
no user responding
21
all rejected
22
number changed
23
user rejects all calls with calling line ID restriction (CLIR)
27
destination out of order
31
normal, unspecified
88
incompatible destination
Note Cause values apply to both UNI 3.0 and UNI 3.1.
Timer Expires--Displays the number of Timer Expiries detected on the interface. The Timer Expiries Counter provides a count of network timer expiries, and to some extent, host or switch timer expiries. The conditions for incrementing the counter are:
Expiry of any network timer
Receipt of a RELEASE or RELEASE COMPLETE message with Cause #102, "recovery on timer expiry".
Setup Attempts--Displays the number of call setup attempts (both successful and unsuccessful) detected on the interface.
Number of Cells--The number of cells received on the interface, including p2p and p2mp cells.
The SSCOP section of the Performance tab allows you to view the following performance information:
Connection Event--Displays the SSCOP Connection Events Counter. The counter counts the sum of the following errors:
SSCOP Connection Disconnect Counter--The abnormal occurrence of the event is characterized by the expiry of Timer_NO_RESPONSE. (The event is communicated to the layer management with MAA-ERROR code P. Refer to ITU-T Q.2110 [13].)
SSCOP Connection Initiation Failure--The condition indicates the inability to establish an SSCOP connection. The event occurs whenever the number of expiries of the connection control timer (Timer_CC) exceeds the MaxCC or upon receipt of a connection reject message BGREJ PDU. (The event is communicated to layer management with MAA-ERROR code O. Refer to ITU-T Q.2110.)
SSCOP Connection Re-Establ or Resynch--Occurs upon receipt of a BGN PDU or RESYNC PDU.
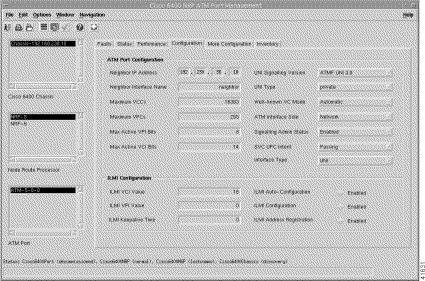
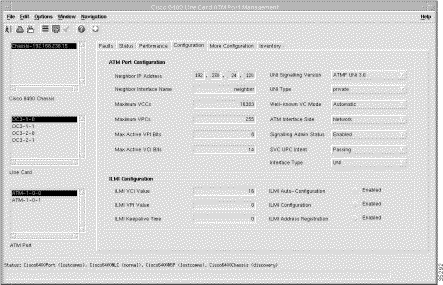
The ATM Port Configuration panel (see Figure 6-27) allows you to configure the following information:
Neighbor IP Address--Allows you to specify the IP address of the neighbor system connected to the far end of the interface, to which a Network Management Station can send SNMP messages, as IP datagrams sent to UDP port 161, in order to access network management information concerning the operation of that system.
Note The value of the object may be obtained in different ways, for example, by manual configuration, or through ILMI interaction with the neighbor system.
Neighbor Interface Name--Allows you to specify the textual name of the interface on the neighbor system on the far end of the interface, and to which the interface connects. When the neighbor system is manageable through SNMP and supports the object ifName, the value of the object must be identical with that of ifName for the ifEntry of the lowest level physical interface for the port. When the interface does not have a textual name, the value of the object is a zero length string. Note that the value of the object may be obtained in different ways, for example, by manual configuration, or through ILMI interaction with the neighbor system.
Maximum VCCs--Allows you to specify the maximum number of VCCs (PVCs and SVCs) supported at the ATM interface.
Maximum VPCs--Allows you to specify the maximum number of VPCs (PVCs and SVCs) supported at the ATM interface. At the ATM UNI, the maximum number of VPCs (PVCs and SVCs) ranges from 0 to 256 only.
Max Active VPI Bits--Allows you to specify the maximum number of active VPI bits configured for use at the ATM interface. At the ATM UNI, the maximum number of active VPI bits configured for use ranges from 0 to 8 only.
Max Active VCI Bits--Allows you to specify the maximum number of active VCI bits configured for use at the ATM interface.
UNI Signalling Version--Allows you to specify the version of UNI signalling that is currently being used on the interface. You can set the UNI Signalling Version to:
ATMF UNI 3.0, ATM FUNI 3.1 or ATMF UNI 4.0--Used when the interface is an UNI or IISP interface.
Not Applicable--Used when the interface is a PNNI interface or when signalling is disabled. It may reflect a manually configured value for the signalling version, or may be determined by other means such as auto-configuration.
Note Setting the variable to a value of "notApplicable" is not allowed. To modify the ciscoAtmIfUniSignallingVersion, ifAdminStatus has to be down and atmIfIlmiAutoConfiguration disabled.
UNI Type--Allows you to specify the type of User to Network Interface (UNI). You can set the UNI Type to public or private.
Note When ciscoAtmIfType is not UNI then UNI type value should be ignored.
Well-known VC Mode--Allows you to specify whether well-known VCs should be automatically or manually created for the interface. You can set the Well-known VC Mode to:
Automatic--In automatic mode, well-known VCs are created with default VPI/VCI values upon startup or upon entry to the automatic mode. In Automatic mode, well-known VCs are not allowed to be deleted or modified by user commands. Automatic mode is the default mode at startup for equipment which supports automatic well-known VC creation.
Manual--In manual mode, well-known VCs won't be automatically created. Instead you can delete and create PVCs with the reserved encapsulation types aalQsAal, aal5Ilmi, and aal5Pnni as applicable. PVCs are allowed to have VCI values in the range 5 to 16383, instead of 32 to 16383.
Manual Delete Upon Entry--The Manual Delete Upon Entry action causes any existing VCs with reserved encapsulation types (aalQsAal, aal5Ilmi or aal5Pnni) to be deleted for the interface as it enters the manual state.
ATM Interface Side--Allows you to specify the side of ATM interface. You can set the ATM Interface Side to either a User or Network side or Not Applicable. A Not Applicable value implies that Interface Type is other than uni or iisp.
Signalling Admin Status--Allows you to Enable or Disable signalling or sscop on the interface. You can set the Signalling Admin Status option to:
Enabled--Signalling or sscop on the interface is enabled.
Disabled--Signalling or sscop on the interface is disabled.
Note To modify the ciscoAtmIfSignallingAdminStatus, ifAdminStatus has to be down.
SVC UPC Intent--Allows you to specify the policing (Usage Parameter Control or UPC) action to take for SVCs established through the interface. You can set the SVC UPC Intent option to Passing, Tagging or Dropping.
Note Values other than passing are allowed only when policing is supported on the interface. The SVC UPC Intent also serves to determine which UPC to use on the terminating (destination) half-leg of Soft PVCs. For the CPU interface or logical ports on the LS1010, only the 'passing' value is supported.
Interface Type--Allows you to specify the type of ATM interface. You can set the Interface Type to Other, UNI (User to Network), PNNI, IISP or NNI PVC Only.
Note To modify the ciscoAtmIftype, ifAdminStatus has to be down and atmIfIlmiAutoConfiguration disabled.
The ILMI Configuration panel (see Figure 6-27) allows you to configure the following information:
ILIM VCI Value--Allows you to specify the VCI value of the VCC supporting the ILMI at the ATM interface. When the values of atmInterfaceIlmiVpi and atmInterfaceIlmiVci are both equal to zero then the ILMI is not supported at the ATM interface.
ILMI VPI Value--Allows you to specify the VPI value of the VCC supporting the ILMI at the ATM interface. When the values of atmInterfaceIlmiVpi and atmInterfaceIlmiVci are both equal to zero then the ILMI is not supported at the ATM interface.
ILMI Keepalive Time--Allows you to specify the amount of time that should elapse between successive ILMI See messages sent on the interface. A value of 0 disables ILMI keepalive messages on the interface.
ILMI Auto-Configuration--Allows you to Enable or Disable the ILMI link and interface type determination. You can set the ILMI Auto-Configuration option to:
Enabled--ILMI link and interface type determination on the interface is enabled.
Disabled--ILMI link and interface type determination on the interface is disabled.
Note The configuration only takes effect on the next interface restart.
ILMI Configuration--Allows you to Enable or Disable ILMI configuration on the interface.
Enabled--ILMI configuration on the interface is enabled.
Disabled--ILMI configuration on the interface is disabled.
Note The configuration takes effect only on the next interface restart. Disabling the ILMI Configuration will also disable atmIfIlmiAddressRegistration and atmIfIlmiAutoConfiguration and atmIfIlmiKeepAlive.
ILMI Address Registration--Allows you to Enable or Disable the ILMI Address Registration on the interface.
Enabled--ILMI Address Registration on the interface is enabled.
Disabled--ILMI Address Registration on the interface is disabled.
Note The configuration takes effect only on the next interface restart.
The Information Element Transfer panel (see Figure 6-28) allows you to configure the following information:
Broadband High Layer--Allows you to specify whether to accept, transfer, and deliver the Broadband High Layer Information Element from the calling party to the called party. You can set the Broadband High Layer to:
Enabled--Information element is transferred to the called party.
Disabled--Information element will not be transferred to the called party.
Called Party Subnet Address--The Called Party Subnet Address is required for ATM systems that support only a value of "disabled" (that is, the ATM systems does not support the feature associated with the parameter).
Calling Party Number--Allows you to specify whether the Calling Party Number Information Element is transferred to the called party address. You can set the Calling Party Number to:
Enabled--Information element is transferred to the called party.
Disabled--Information element will not be transferred to the called party.
Unknown--Allows you to specify whether to accept, transfer, and deliver the unknown Information Element from the calling party to the called party, when the IE instruction field flag is set to zero. You can set the Unknown option to:
Enabled--Information element is transferred to the called party.
Disabled--Information element is not transferred to the called party.
Note When the IE action flag is set to one, the IE action indicator should be followed regardless of the configuration.
Broadband Repeat Indicator--The Broadband Repeat Indicator is required for ATM systems that support only a value of "disabled" (that is, the ATM systems does not support the feature associated with the parameter).
Calling Party Subnet Address--Allows you to specify whether to accept and transfer the Calling Party Subaddress Information Element from the calling party to the called party. You can set the Calling Party Subnet Address to:
Enabled--Information element is transferred to the called party.
Disabled--Information element will not be transferred to the called party.
ATM Adaption Layer Parameters--Allows you to specify whether to accept, transfer, and deliver the ATM Adaptation Layer Parameters Information Element from the calling party to the called party. You can set the ATM Adaption Layer Parameters option to:
Enabled--Information element is transferred to the called party.
Disabled--Information element will not be transferred to the called party.
Broadband Low Layer--The Broadband Low Layer parameter is required for ATM systems that support only a value of "disabled" (that is, the ATM systems does not support the feature associated with the parameter).
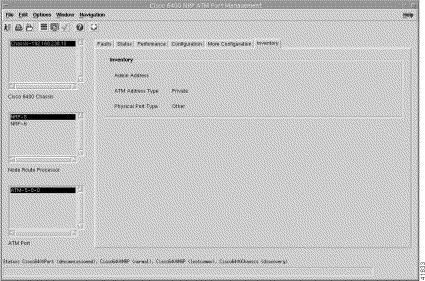
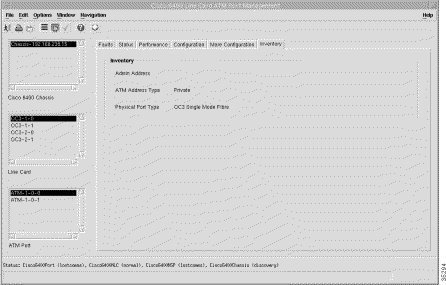
The Inventory panel (see Figure 6-29) displays the following information:
Admin Address--Displays the address assigned for administrative purposes, for example, an address associated with the service provider side of a public network UNI. When the interface has no assigned administrative address, or when the address used for administrative purposes is the same as that used for ifPhysAddress, then the Admin Address is an octet string of zero length.
ATM Address Type--Displays the type of primary ATM address configured for use at the ATM interface.
Physical Port Type--Displays the type of physical layer medium on the port.
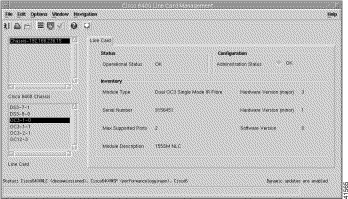
The Inventory panel displays the following information:
Module Type--Displays the module type of the selected NLC.
Serial Number--Displays the serial number of the sub-module.
Max Supported Ports--Displays the maximum number of ports supported by the sub-module.
Hardware Version (major)--Displays the major hardware version of the sub-module. Together with ciscoLS1010SubModuleHwVersionMinor, this completely specifies the hardware version of the sub-module.
Hardware Version (minor)--Displays the minor hardware version of the sub-module. Together with ciscoLS1010SubModuleHwVersion, this completely specifies the hardware version of the sub-module.
Software Version--Displays the current software version number.
The Errors panel (see Figure 6-31) displays the following error information:
Transmitted Message Errors--Displays the number of Incorrect Messages detected on the interface. The Incorrect Messages Counter reflects any sort of incorrect information in a message.
Detected Message Errors--Displays the number of Incorrect Messages detected on the interface. The Incorrect Messages Counter reflects any sort of incorrect information in a message.
SSCOP Error PDUs--Displays the sum of the following errors:
Invalid PDUs are defined in SSCOP and consist of PDUs with incorrect length (MAA-ERROR code U), undefined PDU type code or not 32-bit aligned. PDUs that result in MAA error codes are discarded.
The DS1/E1/DS3/E3 Errors panel displays the following error information:
LCV Errors--Displays the number of CRC errors (in CRC-4 mode) on the physical interface. This object is only present for E1 interfaces.
C-Bit Parity Errors--Displays the number of C-bit parity violations on the physical interface. This object is only present for DS3 interfaces.
P-bit Parity Errors--Displays the number of P-bit parity violations or E3 G.832 BIP-8 errors on the physical interface. This object is present only for DS3/E3 interfaces.
PLCP BIP Violations--Displays the number of PLCP BIP violations on the physical interface. This object is only present for DS3/E3/DS1/E1 interfaces.
E1 CRC Errors--Displays the number of bit errors (CRC-6 error in ESF mode and framing bit error in SF mode) on the physical interface. This object is only present for DS1 interfaces.
DS1 Bit Errors--Displays the number of Line Code Violation errors on the physical interface. This object is only present for DS3/E3/DS1/E1 interfaces.
The ATM Port Status section (see Figure 6-32) displays the following status information:
Receive LED Status--Displays the receive LED color of the port. It can be off, steadyGreen, steadyYellow, steadyRed, flashGreen, flashYellow or flashRed.
Soft VC Destination Address--Displays the 20 byte ATM address of the destination ATM interface for soft ATM PVC/PVP.
Transmit LED Status--Displays the transmit LED color of the port. It can be off, steadyGreen, steadyYellow, steadyRed, flashGreen, flashYellow or flashRed.
The Capacity Status section (see Figure 6-32) displays the following information:
Total Connections--Displays the total number of existing connections at the interface.
Configured VP Interfaces--Displays the number of configured VP interfaces at the physical interface.
Number of VPCs--Displays the number of VPCs (PVCs and SVCs) configured for use at the ATM interface. At the ATM UNI, the configured number of VPCs (PVCs and SVCs) can range from 0 to 256 only.
Active SVPs--Displays the number of active switched virtual paths at the interface.
Number of PVPs--Displays the number of permanent virtual paths at the interface.
SVC Minimum VCI--Displays the minimum of the range of values from which VCI's are assigned to new SVC connections. When the SVC Minimum VCI value is larger, more VCI's are reserved for setting up PVCs. The SVC Minimum VCI value applies to every VPI of the physical interface and every logical port.
Number of VCCs--Displays the number of VCCs (PVCs and SVCs) configured for use at the ATM interface.
Active SVCs--Displays the number of active switched virtual channels at the interface.
Number of PVCs--Displays the number of permanent virtual channels at the interface.
The Physical Layer Status panel (see Figure 6-32) displays the following status information:
Physical Interface Status--Displays the status of the physical interface. The value of the object is only valid when the interface's ifAdminStatus has the value 'up'. Note that some of the enumerated values are specific to a particular physical layer. You will see: normal, los, lof, loc, ais, yellowLine, yellowPath, lop, idle, yellowAlarm, plcpLOF, plcpYellow, maFERF, pathAis or ocd.
Clock Source Status--Displays the network clock source status of the interface:
notSelected--Not selected as the network clock source.
The Transmitted panel (see Figure 6-33) displays the following performance information:
Restarts--Displays the number of Restart Activity errors transmitted from the interface. The Restart Activity Counter provides a count of host, switch, or network restart activity. The Restarts counter is incremented when transmitting a RESTART message.
Unavailable Routes--Displays the number of Restart Activity errors transmitted from the interface. The Restart Activity Counter provides a count of host, switch, or network restart activity. The Unavailable Routes counter is incremented when transmitting a RESTART message.
Unavailable Resources--Displays the number of Resource Unavailability transmitted from the interface. The Unavailable Resources counter is incremented when a RELEASE, RELEASE COMPLETE (only when not preceded by a RELEASE mesg for the same call), ADD PARTY REJECT, or STATUS message that contains one of the following cause code values is received.
Table 6-9: Unavailable Resources Cause Codes
Cause Value
Meaning
17
user busy
18
no user responding
21
call rejected
22
number changed
23
user rejects all calls with calling line ID restriction (CLIR)
27
destination out of order
31
normal, unspecified
88
incompatible destination
Note Cause values apply to both UNI 3.0 and UNI 3.1.
Called Party Events--Displays the number of Called Party Responsible For Unsuccessful Call transmitted from the interface. The Called Party Events counter is incremented when a RELEASE, RELEASE COMPLETE (only when not preceded by a RELEASE message for the same call), ADD PARTY REJECT, or STATUS message that contains one of the following cause code values is transmitted.
Table 6-10: Called Party Events Cause Codes
Cause Value
Meaning
17
user busy
18
no user responding
21
all rejected
22
number changed
23
user rejects all calls with calling line ID restriction (CLIR)
27
destination out of order
31
normal, unspecified
88
incompatible destination
Note Cause values apply to both UNI 3.0 and UNI 3.1.
Calling Party Events--Displays the number of Calling Party Events transmitted from the interface. The Calling Party Events counter monitors error events that occur due to the originating user doing something wrong. The Calling Party Events counter is incremented when a RELEASE, RELEASE COMPLETE (only when not preceded by a RELEASE mesg for the same call), ADD PARTY REJECT, or STATUS message that contains one of the following cause code values is transmitted.
Table 6-11: Calling Party Events Cause Codes
Cause Value
Meaning
28
invalid number format (address incomplete)
43
access information discarded
57
bearer capability not authorized
65
bearer capability not implemented
73
unsupported combination of traffic parameters
78
AAL parameters cannot be supported (UNI 3.1 only)
91
invalid transit network selection
93
AAL parameters cannot be supported (UNI 3.0 only)
Note Cause values apply to both UNI 3.0 and UNI 3.1.
Timer Expires--Displays the number of Timer Expiries transmitted from the interface. The Timer Expiries counter provides a count of network timer expiries, and to some extent, host or switch timer expiries. The conditions for incrementing the Timer Expiries counter are:
Expiry of any network timer--Receipt of a RELEASE or RELEASE COMPLETE message with Cause #102, "recovery on timer expiry".
Setup attempts--Displays the number of call setup attempts (both successful and unsuccessful) transmitted on this interface.
Number of Cells--Displays the number of cells transmitted on the interface, including p2p and p2mp cells.
Bandwidth Utilization--Displays the utilized bandwidth as a percentage of the maximum bandwidth supported by the port.
Note Receive and Transmit Utilization gauges are displayed from a subscriber's point of view, that is, the Transmit Utilization value shows the number of cells per second the subscriber is transmitting and the Receive Utilization value shows the number of cells per second the subscriber is receiving.
The Detected panel (see Figure 6-33) displays the following performance information:
Restarts--Displays the number of Restart Activity errors detected on the interface. The Restart Activity Counter provides a count of host, switch, or network restart activity. The Restarts counter is incremented when receiving a RESTART message.
Unavailable Routes--Displays the number of Route Unavailability detected on the interface. The Unavailable Routes counter is incremented when a RELEASE, RELEASE COMPLETE (only when not preceded by a RELEASE mesg for the same call), ADD PARTY REJECT, or STATUS message that contains one of the following cause code values is received.
Table 6-12: Unavailable Routes Cause Codes
Cause Value
Meaning
1
unallocated (unassigned) number
1
no route to specified transit network
3
No route to destination
88
incompatible destination
Note Cause values apply to both UNI 3.0 and UNI 3.1.
Unavailable Resources--Displays the number of Resource Unavailability detected on the interface. The Unavailable Resources counter is incremented when a RELEASE, RELEASE COMPLETE (only when not preceded by a RELEASE mesg for the same call), ADD PARTY REJECT, or STATUS message that contains one of the following cause code values is received.
Table 6-13: Unavailable Resources Cause Codes
Cause Value
Meaning
35
requested VPCI/VCI not available
37
user cell rate not available (UNI 3.1 only)
38
network out of order
41
temporary failure
45
no VPCI/VCI available
47
resource unavailable, unspecified
49
quality of service unavailable
51
user cell rate not available (UNI 3.0 only)
58
bearer capability not presently available
63
service or option not available, unspecified
92
too many pending add party requests
Note Cause values apply to both UNI 3.0 and UNI 3.1 unless otherwise stated.
Called Party Events--Displays the number of Called Party Responsible For Unsuccessful Call detected on the interface. The Called Party Events counter is incremented when a RELEASE, RELEASE COMPLETE (only when not preceded by a RELEASE mesg for the same call), ADD PARTY REJECT, or STATUS message that contains one of the following cause code values is received.
Table 6-14: Called Party Events Cause Codes
Cause Value
Meaning
17
user busy
18
no user responding
21
all rejected
22
number changed
23
user rejects all calls with calling line ID restriction (CLIR)
27
destination out of order
31
normal, unspecified
88
incompatible destination
Note Cause values apply to both UNI 3.0 and UNI 3.1.
Calling Party Events--Number of Calling Party Events detected on the interface. The Calling Party Events counter monitors error events that occur due to the originating user making an error. The Calling Party Events counter is incremented when a RELEASE, RELEASE COMPLETE (only when not preceded by a RELEASE mesg for the same call), ADD PARTY REJECT, or STATUS message that contains one of the following cause code values is received.
Table 6-15: Calling Parity Events Cause Codes
Cause Value
Meaning
28
invalid number format (address incomplete)
43
access information discarded
57
bearer capability not authorized
65
bearer capability not implemented
73
unsupported combination of traffic parameters
78
AAL parameters cannot be supported (UNI 3.1 only)
91
invalid transit network selection
93
AAL parameters cannot be supported (UNI 3.0 only)
Note Cause values apply to both UNI 3.0 and UNI 3.1.
Timer Expires--Displays the number of Timer Expiries detected on the interface. The Timer Expiries Counter provides a count of network timer expiries, and to some extent, host or switch timer expiries. The conditions for incrementing the Timer Expires counter are:
Expiry of any network timer.
Receipt of a RELEASE or RELEASE COMPLETE message with Cause #102, "recovery on timer expiry".
Setup attempts--Displays the number of call setup attempts (both successful and unsuccessful) detected on the interface.
Number of Cells--The number of cells received of the interface, including p2p and p2mp cells.
Bandwidth Utilization--Displays the utilized bandwidth as a percentage of the maximum bandwidth supported by the port.
Note Receive or Transmit Utilization gauges are displayed from a subscriber's point of view, that is, the Transmit Utilization value shows the number of cells per second that the subscriber is transmitting and the Receive Utilization value shows the number of cells per second that the subscriber is receiving.
The SSCOP panel (see Figure 6-33) displays the following performance information:
Connection Event--SSCOP Connection Events Counter. The Connection Event counter counts the sum of the following errors:
SSCOP Connection Disconnect Counter--The abnormal occurrence of the event is characterized by the expiration of Timer_NO_RESPONSE. (The event is communicated to the layer management with MAA-ERROR code P. Refer to ITU-T Q.2110 [13].)
SSCOP Connection Initiation Failure--Condition indicates the inability to establish an SSCOP connection. The event occurs when ever the number of expiries of the connection control timer (Timer_CC) exceeds the MaxCC or upon receipt of a connection reject message BGREJ PDU. (The event is communicated to layer management with MAA-ERROR code O. Refer to ITU-T Q.2110.)
SSCOP Connection Re-Establ or Resynch--The SSCOP Connection Re-Establ or Resynch event occurs upon receipt of a BGN PDU or RESYNC PDU.
The ATM Port Configuration panel (see Figure 6-34) allows you to configure the following information:
Neighbor IP Address--Allows you to specify the IP address of the neighbor system connected to the far end of the interface, to which a Network Management Station can send SNMP messages, as IP datagrams sent to UDP port 161, in order to access network management information concerning the operation of that system.
Note The value of the object may be obtained in different ways, for example, by manual configuration, or through ILMI interaction with the neighbor system.
Neighbor Interface Name--Allows you to specify the textual name of the interface on the neighbor system on the far end of the interface to which the interface connects. When the neighbor system is manageable through SNMP and supports the object ifName, the value of the object must be identical with that of ifName for the ifEntry of the lowest level physical interface for the port. When the interface does not have a textual name, the value of the object is a zero length string. Note that the value of the object may be obtained in different ways, for example, by manual configuration, or through ILMI interaction with the neighbor system.
Maximum VCCs--Allows you to specify the maximum number of VCCs (PVCs and SVCs) supported at the ATM interface.
Maximum VPCs--Allows you to specify the maximum number of VPCs (PVCs and SVCs) supported at the ATM interface. At the ATM UNI, the maximum number of VPCs (PVCs and SVCs) ranges from 0 to 256 only.
Max Active VPI Bits--Allows you to specify the maximum number of active VPI bits configured for use at the ATM interface. At the ATM UNI, the maximum number of active VPI bits configured for use ranges from 0 to 8 only.
Max Active VCI Bits--Allows you to specify the maximum number of active VCI bits configured for use at the ATM interface.
UNI Signalling Version--Allows you to specify the version of UNI signalling that is currently being used on the interface. You can set the UNI Signalling Version to:
ATMF UNI 3.0, ATMF UNI 3.1 or ATM UNI 4.0--This is used when the interface is a UNI or IISP interface.
Not Applicable--This is used when the interface is a PNNI interface or when signalling is disabled. Not Applicable may reflect a manually configured value for the signalling version, or may be determined by other means such as auto-configuration.
Note Setting the UNI Signalling Version to a value of Not Applicable is not allowed. To modify the ciscoAtmIfUniSignallingVersion, ifAdminStatus has to be down and atmIfIlmiAutoConfiguration disabled.
UNI Type--Allows you to specify the type of User to Network interface. You can set the UNI Type to public or private.
Note When ciscoAtmIfType is not UNI then the UNI type value should be ignored.
Well-known VC Mode--Allows you to specify whether well-known VCs should be automatically or manually created for the interface. You can set the UNI Type to:
Automatic--In automatic mode, well-known VCs is created with default VPI/VCI values upon startup or upon entry to the automatic mode. While in this mode, well-known VCs will not be allowed to be deleted or modified by user commands. This is the default mode at startup for equipment which supports automatic well-known VC creation.
Manual--In manual mode, well-known VCs are not created automatically. Instead you can delete and create PVCs with the reserved encapsulation types aalQsAal, aal5Ilmi, and aal5Pnni as applicable. PVCs are allowed to have VCI values in the range 5 to 16383, instead of 32 to 16383.
Manual Delete Upon Entry--The Manual DeleteUponEntry action causes any existing VCs with reserved encapsulation types (aalQsAal, aal5Ilmi or aal5Pnni) to be deleted for this interface as it enters the manual state.
ATM Interface Side--Allows you to specify the side of ATM interface. You can set the ATM Interface Side to either a user or network side or Not Applicable. A Not Applicable value implies that the Interface Type is other than uni or iisp.
Signalling Admin Status--Allows you to Enable or Disable signalling or sscop on this interface. You can set Signalling Admin Status to:
Enabled--Signalling or sscop on this interface is enabled.
Disabled--Signalling or sscop on this interface is disabled.
Note To modify the ciscoAtmIfSignallingAdminStatus, ifAdminStatus has to be down.
SVC UPC Intent--Allows you to specify the policing (Usage Parameter Control or UPC) action to take for SVCs established through this interface. Yo can set this option to Passing, Tagging or Dropping.
Note Values other than passing are allowed only when policing is supported on the interface. This also serves to determine which UPC to use on the terminating (destination) half-leg of Soft PVCs. For the CPU interface or logical ports on the LS1010, only the 'passing' value is supported.
Interface Type--Allows you to specify the type of ATM interface. You can set the Interface Type to a UNI (User to Network), PNNI, IISP or NNI PVC only.
Note To modify the ciscoAtmIftype, ifAdminStatus has to be down and atmIfIlmiAutoConfiguration disabled.
The ILMI Configuration panel (see Figure 6-34) allows you to configure the following information:
ILIM VCI Value--Allows you to specify the VCI value of the VCC supporting the ILMI at this ATM interface. When the values of atmInterfaceIlmiVpi and atmInterfaceIlmiVci are both equal to zero then the ILMI is not supported at this ATM interface.
ILMI VPI Value--Allows you to specify the VPI value of the VCC supporting the ILMI at this ATM interface. When the values of atmInterfaceIlmiVpi and atmInterfaceIlmiVci are both equal to zero then the ILMI is not supported at this ATM interface.
ILMI Keepalive Time--Allows you to specify the amount of time that should elapse between successive ILMI keepalive messages sent on this interface. A value of 0 disables ILMI keepalive messages on this interface.
ILMI Auto-Configuration--Allows you to Enable or Disable the ILMI link and interface type determination. You can set the ILMI Auto-Configuration to:
Enabled--ILMI link and interface type determination on this interface is enabled.
Disabled--ILMI link and interface type determination on this interface is disabled.
Note This configuration takes effect only on the next interface restart.
ILMI Configuration--Allows you to Enable or Disable ILMI configuration on this interface.
Enabled--ILMI configuration on this interface is enabled.
Disabled--ILMI configuration on this interface is disabled.
Note The configuration takes effect only on the next interface restart. Disabling this object will also disable atmIfIlmiAddressRegistration and atmIfIlmiAutoConfiguration and atmIfIlmiKeepAlive.
ILMI Address Registration--This option allows you to Enable or Disable ILMI Address Registration on this interface.
Enabled--ILMI Address Registration on this interface is enabled.
Disabled--ILMI Address Registration on this interface is disabled.
Note This configuration takes effect only on the next interface restart.
The More Configuration tab (see Figure 6-35) is divided into four panels: Information Element Transfer, Actions, General Physical Layer Configuration, and DS1/E1/DS3/E3 Physical Layer Configuration.
The Information Element Transfer panel (see Figure 6-35) allows you to configure the following information:
Broadband High Layer--Allows you to specify whether to accept, transfer, and deliver the Broadband High Layer Information Element from the calling party to the called party. You can set the Broadband High Layer option to:
Enabled--Information element is transferred to the called party.
Disabled--Information element will not be transferred to the called party.
Called Party Subnet Address--This parameter is required for ATM systems that support only a value of "disabled" (that is, the ATM system does not support the feature associated with the parameter).
Calling Party Number--Allows you to specify whether the Calling Party Number Information Element is transferred to the called party address. You can set the Calling Party Number to:
Enabled--Information element is transferred to the called party.
Disabled--Information element will not be transferred to the called party.
Unknown--Allows you to specify whether to accept, transfer, and deliver the unknown Information Element from the calling party to the called party, when the IE instruction field flag is set to zero. You can set the Unknown option to:
Enabled--Information element is transferred to the called party.
Disabled--Information element will not be transferred to the called party.
Note When the IE action flag is set to one, the IE action indicator should be followed regardless of this configuration.
Broadband Repeat Indicator--This parameter is required for ATM systems that support only a value of 'disabled' (that is, the ATM systems does not support the feature associated with the parameter).
Calling Party Subnet Address--Allows you to specify whether to accept and transfer the Calling Party Subaddress Information Element from the calling party to the called party. You can set the Calling Party Subnet Address to:
Enabled--Information element is transferred to the called party.
Disabled--Information element will not be transferred to the called party.
ATM Adaption Layer Parameters--Allows you to specify whether to accept, transfer, and deliver the ATM Adaptation Layer Parameters Information Element from the calling party to the called party. You can set the ATM Adaption Layer Parameters to:
Enabled--Information element is transferred to the called party.
Disabled--Information element will not be transferred to the called party.
Broadband Low Layer--the Broadband Low Layer parameter is required for ATM systems that support only a value of 'disabled' (that is, the ATM systems does not support the feature associated with the parameter).
The General Physical Layer Configuration panel (see Figure 6-35) allows you to configure the following information:
Cell Payload Scrambling--Allows you to specify whether cell payload scrambling is enabled or disabled on the physical interface. You can set the ATM Adaption Layer Parameters to:
On--Cell payload scrambling is enabled on the physical interface.
Off--Cell payload scrambling is disabled on the physical interface.
Clock Source Priority--Allows you to specify the priority of this interface when configured as a network clock source. You can set the Clock Source Priority option to: notConfigured, priority1, priority2, priority3 or priority4.
Note notConfigured indicates this is not configured as a network clock source.
Framing Mode--Allows you to specify the framing format present on the physical interface. You can set the Framing Mode option to:
SONET--Displays sts-3c or sts-12c format and applies only to OC-3 and OC-12 type interfaces, respectively.
SDH--Displays stm1 or stm4 format and applies only to OC-3 and OC-12 type interfaces, respectively.
DS3 M23 ADM--Displays M23 ADM mode and applies to DS3 type interfaces only.
DS3 M23 PLCP--Displays M23 PLCP mode and applies to DS3 type interfaces only.
DS3 c-bit ADM--Displays C-BIT ADM mode and applies to DS3 type interfaces only.
DS3 c-bit PLCP--Indicates C-BIT PLCP mode and applies to DS3 type interfaces only.
E3 G832 ADM--Displays G.832 ADM mode and applies to E3 type interfaces only.
E3 G751 ADM--Displays G.751 ADM mode and applies to E3 type interfaces only.
E3 G751 PLCP-- Displays G.751 PLCP mode and applies to E3 type interfaces only.
DS1 SF ADM--Displays DS1 SF ADM mode and applies to DS1 type interfaces only.
DS1 ESF ADM--Displays DS1 ESF ADM mode and applies to DS1 type interfaces only.
DS1 SF PLCP--Displays DS1 SF PLCP mode and applies to DS1 type interfaces only.
DS1 ESF PLCP--Displays DS1 ESF PLCP mode and applies to DS1 type interfaces only.
E1 ADM--Displays E1 ADM mode and applies to E1 type interfaces only.
E1 PLCP--Displays E1 PLCP mode and applies to E1 type interfaces only.
E1 CRC ADM--Displays E1 CRC-4 ADM mode and applies to E1 type interfaces only.
E1 CRC PLCP--Displays E1 CRC-4 PLCP mode and applies to E1 type interfaces only.
STS-Stream Scrambling--Allows you to specify whether STS-stream scrambling is enabled or disabled on the physical interface.You can set the STS-Stream Scrambling option to:
on--STS-stream scrambling is enabled.
off--STS-stream scrambling is disabled.
Transmit Clock Source--Allows you to specify the source of the transmit clock.
Loop Timing--Displays that the recovered receive clock is used as the transmit clock. You can set Loop Timing to:
Free Running--Displays that a local clock source is used.
Network Derived--Displays that recovered receive clock from another interface is used as the transmit clock source.
Loopback Configuration--Allows you to specify the loopback configured on the physical interface. You can set Loopback Configuration to:
No Loop--Displays no loopback is present.
Diagnostic Loop--Displays transmit data stream is looped to the receive direction.
Line Loop--Displays receive data stream is looped to the transmit direction.
Other Loop--Displays loopbacks that are not defined here.
The Inventory panel displays the following information:
Admin Address--Displays the address assigned for administrative purposes, for example, an address associated with the service provider side of a public network UNI. When the interface has no assigned administrative address, or when the address used for administrative purposes is the same as that used for ifPhysAddress, then the Admin Address is an octet string of zero length.
ATM Address Type--Displays the type of primary ATM address configured for use at the ATM interface.
Physical Port Type--Displays the type of physical layer medium on the port.
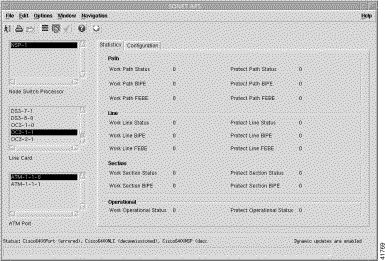
The SONET APS window is divided into two tabbed sections: Statistics and Configuration.
Note The SONET APS window (Statistics tab) only populates when redundancy is configured on the device. Redundancy must be configured manually using Cisco IOS.
The Path panel displays the following information:
Work Path Status--The Work Path Status indicates the path level status of the working channel in APS. The c64SONETAPSWorkPathStatus is a bit map represented as a sum of multiple alarms simultaneously. The sonetPathNoDefect should be set when and only when no other flag is set. Possible bit positions are:
Table 6-16: Work Path Status Bit Positions
1
sonetPathNoDefect
2
sonetPathSTSAIS
3
sonetPathSTSRDI
4
sonetPathSTSLOP
5
sonetBIPE(BIP-8)
6
sonetFEBE
7
sonetPathUnequipped
8
sonetPathSignalLabelMismatch
Work Path BIPE--Displays the number of path BIP-8 errors in working channel.
Work Path FEBE--Displays the number of path far-end-block-errors in working channel.
Protected Path Status--This variable indicates the path level status of the protection channel in APS. The c64SONETAPSProtectPathStatus is a bit map represented as a sum of multiple alarms simultaneously. The sonetPathNoDefect should be set when and only when no other flag is set. Possible bit positions are:
Table 6-17: Protected Path Status Bit Positions
1
sonetPathNoDefect
2
sonetPathSTSLOP
4
sonetPathSTSAIS
8
sonetBIPE(BIP-8)
16
sonetFEBE
32
sonetPathSTSRDI
64
sonetPathUnequipped
128
sonetPathSignalLabelMismatch
Protected Path BIPE--Displays the number of path BIP-8 errors in the protection channel.
Protected Path FEBE--Displays the number of path far-end-block-errors in the protection channel.
The Line panel (see Figure 6-37) displays the following information:
Work Line Status--This variable indicates the line level status of the working channel in APS. The c64SONETAPSWorkLineStatus is a bit map represented as a sum of multiple alarms simultaneously. The sonetLineNoDefect should be set when and only when no other flag is set. Possible bit position are:
Table 6-18: Work Line Status Bit Positions
1
sonetLineNoDefect
2
sonetLineAIS
3
sonetLineRDI
4
sonetBIPE(BIP-8/24)
5
sonetFEBE
Work Line BIPE--Displays the number of line BIP-8/24 errors in the working channel.
Work Line FEBE--Displays the number of line far-end-block-errors in the working channel.
Protected Line Status--This variable indicates the line level status of the protection channel in APS. The c64SONETAPSProtectLineStatus is a bit map represented as a sum of multiple alarms simultaneously. The sonetLineNoDefect should be set when and only when no other flag is set. Possible bit positions are:
Table 6-19: Protected Line Status Bit Positions
1
sonetLineNoDefect
2
sonetLineAIS
4
sonetLineRDI
8
sonetBIPE(BIP-8/24)
16
sonetFEBE
Protected Line BIPE--Displays the number of line BIP-8/24 errors in protection channel.
Protected Line FEBE--Displays the number of line far-end-block-errors in protection channel.
The Section panel (see Figure 6-37) displays the following information:
Work Section Status--This variable indicates the section level status of the working channel in APS. The c64SONETAPSWorkSectionStatus is a bit map represented as a sum of multiple alarms simultaneously. The sonetSectionNoDefect should be set when and only when no other flag is set. Possible bit positions are:
Table 6-20: Work Section Status Bit Positions
1
sonetSectionNoDefect
2
sonetSectionLOS
3
sonetSectionLOF
4
sonetBIPE(BIp-8)
Work Section BIPE--Displays the number of section BIP-8 errors in working channel.
Protected Section Status--This variable indicates the section level status of the protection channel in APS. The c64SONETAPSProtectSectionStatus is a bit map represented as a sum of multiple alarms simultaneously. The sonetSectionNoDefect should be set when and only when no other flag is set. Possible bit positions are:
Table 6-21: Protected Section Status Bit Positions
1
sonetSectionNoDefect
2
sonetSectionLOS
4
sonetSectionLOF
8
sonetBIPE(BIp-8)
Protected Section BIPE--Displays the number of section BIP-8 errors in protection channel.
The Configuration panel (see Figure 6-38) allows you to view and configure the following parameters:
Mode--Allows you to set the APS mode on the corresponding interface referenced by ifIndex object. You can set the Mode option to:
Linear--The value linear is the APS mode of linear 1+1 nonreverting and unidirectional. This only true APS mode supported in cisco6400 at FCS.
yCable--The value yCable is providing the port hardware redundancy but not transmission line redundancy and is not strictly an APS mode.
Disable--Disables the Mode option.
BER Threshold--Allows you to set the Bit-Error-Rate threshold at which an APS request of priority 'Signal Degrade' is posted.
Switch Command--Used to post an APS priority request. This request succeeds when no higher-priority request is posted. You can set the Switch Command option to:
LockOut--Locks out the protection channel corresponding to this entry.
Force Working--Posts a request to switch away from the working channel to protection channel of this entry.
Force Protect--Posts a request to switch away from the protection channel to working channel of this entry.
Manual Working--Posts a request to switch away from the working channel to protection channel of this entry.
Manual Protect--Posts a request to switch away from the protection channel to working channel of this entry.
Clear--Clears all posted APS priority requests in this channel.
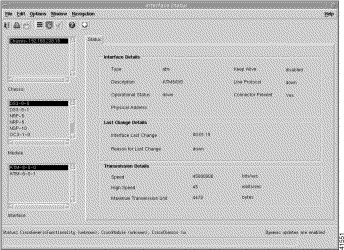
The Interface Details panel displays the following information:
Type--Displays the interface type.
Description--Displays a text string description of the interface.
Operational Status--Displays the current operational status of the interface.
Physical Address--Displays the address of the interface at its protocol sub-layer.
Keep Alive--Displays whether keepalives are enabled or not on this interface.
Line Protocol--Displays whether the line interface protocol is up or not.
Connector Present--Displays whether or not the interface has a physical connector. "True" means a physical connector is present and "False" means a physical connector is not present.
The Management Information window (see Figure 6-45) displays two tabs: Configuration, and IOS/Command Line Security.
Caution The User Name, Login Password, and Exec Password (set in the Management Information window in the IOS /Command Line Security tab) must be identical to the CLI Passwords set in the Cisco 6400 NSP Management window (Configuration tab). See the "Cisco 6400 NSP Management Window" section and this section for further details on setting the User Name, Login Password, and Exec Password. IOS Image Download and Backup/Restore will fail when the user name and passwords are not identical.
Caution The User Name, Login Password, and Exec Password (set in the Management Information window in the IOS /Command Line Security tab) must be identical to the CLI Passwords set in the Cisco 6400 NSP Management window (Configuration tab). See the "Cisco 6400 NSP Management Window" section and this section for further details on setting the User Name, Login Password, and Exec Password. IOS Image Download and Backup/Restore will fail when the user name and passwords are not identical.
The System Details panel allows you to view and configure the following parameters:
User Name--Displays the User Name.
Login Password--Allows you to enter a login password for the device.
Exec Password--Allows you to enter an Exec password for the device.
Save Locally--Click Save Locally to save the management information to a local device.
Save to Device--Click Save to Device to save the management information to a selected device.
The IOS Image Download window (see Figure 6-45) displays a single Download tab.
Caution The Cisco 6400 SCM is unable to verify that the source image is a valid Cisco IOS boot image for the device. Downloading an invalid boot image could prevent the device from booting normally, which would leave it unmanageable and unable to carry traffic. Details of how to load a working Cisco IOS image is in the documentation shipped with your Cisco 6400 UAC. When you have downloaded an invalid boot image but have not yet rebooted the device, you should download a valid boot image immediately. In particular, be aware that NSP boot images are not compatible with the NRP, and vice-versa.
The Configuration panel allows you to view and configure the following parameters:
TFTP Server IP Address--Allows you to set the TFTP IP address.
Destination File System--Allows you to specify any file system name supported by the Cisco 6400 UAC. File system names supported are, Boot Flash, Flash, Disk 0, and Disk 1.
Source File Name--Allows you to specify the source file name (Cisco IOS image name).
Destination File Name--Allows you to specify the name for the file as it is stored in the file system of the Cisco 6400 SCM.
Format the destination device before copying?--Allows you to format the destination device before copying. You can set the Format the destination device before copying? option to:
Yes--Enables formatting of the destination device.
No--Disables formatting of the destination device.
Reboot device using new image?--Allows you to reboot the device after a successful download. You can set the Reboot device using new image? option to:
The Actions panel (see Figure 6-45) allows you to initiate the following actions:
Download--Click Download to download the Cisco IOS image (specified by the Source File Name in the Configuration panel) from the specified TFTP server to the Cisco 6400 file system (specified in the Destination File Name in the Configuration panel).
Scheduled Download--Click Scheduled Download to open the ScheduleDialog window. The ScheduleDialog window allows you to enter a Date (in <mm><dd><yyyy> format) and time (Hour and Minute format) for the download to be performed.
Note Refer to the Setting Up A Workstation As A TPTP Server section in the Cisco6400Service Connection Manager Installation Guide.
The Configuration Backup and Restore window displays a single Backup and Restore tab.
Note Backup and Restore is on a per chassis basis. When all NRP and NSP configurations are backed up when the Restore button is pressed the configuration is copied onto the Cisco 6400 UAC. Selecting the Restore button initiates the action of restoring the running configuration to a Cisco 6400 UAC.
The Configuration panel allows you to view and configure the following parameters:
Backup Server--Allows you to set the TFTP IP address.
Backup after every Action--Allows you to take a backup after every Telnet action (for example, service (de)commission or service (dis)connection). You can set the Backup after every Action option to:
enable--Enables automatic backup after every configuration change.
disable--Configuration changes are not automatically saved after every configuration change.
Note This option (when enabled) automatically backs up the Cisco 6400 after every: Service Instance "Commission" operation, and connect or disconnect operation. The default setting for Backup after every Action is "disable".