|
|

The Cisco 6400 SCM Element Manager adds custom windows to the standard Cisco EMF system to improve management of the Cisco 6400 UAC. For example, the Cisco 6400 Chassis Management window has four tabbed sections:
Each tab displays specific information about the current state of the system or allows you to change various settings on a Cisco 6400 UAC without the need to use Cisco IOS commands. Multiple Element Managers can be installed on a single Cisco EMF server, thereby allowing multi device management from a single system.
This chapter details the Element Manager windows that appear in the Cisco 6400 Service Connection Manager (SCM). The Element Manager windows provide:
Each Element Management window consists of one or more tabs that display information or allows you to configure the Cisco 6400 UAC hardware. A number of the Element Manager windows have a similar layout in terms of management functions. For example, the first tab across a number of the Element Manager windows displays fault information that can be used for troubleshooting problems that can arise.
 |
Note The information displayed on each of the Element Manager windows in this chapter are described in greater detail in "Element Manager Windows: Detailed Description". |
Table 5-1 displays the Element Manager windows that can be launched from each node or object type. For example, to manage the Cisco 6400 chassis (from the Cisco 6400 Chassis Management window) you should select the Cisco 6400 UAC, Manage, Chassis option from a Manager, Site, Chassis, or NSP object.
| Cisco 6400 Element Manager Window/Task | Objects (that can be selected) to Open the Window | Menu Options to Select to Open Window | |||||||
| Site | Shelf | Chassis | NSP | NRP | NRP ATM Port | Node Line Card (NLC) | Line Card ATM Port | ||
Cisco 6400 Chassis Management | Yes | Yes | Yes | No | No | No | No | No | Cisco 6400 UAC, Chassis, Manage, Chassis |
SNMP Management | Yes | No | Yes | No | No | No | No | No | Cisco 6400 UAC, Chassis, Manage, SNMP Management |
Chassis Configuration | Yes | No | Yes | No | No | No | No | No | Cisco 6400 UAC, Chassis, Manage, Configuration |
Module Configuration | Yes | No | Yes | Yes | Yes | No | Yes | No | Cisco 6400 UAC, Module, Manage, Configuration |
Interface Configuration | Yes | No | Yes | Yes | Yes | Yes | Yes | Yes | Cisco 6400 UAC, Port, Manage, Configuration |
Cisco 6400 NSP Management | Yes | Yes | Yes | Yes | No | No | No | No | Cisco 6400 UAC, Module, Manage, NSP |
Cisco 6400 NRP Management | Yes | Yes | Yes | Yes | Yes | No | No | No | Cisco 6400 UAC, Module, Manage, NRP |
SSG Configuration | Yes | Yes | Yes | Yes | Yes | No | No | No | Cisco 6400 UAC, Module, Manage, SSG Configuration |
Cisco 6400 NRP Capacity Statistics | Yes | Yes | Yes | Yes | Yes | No | No | No | Cisco 6400 UAC, Module, Manage, NRP Capacity Statistics |
Cisco 6400 NRP ATM Port Management | Yes | Yes | Yes | Yes | Yes | Yes | No | Yes | Cisco 6400 UAC, Port, Manage, NRP ATM Port |
Cisco 6400 Line Card Management | Yes | Yes | Yes | Yes | No | No | Yes | No | Cisco 6400 UAC, Module, Manage, NLC |
Cisco 6400 Line Card ATM Port Management | Yes | Yes | Yes | Yes | No | No | Yes | Yes | Cisco 6400 UAC, Port, Manage, NLC ATM Port |
SONET APS | Yes | Yes | Yes | Yes | No | No | No | Yes | Cisco 6400 UAC, Port, Manage, SONET APS |
Module Performance | Yes | No | Yes | Yes | Yes | No | No | Yes | Cisco 6400 UAC, Module, Manage, Performance |
Interface Performance | Yes | No | Yes | Yes | Yes | Yes | Yes | Yes | Cisco 6400 UAC, Port, Manage, Performance |
Interface Status | Yes | No | Yes | Yes | Yes | Yes | Yes | Yes | Cisco 6400 UAC, Port, Manage, Status |
Command Log | Yes | No | Yes | Yes | Yes | No | No | No | Cisco 6400 UAC, Module, View, Command Log |
SysLog Message | Yes | No | Yes | Yes | Yes | No | No | No | Cisco 6400 UAC, Module, View, System Log |
Management Information | Yes | Yes | Yes | No | No | No | No | No | Cisco 6400 UAC, Chassis or Module, Admin, Management Information |
IOS Image Download | Yes | No | Yes | Yes | Yes | No | No | No | Cisco 6400 UAC, Module, Admin, IOS Image Download |
Configuration Backup/Restore | Yes | No | Yes | Yes | Yes | No | No | No | Cisco 6400 UAC, Module, Admin, Configuration Backup/Restore |
Service Uplink Bandwidth Utilization | Launch from an appropriate Service Uplink object. | Cisco 6400 UAC, Subscriber Bandwidth Utilization | |||||||
Service, Subscriber Connection Bandwidth Utilization | Launch from an appropriate Connection object. | Cisco 6400 UAC, Bandwidth Utilization | |||||||
Telnet Session | No | No | Yes | Yes | Yes | Yes | Yes | Yes | Cisco 6400 UAC, Tools, Initiate Telnet Service |
Launch WebConsole | No | No | Yes | Yes | Yes | Yes | Yes | Yes | Cisco 6400 UAC, Tools, Launch Web Console |
This section identifies the:
This section is divided into a number of sections (for example, Fault Information, Status Information, and Configuration and Commissioning, Decommissioning). Each section provides a table that details the relevant chassis components, the Element Manager window you would have to launch to view the appropriate window and a guide is provided to the relevant section in this User Guide for further details.
The 6400 SCM software allows you to configure and commission or decommission the components within a selected Cisco 6400 chassis. Table 5-2 details each of the Cisco 6400 UAC components that can be configured, the Element Manager window that you should open, and details of the Tasks that can be performed. Table 5-1 details how to open each of the Element Manager windows.
Each module (that is, NSP, NRP, or NLC) has a module management window where additional module configuration can be carried out either before or after commissioning the selected module. For example, you may wish to configure parameters in the Cisco 6400 Line Card Management window before commissioning the NLC module using the Module Configuration window.
Each port interface (that is, NSP, NRP, or NLC) has a port management window where additional port interface configuration can be carried out either before or after commissioning the selected port interface. For example, you may wish to configure parameters in the Cisco 6400 Line Card ATM Port Management window before commissioning the NLC interface port using the Interface Configuration window.
| Cisco 6400 UAC Component | Element Manager Window | Tasks | For Further Information |
Chassis | Cisco 6400 Chassis Management window (Configuration tab) | Chassis, clock, alarm, temperature threshold, and power supply configuration. | |
Chassis Configuration window (Configuration tab) | Validation Parameters, Clock and Power Supply configuration. Click Commission or Decommission to initiate subchassis discovery. Click Start to begin global performance logging. | ||
Chassis Configuration window (Additional Descriptions tab) | Enter Additional Descriptions for identification purposes, for example, CLLI codes could be entered. | ||
Management Information window | Configure system configuration and IOS/command line security information. | ||
NSP | Cisco 6400 NSP Management window (Configuration tab) | System configuration, CLI password. | |
NRP | Cisco 6400 NRP Management window (Configuration tab) | System configuration, CLI password. | |
NSP, NRP, or NLC | Module Configuration window (Configuration tab) | Enter Additional Descriptions for the selected NSP, NRP, or NLC module for identification purposes, for example, CLLI codes could be entered. Commission or Decommission the selected NSP, NRP, or NLC module. | |
SSG | Cisco 6400 SSG Configuration (SSG Configuration tab) | SSG Parameters, Layer 3 Parameters, Local RADIUS Parameters. Configure or Deconfigure the selected NRP-SSG parameters. | |
Cisco 6400 SSG Configuration (PPPoA Configuration tab) | PPPoA Virtual Template, and PPPoA IP Address Pool. Configure or Deconfigure the PPPoA parameters. | ||
Cisco 6400 SSG Configuration (PPPoA Configuration tab) | PPPoE Virtual Template, and PPPoE IP Address Pool. Configure or Deconfigure the PPPoE parameters. | ||
NRP ATM Port | Cisco 6400 NRP ATM Port Management (Configuration tab) | ATM Port Configuration, and ILMI Configuration | |
Cisco 6400 NRP ATM Port Management (More Configuration tab) | Information Element Transfer. | ||
NLC | Cisco 6400 Line Card Management (Line Card tab) | Configure the Administration Status. | |
NLC ATM Port | Cisco 6400 Line Card ATM Port Management (Configuration tab) | ATM port configuration and ILMI configuration. | See the "Cisco 6400 Line Card ATM Port Management Window" section. |
Cisco 6400 Line Card ATM Port Management (More Configuration tab) | Information Element Transfer, General Physical Layer Configuration and DS1/E1/DS3/E3 Physical Layer Configuration. | ||
NLC ATM Port (SONET APS) | SONET APS (Configuration tab) | Mode, BER Threshold, and Switch Command. | See the "SONET APS Management" section. |
NSP, NRP and NLC Interface Ports | Interface Configuration | Alias, Administration Status, Link Up/Down Trap Enable, and Supplementary Information. Commission or Decommission the selected NSP, NRP or NLC port interface. |
A detailed description for each of the parameters (shown in Table 5-2) is available in "Element Manager Windows: Detailed Description".
The Cisco 6400 SCM software monitors and displays NSP and NRP system log messages. Table 5-3 details the information displayed on the Configuration Backup/Restore window. Table 5-1 details how to open the Configuration Backup/Restore window.
| Cisco 6400 UAC Component | Element Manager Window | Information Displayed | For Further Information |
Chassis, NSP and NRP | Backup/Restore window (Backup/Restore tab) | Configure a backup server. Initiate a backup or restore. Schedule a time for automatic backup/restore. |
A detailed description for each of the parameters displayed in the Configuration Backup/Restore window (shown in Table 5-3) is provided in the "Configuration Backup and Restore Window" section.
The Cisco 6400 SCM software monitors the Cisco 6400 UAC, and specific components connected into the chassis for faults. The fault information obtained from the hardware displays across a number of Element Manager windows. Table 5-4 details each of the Cisco 6400 UAC components that are monitored, the Element Manager window that you should open to view the fault information, and details of the fault information that displays. See Table 5-1 for details of how to open the appropriate Element Manager windows.
| Cisco 6400 UAC Component | Element Manager Window | Information Displayed | For Further Information |
Chassis | Cisco 6400 Chassis Management window (Fault tab) | The alarm information table displays Alarm Index, Alarm Source, Alarm Severity, Alarm Type, and Alarm Cut Off Status information. | |
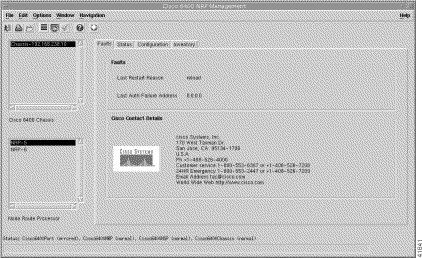
NSP | Cisco 6400 NSP Management window (Fault tab) | Last restart reason and last authentication failure address. | |
NRP | Cisco 6400 NRP Management window (Fault tab) | Last restart reason and last authentication failure address. Cisco contact details. | |
NRP ATM Port | Cisco 6400 NRP ATM Port Management (Fault tab) | Transmitted message errors, detected message errors, and SSCOP errored PDUs. | |
Line Card ATM Port Management | Cisco 6400 Line Card ATM Port Management (Faults tab) | Errors (transmitted message errors, detected message errors, and SSCOP errored PDUs), Sonet Frame Errors, and DS1/E1/E3 Errors. | See the "Cisco 6400 Line Card ATM Port Management Window" section. |
The faults displayed in the Cisco 6400 Chassis Management window (Fault tab) also appear as alarms in the Event Browser application. See the "Cisco 6400 Chassis Management Window" section for further information.
A detailed description for each of the parameters displayed on the Fault tabs (shown in Table 5-4) is provided in "Element Manager Windows: Detailed Description".
The Cisco 6400 SCM software monitors capacity statistics for NRP modules. The capacity statistics information obtained displays on the Cisco 6400 NRP Capacity Statistics window. Table 5-5 details each of the Cisco 6400 UAC components that are monitored, the Element Manager window that you should open to view the fault information, and details of the fault information that displays. See Table 5-1 for details of how to open the appropriate Element Manager windows.
| Cisco 6400 UAC Component | Element Manager Window | Information Displayed | For Further Information |
NRP | Cisco 6400 NRP Capacity Statistics window (NRP Capacity tab) | Subscriber Connections, Service Instance Uplinks, Multi-Domain Service Connections, and Over-Subscription Management. |
|
Note The capacity statistics for NRP modules are maintained internally by the Cisco 6400 SCM software, they are not derived directly from totals on the Cisco 6400 UAC. When services are provisioned or removed through Cisco IOS, then the Cisco 6400 SCMs information is incorrect. |
A detailed description for each of the parameters displayed on the Capacity Statistics tab (shown in Table 5-4) is provided in "Element Manager Windows: Detailed Description".
The Cisco 6400 SCM software monitors and displays status information about the Cisco 6400 UAC, and specific components connected into the chassis. The information displays across a number of Element Manager windows. Table 5-6 details each of the Cisco 6400 UAC components that are monitored, the Element Manager window that you should open to view the status information, and details of the status information displayed. Table 5-1 details how to open the appropriate Element Manager windows.
| Cisco 6400 UAC Component | Element Manager Window | Status Information Displayed | For Further Information |
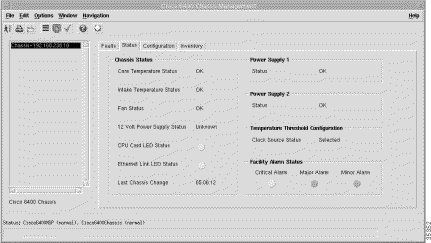
Chassis | Cisco 6400 Chassis Management window (Status tab) | Chassis, Power Supply 1, Power Supply 2, Temperature Threshold Configuration, and Facility Alarm status information. | |
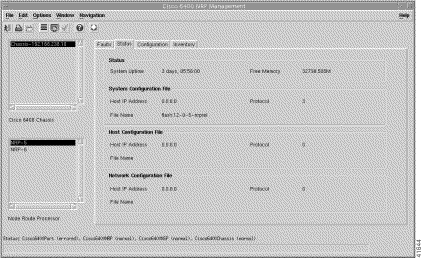
NSP | Cisco 6400 NSP Management window (Status tab) | NSP status, System Configuration File, Host Configuration File, and Network Configuration File. | See the "Cisco 6400 NSP Management Window" section for further details. |
NRP | Cisco 6400 NRP Management window (Status tab) | NRP status, System Configuration File, Host Configuration File, and Network Configuration File. | |
NRP ATM Port | Cisco 6400 NRP ATM Port Management (Status tab) | ATM Port Status. | |
Line Card | Cisco 6400 Line Card Management (Line Card tab) | Operational Status. | |
Line Card ATM Port Management | Cisco 6400 Line Card ATM Port Management (Status tab) | ATM Port Status, and Physical Layer Status. | See the "Cisco 6400 Line Card ATM Port Management Window" section. |
Interface Status | Interface Status | View Interface Details, Last Change Details, and Transmission Details for a selected interface. |
A detailed description for each of the parameters displayed on the Status tabs (shown in Table 5-6) is provided in "Element Manager Windows: Detailed Description".
The Cisco 6400 SCM software monitors the Cisco 6400 UAC and specific components connected into the chassis for inventory information. The inventory information obtained from the hardware displays across a number of Element Manager windows. Table 5-7 details the Cisco 6400 UAC components that are monitored, the Element Manager windows that you should open to view the inventory information, and details the inventory information displayed. Table 5-1 details how to open each of the Cisco 6400 Chassis Management windows.
| Cisco 6400 UAC Component | Element Manager Window | Inventory Information Displayed | For Further Information |
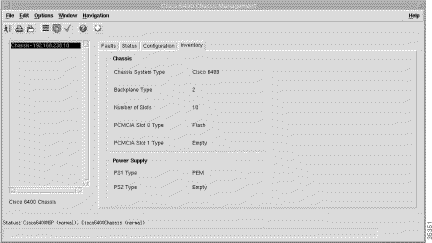
Chassis | Cisco 6400 Chassis Management window (Inventory tab) | Chassis, and Power Supply. | |
NSP | Cisco 6400 NSP Management window (Inventory tab) | System Inventory. | |
NRP | Cisco 6400 NRP Management window (Inventory tab) | System Inventory. | |
NRP ATM Port | Cisco 6400 NRP ATM Port Management (Inventory tab) | Admin Address, ATM Address Type, and Physical Port Type. | |
Line Card | Cisco 6400 Line Card Management (Line Card tab) | Line card Inventory information for the selected line card (that is, Module Type, Serial Number, Max Supported Ports, Module Description, Hardware and Software Versions. | |
Line Card ATM Port | Cisco 6400 Line Card ATM Port Management (Inventory tab) | Admin Address, ATM Address Type, and Physical Port Type. | See the "Cisco 6400 Line Card ATM Port Management Window" section. |
A detailed description for each of the parameters displayed on the Fault tabs (shown in Table 5-7) is provided in "Element Manager Windows: Detailed Description".
The Cisco 6400 SCM software monitors and displays performance information on the Cisco 6400 UAC, and specific components connected into the chassis. The performance information displays across a number of Element Manager windows. Table 5-8 details the Cisco 6400 UAC components that are monitored, the Element Manager window that you should open to view the performance information, and details of the information displayed. Table 5-1 details how to open each of the Element Manager windows.
| Cisco 6400 UAC Component | Element Manager Window | Performance Information Displayed | For Further Information |
Chassis | Service Uplink Bandwidth Utilization | Displays the receive and transmit percentage bandwidth utilization. Click Activate Polling to begin polling on the selected chassis or click Deactivate Polling to stop polling. | |
NSP, NRP | Module Performance window (Performance tab) | CPU Usage. Start or Stop Performance Logging on the selected module. | See the "Module Performance Window" section. |
NRP ATM Port | Cisco 6400 NRP ATM Port Management (Performance tab) | Transmitted, Connections Established, Detected, and SSCOP. | |
Line Card ATM Port | Cisco 6400 Line Card ATM Port Management (Performance tab) | Transmitted, Connections Established, Detected, and SSCOP. | See the "Cisco 6400 Line Card ATM Port Management Window" section. |
Interface | Interface Performance (Performance (1) tab) | View General Information, and Packets and Octets Statistics. Start or Stop performance logging for a selected interface. | |
Interface Performance (Performance (2) tab) | View Error Statistics. |
A detailed description for each of the parameters displayed on the Fault tabs (shown in Table 5-8) is provided in "Element Manager Windows: Detailed Description".
Additional (historical) performance information is available from the Performance Manager application. Performance Manager is a powerful, flexible tool able to view general and performance specific attributes in one application and in a variety of formats (for example, graphs and tables). You can:
See "Performance Management and Historical Data" for further information.
The Cisco 6400 SCM software monitors and displays statistical information for the Line Card ATM Port (SONET APS). The information displays on a the SONET APS Element Manager window. Table 5-9 details the Element Manager window that you should open to view the statistics information, and details of the information that displays. Table 5-1 details how to open SONET APS Element Manager window.
| Cisco 6400 UAC Component | Element Manager Window | Statistics Information Displayed | For Further Information |
Line Card ATM Port (SONET APS) | SONET APS (Statistics tab) | Path, Line, Section, and Operational. | See the "SONET APS Management" section. |
A detailed description for each of the parameters displayed on the Statistics tabs (shown in Table 5-9) is provided in "Element Manager Windows: Detailed Description".
The Cisco 6400 SCM software allows you to download IOS configuration information from a specified TPTP server (either manually or automatically at a specified time and date). Table 5-10 details parameters that can be configured in the IOS Image Download window. Table 5-1 details how to open each of the IOS Image Download window.
| Cisco 6400 UAC Component | Element Manager Window | IOS Image Download Information Displayed | For Further Information |
NSP, NRP | IOS Image Download | Configure the TPTP server. Initiate a download. Schedule a time for automatic download. |
A detailed description for each of the parameters displayed on the IOS Image Download window is provided in "Element Manager Windows: Detailed Description".
The Cisco 6400 SCM software allows you to configure SNMP management information and enable or disable trap generation for a selected chassis. Table 5-11 details parameters that can be configured in the SNMP Management window. Table 5-1 details how to open each of the IOS Image Download window.
| Cisco 6400 UAC Component | Element Manager Window | SNMP Management Information Displayed | For Further Information |
Chassis | SNMP Management | Configure Community Names, SNMP Version details. Configure Trap Generation. Enable or Disable trap generation. | See the "SNMP Management Window" section. |
A detailed description for each of the parameters displayed on the SNMP Management window is provided in "Element Manager Windows: Detailed Description".
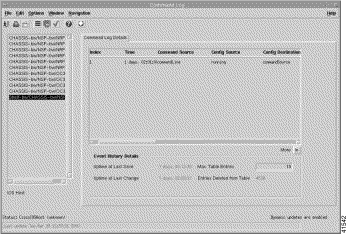
The Cisco 6400 SCM software monitors and displays Command Log information for the selected NSP and NRP in the Command Log window. The information displays across a number of Element Manager windows. Table 5-12 details the information displayed in the Command Log window. Table 5-1 details how to open the Command Log window.
| Cisco 6400 UAC Component | Element Manager Window | Information Displayed | For Further Information |
NSP, NRP | Command Log | Command Log Details table.Uptime information, Entries Bumped, and Max Table Entries information. | See the "Command Log Window" section. |
A detailed description for each of the parameters displayed on the Command Log window is provided in the "Command Log Window" section.
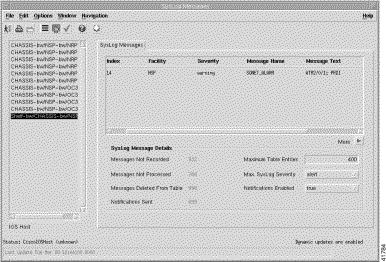
The Cisco 6400 SCM software monitors and displays NSP and NRP system log messages. Table 5-6 details the Element Manager windows that you should open to view the SysLog Messages, and provides details the information displayed. Table 5-1 details how to open the SysLog Messages windows.
| Cisco 6400 UAC Component | Element Manager Window | Information Displayed | For Further Information |
NSP, NRP | SysLog Messages window (SysLog Messages tab) | Displays a SysLog Message Table. Also displays a SysLog Message Details panel (Messages Not Recorded, Messages Not Processed, Messages Deleted from Table, Notifications Sent, Maximum Table Entries, Maximum SysLog Severity, and Notifications Enabled. | See the "SysLog Messages Window" section. |
A detailed description for each of the parameters displayed in the SysLog Messages window (shown in Table 5-13) is provided in the "SysLog Message Tab" section.
The Cisco 6400 Chassis Management window allows you to view and configure Fault, Status, Configuration, and Inventory information for a selected chassis.
Select the Cisco 6400 UAC, Chassis, Manage, Chassis option from a relevant object icon or from an object pick list. See Table 5-1 for information on which objects allow you to launch the Cisco 6400 Chassis Management window.
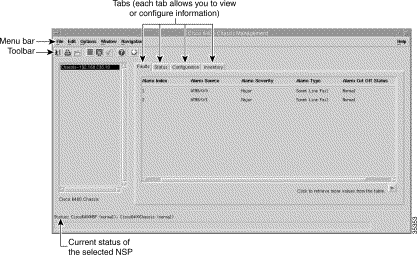
The Cisco 6400 Chassis Management window appears with the Faults tab displayed (see Figure 5-1).
The Cisco 6400 Chassis Management window displays a number of typical Cisco 6400 SCM EM window aspects. A Cisco 6400 Chassis list displays at the left side of the window. This list is populated with all of the Cisco 6400 Chassis's available from your launch point.
The Cisco 6400 Chassis Management window is divided into four tabbed sections:
The Faults tab (see Figure 5-1), appears by default when the Cisco 6400 Chassis Management window appears.
The Faults tab displays a log of alarms raised against the selected chassis. See the "Faults Tab" section for further information.
To view the Status tab, follow these steps:
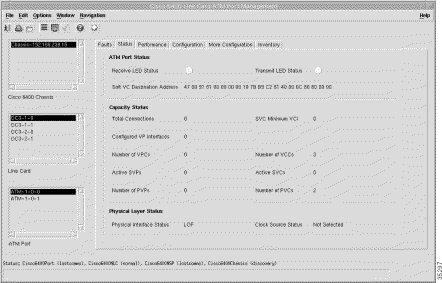
Step 2 Select the Status tab. The status information for the selected chassis appears (see Figure 5-2). See the "Status Tab" section for further information.
To view the Configuration tab, follow these steps:
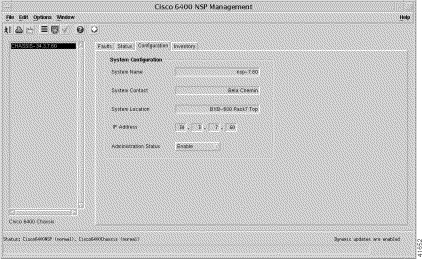
Step 2 Select the Configuration tab. The Cisco 6400 Chassis configuration information appears (see Figure 5-3).
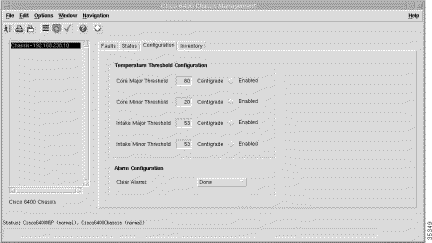
Step 3 Configure the information as required using the menus and data entry boxes. See the "Configuration Tab" section for further information.
Step 4 Save the changes.
|
Note Change the displayed value and click the toggle button to enable any of the disabled temperature thresholds. |
To view the Inventory tab, follow these steps:
Step 2 Select the Inventory tab. The Inventory tab appears (see Figure 5-4). See the "Inventory Tab" section for further information.
The SNMP Management window allows you to:
Select the Cisco 6400 UAC, Chassis, Manage, SNMP Management option from a relevant object icon or from an object pick list. See Table 5-1 for information on which objects allow you to launch the SNMP Management window.
The SNMP Management window (see Figure 5-5) appears with the SNMP Management tab displayed.
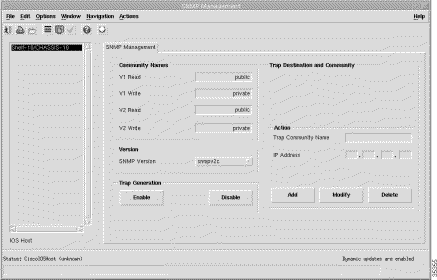
When trap generation is enabled on a selected chassis, any traps generate alarms and send them to the IP Address of the specified chassis. This means that alarms are visible to the user in the appropriate view of the Cisco 6400 SCM. You can also disable this feature, so that no traps are generated and no alarms are sent. This means that no alarms are visible to the user on the selected chassis.
To enable and disable trap generation, follow these steps:
Step 2 Select the relevant Chassis from the IOS Host list displayed at the left side of the window.
Step 3 Click Enable to allow trap generation or click Disable to avoid trap generation.
See the "SNMP Management Window" section for further information on the parameters displayed on this tab.
The Chassis Configuration window allows you to view and configure parameters relevant to the selected chassis and commission or decommission a selected chassis. The Chassis Configuration (Additional Descriptions tab) allows you to specify additional description information for a selected chassis. The Description 1 and Description 2 data entry fields allow you to enter any additional text descriptions for identification purposes, for example, CLLI codes could be entered.
Select the Cisco 6400 UAC, Chassis, Manage, Configuration option from a relevant object icon or from an object pick list. See Table 5-1 for information on which objects allow you to launch the Chassis Configuration window. The Chassis Configuration window appears with the Configuration tab displayed.
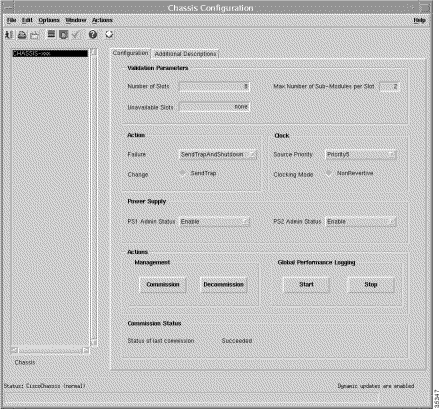
See the "Chassis Configuration Window" section for further information on the parameters displayed on this window.
|
Note See the "Commissioning a Chassis" section for further details. |
|
Note See the "Decommissioning a Chassis" section for further details. |
Global performance logging allows the Cisco 6400 SCM to collect performance information for the NSP, NRP modules and for NRP and NLC port interfaces within a selected chassis. This historical information can then be viewed using Performance Manager. "Performance Management and Historical Data," provides further information on how to use the Performance Manager application.
|
Note Performance logging can start or stop on a per module or interface (port) basis. See the "Module Performance Window" section for details on how to start performance logging for a selected module (that is, NSP or NRP modules). See the "Interface Performance Window" section for details on how to start performance logging for a selected interface (that is, for NRP or NLC port interfaces). |
To begin global performance logging for a selected chassis, follow these steps:
Step 2 Select the relevant Chassis from the list displayed at the left side of the window.
Step 3 Click Start to begin performance logging on the selected chassis.
|
Note Performance logging can also be stopped on a per module or interface (port) basis. See the "Module Performance Window" section for details on how to stop performance logging for a selected module (that is, NSP or NRP modules). See the "Interface Performance Window" section for details on how to stop performance logging for a selected interface (that is, for NRP or NLC port interfaces). |
To stop global performance logging for a selected chassis, follow these steps:
Step 2 Select the relevant Chassis from the list displayed at the left side of the window.
Step 3 Click Stop to stop global performance logging for the selected chassis.
 |
Caution The User Name, Login Password, and Exec Password (set in the Management Information window in the IOS /Command Line Security tab) must be identical to the CLI Passwords set in the Cisco 6400 NSP Management window (Configuration tab). See the "Management Information Window" section for further details on setting the User Name, Login Password, and Exec Password. IOS Image Download and Backup/Restore will fail when the user name and passwords are not identical. |
The Cisco 6400 NSP Management window allows you to monitor and configure installed NSP modules.
|
Note To Commission the selected NSP, See the "Commissioning an NSP, NRP or NLC Module" section for further details. |
Select the Cisco 6400 UAC, Module, Manage, NSP option from a relevant object icon or from an object pick list. See Table 5-1 for information on which objects allow you to launch the Cisco 6400 NSP Management window. The Cisco 6400 NSP Management window appears with the Faults tab displayed.
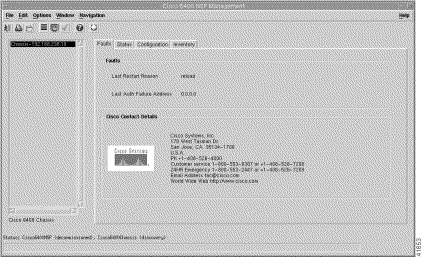
The Cisco 6400 NSP Management window is divided into four tabs, Faults, Status, Performance, Configuration, and Inventory.
To view the Faults tab, follow these steps:
The Faults tab appears (see Figure 5-7).
Step 2 Select a relevant Chassis from the chassis list.
The fault information for the selected chassis appears. See the "Faults Tab" section for further information.
To view the Status tab, follow these steps:
Step 2 Select the Status tab.
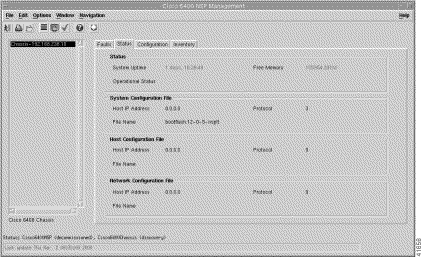
Step 3 Select a relevant Chassis from the list.
The status information for the selected chassis appears (see Figure 5-8). See the "Status Tab" section for further information.
The Configuration tab allows you to configure some of the parameters that can be set on the selected NSP module.
|
Note To Commission s selected NSP, see the "Commissioning an NSP, NRP or NLC Module" section for further details. |
To view the Configuration tab, follow these steps:
Step 2 Select the Configuration tab.
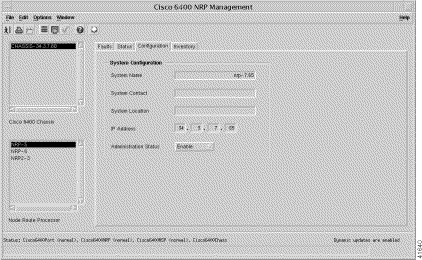
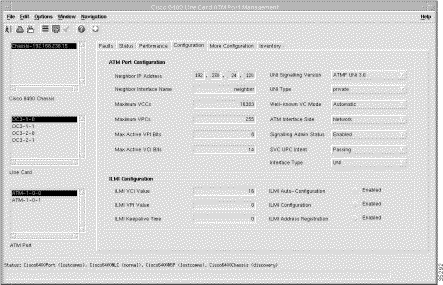
Step 3 Select a relevant Chassis from the chassis list. The configuration information for the selected NSP appears (see Figure 5-9).
See the "Configuration Tab" section for further information.
Step 4 Edit the information in the Configuration tab, as required.
Step 5 Select Save from the Edit menu to save any changes.
To view the Inventory tab, follow these steps:
Step 2 Select the Inventory tab.
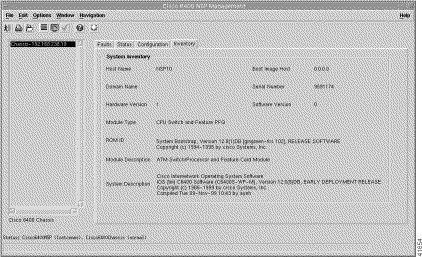
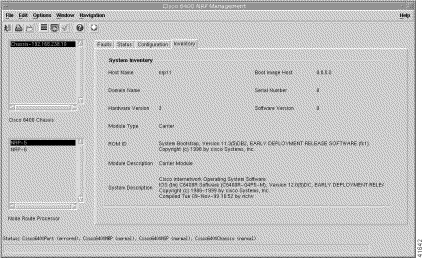
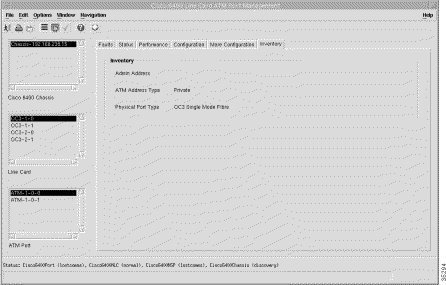
Step 3 Select a relevant Chassis from the chassis list. The Inventory information for the selected chassis appears.
See the "Inventory Tab" section for further information.
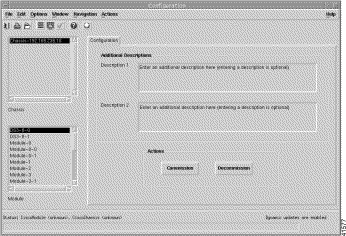
The Module Configuration window allows you to enter a description for a selected NSP, NRP or NLC module and Commission or Decommission the selected module.
Select the Cisco 6400 UAC, Module, Manage, Configuration option from a relevant object icon or from an object pick list. See Table 5-1 for information on which objects allow you to launch the Module Configuration window. The Module Configuration window appears with the Configuration tab displayed.
The Module list displays half height modules (OC3 or DS3 NLCs) with a slot and sub-slot number (for example, DS3-8-0). Full height modules (NSPs, NRPs or OC12 NLCs) display as a module with a slot number (for example, NRP-5). When selecting a Module from the list, you must first identify the modules location in the chassis and then select the module according to its slot location in the rack.
Step 2 Select the relevant Chassis and Module from the lists displayed at the left side of the window. The Status of the selected module appears at the bottom left corner of the window.
Step 3 Enter optional Description 1 and Description 2 information, as required. The Description 1 and Description 2 data entry fields allow you to enter any additional text descriptions for identification purposes, for example, CLLI codes could be entered.
Step 4 Click Commission when the status is Decommissioned.
The NSP, NRP or NLC is now commissioned, its state changes to Commissioning and then Normal.
Step 2 Select the relevant Chassis and NSP, NRP or NLC from the lists displayed at the left side of the window. The Status of the selected card appears at the bottom left corner of the window.
Step 3 Click Decommission when the Status is Normal.
The NRP, NSP or NLC is now decommissioned, its state changes to Decommissioned.
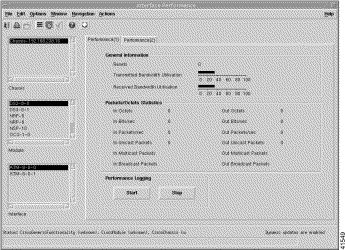
The Module Performance window displays performance attributes for the selected module. The Module Performance tab displays CPU Usage information and allows you to Start or Stop performance logging for the selected NSP or NRP modules (see Figure 5-12).
|
Note Performance logging can also be started or stopped on a global basis for a selected chassis. See the "Chassis Configuration Window" section for details on how to start or stop global performance logging for a selected chassis. |
Selecting an NLC module provides performance data for the NSP. The NSP displays the selected NLCs performance data.
|
Note The values displayed relate to CPU performance, so modules without a CPU display the same value as the CPU card in the chassis. |
Select the Cisco 6400 UAC, Module, Manage, Performance option from a relevant object icon or from an object pick list. See Table 5-1 for information on which objects allow you to launch the Module Performance window.
The Module Performance window appears with the Performance tab displayed.
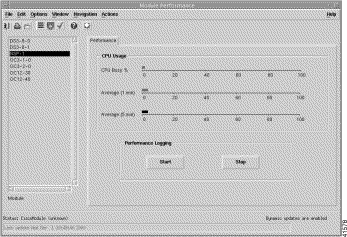
Select a Module from the list displayed. The performance information for the selected module appears (see Figure 5-12). See the "Viewing the Module Performance Window" section for further information.
Performance logging allows performance information to be collected for a selected module. This historical information can then be viewed using Performance Manager. "Performance Management and Historical Data," provides further information on how to use the Performance Manager application.
To Start or Stop performance logging for a selected module, follow these steps:
Step 2 Click Start to begin performance logging for the selected module. Click Stop to stop performance logging for the selected module.
Step 3 Launch the Performance Manager application to view the historical performance information for the selected module. See "Performance Management and Historical Data," for further information on how to use the Performance Manager application.
The Command Log window allows you to view the event commands stored in the Command Log Details table and the system log messages stored in the syslog Message table for the selected NSP.
Select the Cisco 6400 UAC, Module, View, Command Log option from a relevant object icon or from an object pick list. See Table 5-1 for information on which objects allow you to launch the Command Log window. The Command Log window appears with the Command Log Details tab displayed.
To view the Command Log Details information:
Step 2 Select a relevant Chassis.
The Command Log Details table for the selected NSP displays. See the "Command Log Details Tab" section for further information.
Step 3 Scroll through the list of event commands (using the arrow keys) until the relevant event command appears. The down arrow displays the next 10 entries and the up arrow displays the previous 10 entries. Use the horizontal scroll bar to view all the table entries. Drag the scroll bar until the relevant information appears. You can change the width of each column if necessary to view fault strings clearly (see the "Changing Column Width" section).
To change the width of a column:
Step 2 Place the cursor to the left of a column heading and move the cursor until it changes to a double arrow.
Step 3 Click and hold the left mouse button when the cursor changes.
Step 4 Drag the cursor until the column is at the required width.
Step 5 Release the mouse button.
Any text wider than the column is truncated. The column widths return to the default widths when you close this window.
The SysLog Messages window displays log information for the selected NSP or NRP modules.
To view the SysLog messages:
The SysLog Messages window appears with the SysLog Messages tab displayed.
Step 2 Select a relevant Chassis. The SysLog Message Table appears for the selected chassis. See the "SysLog Message Tab" section for further information.
Step 3 Scroll through the list of system messages using the arrow keys until you find the information you want. The right arrow displays the next 10 entries and the left arrow displays the previous 10 entries.
You can view all the table entries by using the horizontal scroll bar. Click and drag the scroll bar until you see the information you want. You can change the width of each column if necessary (see the "Changing Column Width" section).
The Cisco 6400 NRP Management window is divided into four tabbed sections: Faults, Status, Configuration, and Inventory.
|
Note To Commission the selected NRP, see the "Commissioning an NSP, NRP or NLC Module" section for further details. |
Select the Cisco 6400 UAC, Module, Manage, NRP option from a relevant object icon or from an object pick list. See Table 5-1 for information on which objects allow you to launch the Cisco 6400 NRP Management window. The Cisco 6400 NRP Management window appears with the Faults tab displayed.
To view the Faults tab, follow these steps:
Step 2 The Faults tab appears by default. See the "Faults Tab" section for further information.
Step 3 Select the relevant chassis and NRP. The fault information for the selected chassis appears.
To view the Status tab, follow these steps:
Step 2 Select the Status tab.
Step 3 Select the relevant chassis and NRP.
The status information for the selected NSP and NRP appears. See the "Status Tab" section for further information.
|
Note To Commission the selected NRP, see the "Commissioning an NSP, NRP or NLC Module" section for further details. |
To view the Configuration tab, follow these steps:
Step 2 Select the Configuration tab.
Step 3 Select the relevant chassis and NRP.
The configuration information for the selected NRP appears (see Figure 5-17). See the "Configuration Tab" section for further information.
Step 4 Change the information in the drop down lists and data entry boxes.
Step 5 Save the changes.
To view the Inventory tab, follow these steps:
Step 2 Select the Inventory tab.
Step 3 Select a relevant Chassis and NRP.
See the "Inventory Tab" section for further information.
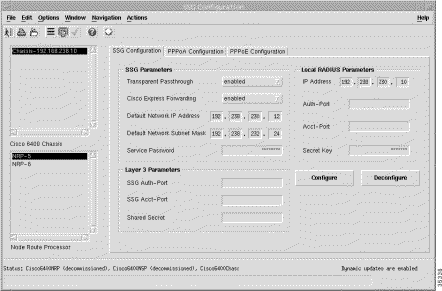
The SSG Configuration window is divided into three tabs: SSG Configuration, PPPoA Configuration, and PPPoE Configuration.
Select the Cisco 6400 UAC, Module, Manage, SSG Configuration option from a relevant object icon or from an object pick list. See Table 5-1 for information on which objects allow you to launch the Cisco 6400 NRP Management window. The SSG Configuration window appears with the SSG Configuration tab displayed.
To view the SSG Configuration tab:
Step 2 Select a relevant Chassis and NRP.
See the "SSG Configuration Tab" section for further information.
SSG configuration should be carried out when the NRP SSG functionality is required.
To set the SSG configuration parameters onto a selected NRP-SSG, follow these steps:
Step 2 Select a relevant Chassis and NRP.
Step 3 Configure the parameters displayed in the SSG Parameters, Layer 3 Parameters, and Local RADUIUS Parameters panels, as required.
Step 4 Click Configure, to set the parameters on the selected NRP-SSG.
SSG deconfiguration should be carried out when the NRP SSG functionality is no longer required.
To deconfigure the SSG configuration parameters from a selected NRP-SSG, follow these steps:
Step 2 Select a relevant Chassis and NRP.
Step 3 Click Deconfigure, to deconfigure the parameters set on the selected NRP-SSG.
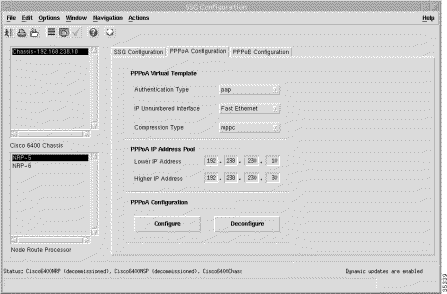
To view the PPPoA Configuration tab:
Step 2 Select the PPPoA Configuration tab.
Step 3 Select a relevant Chassis and NRP.
See the "PPPoA Configuration Tab" section for further information.
PPPoA Configuration must be carried out before a subscriber can be connected to an NRP using PPPoA or statically to an IP-Uplink service.
To set the PPPoA configuration parameters onto a selected NRP, follow these steps:
Step 2 Select the PPPoA Configuration tab.
Step 3 Select a relevant Chassis and NRP.
Step 4 Configure the parameters displayed in the PPPoA Virtual Template, and PPPoA IP Address Pool panels, as required.
Step 5 Click Configure, to set the parameters on the selected NRP.
To deconfigure PPPoA configuration parameters set on a selected NRP, follow these steps:
Step 2 Select the PPPoA Configuration tab.
Step 3 Select a relevant Chassis and NRP.
Step 4 Click Deconfigure, to set the parameters on the selected NRP.
To view the PPPoE Configuration tab:
Step 2 Select the PPPoE Configuration tab.
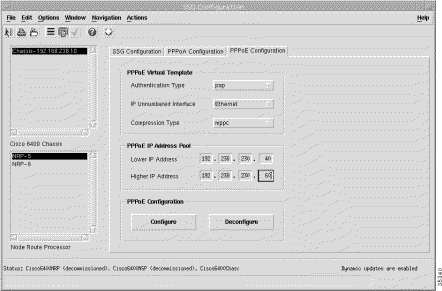
Step 3 Select a relevant Chassis and NRP.
See the "PPPoE Configuration Tab" section for further information.
PPPoE Configuration must be carried out before a subscriber can be connected to an NRP using PPPoE.
To set the PPPoE configuration parameters onto a selected NRP, follow these steps:
Step 2 Select the PPPoE Configuration tab.
Step 3 Select a relevant Chassis and NRP.
Step 4 Configure the parameters displayed in the PPPoE Virtual Template, and PPPoA IP Address Pool panels, as required.
Step 5 Click Configure, to set the parameters on the selected NRP.
To deconfigure PPPoE configuration parameters set on a selected NRP, follow these steps:
Step 2 Select the PPPoE Configuration tab.
Step 3 Select a relevant Chassis and NRP.
Step 4 Click Deconfigure, to set the parameters on the selected NRP.
The Cisco 6400 NRP Capacity Statistics window displays a single NRP Capacity tab.
Select the Cisco 6400 UAC, Module, Manage, NRP Capacity Statistics option from a relevant object icon or from an object pick list. See Table 5-1 for information on which objects allow you to launch the Cisco 6400 NRP Capacity Statistics window. The Cisco 6400 NRP Capacity Statistics window appears with the NRP Capacity tab displayed.
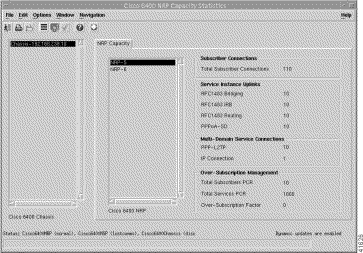
To view the NRP Capacity tab, follow these steps:
Step 2 The NRP Capacity tab appears by default. See the "NRP Capacity Tab" section for further information.
Step 3 Select the relevant Cisco 6400 Chassis and Cisco 6400 NRP. The NRP capacity information for the selected NRP appears.
The Cisco 6400 NRP ATM Port Management window displays six tabs: Faults, Status, Performance, Configuration, More Configuration, and Inventory.
|
Note To Commission the selected interface port, see the "Commissioning an NRP or NLC Interface Port" section for further details. |
Select the Cisco 6400 UAC, Port, Manage, NRP ATM Port option from a relevant object icon or from an object pick list. See Table 5-1 for information on which objects allow you to launch the Cisco 6400 NRP ATM Port Management window. The Cisco 6400 NRP ATM Port Management window appears with the Faults tab displayed.
|
Note To Commission the selected NRP ATM Port Interface, see the "Commissioning an NRP or NLC Interface Port" section for further details. |

To view the Faults tab, follow these steps:
Step 2 Select a relevant Chassis, NRP and ATM Port.
The fault information for the selected ATM Port appears. See the "Faults Tab" section for further information.
The status information for the selected ATM Port appears. See the "Status Tab" section for further information. To view the Status tab, follow these steps:
Step 2 Select the Status tab.
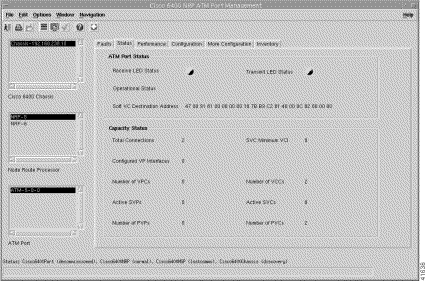
Step 3 Select a relevant Chassis, NRP and ATM Port.
To view the Performance tab, follow these steps:
Step 2 Select the Performance tab.
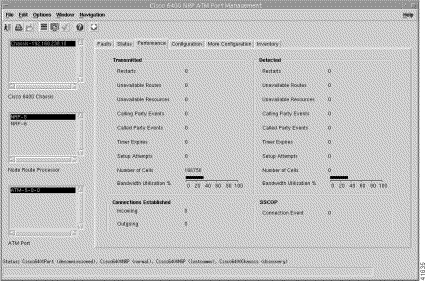
Step 3 Select a relevant Chassis, NRP and ATM Port.
The performance information for the selected NRP appears (see Figure 5-25). See the "Performance Tab" section for further information.
To view the Configuration tab, follow these steps:
Step 2 Select the Configuration tab.
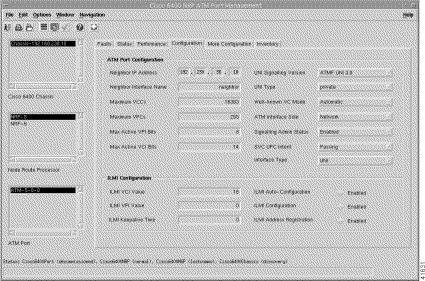
Step 3 Select a relevant Chassis, NRP and ATM Port.
The configuration information for the selected ATM Port appears. See the "Configuration Tab" section for further information.
Step 4 Configure the information displayed, as required.
Step 5 Save the changes.
|
Note To Commission the selected interface port, see the "Commissioning an NRP or NLC Interface Port" section for further details. |
To view the More Configuration tab, follow these steps:
Step 2 Select the More Configuration tab.

Step 3 Select a relevant Chassis, NRP and ATM Port.
The configuration information for the selected ATM port appears (see Figure 5-27). See the "More Configuration Tab" section for further information.
Step 4 Change the information as required.
Step 5 Save the changes.
To view the Inventory tab, follow these steps:
Step 2 Select the Inventory tab.
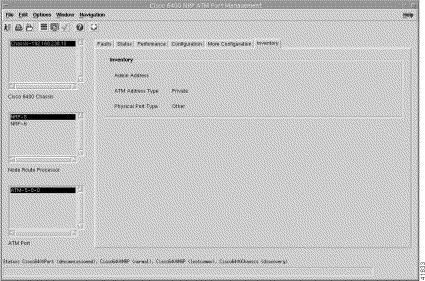
Step 3 Select a relevant Chassis, NRP and ATM Port.
The Inventory information displays for the selected ATM Port. See the "Inventory Tab" section for further information.
The Cisco 6400 Line Card Management window displays a single Line Card tab. The Cisco 6400 SCM supports OC-3, OC-12 and DS3 line modules.
|
Note To Commission a selected NLC, see the "Commissioning an NSP, NRP or NLC Module" section for further details. |
Select the Cisco 6400 UAC, Module, Manage, NLC option from a relevant object icon or from an object pick list. See Table 5-1 for information on which objects allow you to launch the Cisco 6400 Line Card Management window. The Cisco 6400 Line Card Management window appears with the Line Card tab displayed.
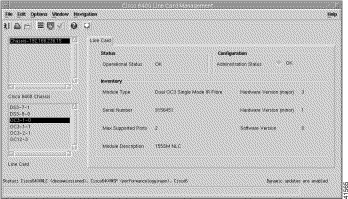
To view the Line Card tab:
Step 2 Select a relevant Chassis and Line Card.
Status information for the selected NLC appears. See the "Line Card Tab" section for further information.
The Cisco 6400 Line Card ATM Port Management window displays six tabs: Faults, Status, Performance, Configuration, More Configuration, and Inventory.
|
Note To Commission the selected NLC ATM Port Interface, see the "Commissioning an NRP or NLC Interface Port" section for further details. |
Select the Cisco 6400 UAC, Port, Manage, NLC ATM Port option from a relevant object icon or from an object pick list. See Table 5-1 for information on which objects allow you to launch the Cisco 6400 Line Card ATM Port Management window. The Cisco 6400 Line Card ATM Port Management window appears with the Faults tab displayed.
|
Note To Commission the selected NLC ATM Port Interface, see the "Commissioning an NRP or NLC Interface Port" section for further details. |
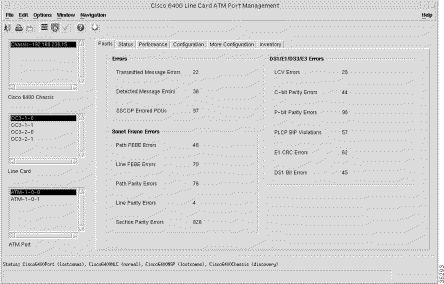
To view the Faults tab, follow these steps:
Step 2 Select a relevant Chassis, Line Card and ATM Port. The fault information for the selected ATM Port appears (see Figure 5-30). See the "Faults Tab" section for further information.
To view the Status tab, follow these steps:
Step 2 Select the Status tab.
Step 3 Select a relevant Chassis, Line Card and ATM Port. The status information for the selected ATM port appears. See the "Status Tab" section for further information.
To view the Performance tab, follow these steps:
Step 2 Select the Performance tab.

Step 3 Select a relevant Chassis, Line Card and ATM Port. The performance information for the selected ATM Port appears. See the "Performance Tab" section for further information.
|
Note To Commission the selected NRP ATM Port Interface, see the "Commissioning an NRP or NLC Interface Port" section for further details. |
To view the Configuration tab, follow these steps:
Step 2 Select the Configuration tab.
Step 3 Select a relevant Chassis, Line Card and ATM Port. The configuration information for the selected ATM Port appears.
Step 4 Change the information as required using the drop down lists. See the "Configuration Tab" section for further information.
Step 5 Save the changes.
|
Note To Commission the selected NRP ATM Port Interface, see the "Commissioning an NRP or NLC Interface Port" section for further details. |
To view the More Configuration tab, follow these steps:
Step 2 Select the More Configuration tab.

Step 3 Select a relevant Chassis, Line Card and ATM Port. The configuration information for the selected ATM Port appears. See the "Download Tab" section for further information.
Step 4 Change the information as required. See the "More Configuration Tab" section for further information.
Step 5 Save the changes.
To view the Inventory tab, follow these steps:
Step 2 Select the Inventory tab.
Step 3 Select a relevant Chassis, Line Card, and ATM Port. The Inventory information appears for the selected ATM Port. See the "Inventory Tab" section for further information.
The SONET APS window is divided into two tabbed sections: Statistics and Configuration. These tabs allow you to view the statistics for SONET devices and configure the SONET automatic protection switching between SONET devices.
Select the Cisco 6400 UAC, Port, Manage, SONET APS option from a relevant object icon or from an object pick list. See Table 5-1 for information on which objects allow you to launch the SONET APS window. The SONET APS window appears with the Statistics tab displayed (see Figure 5-36).
|
Note The SONET APS window (Statistics tab) only populates when redundancy is configured on the device. Redundancy must be configured manually using Cisco IOS. See "Configuring Redundancy in a Cisco 6400 Chassis" section for further information on configuring redundancy. |
To view the SONET APS statistics for a specified port:
Step 2 Select a relevant NSP, Line Card and ATM Port.
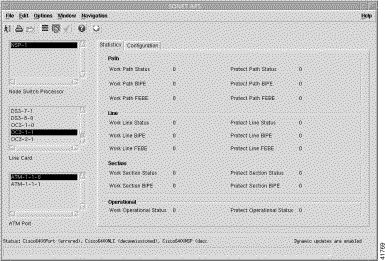
The statistics for the selected ATM Port appear (see Figure 5-36). See the "Statistics Tab" section for further information.
To change SONET APS configuration information for a specified port:

Step 2 Select the Configuration tab.
Step 3 Select a relevant NSP, Line Card and ATM Port. The configuration information for the selected ATM Port appears (see Figure 5-37).
Step 4 Configure the information displayed as required.
Step 5 Save any changes made. See the "Configuration Tab" section for further information.
Redundancy configuration allows you to specify the redundancy pairings for CPUs (NSPs), slots (NRPs and OC-12 NLC), and sub-slots (OC-3 and DS-3 NLCs). Redundancy configuration is not supported in the current release of the Cisco 6400 SCM application. Redundancy can be set up manually however, using Cisco IOS commands.
|
Note The SONET APS window (see Figure 5-36) will only populate when redundancy is configured on the device. |
To Configure any of the Redundancy Parameters on the NSP, follow these steps:
Step 2 Release the mouse button. A telnet window appears. (See Figure 5-38)
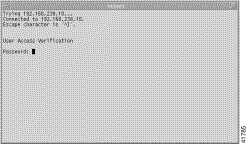
Step 3 Enter a password at the prompt, type:
<yourpassword>
Step 4 The NSP prompt appears.
Step 5 Enter enable mode, type:
enable
Step 6 Enter the enable password at the prompt, type:
<enablepassword>
Step 7 Enter configuration mode, type:
NSPprompt# conigure terminal
Step 8 Enter redundancy mode, type:
NSPprompt(config)#redundancy
The next step is to configure the Main CPU parameters on the NSP:
Step 9 Enter main-cpu mode, type:
NSPprompt(config-r)#main-cpu
Step 10 To configure the auto sync elements, type:
NSPprompt(config-r-mc)#auto-sync <startup-config> <config-register> <bootvar> <standard>
|
Note Adding on to the command any of the <> parameters will set this parameter on the NSP. |
Step 11 Enter the slot numbers to configure slot redundancy, enter:
NSPprompt(config-r)#associate slot x y
|
Note When entering the slots to be associated, the slot numbers (x and y) must be adjacent and the first slot must be an odd numbered slot, for example, slot 1 + 2 is valid but slot 2 + 3 is invalid. The x and y must be integer values between 1 and 8. |
Step 12 Enter the subslot numbers (adhering to the same numbering restrictions as for slot numbers) to configure subslot redundancy, enter:
NSPprompt(config-r)#associate subslot <slot>/<card> <slot>/<card>
|
Note To de-configure any of the settings described earlier, prefix the command with "no", for example, NSPprompt(config-r)#no associate subslot <slot>/<card> <slot>/<card> |
The Interface Configuration window allows you to carry out part of the configuration for the NRP and NLC interface ports in a selected chassis. The selected interface port can then be commissioned or decommissioned.
Each port interface (that is, NRP or NLC) has a port management window where additional port interface configuration can be carried out (either before or after commissioning the selected port interface). For example, you may wish to configure parameters in the Cisco 6400 Line Card ATM Port Management window before commissioning the NLC interface port using the Interface Configuration window.
Select the Cisco 6400 UAC, Port, Manage, Configuration option from a relevant object icon or from an object pick list. See Table 5-1 for information on which objects allow you to launch the Interface Configuration window. The Interface Configuration window appears with the Configuration tab displayed.

The Module list displays half height modules (OC3 or DS3 NLCs) with a slot and sub-slot number displayed (for example, OC3-8-0). Full height modules (NSPs, NRPs or OC12 NLCs) are displayed as a module with a slot number (for example, NRP-5). When selecting a Module from the list, you must firstly identify the modules location in the chassis and then select the module according to its slot location in the rack.
The Interface list displays a list of the interfaces for the selected chassis and module (that is, NSP, NRP or NLC). The Interface list displays half height modules (OC3 or DS3 NLCs) with a slot, sub-slot and port number (for example, ATM-8-0-0). Full height modules (NSPs, NRPs or OC12 NLCs) are displayed as a module with a slot number, sub slot number and port number (for example, ATM-1-0-0).
Step 2 Select the relevant Chassis, Module and Interface from the lists displayed at the left side of the window. The Status of the selected module appears at the bottom left corner of the window.
|
Note The NSP module resides in Slot 0 in the chassis. Do not attempt to commission an NSP module. |
Step 3 Configure the parameters displayed in the Configurable Parameters panel, as required.
Step 4 Click Commission when the status is Decommissioned.
The NRP, NSP or NLC interface is now commissioned, its state changes to Commissioning and then Normal.
Step 2 Select the relevant Chassis, Module and Interface from the lists displayed at the left side of the window. The Status of the selected module appears at the bottom left corner of the window.
Step 3 Click Decommission when the Status is Normal. The NRP, NSP or NLC is now decommissioned, its state changes to Decommissioned.
The Interface Performance window displays performance attributes for the selected interface and allows you to Start or Stop performance logging for the selected interface.
|
Note Performance logging can start or stop on a module or global basis for a selected chassis. See the "Chassis Configuration Window" section for details on how to start or stop global performance logging for a selected chassis. See the "Module Configuration Window" section for details on how to start or stop global performance logging on a per module basis. |
Select the Cisco 6400 UAC, Port, Manage, Performance option from a relevant object icon or from an object pick list. See Table 5-1 for information on which objects allow you to launch the Interface Performance window. The Interface Performance window appears with the Performance (1) tab displayed.
To begin performance logging for a selected interface, follow these steps:
Step 2 Select the relevant Chassis, Module, and Interface from the lists displayed at the left side of the window.
Step 3 Click Start to begin performance logging for the selected interface. A window appears for you to confirm that you wish to start performance logging.
Step 4 Click Yes to begin performance logging for the selected interface.
|
Note Select the Performance (2) tab to view Error Statistics information for the selected interface. |
See the "Interface Performance Window" section for further information on the parameters displayed on this tab.
To stop performance logging for a selected interface, follow these steps:
Step 2 Select the relevant Chassis, Module, and Interface from the lists displayed at the left side of the window.
Step 3 Click Stop to stop performance logging for the selected interface. A window appears for you to confirm that you wish to stop performance logging.
Step 4 Click Yes to stop performance logging for the selected interface.
See the "Interface Performance Window" section for further information on the parameters displayed on this tab.
The Interface Status window displays status information for the selected interface.
Select the Cisco 6400 UAC, Port, Manage, Status option from a relevant object icon or from an object pick list. See Table 5-1 for information on which objects allow you to launch the Interface Status window. The Interface Status window appears with the Status tab displayed.
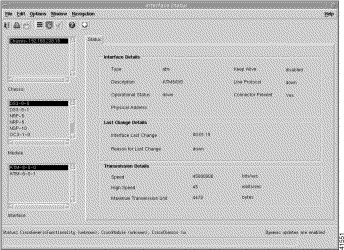
To view the Status tab:
The Status tab appears.
Step 2 Select the relevant Chassis, Module, and Interface from the lists displayed at the left side of the window.
See the "Interface Status Window" section section for further information on the parameters displayed on this tab.
The Management Information window allows you to set system configuration information for a selected chassis. IOS command line security information can also be set.
Select the Cisco 6400, Chassis, Admin, Management Information option from a relevant object icon or from an object pick list. See Table 5-1 for information on which objects allow you to launch the Management Information window. The Management Information window appears with the Configuration tab displayed.
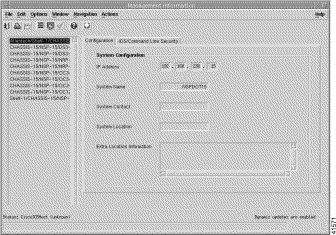
To configure system configuration and IOS/command line security information, follow these steps:
Step 2 Select the relevant Chassis from the lists displayed at the left side of the window.
|
Note See the "Management Information Window" section section for further information on the parameters displayed on this tab. |
Step 3 Configure the parameters displayed in the Configuration tab.
Step 4 Select the IOS/Command Line Security tab.
Step 5 Configure the parameters displayed in the Security Details panel.
|
Caution The User Name, Login Password, and Exec Password (set in the Management Information window in the IOS /Command Line Security tab) must be identical to the CLI Passwords set in the Cisco 6400 NSP Management window (Configuration tab). See the "Cisco 6400 NSP Management Window" section and the "Management Information Window" section for further details on setting the User Name, Login Password, and Exec Password. IOS Image Download and Backup and Restore will fail when the user name and passwords are not identical. |
Step 6 Click Save Locally to save the configuration information.
The IOS Image Download window displays a single Download tab. The Download tab allows you to configure download parameters and initiate a Cisco 6400 firmware or Cisco IOS release download to one or more user-selected NSPs and NRPs at a user specified time.
|
Caution IOS image download is available on a chassis and modules. Care is required when selecting a chassis or NRP from the IOS Host list. When a chassis or NLC is selected (in the IOS Host list) the IOS image is downloaded to the NSP, and when an NRP is selected (in the IOS Host list) the image is downloaded to the NRP. |
Select the Cisco 6400 UAC, Module, Admin, IOS Image Download option from a relevant object icon or from an object pick list. See Table 5-1 for information on which objects allow you to launch the IOS Image Download window.
The IOS Image Download window appears with the Download tab displayed.
|
Caution The User Name, Login Password, and Exec Password (set in the Management Information window in the IOS /Command Line Security tab) must be identical to the CLI Passwords set in the Cisco 6400 NSP Management window (Configuration tab). See the "Cisco 6400 NSP Management Window" section and the "Management Information Window" section for further details on setting the User Name, Login Password, and Exec Password. IOS Image Download and Backup/Restore will fail when the user name and passwords are not identical. |
To initiate a download, follow these steps:
Step 2 Select an IOS Host (that is, an NSP). The download information appears. See the "Download Tab" section for further information.
|
Caution IOS image download is available on a chassis and modules. Care is required when selecting a chassis or NRP from the IOS Host list. When a chassis or NLC is selected (in the IOS Host list) the IOS image is downloaded to the NSP, and when an NRP is selected (in the IOS Host list) the image is downloaded to the NRP. |
Step 3 Configure the parameters displayed in the Configuration panel.
Step 4 Click Download to download the Cisco IOS image (specified by the Source File Name in the Configuration panel) from the specified TFTP server to the file system of the Cisco 6400 (specified in the Destination File Name in the Configuration panel).
To schedule a Cisco IOS image download, follow these steps:
Step 2 Select an IOS Host. The download information appears. See the "Download Tab" section for further information.
|
Caution IOS image download is available on a chassis and modules. Care is required when selecting a chassis or NRP from the IOS Host list. When a chassis or NLC is selected (in the IOS Host list) the IOS image is downloaded to the NSP, and when an NRP is selected (in the IOS Host list) the image is downloaded to the NRP. |
Step 3 Configure the parameters displayed in the Configuration panel.
Step 4 Click Scheduled Download. The Schedule window appears (see Figure 5-44). The Schedule window allows you to enter a Date (in <mm><dd><yyyy> format) and time (Hour and Minute format) for the download to be performed.
Step 5 Enter a Date (mm/dd/yyyy) and time (hh:mm) for the download to take place automatically. Click Ok to save the new date and time. An Action Report window appears. The Action Report window details the Cisco IOS commands executed. Invalid Cisco IOS commands result in a failure to download.
Step 6 Check the details in the Action Report window to ensure that the scheduled download was setup successfully.
Step 7 Select Save to save the Action Report, when required.
Step 8 Select Close to close the Action Report window and return to the Cisco IOS Image Download window.
Step 9 Select Close from the File menu to close the Cisco IOS Image Download window.
|
Caution The User Name, Login Password, and Exec Password (set in the Management Information window in the IOS /Command Line Security tab) must be identical to the CLI Passwords set in the Cisco 6400 NSP Management window (Configuration tab). See the "Cisco 6400 NSP Management Window" section and the "Management Information Window" section for further details on setting the User Name, Login Password, and Exec Password. IOS Image Download and Backup/Restore will fail when the user name and passwords are not identical. |
The Configuration Backup/Restore window allows you to upload the current Cisco 6400 SCM running configuration from a specified Cisco 6400 UAC and save it as a file to any Trivial File Transfer Program (TFTP) server. This file can later be downloaded from the specified TFTP server to a user specified Cisco 6400 UAC.
Regular configuration backups allow recovery if hardware fails. For example, if an NPR were to fail, a replacement NRP could be inserted into the chassis and the configuration data would be restored. Changes in configuration data between the last backup and the time of the failure would be lost.
|
Note The backup/restore mechanism is not intended as a "configuration upload and manipulation" facility permitting configuration of the Cisco 6400 UAC (for example, through Cisco IOS, followed by subsequent management by the Cisco 6400 SCM). |
Select the Cisco 6400 UAC, Module, Admin, Configuration Backup/Restore option from a relevant object icon or from an object pick list. See Table 5-1 for information on which objects allow you to launch the Configuration Backup/Restore window. The Configuration Backup/Restore window appears with the Backup/Restore tab displayed (see Figure 5-45).
To initiate a backup, follow these steps:
Step 2 Select a relevant Chassis. The backup/restore information for the Cisco 6400 SCM appears. See the "Backup/Restore Tab" section for further information.
Step 3 Click Backup to begin the backup. The Action Report window (see Figure 5-46) appears:
The Action Report window details the Cisco IOS commands executed when the service is commissioned. Invalid Cisco IOS commands result in a failure to commission the service.
Step 4 Check the details in the Action Report window to ensure that the backup was successfully.
Step 5 Select Save to save the Action Report, if required.
Step 6 Select Close to close the Action Report window and return to the Configuration Backup/Restore window.
Step 7 Select Close from the File menu to close the Configuration Backup/Restore window.
To initiate a restore, follow these steps:
Step 2 Select a relevant Chassis. The backup/restore information for the Cisco 6400 SCM appears. See the "Backup/Restore Tab" section for further information.
Step 3 Click Restore to begin the backup. An Action Report window appears. The Action Report window details the Cisco IOS commands executed when the service is commissioned. Invalid Cisco IOS commands result in a failure to commission the service.
Step 4 Check the details in the Action Report window to ensure that the restore was successfully.
Step 5 Select Save to save the Action Report, if required.
Step 6 Select Close to close the Action Report window and return to the Configuration Backup/Restore window.
Step 7 Select Close from the File menu to close the Configuration Backup/Restore window.
To schedule a backup, follow these steps:
Step 2 Select a relevant IOS Host. The backup/restore information for the Cisco 6400 SCM appears. See the "Backup/Restore Tab" section for further information.
Step 3 Click Schedule Backup to schedule a date and time for the backup to take place. The Schedule window (see Figure 5-47) appears:
Step 4 Enter a Date (mm/dd/yyyy) and time (hh:mm) for the scheduled backup to take place automatically. Click Ok to save the new date and time. An Action Report window appears. The Action Report window details the Cisco IOS commands executed when the service is commissioned. Invalid Cisco IOS commands result in a failure to commission the service.
Step 5 Check the details in the Action Report window to ensure that the scheduled backup was setup successfully.
Step 6 Select Save to save the Action Report, if required.
Step 7 Select Close to close the Action Report window and return to the Configuration Backup/Restore window.
Step 8 Select Close from the File menu to close the Configuration Backup/Restore window.
You can launch a telnet session from an icon representing a Chassis, NSP or NRP in the MapViewer application.
To launch a telnet session, follow these steps:
Step 2 Release the mouse button. A telnet window appears.
Step 3 Enter the required password. Refer to the Cisco 6400 UAC Software Configuration Guide (Cisco document number 78-5785-01) for further telnet information.
You can launch Netscape and open the URL representing the home page of the embedded NSP or NRP HTTP server application (known as the WebConsole) from an icon representing an NSP or NRP in the MapViewer application.
To launch the WebConsole application, follow these steps:
Step 2 Release the mouse button. A password window appears. Enter the required user ID and password.
A window appears providing access to the Cisco WebConsole product. Refer to the Cisco 6400 UAC Software Configuration Guide (Cisco document number 78-5785-01) for further information on WebConsole.
The Cisco 6400 SCM allows you to enter Site and Contact information for each site object. To enter or edit information, proceed as follows:
To view and edit Site Information, follow these steps:
Step 2 Select the Site Information option. The Site Information window appears:
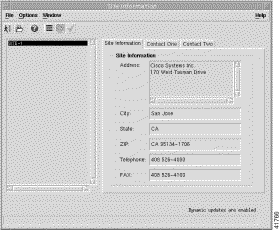
The Site Information window has three tabbed sections:
Step 3 Enter information into each of the data entry boxes (as required) in the Site Information tab to identify the location of the site.
Step 4 Select the Contact One tab. (See Figure 5-49.)
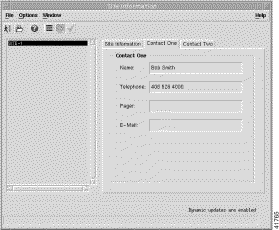
Step 5 Enter information into each of the data entry boxes as required, to provide personal contact details for an individual at the site.
Step 6 Select the Contact Two tab.
Step 7 Enter the details of a second contact person at the selected site.
Step 8 Select the Save option from the File menu to save the Site Information.
|
Note To edit any of the information contained in the Site Information window, select the appropriate tab and enter or change the information in the appropriate data entry box then select the Save option from the File menu to save the changes. |
Step 9 Click the Close icon.
The Cisco 6400 SCM allows you to enter Notes for each site object. To enter or edit information, proceed as follows:
Step 2 Select the Notes option. The Notes window appears. (See Figure 5-50.)
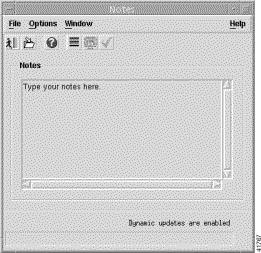
Step 3 Enter information into the Notes panel.
Step 4 Click the Save icon to save changes.
Click the Close icon.
![]()
![]()
![]()
![]()
![]()
![]()
![]()
![]()
Posted: Fri Aug 4 01:49:38 PDT 2000
Copyright 1989-2000©Cisco Systems Inc.