|
|

This chapter describes how to install and update the Cisco 605 PPP software.
This chapter also describes how to remove the 1483 driver software. Refer to the "1483 Driver Description" section and "Using the Cisco 605 1483 Software."
The PPP software consists of two parts:
The PPP driver contains the software that runs the Cisco 605 adapter. The Cisco 605 Commander allows you to see statistics and control parameters of the Asymmetric Digital Subscriber Line (ADSL) connection. For more information on the Cisco 605 Commander, refer to "Viewing and Changing Cisco 605 Settings."
The Cisco 605 PPP software supports three platforms: Window NT, Windows 95, and Windows 98. The PPP driver files are located on the Cisco 605 CD in the following directories:
PPP\WINNT --- Windows NT drivers
PPP\WIN95 --- Windows 95 drivers
PPP\WIN98 --- Windows 98 drivers
This section describes how to install the Cisco 605 PPP software onto a Windows NT Version 4.0 platform. Windows NT 4.0 does not support plug-and-play functionality and does not auto-detect new hardware. Therefore, the system does not automatically install drivers for the Cisco 605.
If you are:
Before you install the Cisco 605 PPP software on a Windows NT Version 4.0 system, be sure the following requirements are met:
Step 1 After you log on to Windows NT Version 4.0, left-click the Start button and select Settings\>\>Control Panel.
Step 2 Double-click the Network icon.
Step 3 At the Network dialog box, click the Adapters tab.
Step 4 Click the Add button. A list of possible adapters appears in the Select Network Adapter window (Figure 3-1).
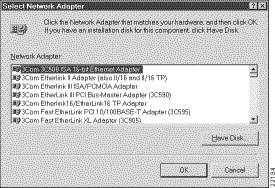
Step 5 Click the Have Disk button. The Insert Disk screen appears.
Step 6 Insert the CD into your CD drive. At the Insert Disk screen, enter the following path name:
<CD ROM Drive Letter>: PPP\Winnt
Step 7 Click OK. The Select OEM Option window appears (Figure 3-2).
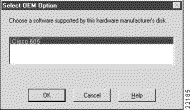
Step 8 Select the Cisco 605 from the list
Step 9 Click OK. A message appears informing you that the system has successfully installed the adapter. This message also instructs you to configure the Remote Access Service (RAS) (Figure 3-3).

Step 10 Click OK. If the RAS software is:
Not installed---A wizard prompts you for the path name of the Windows NT CD. Enter the path name of the CD and click OK. For more information on installing RAS software, consult the Windows NT Version 4.0 User's Manual. After the system installs the RAS software, the Add RAS Device dialog box (Figure 3-4) appears. Refer to the "Configuring the Remote Access Service" section below to configure RAS.
Already installed---The system accesses the Add RAS Device dialog box (Figure 3-4). To configure RAS, refer to "Configuring the Remote Access Service" below.
The Cisco 605 supports multiple simultaneous destinations with Windows NT Version 4.0. To use this feature, you must add all Cisco 605 devices shown in the drop-down menu in the Add RAS Device screen. See the following steps to use RAS to configure a Cisco 605 device:
Step 1 At the Add RAS Device dialog box, select the Cisco 605 device (ISDN_1 Cisco 605, ISDN_2 Cisco 605, or ISDN_3 Cisco 605) from the list of port names
(Figure 3-4).

Step 2 Click OK to view the Remote Access Setup dialog box.
Step 3 Click the Configure button. The Configure Port Usage dialog box appears (Figure 3-5).
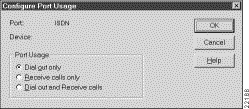
Step 4 Click the Dial out only option.
Step 5 Click OK. The Remote Access Setup dialog box appears.
Step 6 To add and configure additional 605 port devices, repeat steps 1 through 5 to configure all three port devices. After you configure all 605 port devices, the Remote Access Setup box displays the following screen with three port devices configured (Figure 3-6).
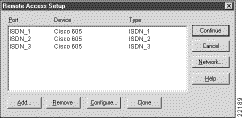
Step 7 At the Remote Access Setup dialog box, click Continue. The Network dialog box appears.
Step 8 At the Network dialog box, click Close.
A message appears briefly to inform you that the system is binding the new configurations.
Step 9 At the prompt, reboot.
After you configure RAS, you must create new phonebook entries using Dial-Up Networking (DUN). Refer to the "Creating a New Phonebook Entry" section for more information.
By creating and saving a phonebook entry for each dial-up session, you do not have to re-enter the same information each time you connect to your corporate LAN or ISP.
You create new phonebook entries using one of the following methods:
The wizard provides a step-by-step mechanism for creating new entries. The property tabs allow you to create entries directly.
To use the New Phonebook Entry Wizard to create new entries:
To use the New Phonebook Entry property tabs to create new entries:
The New Phonebook Entry Wizard provides a step-by-step procedure for creating new entries. The wizard is useful if this is the first time you have created entries.
To enable the New Phonebook wizard:
Step 1 Double-click the My Computer icon. The My Computer window appears.
Step 2 Double-click the Dial-Up Networking icon.
If the DUN phonebook contains no entries, the Dial-Up Networking phonebook is empty dialog box appears (Figure 3-7). Click OK. One of three dialogs appears. See the following steps for more information.

If the DUN phonebook contains entries, one of three dialogs appears. See the following steps for more information.
Step 1 If the New Phonebook Entry Wizard dialog appears (Figure 3-8), see "Using the New Phonebook Entry Wizard to Create Entries" section.
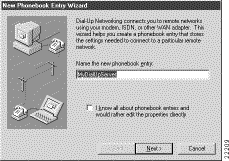
Step 2 If the New Phonebook Entry dialog box appears (Figure 3-9), click Cancel.
The Dial-Up Networking dialog box (Figure 3-10) appears.
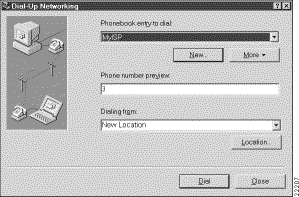
Step 3 If the Dial-Up Networking dialog box appears (Figure 3-10), click on the More button and select the Users Preferences option.
Step 4 Click the Appearance tab and select the Use wizard to create new phonebook entries option.
Step 5 Click OK. The Dial-Up Networking dialog box reappears (see Figure 3-10).
Step 6 Click New and the New Phonebook Entry Wizard dialog box appears
(Figure 3-8).
To use the wizard to create phonebook entries, refer to the "Using the New Phonebook Entry Wizard to Create Entries" section.
The New Phonebook Entry Wizard provides a step-by-step procedure for creating new entries. The wizard is useful if this is the first time you have created entries.
To use the wizard, you must first check the Use wizard to create new phonebook entries option. Refer to the "Enabling the New Phonebook Entry Wizard" section for more information. To disable the wizard, refer to the "Disabling the New Phonebook Entry Wizard" section.
To create new phonebook entries:
Step 1 Ensure that the Use wizard to create new phonebook entries option is selected. For instructions, refer to the "Enabling the New Phonebook Entry Wizard" section.
Step 2 Access the New Phonebook Entry Wizard. The New Phonebook Entry Wizard dialog box appears (Figure 3-11).

Step 3 Enter the name of the phonebook entry.
 | TimeSaver To edit the phonebook entries directly, click the I know all about phonebook entries checkbox on this screen. Then click Finish. The New Phonebook Entry screen appears. For more information, refer to the "Using New Phonebook Entry Property Tabs to Create Entries" section. |
Step 4 Click Next. The Server dialog box appears (Figure 3-12).
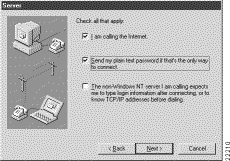
Step 5 Contact your service provider for information on about the checkboxes to select. In most cases, select the following (as shown in Figure 3-12):
Step 6 Click Next. The Modem or Adapter dialog box appears (Figure 3-13).
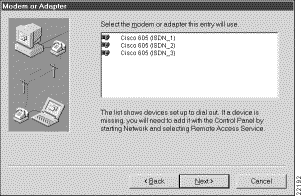
Step 7 Select Cisco 605 (ISDN_1), (ISDN_2), or (ISDN_3) from the list, depending on the connection entry you want to create.
Step 8 Click Next. The Phone Number dialog box appears (Figure 3-14).
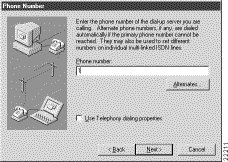
Step 9 In the Phone number field, enter the phone number provided by your service provider.
The value for the phone number field is the virtual circuit (VC) number assigned to you by your service provider. It must match the VC number of the equipment terminating your call. In the example in Figure 3-14, the VC number is 1. For more information, contact your service provider.
Step 10 Click Next. The New Phonebook Entry Wizard window appears (Figure 3-15).
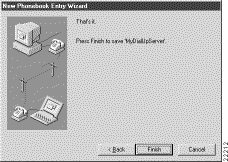
Step 11 Click Finish. The Dial-Up Networking window appears with the new phonebook entry.
Step 12 To use the wizard to create more new entries, click New.
After you create a phonebook entry, you are ready to dial out. Refer to the "Dialing Out" section for more information.
To disable the New Phonebook Entry Wizard and use the property tabs to create entries:
Step 1 Double-click the My Computer icon. The My Computer window appears.
Step 2 Double-click the Dial-Up Networking icon.
If the DUN phonebook contains no entries, the Dial-Up Networking phonebook is empty dialog box appears (Figure 3-16). Click OK. One of three dialogs appears. See the following steps for more information.

If the DUN phonebook contains entries, one of three dialogs appears. See the following steps for more information.
Step 1 If the New Phonebook Entry property tabs appears (Figure 3-18), refer to the "Using New Phonebook Entry Property Tabs to Create Entries" section.
Step 2 If the New Phonebook Entry Wizard (Figure 3-15) dialog box appears, click Cancel. The Dial-Up Networking dialog box appears (Figure 3-17).
Step 3 If the Dial-Up Networking dialog box appears, click the More button and select the Users Preferences option.

Step 4 Click the Appearance tab and de-select the Use wizard to create new phonebook entries option.
Step 5 Click OK. The Dial-Up Networking dialog box re-appears.
Step 6 Click New. The New Phonebook Entry screen appears with property tabs.
To use the property tabs to create new entries, refer to the "Using New Phonebook Entry Property Tabs to Create Entries" section.
Use the Dial-Up Networking (DUN) property tabs (see Figure 3-18) to bypass the New Phonebook Entry Wizard to create new phonebook entries. This section describes how to access and use property tabs.
To create new phonebook entries using the property tabs:
Step 1 Ensure that the Use wizard to create new phonebook entries option is not selected. Refer to the "Disabling the New Phonebook Entry Wizard" section for instructions.
Step 2 At the New Phonebook Entry screen, click on the Basic tab. The New Phonebook entry window appears (Figure 3-18).
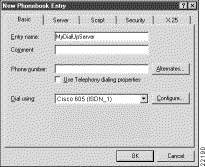
Step 3 In the Entry name field, enter a name for the connection. Each connection must be assigned a different name.
Step 4 Tab to the Phone number field and enter the connection information from your service provider.
The value for the phone number field is the virtual circuit (VC) number assigned to you by your service provider. Make sure this number matches the VC number of the equipment terminating your call. In the example above, the VC number is 1. For more information, contact your service provider.
Step 5 Tab to the Dial using field. Select the 605 port from the drop-down menu. The drop-down menu lists the ports you configured during installation (a maximum of three ports). Examples are:
Step 6 Click the Server tab. The Server tab information appears (Figure 3-19).
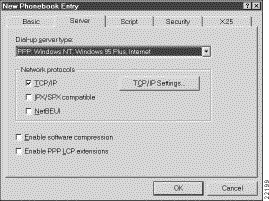
Step 7 Select or check the following settings:
Step 8 Click the TCP/IP Setting button. The PPP TCP/IP Settings dialog box appears (Figure 3-20).
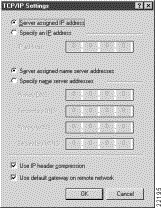
Make sure the settings match those required by the network. Contact your ISP for these settings.
Step 9 If instructed to by your service provider, select the Use default gateway on remote network option.
Step 10 Click OK to save the connection profile. The Server tab re-appears.
Step 11 Click the Security tab.
Step 12 Click the Accept any authentication including clear text option.
Step 13 At the Server page, click OK to apply the correct settings for your connection. The Dial-Up Networking dialog box re-appears (see Figure 3-17).
Step 14 Click Close to exit DUN or click Dial to start the connection.
After you create a new phonebook entry, you are now ready to dial out. Refer to "Dialing Out" section for more information.
After you create a phonebook entry, use the entry to dial out as follows:
Step 1 If you are not already in DUN, double-click My Computer. The My Computer dialog box appears.
Step 2 Double-click the Dial-Up Networking icon. The Dial-Up Networking dialog box appears (Figure 3-21).
 | TimeSaver You can also access DUN by clicking Start\>\>Accessories\>\>Dial-Up Networking. |

Step 3 From the drop-down menu under the Phonebook entry to dial option, select the appropriate phonebook entry.
Step 4 Click Dial. You are prompted to enter your remote domain password. To obtain this password, contact your ISP or corporate LAN administrator.
Step 5 Click OK. A message appears saying that the computer is connecting to the remote network. Expect a 7 to 15 second delay as the Cisco 605 establishes the connection. The green LED on the Cisco 605 blinks as it connects.
To upgrade to the latest version of the PPP software:
Step 1 Click Start\>\>Settings\>\>Control Panel\>\>Network. The Network window appears.
Step 2 Click the Adapters tab.
Step 3 Select the Cisco 605 from the list of adapters.
Step 4 Click Update. A wizard prompts you for a path name.
Step 5 Put the Cisco 605 software CD into the CD drive of your computer.
Step 6 Enter the following path name: <CD ROM Drive Letter>: PPP\Winnt.
Step 7 Click Continue.
Step 8 Click Close. A message appears stating that the system is updating the bindings.
Step 9 At the prompt, reboot the system.
This section describes how to install Cisco 605 PPP software onto a Windows 95 platform. Windows 95 auto-detects new hardware.
Before you install the Cisco 605 PPP software on a Windows 95 system, be sure the following requirements are met:
To install the Cisco 605 PPP software onto a Windows 95 platform:
Step 1 Power off and install the Cisco 605.
Step 3 Select the Driver from disk provided by hardware manufacturer option.
Step 4 Click OK. The Install from disk dialog box appears.
Step 5 Insert the CD ROM into the CD ROM drive. Then click Specify a location and ensure that the drive path is correct. If necessary, enter the following directory path: <CD ROM Drive Letter>:\PPP\Win95.
Step 6 Click OK. The system copies the software files. When the copy is complete, the system prompts you to reboot.
Step 7 At the prompt, reboot the system.
You can now create a new connection using DUN. For more information, refer to the "Creating a New Connection Profile" section.
To install the Cisco 605 PPP software onto a Windows 95 OSR 2 platform:
Step 1 Power off and install the Cisco 605.
Step 3 Click the Next button in the Update Device Driver wizard.
Step 4 Click the Other Location button in the Update Device Driver wizard.
Step 5 Enter the following directory path: <CD ROM Drive Letter>:\PPP\Win95.
Step 6 Click OK.
Step 7 Click Finish. The system copies the software files.
Step 8 At the Copying Files window, enter <CD ROM Drive Letter>:\PPP\Win95.
When the copy is complete, the system prompts you to reboot.
Step 9 At the prompt, reboot the system. Windows continues the bootup.
You can now create a new connection using DUN. For more information, refer to the "Creating a New Connection Profile" section.
Create and save a connection profile for each dial-up session so that you do not have to re-enter the same information each time you connect to your corporate LAN or ISP.
To create a new connection profile:
Step 1 Double-click the My Computer icon. The My Computer dialog box appears.
Step 2 Double-click the Dial-Up Networking icon. The Dial-Up Networking window appears (Figure 3-22).

Step 3 To create a new connection profile, double-click the Make New Connection icon. The Make New Connection Wizard appears (Figure 3-23).
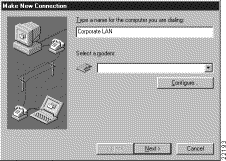
Step 4 In the Type a name for the computer field, enter a name for the connection.
Step 5 From the Select a modem drop-down menu, select the Cisco 605-LineX option.
Step 6 Press Next. The Wizard's Make New Connection Phone Number window appears (Figure 3-24).
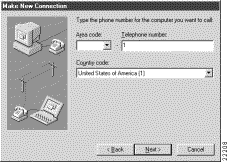
Step 7 In the fields provided, enter the area code and telephone number.
The value for the telephone number field is the VC number assigned by your service provider. Make sure the number matches the VC number of the equipment terminating your call. For more information, contact your service provider.
Step 8 Click Next. A message states that you have successfully created a new connection (Figure 3-25).
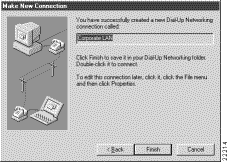
Step 9 To save the profile in the Dial-Up Networking folder, click Finish.
The system creates a new connection icon under the Dial-Up Networking folder. Now you can set the properties for the new connection. Refer to the "Setting Properties for New Connection Profiles" section.
After you create a phonebook entry, you can set the properties for that entry. Refer to the "Setting Properties for New Connection Profiles" section for more information.
To set properties for newly-configured profiles in the Cisco 605:
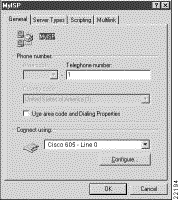
Step 1 Single left-click the connection profile you created. To access properties, right-click and select Properties. The My ISP dialog box appears (Figure 3-26).
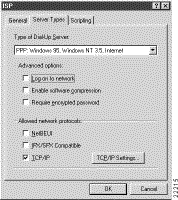
Step 2 Click the Server Types tab. Select or check the following settings (Figure 3-27):
Make sure other settings match those required by the network. For settings information, contact your service provider.
Step 3 Click TCP/IP Settings. The TCP/IP Settings dialog box appears (Figure 3-28).
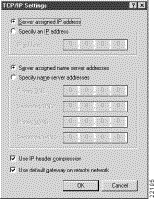
Step 4 Make sure that the Use IP header compression option is not selected.
Step 5 If instructed to by your ISP, select the Use default gateway on remote network option.
Step 6 To apply settings, click OK. The Server Types tab reappears.
Step 7 Click OK. You have now set the properties for a new connection.
After you set the properties for the connection, you are ready to dial out. Refer to the "Dialing Out" section for more information.
To dial out:
Step 1 If you are not already in Dial-Up Networking, double-click My Computer. The My Computer dialog box appears.
Step 2 Double-click the Dial-Up Networking icon. The Dial-Up Networking dialog box appears (see Figure 3-21).
 | TimeSaver You can also access DUN by pressing Start\>\>Accessories\>\>Dial-Up Networking. |
Step 3 Double-click the connection icon you set up in the "Creating a New Connection Profile" section.
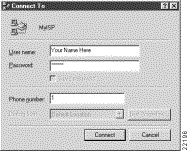
Step 4 When the Connect To dialog box appears (Figure 3-29), enter your password, verify the phone number, and press Connect. To obtain this password, contact your ISP or corporate LAN administrator.
A message states that the computer is connecting to the remote network.
To upgrade from a previous version of the Windows 95 PPP software, you must remove the old driver software and then install the new driver software.
To upgrade the PPP 95 software to Version 2.0.2:
Step 1 Click Start\>\>Settings\>\>Control Panel.
Step 2 Click the Network icon. The Network screen appears with a list of adapters.
Step 3 Select the Cisco 605.
Step 4 Click Remove.
Step 5 Click OK.
Step 6 At the prompt, reboot the system.
Step 7 After the system reboots, refer to the "Installing PPP Software onto Windows 95" section to install the latest software version of the PPP driver.
This section describes how to install Cisco 605 PPP software onto a Windows 98 platform. Windows 98 auto-detects new hardware.
Before you install the Cisco 605 PPP software on a Windows 98 system, be sure that the system does not have the Cisco 605 1483 software installed. For more information, refer to the "Deleting 1483 Driver Software" section.
To install the Cisco 605 PPP software onto a Windows 98 system:
Step 1 Power off and install the Cisco 605.
Step 2 Power on Windows 98 and allow the system to detect the 605 ADSL adapter.
The wizard displays a panel informing you that it detected a PCI ATM controller.
Step 3 Click Next to go to the next wizard panel. Two options appear.
Step 4 Choose Search for the best driver for your device and click Next to go to the next wizard panel. The wizard asks where to search for the driver you want to install.
Step 5 Insert the CD ROM into the CD ROM drive. Then click Specify a location and ensure that the drive path is correct. If necessary, enter the following directory path: <CD ROM Drive Letter>:\PPP\Win98 then click Next. The wizard presents a verification panel and shows the selection you just made as follows: Cisco 605 PCI ADSL Adapter Driver.
Step 6 Click Next to go to the next panel. The system finds the driver and begins to automatically copy the driver files from the CD. When the copy is complete, the system presents a dialog box.
Step 7 Click Finish. After you complete the driver installation wizard, the system prompts you to reboot. Click Yes.
Step 8 At the prompt, reboot the system. Windows continues with bootup.
You can now create a new connection using DUN. For more information, refer to "Creating a New Connection Profile" below.
Create and save a connection profile for each dial-up session so that you do not have to re-enter the same information each time you connect to your corporate LAN or ISP.
To create a new connection profile:
Step 1 Double-click the My Computer icon. The My Computer dialog box appears.
Step 2 Double-click the Dial-Up Networking icon. The Dial-Up Networking window appears (Figure 3-30).

Step 3 To create a new connection profile, double-click the Make New Connection icon. The Make New Connection Wizard appears (Figure 3-31).

Step 4 In the Type a name for the computer field, enter a name for the connection.
Step 5 From the Select a modem drop-down menu, select the Cisco 605- LineX option.
Step 6 Press Next. The Wizard's Make New Connection Phone Number window appears (Figure 3-32).

Step 7 In the fields provided, enter the area code and telephone number.
The value for the telephone number field is the VC number assigned by your service provider. Make sure the number matches the VC number of the equipment terminating your call. For more information, contact your service provider.
Step 8 Click Next. A message states that you have successfully created a new connection (Figure 3-33).

Step 9 To save the profile in the Dial-Up Networking folder, click Finish.
The system creates a new connection icon under the Dial-Up Networking folder. Now you can set the properties for the new connection. Refer to the "Setting Properties for New Connection Profiles" section.
To set properties for newly-configured profiles in the Cisco 605:
Step 1 Single left-click the connection profile you created. To access properties, right-click and select Properties. The My ISP dialog box appears (Figure 3-34).

Step 2 Click the Server Types tab (Figure 3-35).

Step 3 Select or check the following settings:
Make sure other settings match those required by the network. For settings information, contact your service provider.
Step 4 Click TCP/IP Settings. The TCP/IP Settings dialog box appears (Figure 3-36).
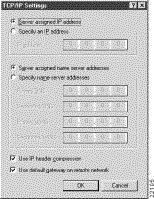
Step 5 Make sure that the Use IP header compression option is not selected.
Step 6 If instructed to by your ISP, select the Use default gateway on remote network option.
Step 7 To apply settings, click OK. The Server Types tab reappears.
Step 8 Click OK. You have now set the properties for your new connection.
You are now ready to dial out. Refer to the "Dialing Out" section for more information.
To dial out:
Step 1 If you are not already in Dial-Up Networking, double-click My Computer. The My Computer dialog box appears.
Step 2 Double-click the Dial-Up Networking icon. The Dial-Up Networking dialog box appears (see Figure 3-21).
Step 3 Double-click the connection icon you set up in the "Creating a New Connection Profile" section.
Step 4 When the Connect To dialog box appears (Figure 3-37), enter your password, verify the phone number, and press Connect. To obtain this password, contact your ISP or corporate LAN administrator.

A message states that the computer is connecting to the remote network.
To upgrade from a previous version of the Windows 98 PPP software:
Step 1 Click Start\>\>Settings\>\>Control Panel. The Control Panel opens.
Step 2 Click the System icon. The System dialog box appears.
Step 3 Click the Devices tab. A list of devices that your system currently supports appears.
Step 4 Scroll down to the Network entry.
Step 5 Expand the list by left-clicking on the plus sign to the left of the Network entry. A list of network entries appears.
Step 6 Single left-click the Cisco 605.
Step 7 Click Update. The system prompts you for path information.
Step 8 Enter the following path name: <CD ROM Drive Letter>: PPP\Win98. A message appears stating that the system is copying files.
Step 9 At the prompt, reboot the system.
The latest version of the Cisco 605 driver software is installed. Use your DUN connection profiles to connect to your service provider.
If you cannot connect to your service provider, check the following settings for accuracy:
If these are correct and you still cannot connect, contact your ADSL SP.
You can monitor ADSL connections using system tray icons that appear for the duration of the connection.
To invoke these icons:
You must remove the 1483 driver software and all associated files before installing the PPP driver. See the following sections for instructions on deleting the 1483 software from a specific platform.
To remove the 1483 driver from an NT platform:
Step 1 Click Start\>\>Settings\>\>Control Panel. The Control Panel appears.
Step 2 Click the Network icon. The Network dialog box appears.
Step 3 Click the Adapters tab. A list of the adapters currently installed on the system appears.
Step 4 Click Cisco 605 PCI ADSL Adapter.
Step 5 Click Remove.
The adapter and all of the protocols bound above it are deleted from the Network Control Panel bindings list.
Step 6 Exit the Network dialog box.The system prompts you to reboot.
Step 7 Click Yes.
You have now successfully removed the 1483 software from your NT machine.
See the following instructions to remove the 1483 software from a Windows 95 or Windows 98 machine:
Step 1 Click Start\>\>Settings\>\>Control Panel. The Control Panel appears.
Step 2 Click the Network icon. The Network dialog box appears.
Step 3 A list of the adapters currently installed on the system appears at the Configuration tab.
Step 4 Click Cisco 605 PCI ADSL Adapter.
Step 5 Click on Remove.
The adapter and all of the protocols bound above it are deleted from the Network Control Panel bindings list.
Step 6 Click OK at the Network dialog box.The system prompts you to reboot.
Step 7 If you are using Windows 95, click Yes. If you are using Windows 98 click No and see the following steps.
Step 8 Place the Cisco 605 CD into the CD drive on your computer.
Step 9 Launch Windows Explorer or initiate an MS-DOS session.
Step 10 Locate the drive that your CD drive is mapped to and select it. The root level system files and folders appear.
Step 11 In Explorer, click the delfiles.exe file in the Win98 folder. The Delete Files dialog box appears.
Step 12 At the DOS prompt, issue the following command:
Win98>delfiles
The Delete Files dialog box appears (Figure 3-38).

Step 13 Click OK. The utility deletes the files.
Step 14 When the system completes the deletion, reboot the system.
After the system reboots, you are ready to install the latest software version. Refer to one of the following sections to install the PPP software:
![]()
![]()
![]()
![]()
![]()
![]()
![]()
![]()
Posted: Mon Mar 29 08:30:18 PST 1999
Copyright 1989-1999©Cisco Systems Inc.