|
|

This chapter describes how to install and update the Cisco 605 1483 software.
This chapter also describes how to remove the PPP driver software. For background information, refer to the section titled "PPP Driver Description" section and "Using the Cisco 605 PPP Software."
The 1483 software consists of two parts:
The 1483 driver contains the software that runs the Cisco 605. The Cisco 605 Commander feature is required to connect to your service provider and also allows you to view statistics and control parameters of the Asymmetric Digital Subscriber Loop (ADSL) connection.
For more information on the Cisco 605 Commander feature, refer to "Viewing and Changing Cisco 605 Settings."
The Cisco 605 1483 software supports three platforms: Windows NT, Windows 95, and Windows 98. The 1483 driver files are located on the Cisco 605 CD in the following directories:
RFC1483\WINNT --- Windows NT drivers
RFC1483\WIN95 --- Windows 95 drivers
RFC1483\WIN98 --- Windows 98 drivers
This section describes how to install the 1483 software on a Windows NT Version 4.0 system. Windows NT 4.0 does not support plug-and-play functionality and does not auto-detect new hardware. Therefore, the system does not prompt you to install the software during boot-up.
Before you install the Cisco 605 software on a Windows NT Version 4.0 system, be sure the following requirements are met:
Step 1 After you log on to Windows NT Version 4.0, left-click the Start button and select Settings\>\>Control Panel.
Step 2 Double-click the Network icon.
Step 3 At the Network dialog box, click the Adapters tab.
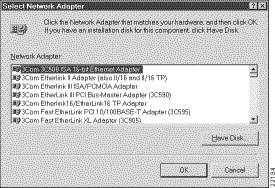
Step 4 Click Add. A list of possible adapters appears (Figure 4-1).

Step 5 Click the Have Disk button. The Insert Disk window appears.
Step 6 Insert the Cisco 605 CD into the disk drive. Select a source disk drive on the Insert Disk screen and enter the path name <CD ROM Letter Name>\rfc1483\winnt in the field provided.
Step 7 Click OK. The Select OEM Option dialog box appears.
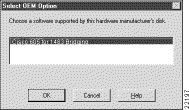
Step 8 At the Select OEM Option dialog box, select the Cisco 605 for 1483 Bridging option (Figure 4-2).

Step 9 Click OK. The system copies files from the CD and automatically copies the 1483 intermediate driver files.
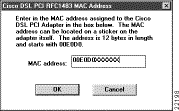
The system prompts you for a valid MAC Address for the card (Figure 4-3). The MAC address in Figure 4-3 is an example only.

Step 10 Enter the Valid MAC address located on the sticker on the Cisco 605. The system performs binding operations and then prompts you to configure TCP/IP settings for the adapter.
Step 11 Using the information provided by your ISP, either select the DHCP option or enter a valid IP address and subnet mask.
Step 12 Click OK. The installation completes and prompts you to reboot.
Step 13 Click Yes to restart the computer.
When the system reboots, the Cisco 605 Commander icon appears in the system tray. Click this icon to launch the Cisco 605 Commander and connect to your Service Provider (SP). For more information, refer to the "Connecting to Your Service Provider" section.
If the Cisco 605 does not function, refer to the "Checking Connectivity" section.
This section describes how to install the 1483 software on a Windows 95 system. Windows 95 auto-detects new hardware.
Before you install the Cisco 605 software on a Windows 95 system, be sure the following requirements are met:
To install the Cisco 605 software on Windows 95:
Step 1 Power off and install the Cisco 605.
Step 3 Select the Driver from disk provided by hardware manufacturer option.
Step 4 Click OK. The Install from disk dialog box appears.
Step 5 Insert the CD ROM into the CD ROM drive, then click Specify a location and ensure that the drive path is correct. If necessary, enter the following directory path: <CD ROM Drive Letter>:\rfc1483\Win95.
Step 6 Click OK.
The system copies the software files. When the copy is complete, the system prompts you to enter a MAC address (Figure 4-4). The MAC address in
Figure 4-4 is an example only.

Step 7 Enter a MAC address and click OK.
The system continues copying system files. It then prompts you to reboot.
Step 8 If you do not need to change your TCP/IP settings, click Yes when prompted and allow the system to reboot.
After the system reboots, the Cisco 605 Commander icon appears in the system tray. Click this icon to launch the Cisco 605 Commander and connect to your Service Provider (SP). For more information, refer to the "Connecting to Your Service Provider" section.
If the Cisco 605 does not function, refer to the "Checking Connectivity" section.
Step 9 If you need to change your TCP/IP settings, click No when prompted and refer to the following steps for instructions.
Step 10 Click Start\>\>Settings\>\>Control Panel.
Step 11 Click the Network icon. A list of objects that your network currently uses appears.
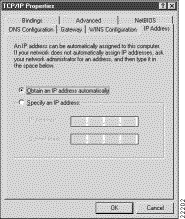
Step 12 Double-click the TCP/IP»Cisco 605 PCI ADSL Adapter Driver for 1483 Bridging option. The following screen appears:

Step 13 Contact your Internet Service Provider (ISP) for an IP address and subnet mask.
Step 14 Enter the IP address and subnet mask that your ISP provides.
Step 15 Click OK. This returns you to the Network dialog box.
Step 16 At the Network dialog box, click OK.
Step 17 Reboot when prompted.
After the system reboots, the Cisco 605 Commander icon appears in the system tray. Click this icon to launch the Cisco 605 Commander and connect to your Service Provider (SP). For more information, refer to the "Connecting to Your Service Provider" section.
If the Cisco 605 does not function, refer to the "Checking Connectivity" section.
To install the 1483 software on Windows 95 OSR 2.0:
Step 1 Power off and install the Cisco 605.
Step 3 Click the Next button in the Update Device Driver wizard.
Step 4 Click the Other Location button in the Update Device Driver wizard.
Step 5 Enter the following directory path: <CD ROM Drive Letter>:\rfc1483\Win95.
Step 6 Click OK.
Step 7 Click Finish. The system copies the software files.
Step 8 At the Copying Files window, enter <CD ROM Drive Letter>:\rfc1483\Win95.
Step 9 Click OK.
The system copies the software files. When the copy is complete, the system prompts you to enter a MAC address (Figure 4-6). The MAC address in Figure 4-6 is an example only.

Step 10 Enter a MAC address and click OK.
The system copies system files. It then prompts you to reboot.
Step 11 If you do not need to change your TCP/IP settings, click Yes when prompted and allow the system to reboot.
After the system reboots, the Cisco 605 Commander icon appears in the system tray. Click this icon to launch the Cisco 605 Commander and connect to your Service Provider (SP). For more information, refer to the "Connecting to Your Service Provider" section.
If the Cisco 605 does not function, refer to the "Checking Connectivity" section.
Step 12 If you need to change your TCP/IP settings, click No when prompted to reboot and refer to the following steps for instructions.
Step 13 Click Start\>\>Settings\>\>Control Panel.
Step 14 Click the Network icon. A list of objects that your network currently uses appears.
Step 15 Double-click the TCP/IP»Cisco 605 PCI ADSL Adapter Driver for 1483 Bridging option. The following screen appears:

Step 16 Contact your Internet Service Provider (ISP) for an IP address and subnet mask.
Step 17 Enter the IP address and subnet mask that your ISP provides.
Step 18 Click OK. This returns you to the Network dialog box.
Step 19 At the Network dialog box, click OK.
Step 20 Reboot when prompted.
After the system reboots, the Cisco 605 Commander icon appears in the system tray. Click this icon to launch the Cisco 605 Commander and connect to your Service Provider (SP). For more information, refer to the "Connecting to Your Service Provider" section.
If the Cisco 605 does not function, refer to the "Checking Connectivity" section.
This section describes how to install the Cisco 605 software on a Windows 98 system. Windows 98 auto-detects new hardware.
Before you install the Cisco 605 software on a Windows 98 system, be sure the following requirements are met:
To install the Cisco 605 software on Windows 98:
Step 1 Power off the system and install the Cisco 605.
Step 3 Click Next to go to the next wizard panel. At the next wizard panel, two choices appear.
Step 4 Choose Search to find the best driver for your device and click Next to go to the next wizard panel. The wizard prompts you to specify a location to search for the driver you are installing.
Step 5 Insert the CD ROM. Click the Specify a location button and ensure that the drive path is correct. If necessary, enter the following directory path:<CD ROM Drive Letter>:\rfc1483\Win98 then click Next. The wizard presents a verification panel and displays the choice you made as follows: Cisco 605 PCI ADSL Adapter Driver for 1483 Bridging.
Step 6 Click the Next button to go to the next panel. The system finds the driver and begins to automatically copy the driver files from the CD.
The system copies the software files. When the copy is complete, the system prompts you to enter a MAC address (Figure 4-8). The MAC address in Figure 4-8 is an example only.

Step 7 Enter a MAC address and click OK. The system copies system files.
Step 8 Click Finish. After completing the driver installation wizard, the system prompts you to reboot.
Step 9 If you do not need to change your TCP/IP settings, click Yes and allow the system to reboot.
After the system reboots, the Cisco 605 Commander icon appears in the system tray. Click this icon to launch the Cisco 605 Commander and connect to your Service Provider (SP). For more information, refer to the "Connecting to Your Service Provider" section.
If the Cisco 605 does not function, refer to the "Checking Connectivity" section.
Step 10 If you need to change your TCP/IP settings, click No and refer to the following steps for instructions.
Step 11 Click Start\>\>Settings\>\>Control Panel.
Step 12 Click the Network icon. The Network dialog box appears.
Step 13 Click OK. The Network dialog box appears.
Step 14 Double-click the TCP/IP»Cisco 605 PCI ADSL Adapter Driver for 1483 Bridging option or click Properties.
Step 15 Enter an IP Address and subnet mask for the Cisco 605.
Step 16 At the Properties dialog box, click OK.
Step 17 At the Network dialog box, click OK.
Step 18 Click Yes to restart the computer.
After the system reboots, the Cisco 605 Commander icon appears in the system tray. Click this icon to launch the Cisco 605 Commander and connect to your Service Provider (SP). For more information, refer to the "Connecting to Your Service Provider" section.
If the Cisco 605 does not function, refer to the "Checking Connectivity" section.
This section describes how to perform a software upgrade from Version 2.0.1 for Windows 98. When you upgrade your 1483 software from software Version 2.0.1 to the latest version, you must:
If you do not delete system files before upgrading, your system auto-detects incorrectly and the Version 2.0.2 software does not function properly.
To remove the 1483 software:
Step 1 Go to the Network Control Panel.
Step 2 Click Cisco 605 PCI ADSL Adapter Driver for 1483 Bridging.
Step 3 Click Remove.
The adapter and all of the protocols bound above it are deleted from the Network Control Panel bindings list.
Step 4 At the reboot prompt, click No.
After you remove the Cisco 605, you must delete the setup files. Refer to "Deleting Setup Files" below.
Step 1 Place the Cisco 605 2.0.1 CD into the CD drive on your computer.
Step 2 Launch Windows Explorer or initiate an MS-DOS session.
Step 3 Locate the drive that your CD drive is mapped to and select it. The root level system files and folders appear.
Step 4 In Explorer, click the delfiles.exe file in the Win98 folder. The Delete Files dialog box appears.
Step 5 At the DOS prompt, issue the following command:
Win98>delfiles
The Delete Files dialog box appears (Figure 4-9).

Step 6 Click OK. The utility deletes the files.
Step 7 When the system completes the deletion, reboot the system.
After the system reboots, you are ready to install the latest software version. Refer to the "Installing 1483 Software on Windows 98" section for more information.
After you install the Cisco 605 software, the Cisco 605 Commander icon appears in your system tray. Use the Cisco 605 Commander icon to establish a connection to your service provider using one of the following methods:
For more information on using the Cisco 605 Commander, refer to "Viewing and Changing Cisco 605 Settings."
If you cannot connect to your service provider, check the following settings for accuracy:
If these are correct and you still cannot connect, contact your ADSL SP.
You must remove the PPP driver software and all associated files before installing the 1483 driver. See the following sections for instructions on deleting the PPP software from a specific platform.
To remove the PPP driver from an NT platform:
Step 1 Click Start\>\>Settings\>\>Control Panel. The Control Panel appears.
Step 2 Click the Network icon. The Network dialog box appears.
Step 3 Click the Adapters tab. A list of the adapters currently installed on the system appears.
Step 4 Click Cisco 605 PCI ADSL Adapter.
Step 5 Click Remove.
The adapter and all of the protocols bound above it are deleted from the Network Control Panel bindings list.
Step 6 Exit the Network dialog box.The system prompts you to reboot.
Step 7 Click Yes.
You have now successfully removed the PPP software from your NT machine.
Step 1 Click Start\>\>Settings\>\>Control Panel. The Control Panel appears.
Step 2 Click the Network icon. The Network dialog box appears.
Step 3 A list of the adapters currently installed on the system appears at the Configuration tab.
Step 4 Click Cisco 605 PCI ADSL Adapter.
Step 5 Click on Remove.
The adapter and all of the protocols bound above it are deleted from the Network Control Panel bindings list.
Step 6 Click OK at the Network dialog box.The system prompts you to reboot.
Step 7 If you are using Windows 95, click Yes. If you are using Windows 98 click No and see the following steps.
Step 8 Place the Cisco 605 CD into the CD drive on your computer.
Step 9 Launch Windows Explorer or initiate an MS-DOS session.
Step 10 Locate the drive that your CD drive is mapped to and select it. The root level system files and folders appear.
Step 11 In Explorer, click the delfiles.exe file in the Win98 folder. The Delete Files dialog box appears.
Step 12 At the DOS prompt, issue the following command:
Win98>delfiles
The Delete Files dialog box appears (Figure 4-10).

Step 13 Click OK. The utility deletes the files.
Step 14 When the system completes the deletion, reboot the system.
After the system reboots, you are ready to install the latest software version. Refer to the "Installing 1483 Software on Windows 98" section for more information.
![]()
![]()
![]()
![]()
![]()
![]()
![]()
![]()
Posted: Mon Mar 29 08:29:49 PST 1999
Copyright 1989-1999©Cisco Systems Inc.