|
|

This chapter describes how to install the Cisco 605. It describes steps to take before you begin the installation process, the shipping contents of the Cisco 605, and how to cable the Cisco 605 for both the POTS Splitter and Splitterless (EZ-DSL) phone configurations.
 | TimeSaver To save time, determine the following information before you begin installing the Cisco 605: |
If you have questions, contact your Internet Service Provider (ISP).
To install the Cisco 605, consult the following sections:
After you complete these steps, you are ready to install the Cisco 605 driver software.
Be sure you meet the following hardware and software requirements necessary to configure and use the Cisco 605:
Unpack the shipping carton and check for the following items:
If any items you ordered were not delivered, contact Cisco or your equipment provider.
Your shipment may also contain the optional items listed in Table 2-1.
| Contents | Description |
|---|---|
Filter connected to the phone set in splitterless installations. Reduces effects of POTS-generated noise on the ADSL transceiver. | |
Microfilter cable | RJ-11 to RJ-11 cable that connects the Microfilter to the phone set and wall. |
Wall-mount microfilter | Microfilter for use with wall-mount phones. |
Optional items are illustrated in Figure 2-1 and Figure 2-2.


After you open the box, unpack and examine the Cisco 605 (Figure 2-3).
To install the Cisco 605:
Step 1 Power off the computer.
Step 2 Open the computer.
Step 3 Locate an empty PCI slot.
Make sure the PCI slot is a bus-master and DMA capable.
Step 4 For 1483 only, write down the MAC address located on a sticker on the Cisco 605 unit.
Step 5 Carefully slide the Cisco 605 into the PCI slot. Before going to Step 6, refer to the sections below to perform your installation configuration:
Step 6 Close the computer.
Step 7 Locate the connector port on the Cisco 605 bracket.
Figure 2-4 shows the configuration used for a mini-tower configuration. In most mini-tower configurations, slide the Cisco 605 into the PCI connector located directly on the motherboard.
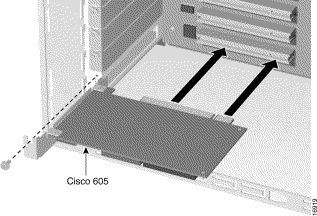
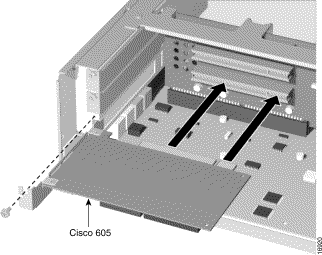
Figure 2-5 shows the configuration used for a riser configuration. In the riser configuration, slide the Cisco 605 into the PCI riser card, and then slide the card into the motherboard.
Cisco 605 supports the following phone configurations:
Before cabling the Cisco 605, verify your configuration with your service provider.
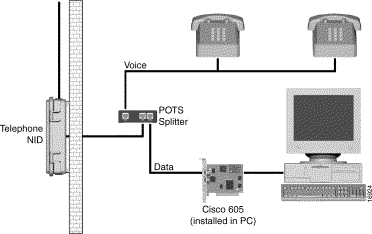
In POTS splitter configurations, a POTS splitter separates data signals from voice signals on your phone line. The POTS splitter works by running a separate data line from the voice line, so that the ADSL modem has a dedicated cable for data transmission. Figure 2-6 shows phone equipment connected to a POTS splitter.
In EZ-DSL configurations, your phone equipment is not connected to a POTS splitter. Without a POTS splitter and under certain circumstances, transient noise from the phone can interfere with the modem's operation. Likewise, the modem can cause noise on the phone line. To protect this from happening, connect small microfilters to the phone lines. Figure 2-7 shows a configuration for phone equipment which uses EZ-DSL (splitterless) configuration.
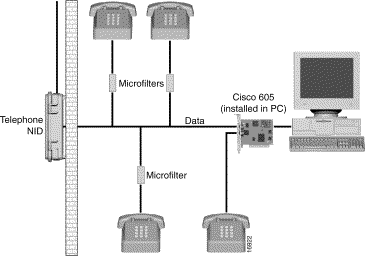
Figure 2-8 shows how to connect cables for both the POTS splitter and EZ-DSL configurations.
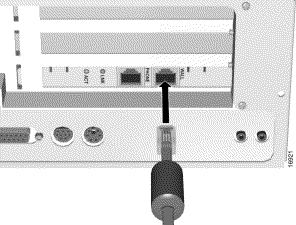
To cable for the POTS splitter phone configuration, plug the ADSL cable running from the POTS splitter into the WALL connector port on the Cisco 605.
 | Caution CIf you are using a POTS splitter to run a dedicated line to your modem, do not plug your phone cord into the PHONE connector on the back of the Cisco 605. Check with your service provider for information on your configuration. |
To cable the Cisco 605 for an EZ-DSL configuration:
Step 1 Plug the ADSL cable into the WALL connector port on the Cisco 605 card.
The Cisco 605 is shipped with an extra PHONE connector port that you can plug your phone into. This phone port has a built-in microfilter.
Step 2 Connect the remaining phones in your home to the EZ-DSL microfilters provided in the shipping contents of the package.
The microfilters do not function if you connect them improperly. For connection instructions, refer to "EZ-DSL Microfilter Specifications."
To power on your system, turn on your PC. The Light-Emitting Diodes (LEDs) do not blink until the 605 begins training.
After the system is powered on, you can install the Cisco 605 software for your operating system. Refer to the appropriate chapter for the software you want to install:
![]()
![]()
![]()
![]()
![]()
![]()
![]()
![]()
Posted: Mon Mar 29 08:28:22 PST 1999
Copyright 1989-1999©Cisco Systems Inc.