|
|

This chapter describes GR-303 and explains how to configure it. The chapter includes the following sections:
GR-303 is a standard interface for integrated digital loop carrier systems. Information in this chapter pertains to the Cisco 6732, which uses GR-303 to handle call processing and operations when connected to a Class 5 switch.
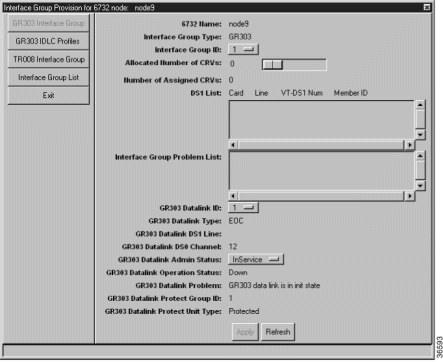
The Cisco 6732 supports up to four GR-303 interface groups. Each interface group consists of at least two DS1 lines from the Cisco 6732 to the Class 5 switch. The primary DS1 line carries the embedded operations channel (EOC) and timeslot management channel (TMC), and the secondary DS1 line offers protection in case of loss of service on the primary DS1 line.
Each interface group can contain a maximum of 28 DS1 lines. You can combine DS1 lines from multiple line cards for a single interface group.
GR-303 uses dynamic cross connects for concentration of DS0 channels, allowing one DS1 to serve more than 24 subscribers. GR-303 assigns call reference values (CRV) to analog lines. CRVs are used to build translation tables on the Class 5 switch that map remote analog connections to internal circuits at the switch. A single interface group can support up to 2,016 CRVs.
Local CRVs are assigned for analog circuits directly connected to the GR-303 processing node (the Cisco 6732). Lines used for local CRVs are assigned an interface group and CRV numbers. The EOC places the analog lines in service when needed. Local CRV provisioning allows the switch to decide if the line is ground start or loop start.
External CRVs are assigned to separate DS0s on the DS1s located in the Cisco 6732. The DS1s/DS0s that are assigned CRVs are not the same as those connected to the IDT. The CRV DS1s/DS0s physically connect to DS0s/DS1s in an external node. In the external nodes, the DS1s are cross connected to analog lines that correlate to the assigned CRVs. External CRV provisioning allows the switch to decide if the line is in ground start or loop start mode.
Remote CRVs are assigned to analog circuits connected to a remote node, such as a Cisco 6705 or Cisco IAD1101. The CRVs are assigned through an inter node data link from the Cisco 6732 to the remote node. For more information about inter node data links, see "Inter Node Links."
After a CRV is assigned to a line, the EOC puts that line in service when it is needed. If you provision the line in service, there are conflicts between the Cisco 6732 database and the switch database.
Step 2 Set the following GR-303 parameters:
Step 3 Click Apply to provision CRVs for the interface group. Repeat Step 2 to provision additional interface groups.
You can provision DS1 lines for GR-303 on the following line cards:
At least two DS1 lines (primary and secondary) must be provisioned for each interface group.

Step 2 In the line provisioning window, set the following parameters:
Step 3 Click Apply to provision the DS1 line.
 |
Note To reassign an incorrect interface group ID or member ID, first set the ID to 0 and click Apply, then select the correct ID number and click Apply. |
Step 4 Repeat this procedure until all DS1 lines are assigned to the GR-303 interface group. You must provision at least two DS1 lines (primary and secondary) for each interface group.
Step 2 Click VT-DS1 Basic Provision in the function bar. EMS displays the VT-DS1 line provisioning window. (See Figure 10-3.)

Step 3 In the VT-DS1 line provisioning window, set the following parameters:
Step 4 Click Apply to provision the DS1 line.
Step 5 Repeat this procedure until all DS1 lines are assigned to the GR-303 interface group.
|
Note You must provision at least two DS1 lines (primary and secondary) for each interface group. |
|
Note To reassign an incorrect interface group ID or member ID, first set the ID to 0 and click Apply, then select the correct ID number and click Apply. |
 |
Caution In a network using a Cisco 6732 and a Class 5 switch, always assign CRVs on the Cisco 6732 (either local or remote) before assigning them on the Class 5 switch. When assigning CRVs on a Class 5 switch, always use their respective directory number. The Class 5 switch provisions the CRV (through the EOC channel) on the Cisco 6732 in an inservice state. Following this sequence prevents mismatched provisioning states in the CRV tables, which can cause loss of dialtone on those CRVs. |
You cannot use a CRV number twice. The range for the CRVs allocated must be equal to or greater than the actual number of CRVs provisioned.
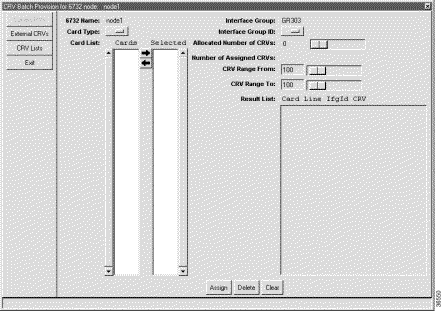
Step 2 From the CRV batch provisioning window, select the Card Type to be provisioned:
EMS displays the applicable card numbers in the Card List display, and the EOC provisions the lines in service.
Step 3 In the Card List display, highlight the cards to be provisioned. Click the right arrow icon to move the selected cards to the Selected list.
Step 4 Select the appropriate Interface Group ID (from 1 to 4). To assign CRVs, enter starting and ending values in the CRV Range From and CRV Range To fields.
Step 5 Highlight the lines to be provisioned in the Result list.
Step 6 Click Assign to assign CRVs to the highlighted lines. EMS displays the assigned CRVs in the Result list and indicates the number of assigned CRVs in the Number of Assigned CRVs field. (See Figure 10-5.)

Step 2 Click the CRV Lists tab to launch the CRV list window. (See Figure 10-6.)
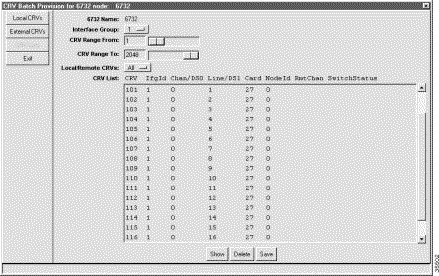
Step 3 Set the following parameters in the CRV list window:
Step 4 Click Show to view the CRV information, including card and line numbers, in the CRV list.
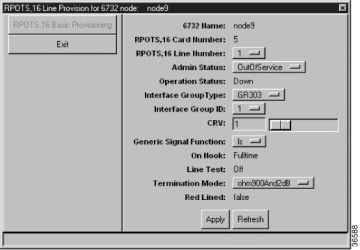
Step 2 In the line provisioning window, set the following parameters:
Step 3 Click Apply to complete GR-303 provisioning for the line.
Step 4 Repeat this procedure to provision additional GR-303 lines.
Step 2 Change the Interface Group Type of each analog line to be reset to TR-008.
Step 3 Click Apply to complete the change.
Step 4 Change the Interface Group Type of the line back to GR-303, and reassign the CRV as desired. You must also specify the appropriate Interface Group ID.
Step 5 Click Apply to complete the change.
Before provisioning remote CRVs, you must provision an inter node link between the local and remote nodes. See "Inter Node Links," for inter node link provisioning procedures.
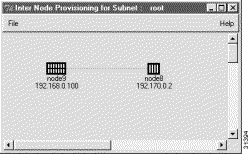
Step 2 If there is no inter node link between the local and remote nodes, click and drag a line from the local node to the remote node. The line appears as a red arrow pointing to the remote node.
EMS displays a path list window, indicating the path that will be used to communicate between the two nodes (Path ID) and the number of nodes that are included in the path (Node Count). (See Figure 10-9.)
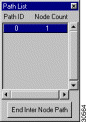
Step 3 If more than one path ID appears in the path list, select the desired path between the local and remote node. Click each path ID to show the path (red arrow) in the inter node provisioning window.
Step 4 In the inter node provisioning window, double-click the red arrow. EMS launches the inter node cross connect display, showing the broadband line cards installed in each node. (See Figure 10-10.)
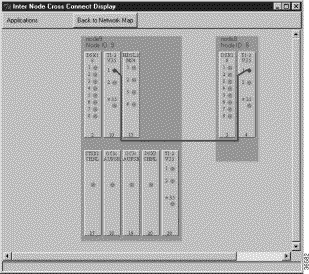
The blue line linking the two nodes is the inter node link. See "Inter Node Links" for more information on provisioning inter node links.
Step 5 Select Applications > CRV Batch Provisioning from the inter node cross connect display menu. EMS launches the inter node CRV batch provisioning window. (See Figure 10-11.)
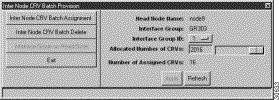
Step 6 Select an Interface Group ID to be assigned (from 1 to 4).
Step 7 Set the Allocated Number of CRVs to the number of CRVs for the selected interface group.
Step 8 Click Apply to provision the interface group.
Step 9 Select Inter Node CRV Batch Assignment in the function bar. EMS displays the inter node CRV batch assignment window. (See Figure 10-12.)
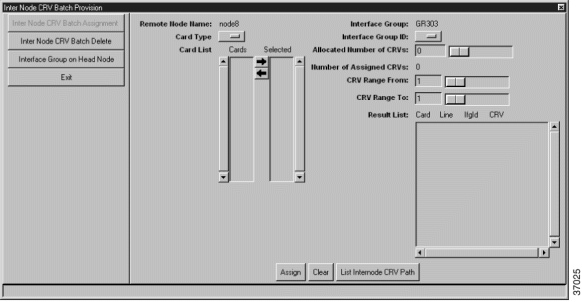
Step 10 From the inter node CRV batch provision window, define the following parameters:
After the appropriate cards have been moved to the Selected list, the card and line information appear in the result list. (See Figure 10-13.)

Step 11 Set the following fields for remote CRV batch provisioning:
|
Note Ignore this field if you already allocated the CRVs in Step 6 through Step 8. |
Step 12 Click Assign to provision the CRVs.
Each call reference value (CRV) provisioned on an ISDN-BRI/8 module occupies three DS0 channels (one DS0 each for the B1, B2, and D channels) over the transport between the Cisco 6732 and the remote node. When provisioning CRVs for ISDN, make sure that the interface group uses enough transport lines to accommodate three DS0s for each CRV.
For example, a DS1 transport between a Cisco 6705 remote node and a Cisco 6732 local node can carry up to 8 ISDN lines (24 divided by 3) over an FDL INDL. A DS1 transport using a DS0 INDL can carry up to 7 ISDN lines, because one DS0 is used as the INDL (leaving 23 available DS0s).
|
Caution The Class 5 switch GR-303 interface serves as the master controller of the Cisco 6732 GR-303 database. When deleting CRVs in a network with a Cisco 6732 and a Class 5 switch, always remove the CRV on the Class 5 switch first. The Class 5 switch provisions the CRV (through the EOC channel) on the Cisco 6732 in an out of service state. Then remove the CRV from the Cisco 6732. Otherwise, the Cisco 6732 database can lose synchronization with the Class 5 switch, resulting in mismatched provisioning states in the CRV tables and possible loss of dialtone on those CRVs. |
When deleting an ISDN CRV, you must delete the CRV from the switch before deleting it in EMS. Monitor the facility service state through EMS to ensure that the CRV has been deleted from the switch side. A transition from in service to out of service indicates that the switch has deleted the CRV from its database. After confirming its deletion from the switch side, delete the CRV in EMS.
Under heavy traffic conditions, when deleting an ISDN CRV from the Class 5 switch and the Cisco 6732, the switch may not delete the quarter DS0 carrying the D channel from the Cisco 6732 database. This issue depends on the switch scheduler for deleting CRVs; excessive traffic can delay or prohibit the removal of the quarter DS0.
When viewing the expanded line view of a cross-connected GR-303 facility, the channel with a quarter DS0 appears with a small black hashmark next to the channel (see Figure 10-15). In this case, use EMS to delete the quarter DS0. Refer to the sections "Deleting a Quarter DS0 Cross Connect" and "Deleting a Quarter DS0" for detailed procedures.
To delete CRV provisioning at the Cisco 6732, following these steps in sequence:
Step 2 From Cisco 6700 NodeView, select Objects > CRV Batch Provisioning from the NodeView of the node to be provisioned. EMS launches the CRV batch provision window.
Step 3 Click the CRV Lists tab to launch the CRV list window. (See Figure 10-6.)
Step 4 Set the following parameters in the CRV list window:
Step 5 To delete a range of assigned CRVs, highlight the CRVs to be deleted in the CRV list and click Delete. EMS confirms the deletion by removing the selected CRVs from the CRV list.
Step 2 Select the line that is provisioned with the cross connect. EMS displays the internal cross-connects.
Step 3 Look for a channel with a small black hashmark to the right. This channel carries the quarter DS0. In Figure 10-15, channel 3 of an STS1 transport carries a quarter DS0.

Step 4 Right-click the quarter DS0 channel and select Display Quarter DS0. EMS starts the cross connect display.
Step 5 Double-click a cross connect line to start the cross connect provisioning window.
Step 6 Click Delete.
Step 7 EMS displays a warning, recommending that this operation be performed from the switch. To proceed, Click Yes.
If EMS is unable to delete the cross connect, an error message will appear.
Step 8 After deleting the cross connect, you must close and restart the cross connect display to reflect the changes made.
Step 2 Select the appropriate QDS0 from the pull-down menu.
Step 3 Click Delete.
Step 4 A warning appears recommending that this operation be performed from the switch. Click Yes to proceed.
|
Note EMS displays an error message if you attempt to delete a cross connected QDS0. You must delete the cross connect before deleting the QS0. |
The cross connect box is refreshed with the current QDS0 status when the you exit from the QDS0 provisioning screen. For instance, if all QDS0s on a DS0 have been deleted, a black hash mark no longer appears on the DS0.
The following procedure describes how to batch delete the CRVs of analog lines.

Step 2 Set the following parameters:
![]()
![]()
![]()
![]()
![]()
![]()
![]()
![]()
Posted: Mon Feb 5 13:03:35 PST 2001
All contents are Copyright © 1992--2001 Cisco Systems, Inc. All rights reserved.
Important Notices and Privacy Statement.