|
|

Before installing the CDDI/FDDI Workgroup WS-C1400 Concentrator, read this chapter carefully. It contains information about safety recommendations, site requirements, and cabling requirements and lists the tools and materials you will need to install the concentrator.
 | Warning This warning symbol means danger. You are in a situation that could cause bodily injury. Before you work on any equipment, be aware of the hazards involved with electrical circuitry and be familiar with standard practices for preventing accidents. To see translated versions of this warning, refer to the appendix "Translated Safety Warnings." |
Follow these guidelines to ensure general safety:
Follow these guidelines when working on equipment powered by electricity.
| Warning Before working on equipment that is connected to power lines, remove jewelry (including rings, necklaces, and watches). Metal objects will heat up when connected to power and ground and can cause serious burns or weld the metal object to the terminals. To see translated versions of this warning, refer to the appendix "Translated Safety Warnings." |
| Warning There is the danger of explosion if the battery is replaced incorrectly. Replace the battery only with the same or equivalent type recommended by the manufacturer. Dispose of used batteries according to the manufacturer's instructions.To see translated versions of this warning, refer to the appendix "Translated Safety Warnings." |
Electrostatic discharge (ESD) can damage equipment and impair electrical circuitry. It occurs when electronic components are improperly handled and can result in complete or intermittent failures. Always follow ESD-prevention procedures when removing and replacing components. Ensure that the chassis is electrically connected to earth ground using an ESD mat or a ground wire. Wear an ESD-preventive wrist strap, ensuring that it makes good skin contact. Connect the clip to an unpainted surface of the chassis frame to safely channel unwanted ESD voltages to ground. To properly guard against ESD damage and shocks, the wrist strap and cord must operate effectively. If no wrist strap is available, ground yourself by touching the metal part of the chassis.
 | Caution For safety, periodically check the resistance value of the antistatic strap, which should be between 1 and 10 megohms. |
Following are the site requirements for installation.
Choose a clean, dust-free, (preferably) air-conditioned location. Avoid direct sunlight, heat sources, or areas with high levels of electromagnetic interference (EMI).
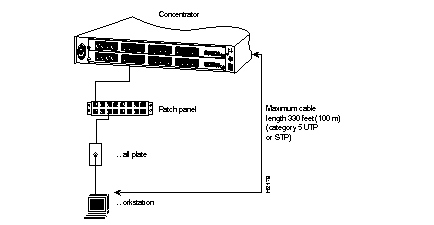
Both the front and rear panels of the concentrator chassis have duplicate status indicators that you may need to monitor. (The traffic LEDS are only on the front panel.) Leave at least 24 inches (60.9 cm) clearance at the rear of the concentrator for easier cabling, service, and access to the LEDs and the reset switch.
Two fans located at the side of the chassis cool the chassis interior. Both fans always operate. The fans draw air through vents in the left side and exhaust heated air through holes in the right side. If the concentrator temperature exceeds 104°F (40°C) the concentrator status LED will be red. If the interior temperature returns to normal, the status LED will return to its normal green.
| Warning To prevent the switch from overheating, do not operate it in an area that exceeds the maximum recommended ambient temperature of 104°F (40°C). To prevent airflow restriction, allow at least 3 inches (7.6 cm) of clearance around the ventilation openings. To see translated versions of this warning, refer to the appendix "Translated Safety Warnings." |
The source electrical outlet should be installed near the concentrator, be easily accessible, and be properly grounded. Power should come from a building branch circuit. Use a maximum breaker current rating of 20A for 110V or 8A for 230V. Note the power consumption ratings of each unit before you connect to a power source.
Following are the cabling requirements for installation. For pinouts of the following cable types, refer to the appendix "Cabling Specifications."
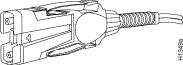
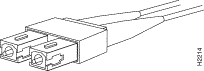
The multimode FDDI connectors on the concentrator accept 62.5/125-micron multimode fiber, or 50/125-micron multimode fiber, with standard FDDI MICs. The single-mode connectors accept 8.7 to 10/125-micron single-mode fiber, with standard FDDI ST-type connectors. Table 2-1 lists FDDI distance specifications and Figure 2-1, Figure 2-2, and Figure 2-3 illustrate single-mode ST, multimode MIC, and multimode SC (low cost) connectors, respectively.
| Transceiver Type | Maximum Distance Between Stations |
|---|---|
| Single-mode-ST | 18.6 miles (30 km) |
| Multimode-MIC | 1.2 miles (up to 2 km) |
| Multimode-SC | 1.2 miles (up to 2 km) |
| Multimode-SC (low cost) | 320 feet (up to 100 m) |
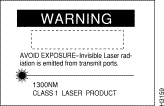 |
| Warning Class 1 laser product. |

Check all existing cables for conformance with CDDI/MLT-3 distance requirements and to ensure that you have the proper connectors (modular RJ-45). Following are cable and distance specifications:
When you plan your CDDI installation, remember the following:
As with all signaling systems, EIA/TIA-232 signals can travel a limited distance at any given bit rate; generally, the slower the data rate, the greater the distance. Table 2-2 contains the baud rates and maximum distances. The EIA/TIA-232 admin. port requires a modular RJ-45 connector for the switch end and an RJ-45-to-DB-25 connector for the console terminal to which it will attach.
| Data Rate (baud) | Distance (feet) | Distance (meters) |
|---|---|---|
| 2,400 | 200 | 60 |
| 4,800 | 100 | 30 |
| 9,600 | 50 | 15 |
| 19,200 | 25 | 7.6 |
| 38,400 | 12 | 3.7 |
Table 2-3 lists the tools and supplies you will need to install the concentrator. The concentrator can be mounted in a standard 19-inch rack or placed on a desktop in a work area.
|
|