|
|

Table Of Contents
Configuring ATM Accounting and ATM RMON
Configuring Global ATM Accounting
Enabling ATM Accounting on an Interface
Configuring the ATM Accounting Selection Table
Configuring ATM Accounting Files
Controlling ATM Accounting Data Collection
Configuring ATM Accounting SNMP Traps
Using TFTP to Copy the ATM Accounting File
Configuring Remote Logging of ATM Accounting Records
Configuring Port Select Groups
Configuring Interfaces into a Port Select Group
Enabling ATM RMON Data Collection
Configuring ATM Accounting and ATM RMON
This chapter describes the ATM accounting and Remote Monitoring (RMON) features used with the ATM switch router.
Note
This chapter provides advanced configuration instructions for the Catalyst 8540 MSR, Catalyst 8510 MSR, and LightStream 1010 ATM switch routers. For complete descriptions of the commands mentioned in this chapter, refer to the ATM Switch Router Command Reference publication.
This chapter includes the following sections:
Note
Configuring ATM Accounting
The following sections describe the process used to enable and configure the ATM accounting feature on the ATM switch router:
•
•
•
•
•
•
•
•
ATM Accounting Overview
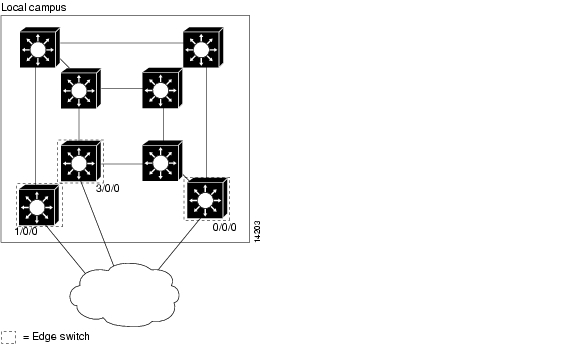
The ATM accounting feature provides accounting and billing services for virtual circuits (VCs) used on the ATM switch router. You enable ATM accounting on an edge switch to monitor call setup and traffic activity. A specific interface can be configured to monitor either incoming or outgoing or incoming and outgoing VC use. Figure 14-1 shows a typical ATM accounting environment.
Figure 14-1 ATM Accounting Environment
The edge switches, connected to the exterior Internet, are connections that require monitoring for accounting and billing purposes.
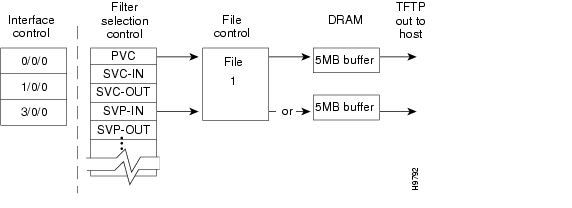
Switching speeds and number of VCs supported by the ATM switch router while monitoring virtual circuit use for accounting purposes can cause the amount of data to be gathered to reach the megabyte range. With such a large amount of data in the ATM accounting files, using traditional Simple Network Management Protocol (SNMP) methods of data retrieval is not feasible. You can store the collected accounting information in a file that you can retrieve using a file transfer protocol. SNMP provides management control of the selection and collection of accounting data. Figure 14-2 shows an interface, filtering, and file configuration example.
Figure 14-2 Interface and File Management for ATM Accounting
A file used for data collection actually corresponds to two memory buffers on the multiservice route processor. One buffer is actively saving data, while the second is passive and ready to have its data either retrieved using Trivial File Transport Protocol (TFTP) or overwritten when the currently active file reaches its maximum capacity. Alternatively, the file can be written to a remotely connected PC over a TCP connection.
Configuring Global ATM Accounting
The ATM accounting feature must be enabled to start gathering ATM accounting virtual circuit call setup and use data. The ATM accounting feature runs in the background and captures configured accounting data for VC changes such as calling party, called party, or start time and connection type information for specific interfaces to a file.
Caution
Note
To enable the ATM accounting feature, use the following command in global configuration mode:
Displaying the ATM Accounting Configuration
To display the ATM accounting status, use the following privileged EXEC command:
Enabling ATM Accounting on an Interface
After you enable ATM accounting, you must configure specific ingress or egress interfaces, usually on edge switches connected to the external network, to start gathering the ATM accounting data.
To enable ATM accounting on a specific interface, perform the following tasks, beginning in global configuration mode:
Example
The following example shows how to enable ATM accounting on ATM interface 1/0/3:
Switch(config)# interface atm 1/0/3Switch(config-if)# atm accountingDisplaying the ATM Accounting Interface Configuration
To display the ATM accounting status, use the following privileged EXEC command:
Example
The following display shows that ATM accounting is enabled on ATM interface 1/0/3:
Switch# more system:running-configBuilding configuration...Current configuration:!<information deleted>!interface ATM1/0/3no keepaliveatm accounting!<information deleted>Configuring the ATM Accounting Selection Table
The ATM accounting selection table determines the connection data to be gathered from the ATM switch router. To configure the ATM accounting selection entries, perform the following tasks, beginning in global configuration mode:
Step 1
Switch(config)# atm accounting selection index
Switch(config-acct-sel)#
Specifies the ATM accounting selection index number and changes to accounting selection mode.
Step 2
Switch(config-acct-sel)# default [connection-type | list]
Resets the ATM accounting selection table configuration to the default.
Step 3
Switch(config-acct-sel)# connection-types [pvc | pvp | spvc-originator | spvc-target | spvp-originator | spvp-target | svc-in | svc-out | svp-in | svp-out]
Specifies the connection type(s) for which you want to collect accounting records.
Step 4
Switch(config-acct-sel)# list hex-bitmap
Configures the list of ATM accounting MIB objects to collect.1
1 The MIB objects are listed in the ATM Accounting Information MIB publication.
The atm accounting selection command creates or modifies an entry in the selection table by specifying the fields of the entry.
Note
Some features of the ATM accounting selection table configuration include:
•
•
•
•
•
Note
Ζ atmAcctngTransmittedClp0Cells (object number 16)
Ζ atmAcctngReceivedClp0Cells (object number 18)
Ζ atmAcctngCallingPartySubAddress (object number 31)
Ζ atmAcctngCalledPartySubAddress (object number 32)
Ζ atmAcctngRecordCrc16 (object number 33)
Examples
The following example shows how to change to ATM accounting selection configuration mode and add the SPVC originator connection type entry to selection entry 1:
Switch(config)# atm accounting selection 1Switch(config-acct-sel)# connection-types spvc-originatorThe following example shows how to change to ATM accounting selection configuration mode and reset the connection types for selection entry 1:
Switch(config)# atm accounting selection 1Switch(config-acct-sel)# default connection-typesThe following example shows how to change to ATM accounting selection configuration mode and configure the selection list to include all objects:
Switch(config)# atm accounting selection 1Switch(config-acct-sel)# default listThe following example shows how to change to ATM accounting selection configuration mode and configure the selection list to include object number 20 (atmAcctngTransmitTrafficDescriptorParam1):
Switch(config)# atm accounting selection 1Switch(config-acct-sel)# list 00001000Displaying ATM Accounting Selection Configuration
To display the ATM accounting status, use the following EXEC command:
Example
The following example shows the ATM accounting status using the show atm accounting EXEC command:
Switch# show atm accountingATM Accounting Info: AdminStatus - UP; OperStatus : UPTrap Threshold - 90 percent (4500000 bytes)Interfaces:File Entry 1: Name acctng_file1Descr: atm accounting dataMin-age (seconds): 3600Failed_attempt : C0Sizes: Active 69 bytes (#records 0); Ready 73 bytes (#records 0)selection Entry -
Active selection -Selection entry 1, subtree - 1.3.6.1.4.1.9.10.18.1.1Selection entry 1, list - FF.FE.BF.FCSelection entry 1, connType - F0.00Debug output<information deleted>Configuring ATM Accounting Files
Direct the ATM accounting data being gathered from the configured selection control table to a specific ATM accounting file. To configure the ATM accounting files and change to ATM accounting file configuration mode, perform the following tasks, beginning in global configuration mode:
Note
Examples
The following example shows how to enable ATM accounting file configuration mode for acctng_file1 and reconfigure the collection mode on release of a connection:
Switch(config)# atm accounting file acctng_file1Switch(config-acct-file)# collection-mode on-releaseThe following example shows how to enable ATM accounting file configuration mode for acctng_file1 and reconfigure the minimum age to the default value:
Switch(config)# atm accounting file acctng_file1Switch(config-acct-file)# default min-ageThe following example shows how to enable ATM accounting file configuration mode for acctng_file1 and configure a short description to be displayed in the show atm accounting file display and the file header:
Switch(config)# atm accounting file acctng_file1Switch(config-acct-file)# description Main accounting file for engineeringThe following example shows how to enable ATM accounting file configuration mode for acctng_file1:
Switch(config)# atm accounting file acctng_file1Switch(config-acct-file)# enableThe following example shows how to enable ATM accounting file configuration mode for acctng_file1 to collect connection data every hour:
Switch(config)# atm accounting file acctng_file1Switch(config-acct-file)# interval 3600Displaying the ATM Accounting File Configuration
To display the ATM accounting status, use the following EXEC command:
Example
The following example shows the ATM accounting file status using the show atm accounting EXEC command:
Switch# show atm accountingATM Accounting Info: AdminStatus - UP; OperStatus : UPTrap Threshold - 90 percent (4500000 bytes)Interfaces:selection Entry -Selection entry 1, subtree - 1.3.6.1.4.1.9.10.18.1.1Selection entry 1, list - FF.FE.BF.FCSelection entry 1, connType - F0.00Active selection -Selection entry 1, subtree - 1.3.6.1.4.1.9.10.18.1.1Selection entry 1, list - FF.FE.BF.FCSelection entry 1, connType - F0.00Debug outputSig API: Err - 0New_Conn: OK - 0; Err - 0Rel_Conn: OK - 0; Err - 0New_Leg: OK - 0; Err - 0Rel_Leg: OK - 0; Err - 0New_Party: OK - 0; Err - 0Rel_Party: OK - 0; Err - 0Controlling ATM Accounting Data Collection
To configure the behavior of the buffers used for ATM accounting collection, use the following command in privileged EXEC mode:
atm accounting collection {collect-now | swap} filename
Configures the ATM accounting data collection.
Examples
The following example specifies that all VCs that meet the minimum age requirement should be collected:
Switch# atm accounting collection collect-now accntg_file1The following example swaps the buffers used to store accounting records; the old buffer is now ready to download:
Switch# atm accounting collection swap acctng_file1Displaying the ATM Accounting Data Collection Configuration and Status
To display the ATM accounting file configuration status, use the following EXEC command:
Example
The following example shows the ATM accounting status using the show atm accounting files EXEC command:
Switch# show atm accountingATM Accounting Info: AdminStatus - UP; OperStatus : DOWNTrap Threshold - 90 percent (4500000 bytes)Interfaces:File Entry 1: Name acctng_file1Descr: atm accounting dataMin-age (seconds): 3600Failed_attempt : C0selection Entry -Selection entry 1, subtree - 1.3.6.1.4.1.9.10.18.1.1Selection entry 1, list - FF.FE.BF.FCSelection entry 1, connType - F0.00Active selection -Selection entry 1, subtree - 1.3.6.1.4.1.9.10.18.1.1Selection entry 1, list - FF.FE.BF.FCSelection entry 1, connType - F0.00<Information deleted>Configuring ATM Accounting SNMP Traps
You can configure SNMP traps to be generated when the ATM accounting file reaches a specified threshold. You can use these traps to alert you when a file is full and needs to be downloaded.
Configuring ATM Accounting Trap Generation
To configure ATM accounting SNMP traps, use the following command in global configuration mode:
atm accounting trap threshold percent-value
Configures the ATM accounting file threshold to generate an SNMP trap when it reaches a percentage of the maximum size.
Example
The following example shows how to configure ATM accounting SNMP traps to be sent when the file size reaches 85 percent full:
Switch(config)# atm accounting trap threshold 85Displaying ATM Accounting Trap Threshold Configuration
To display the ATM accounting trap threshold configuration, use the following EXEC command:
Example
The following example shows the ATM accounting trap threshold configuration using the show atm accounting command:
Switch# show atm accountingATM Accounting Info: AdminStatus - UP; OperStatus : UPInterfaces:File Entry 1: Name acctng_file1Descr: atm accounting dataMin-age (seconds): 3600Failed_attempt : C0Sizes: Active 69 bytes (#records 0); Ready 73 bytes (#records 0)selection Entry -Selection entry 1, subtree - 1.3.6.1.4.1.9.10.18.1.1Selection entry 1, list - FF.FE.BF.FCSelection entry 1, connType - F0.00Active selection -Selection entry 1, subtree - 1.3.6.1.4.1.9.10.18.1.1Selection entry 1, list - FF.FE.BF.FCSelection entry 1, connType - F0.00<information deleted>Configuring SNMP Server for ATM Accounting
To enable SNMP ATM accounting trap generation and specify an SNMP server, perform the following steps in global configuration mode:
Example
The following example shows how to enable SNMP server ATM accounting traps and configure the SNMP server host at IP address 1.2.3.4 with community string public for ATM accounting:
Switch(config)# snmp-server enable traps atm-accountingSwitch(config)# snmp-server host 1.2.3.4 public atm-accountingDisplaying SNMP Server ATM Accounting Configuration
To display the SNMP server ATM accounting configuration, use the following privileged EXEC command:
Example
The following example shows the SNMP server ATM accounting configuration using the more system:running-config privileged EXEC command:
Switch# more system:running-configBuilding configuration...Current configuration:!<information deleted>!ip rcmd rcp-enableip rcmd remote-host dplatz 171.69.194.9 dplatzip rcmd remote-username dplatzatm template-alias byte_wise 47.9*f8.33...atm template-alias bit_set 47.9f9(1*0*)88ab...atm template-alias training 47.1328...atm accounting enableatm accounting trap threshold 85!<information deleted>no ip classlessatm route 47.0091.8100.0000.0000.0ca7.ce01... ATM3/0/0snmp-server enable traps chassis-failsnmp-server enable traps chassis-changesnmp-server enable traps atm-accountingsnmp-server host 1.2.3.4 public atm-accounting!<information deleted>Using TFTP to Copy the ATM Accounting File
After the ATM accounting file is written to DRAM, you must configure TFTP to allow network requests to copy the accounting information to a host for processing. To do this, use the following command in global configuration mode:
Example
The following example shows how to allow TFTP service to copy the ATM accounting file acctng_file1 to the IP access list of requesting host number 1:
Switch(config)# access-list 1 permit 10.1.1.1Switch(config)# tftp-server atm-acct-ready:acctng_file1 1For more information about access lists, refer to the "Filtering IP Packets at the IP Interfaces" section.
Configuring Remote Logging of ATM Accounting Records
You can collect ATM accounting records to a remotely connected PC or UNIX workstation. You can use this method in place of, or in addition to, collecting ATM accounting records as a file into the switch's memory.
The remote logging method requires a server daemon to be running on a PC or a UNIX workstation that is reachable from the switch using IP. The server daemon listens to the TCP port specified in the switch side remote logging configuration. When the ATM accounting process on the switch sends a TCP connect request, the daemon accepts the connection. After connection has been established, the switch side ATM accounting process sends accounting records, as they are created, to the remote host. The remote host then receives the records and stores them in a local file. The collected ATM accounting records are in ASN1 format. The first record contains the format of the following records.
To configure remote logging, perform the following steps in global configuration mode:
The PC or workstation configured as backup takes over collection of ATM accounting records if the primary fails. Using the keyword only causes only remote logging to be performed, freeing the ATM switch router's memory for other purposes.
Example
The following example shows how to configure remote logging to a PC named eagle on port 2001, with port 2002 as a backup:
Switch(config)# atm accounting file acctng_file1Switch(config-acct-file)# remote-log primary-host eagle 2001 alternate-host eagle 2002Displaying the Remote Logging Configuration
To display the remote logging configuration, use the following privileged EXEC command:
The following example shows the remote logging configuration using the show atm accounting EXEC command:
Switch# show atm accountingATM Accounting Info: AdminStatus - UP; OperStatus : UPTrap Threshold - 90 percent (4500000 bytes)Interfaces:AT1/0/0AT2/0/0File Entry 1 -Name: acctng_file1Descr: atm accounting dataMin-age (seconds): 0Failed_attempt : soft regularInterval (seconds) : 60Collect Mode : on-release periodicSizes: Active 68 bytes (#records 0); Ready 74 bytes (#records 0)Remote Log and local storage are enabled.Primary Log Host: eagle, TCP listen port: 2001, OperStatus: DOWNAlternate Log Host: eagle, TCP listen port: 2002, OperStatus: DOWNSelection Entry 1 -Subtree OID : 1.3.6.1.4.1.9.10.18.1.1List Bitmap : FF.FE.BF.FCConn Type : svc-in svc-out pvc pvp spvc-originator spvc-targetActive List Bitmap - FF.FE.BF.FCConfiguring ATM RMON
This section describes the process you use to configure ATM RMON on the ATM switch router. The following sections describe the process:
•
•
•
RMON Overview
The ATM RMON feature allows you to monitor network traffic for reasons such as fault monitoring or capacity planning. The ATM RMON feature is an extension of an existing, well-known RMON standard and provides high-level per-host and per-conversation statistics in a standards-track MIB similar to the following RMON MIBs:
•
•
The ATM-RMON counter uses the per-VC counters already maintained in the hardware and polled by the software. The ATM RMON agent can report cell traffic statistics by monitoring connection management activity. At connection setup and release time, some ATM-RMON bookkeeping code is executed. The amount of information varies, depending on the ATM RMON configuration. The ATM-RMON bookkeeping capability significantly reduces the processing requirements for ATM-RMON, and allows collecting statistics on many or all the of ATM switch router ports at once.
The ATM-RMON agent uses the 64-bit version of each cell counter if 64-bit counter support is present in the SNMP master-agent library.
Configuring Port Select Groups
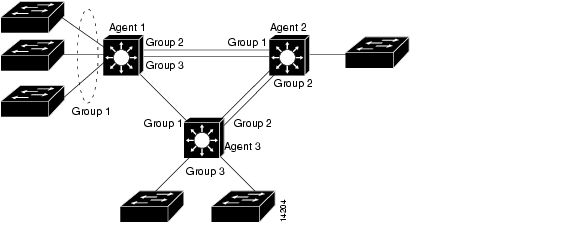
Previously, RMON allowed collection of connection information on a per-interface basis only. ATM RMON allows a group of ports to be configured as an aggregate. The port select group defines this collection unit used by the ATM RMON agent to gather host and matrix connection data. For example, in Figure 14-3, agent 1 has a port selection group 1 made up of ports.
Figure 14-3 ATM RMON Port Select Group Examples
An active port select group must be defined before any data collection can begin. You can use the command-line interface (CLI) and Simple Network Management Protocol (SNMP) modules to configure and access port select group structures.
To configure an RMON port selection group, use the following command in global configuration mode:
Example
The following example shows how to configure port selection group 7 with the a maximum host count of 500, maximum matrix count of 2000, host priority of 1, and owner name "nms 3".
Switch(config)# atm rmon portselgrp 7 maxhost 500 maxmatrix 2000 host-prio 1 owner "nms 3"Displaying the ATM RMON Port Select Group
To display the ATM RMON port select group statistics, use the following EXEC command:
Example
The following example shows how to display the configuration of port selection group 3 using the show atm rmon stats command from EXEC mode:
Switch# show atm rmon stats 3PortSelGrp: 3 Collection: Enabled Drops: 0CBR/VBR: calls: 0/0 cells: 0 connTime: 0 days 00:00:00ABR/UBR: calls: 0/0 cells: 0 connTime: 0 days 00:00:00Configuring Interfaces into a Port Select Group
Before the port selection group can begin gathering host and matrix connection information, an interface or group of interfaces must be added to the port selection group.
To configure an interface to an ATM RMON port selection group, perform the following steps, beginning in global configuration mode:
Example
The following example shows how to configure ATM interface 0/1/3 to ATM RMON port selection group 6:
Switch(config)# interface atm 0/1/3Switch(config-if)# atm rmon collect 6Displaying the Interface Port Selection Group Configuration
To display the ATM RMON port configuration status, use the following EXEC command:
show atm rmon {host number |
matrix number | stats number | status}Displays the interface port selection group configuration.
Examples
The following example shows how to display the ATM RMON host configuration for port selection group 6 using the show atm rmon host command from user EXEC mode:
Switch# show atm rmon host 6PortSelGrp: 6 Collection: Enabled Drops: 0The following example shows how to display the ATM RMON matrix configuration for port selection group 6 using the show atm rmon matrix command from user EXEC mode:
Switch# show atm rmon matrix 6PortSelGrp: 6 Collection: Enabled Drops: 0The following example shows how to display the ATM RMON statistics configuration for port selection group 6 using the show atm rmon stats command from user EXEC mode:
Switch# show atm rmon stats 6PortSelGrp: 6 Collection: Enabled Drops: 0CBR/VBR: calls: 0/0 cells: 0 connTime: 0 days 00:00:00ABR/UBR: calls: 0/0 cells: 0 connTime: 0 days 00:00:00The following example shows how to display the ATM RMON status for all port selection groups using the show atm rmon status command from user EXEC mode:
Switch# show atm rmon statusPortSelGrp: 1 Status: Enabled Hosts: 4/no-max Matrix: 4/no-maxATM0/0/0 ATM0/0/2PortSelGrp: 2 Status: Enabled Hosts: 0/no-max Matrix: 0/no-maxATM0/0/3PortSelGrp: 3 Status: Enabled Hosts: 0/no-max Matrix: 0/no-maxATM0/1/0 ATM0/1/1PortSelGrp: 4 Status: Enabled Hosts: 0/1 Matrix: 0/5ATM0/0/1PortSelGrp: 5 Status: Enabled Hosts: 0/no-max Matrix: 0/no-maxATM0/1/2PortSelGrp: 6 Status: Enabled Hosts: 0/no-max Matrix: 0/no-maxATM0/1/3PortSelGrp: 7 Status: Enabled Hosts: 0/no-max Matrix: 0/no-maxATM2/0/0PortSelGrp: 8 Status: Enabled Hosts: 0/no-max Matrix: 0/no-maxPortSelGrp: 9 Status: Enabled Hosts: 0/no-max Matrix: 0/no-maxEnabling ATM RMON Data Collection
Use the atm rmon enable command to start ATM RMON data collection.
Note
To enable ATM RMON data collection, use the following command in global configuration mode:
Displaying the ATM RMON Configuration
To display the ATM RMON configuration, use the following privileged EXEC command:
Example
The following example shows the ATM RMON configuration using the more system:running-config privileged EXEC command:
Switch# more system:running-configBuilding configuration...Current configuration:!<information deleted>ip default-gateway 172.20.53.206no ip classlesssnmp-server community public RWsnmp-server location racka-cs:2016snmp-server contact abiermanatm rmon portselgrp 1 host-scope 3 matrix-scope 3atm rmon portselgrp 2 host-scope 3 matrix-scope 3 descr "router port 2" ownerrubble"atm rmon portselgrp 3 host-scope 3 matrix-scope 3 descr "test" owner "bam_bam"atm rmon portselgrp 4 maxhost 1 maxmatrix 5 host-scope 1 descr "no active ports" owner "wilma"atm rmon portselgrp 5atm rmon portselgrp 6 matrix-prio 1atm rmon portselgrp 7 host-scope 3 matrix-scope 3 descr "CPU port" owner "pebbles"atm rmon portselgrp 8atm rmon portselgrp 9atm rmon enable!<information deleted>Configuring an RMON Event
To configure an RMON event being generated, use the following command in global configuration mode:
rmon event number [log] [trap community] [description string] [owner string]
Configures an RMON event.
Example
The following example shows how to configure a generated RMON event with an assigned name, description string, owner, and SNMP trap with community string:
Switch(config)# rmon event 1 description test owner nms_3 trap testDisplaying the Generated RMON Events
To display the generated RMON events, use the following EXEC command:
Example
The following example shows the RMON events generated using the show rmon events EXEC command:
Switch# show rmon eventsEvent 1 is active, owned by nms_3Description is testEvent firing causes trap to community test, last fired 00:00:00Configuring an RMON Alarm
You can configure RMON alarm generation if any of the configured parameters are met.
Note
To configure RMON alarms, use the following command in global configuration mode:
rmon alarm number variable interval {delta | absolute} rising-threshold value [event-number] falling-threshold value [event-number]
[owner string]Configures the ATM RMON alarm.
Example
The following example shows how to configure RMON alarm number 1 to generate an alarm under the following conditions:
•
•
–
–
•
Switch(config)# rmon alarm 1 atmHostInHCCells 500 absolute rising-threshold 10000 falling-threshold 1000
owner "nms 3"
Displaying the Generated RMON Alarms
To display the RMON alarm event, use the following EXEC command:
Example
The following example shows the RMON alarms and events using the show rmon alarms events EXEC command:
Switch# show rmon alarms eventsEvent 1 is active, owned by nms 3Description is testEvent firing causes trap to community test, last fired 00:00:00Alarm table is empty
![]()
![]()
![]()
![]()
![]()
![]()
![]()
![]()
Posted: Mon Oct 11 09:23:07 PDT 2004
All contents are Copyright © 1992--2004 Cisco Systems, Inc. All rights reserved.
Important Notices and Privacy Statement.