|
|

The Operations section of the BBSM Dashboard allows you to view port data, perform port maintenance, change port assignments, and manage access codes on an operating BBSM server. The following four Operations options require administrator or operator privileges for access:
These options are described in the sections that follow.
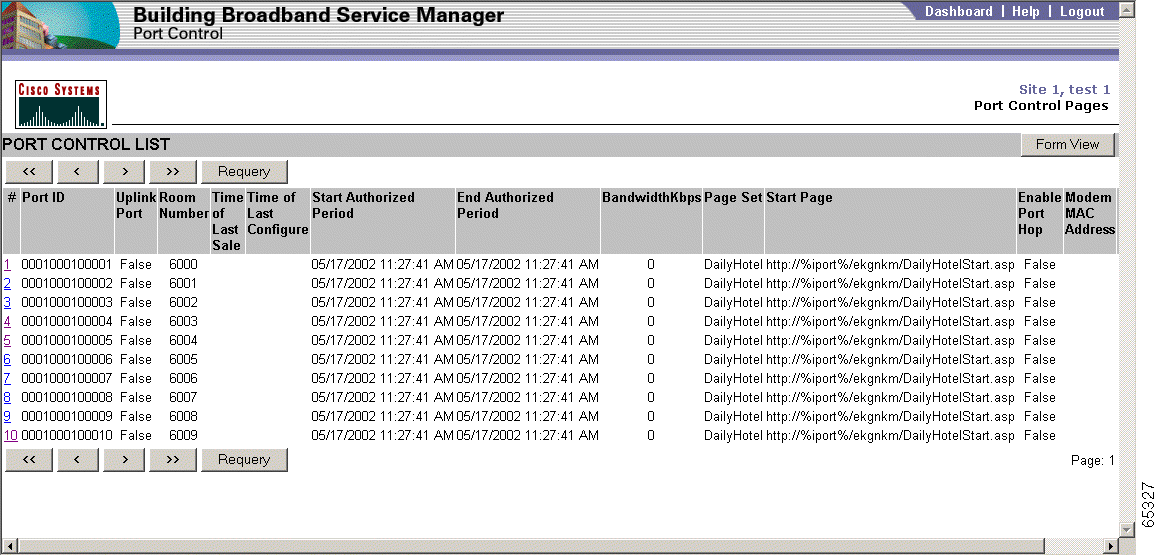
The Port Control web pages allow you to view port control data and perform port maintenance for all policies except for subscription policies. Port control information is displayed in either the List View format or the Form View format. The List View is the default format that is used to view the port information. The Form View is used to change the port information for a specific port. Note that administrator or operator privileges are required to access the Form View web pages.
 |
Note To use either of the port control web pages, you must first generate a port map. |
The Port Control List View allows you to view the behavior of individual ports. It displays all the ports for a site in groups of ten.
|
Note Information cannot be changed in List View. You must switch to Form View for editing. |
Step 2 Use the navigation buttons to scroll through the list until you find the desired entry.
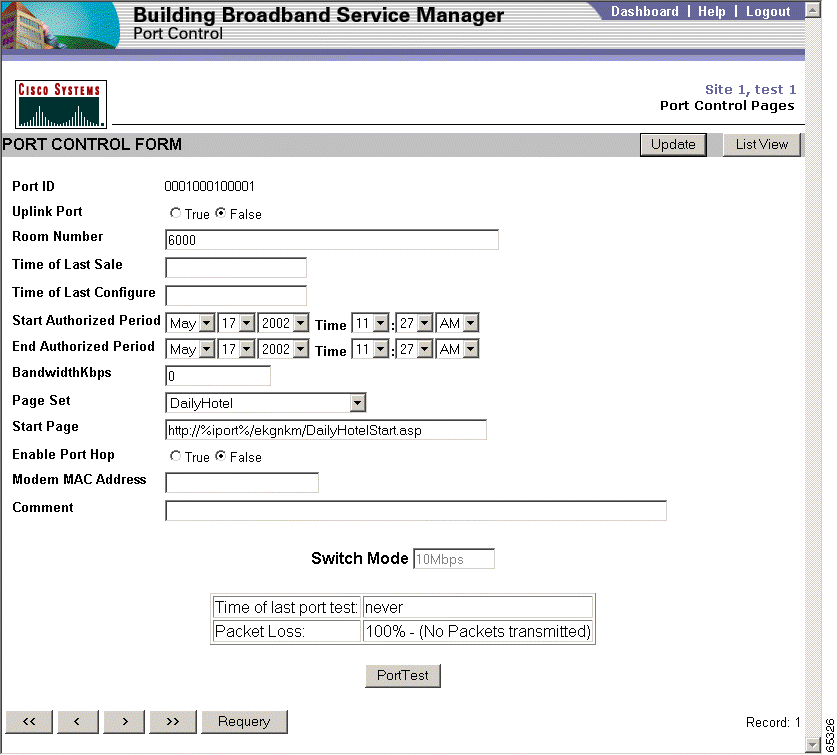
The BBSM port settings for access policies, except for a Subscription access policies, can be viewed and/or changed by using the Form View of the Port Control option, which is accessed on the BBSM Dashboard. The Form View displays the settings for a single port in a data entry form. It is accessed from the List View web page.
|
Note Only those with administrator or operator privileges can access and use the Form View. |
Use the following procedure to view and/or change the Port Control Form View data for each port.
 |
Caution Before making any changes, be sure the Port ID and room number shown correspond to the port you want to change. If they do not, use the navigation buttons or the List View to find the correct port. |
Step 2 In the Port Control Form fields, enter the appropriate information. (See Table 6-1.)
Table 6-1 Port Control Form View Descriptions
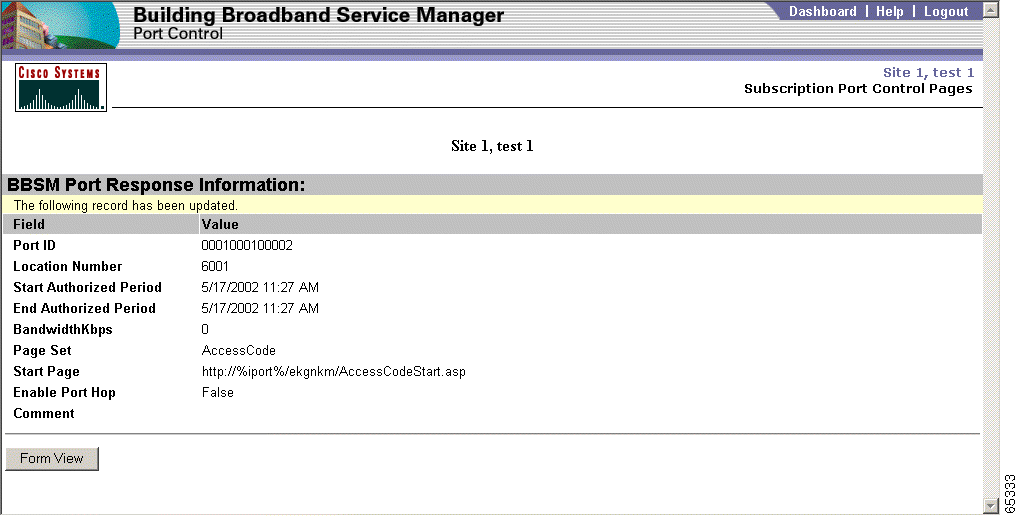
Step 3 Click Update. The Port Control update confirmation web page appears. (See Figure 6-3.)
Step 4 Click List View to return to the Port Control List.
 |
Tip You can click Requery at any time to refresh the list. |
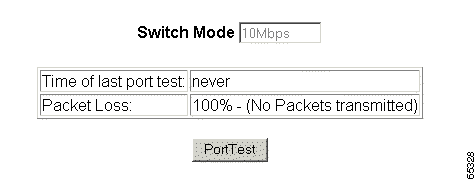
You can test the port using the information at the bottom of the Port Control Form View web page. (See Figure 6-4.)
The information at the bottom of the page shows the "Time of the last port test" and "Packet Loss" in the left column and the related information displayed in the right column. Below the table is the Port Test button. When you click this button, the port is tested and the results are shown in the table.
|
Note A client must be active on the port for the port test to work. |
Room can be mapped or remapped by using the Map Rooms option under Operations on the BBSM Dashboard. This option is allows you to change port assignments for a room, meeting room, or public space. Because this option is part of the initial BBSM configuration, it is discussed in detail in the "Mapping Rooms and Port Testing" section.
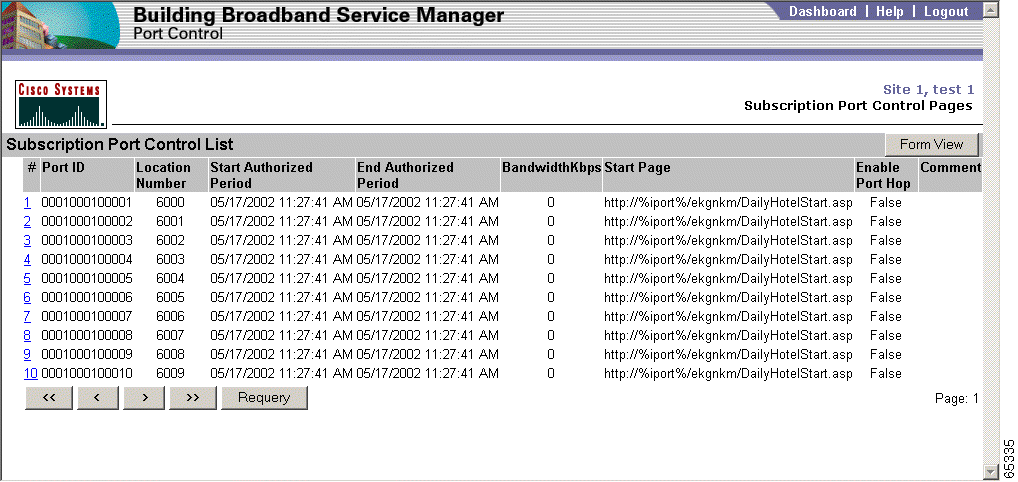
The Subscription Port Control option allows you to view port control data and/or perform maintenance for ports that are associated with a Subscription access policy. For access policies other than the Subscription access policy, use the Port Control option.
Using the Subscription Port Control option, you can obtain information to:
Subscription Port Control information is displayed in either List View format or Form View format. The List View is the default format and is used to view the port information. The Form View is used to change the port information on a specific port. Note that administrator or operator privileges are required to access the Form View web pages.
|
Note To use either of the port control web pages, you must first generate a port map. |
Subscription Port Control Lists are on a site basis and are used to view port information. It displays all the ports for a site using a subscription access policy in groups of ten.
|
Note Information cannot be changed in List View. You must switch to Form View for editing. |
Use the following procedure to view and/or change the Subscription Port Control List View data for each port.
Step 2 If prompted, enter a valid user login and password. The Subscription Port Control List View web page appears. (See Figure 6-5.)
Step 3 Use the navigation buttons to scroll through the list until you find the desired entry.
The BBSM port settings for a Subscription access policy can be viewed and/or changed by using the Form View of the Subscription Port Control option, which is accessed on the BBSM Dashboard. The Form View displays the settings for a single port in a data entry form. It is accessed from the List View web page.
|
Note Only users with administrator or operator privileges can access and use the Form View. |
Use the following procedure to view and/or change the Subscription Port Control Form View data for each port.
|
Caution Before making any changes, be sure that the Port ID and location number shown correspond to the port you want to change. If they do not, use the navigation buttons or List View to find the correct port. |
Step 2 In the Subscription Port Control Form fields, enter the appropriate information. (See Table 6-2.)
Table 6-2 Subscription Port Control Form View Descriptions
Step 3 Click Update. The Subscription Port Control update confirmation web page appears. (See Figure 6-7.)
Step 4 Click Form View.
Step 5 Click List View to return to the Subscription Port Control List.
|
Tip You can press Requery at any time to refresh the list. |
You can test a specific port using the information at the bottom of the Subscription Port Control Form View web page. (See Figure 6-8.)
The information at the bottom of the page shows the "Time of the last port test" and "Packet Loss" in the left column and the related information is displayed in the right column. Below the table is the Port Test button. When you click this button, the port is tested and the results are shown in the table.
|
Note A client must be active on the port for the port test to work. |
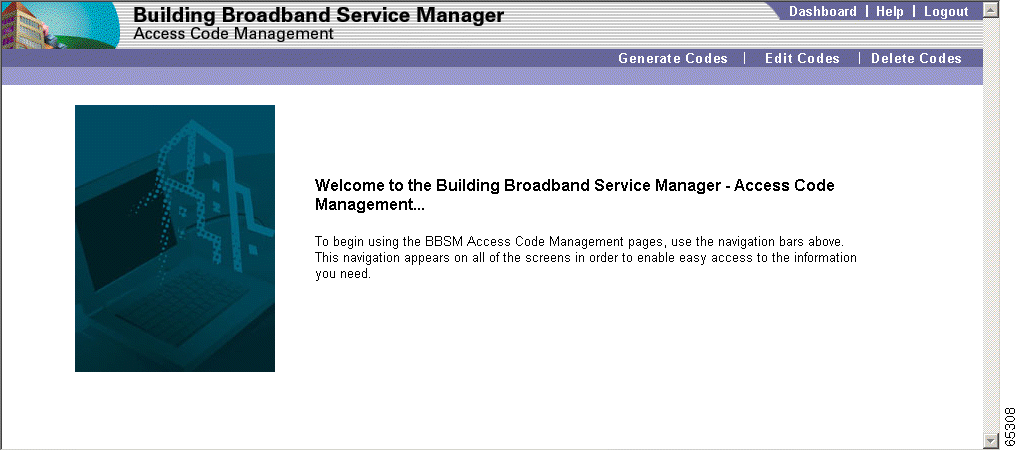
The Access Code Management option under Operations on the Dashboard allows you to provide high-speed Internet access for meeting or conference rooms. It also allows you generate, edit, and delete access codes. This option also provides control and accountability for end users viewing access codes and retrieving transaction history.
The administrator or operator can configure access so that either multiple users or only one person at a time can use a particular access code. This is determined by the page set selected for the meeting room site or ports:
BBSM Access Code Management can be configured one of two ways:
Note that configuring your meeting rooms by site or by port does not depend on the physical layout of the property but on how you want to manage your BBSM server.
|
Note When using access codes, all of the BBSM sites must be located in the same time zone. |
If you want to configure your meeting rooms so that they are all on the same site, use the following steps. Assuming that your guest rooms are in Site 1, the following steps use Site 2 for meeting rooms.
|
Note Site 1 must be created before it can be configured. |
Step 2 Click the Port Map button.
Step 3 Verify that the site number is "2."
Step 4 From Page Set drop-down menu, select MeetingRoom or AccessCode.
Step 5 Make all other necessary selections for your site.
Step 6 Click Generate.
If you want to configure your meeting rooms in the same sites as your guest rooms, you must configure the port for each meeting room separately. Use the following procedure to configure each port as a meeting room.
Port Control List View web page appears. (See Figure 6-9.)
|
Note The user must be a member of the BBSM Operator or Administrators group to access the Port Control web page. |
Step 2 Use the navigation buttons to select the meeting room port. Note that the meeting room ports can be identified by their page sets, which will be either MeetingRoom or AccessCode.
Step 3 In the Port Control List View web page, click the desired port number (below the # column). The Port Control Form View web page appears. (See Figure 6-2.)
Step 4 From the Page Set drop-down menu, select MeetingRoom.
Step 5 Enter any other changes as needed.
Step 6 Click Update, which is located in the top right corner of the web page.
Step 7 Close the browser when finished.
The Access Code Management screens are designed to be used to issue access codes to clients. A local administrative computer is typically configured within the property, and the default home page of the browser is set to http://localhost:9488/accesscodes.
The BBSM Access Code Management provides three different functions:
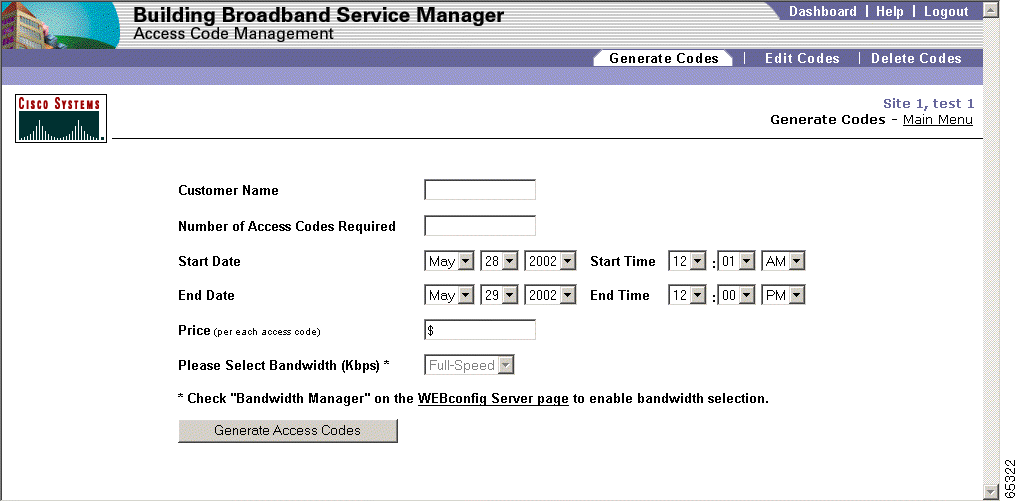
This option provides the hotel manager or administrator with the ability to generate access codes from the BBSM Access Code Management startup web page. Access codes are generated for the end user for a specific date, bandwidth, and price (if applicable).
Step 2 From the primary navigation buttons, click Generate Codes. The Generate Codes web page appears. (See Figure 6-11.)
Step 3 Enter the desired values or select from drop-down menus.
Step 4 Click Generate Codes.
|
Note If the default MeetingRoom page set is being used, another user cannot use access codes at the same time. |
The following table explains the fields and various settings available on the Access Codes Management Generate Codes page.
Table 6-3 Generate Codes Field Descriptions
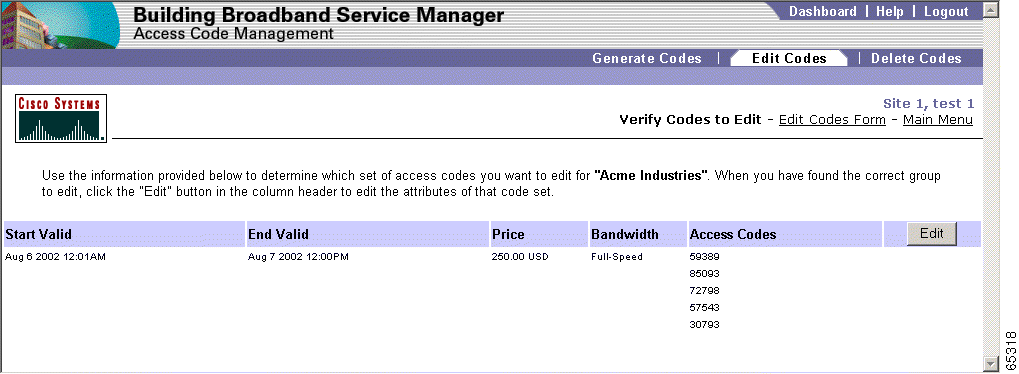
Use the following procedure to edit the access codes, if necessary.
Step 2 Select Customer Name from the drop-down menu.
Step 3 Click Find Codes. The Verify Codes to Edit web page appears. (See Figure 6-12.)
Step 4 Locate the set of access codes to edit.
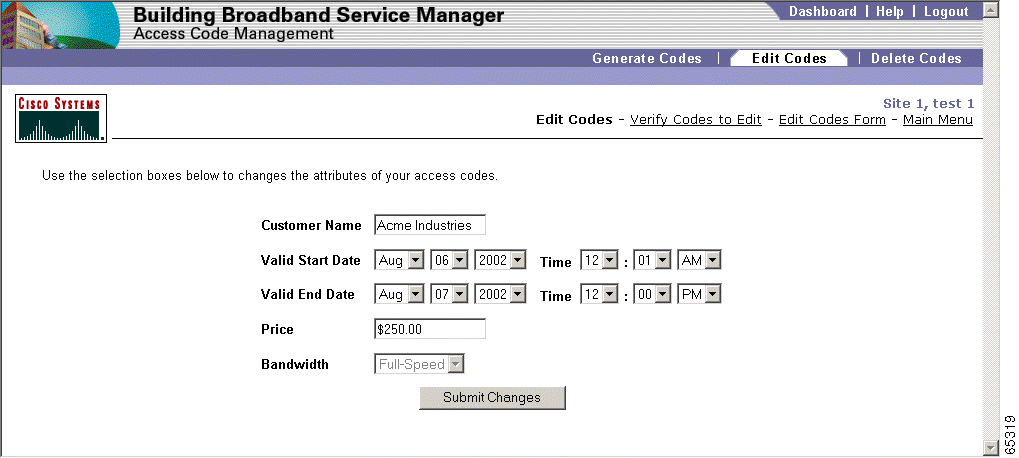
Step 5 Click Edit. The Edit Codes web page appears. (See Figure 6-13.)
Step 6 Enter any desired changes.
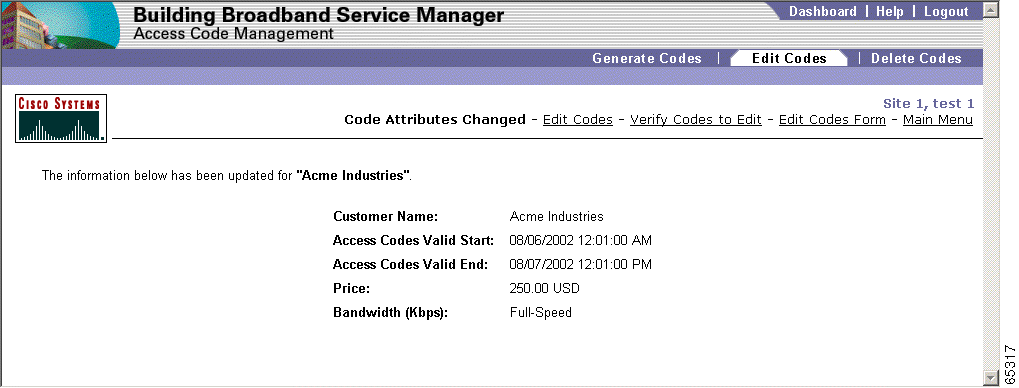
Step 7 Click Submit Changes. The Code Attributes Changed web page appears. (See Figure 6-14.)
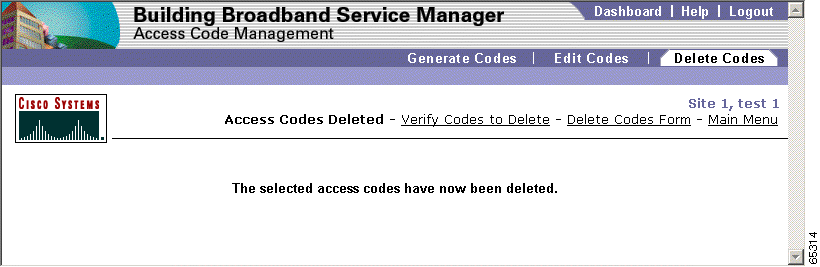
Follow this procedure to delete access codes.
Step 2 From the Select Customer Name from the drop-down menu.
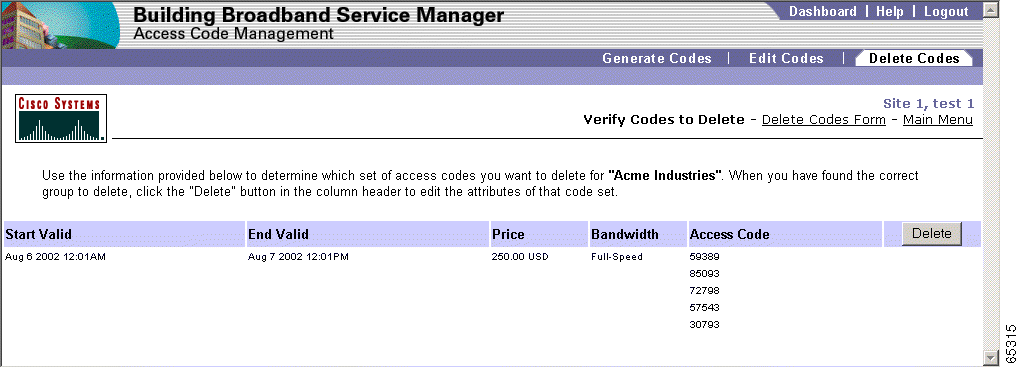
Step 3 Click Find Codes. The Verify Codes to Delete web page appears. (See Figure 6-15.)
Step 4 Locate the set of access codes to delete.
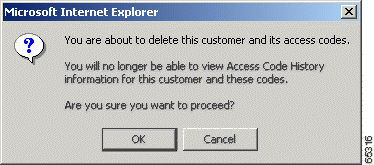
Step 5 Click Delete. A warning dialog box appears. (See Figure 6-16.)
Step 6 Click OK. A confirmation dialog box appears. (See Figure 6-17.)
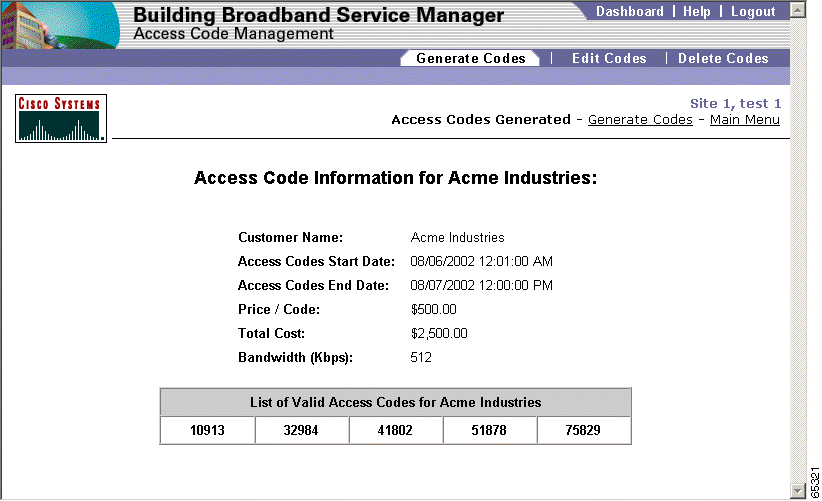
The following is an example of how to generate access codes. To use this example, enter the field values on the Generate Codes web page, as indicated in the following steps. (See Figure 6-11.)
Acme Industries wants five access codes for $250 each at 256 Kbps bandwidth on August 6, 2001 from midnight to midnight. In addition, they want five access codes for $500 each at 512 Kbps bandwidth, also on August 6th, 2001 from midnight to midnight.
1. Launch Access Code Management from the BBSM Dashboard.
2. Click Generate Codes from the primary navigation bar.
3. Enter the following information:
4. Click Generate Access Codes. The access code information appears. (See Figure 6-18.)
5. To generate additional access codes for Acme Industries, click Main Menu in the upper right corner of the web page. The Access Code Management web page appears.
6. Click Generate Codes again.
7. Enter the following information:
8. Click Generate Access Codes. The access code information appears. (See Figure 6-19.)
![]()
![]()
![]()
![]()
![]()
![]()
![]()
![]()
Posted: Fri Mar 7 14:49:13 PST 2003
All contents are Copyright © 1992--2002 Cisco Systems, Inc. All rights reserved.
Important Notices and Privacy Statement.