|
|

Table Of Contents
Starting the CiscoSecure Administrator Interface
Web Browser Requirements for the CiscoSecure Administrator
Accessing and Logging into the CiscoSecure Administrator
Changing the Superuser Password
Performing CiscoSecure Quick Operations
User-Level Functions (Changing a Password)
Changing a Password through the Web
Logging Off the CiscoSecure Administrator Interface
Starting and Stopping the CiscoSecure ACS Software
Configuring the CiscoSecure AutoRestart Feature
Basic User and ACS Management
This chapter contains the instructions for simple management of your CiscoSecure users. Most management of the CiscoSecure Access Control Server (ACS) is done through the Administrator program.
This chapter covers the following topics:
•
Starting the CiscoSecure Administrator Interface
•
•
•
•
Note
Note
Starting the CiscoSecure Administrator Interface
This section describes the basic steps to log in to the CiscoSecure Administrator GUI and how to change the superuser password.
Web Browser Requirements for the CiscoSecure Administrator
To manage the CiscoSecure ACS using the Administrator program, you need a web browser that supports Java and JavaScript. The Administrator program operates on any hardware platform that supports the web browsers listed in the readme.txt file and release notes.
Accessing and Logging into the CiscoSecure Administrator
To access and log in to the CiscoSecure Administrator:
Step 1
Step 2
•
http://your_server/cs
where your_server is the host name (or the fully qualified domain name, FDQN, if host name and FDQN differ) of the SPARCstation where you installed the CiscoSecure ACS. You can also substitute the SPARCstation's IP address for your_server.
•
https://your_server/cs
where your_server is the host name (or the fully qualified domain name, FDQN, if host name and FDQN differ) of the SPARCstation where you installed the CiscoSecure ACS. You can also substitute the SPARCstation's IP address for your_server.
Note
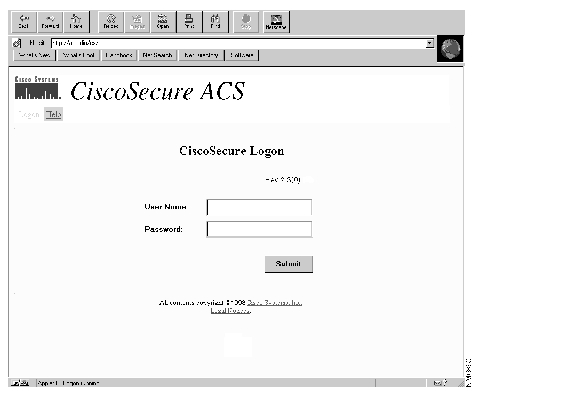
The CiscoSecure ACS Logon page displays.
Figure 4-1 CiscoSecure ACS Logon Page
Step 3
Note
After you log in, the CiscoSecure ACS main page appears, displaying the main menu options along the top.
Note
CiscoSecure ACS Main Menu Page
The CiscoSecure ACS Main menu page will only appear if the user provides a name and password that have an administrator privilege level. If the user provides a name and password that has only user-level privileges, then a different screen appears. Refer to the "User-Level Functions (Changing a Password)" section.
Figure 4-2 The CiscoSecure ACS Web Menu Bar
Several options appear at the top of the page:
Table 4-1 CiscoSecure ACS Web Menu Buttons
Main
Return to the Main menu.
Member
Display the user and group related suboptions: Add, Edit, Delete, Browse, and View.
•
Add users to existing database.
•
Edit privileges, passwords, access, and other parameters for a specified user.
•
Delete users from existing database.
•
Provide a means to browse a group or user hierarchy.
•
Enable the administrator to view the profile of a specified user.
AAA
Display server and NAS related suboptions: General, NAS1 , Domain, Re-Initialize.
•
Configure the current CiscoSecure ACS with TACACS+-related options.
•
Add and configure TACACS+-enabled NASes as CiscoSecure ACS clients.
•
Configure the CiscoSecure ACS to authenticate or route users logging in with local or remote domain name strings.
•
Initialize the new CiscoSecure ACS General, NAS, or Domain settings without terminating and restarting server operations.
Help
Access instructions for a specified aspect of CiscoSecure ACS.
Advanced
Takes the user to the CiscoSecure Administrator Java-based advanced configuration program. For details on using this program, see "Starting the Advanced Configuration Program" in "Advanced Group and User Management."
Log Off
Log off CiscoSecure.
1 NAS = network access server.
Note
Changing the Superuser Password
The default administrator of the CiscoSecure ACS is "superuser," and the default password is "changeme." As a security measure, Cisco recommends that you change the password for superuser as quickly as possible after installing the CiscoSecure ACS.
Step 1
Step 2
Step 3
Step 4
Valid characters for passwords are:
•
•
•
Step 5
CiscoSecure displays a confirmation of the password change.
Performing CiscoSecure Quick Operations
The operations described in this section are carried out through the CiscoSecure ACS web pages. They are the quickest and most frequently executed of CiscoSecure operations. These operations include:
•
•
•
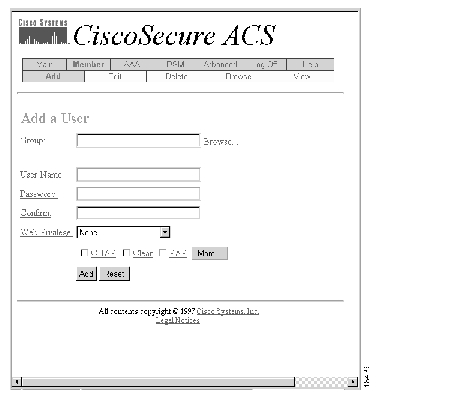
Creating a Quick User Profile
To add a user to the CiscoSecure ACS database, use the Add a User web page. The Add a User web page enables you to quickly set up a user profile with basic password information.
Note
Add a user profile:
Step 1
Figure 4-3 CiscoSecure Add a User Page
Step 2
If you need to search the database for the correct group, click Browse... to the right of the field. The Browse screen will appear. For more on using the Browse function, refer to the section, " Browsing Groups and Users" later in this chapter. Enter the new user's name in the User Name field.
Step 3
Step 4
•
•
•
An asterisk will appear in place of each letter.
Step 5
The Password and Confirm entries must agree. If the entry in the Password field does not agree with the entry in the Confirm field, you will be prompted to retype.
Step 6
•
•
•
Note
Step 7
•
•
•
•
Note
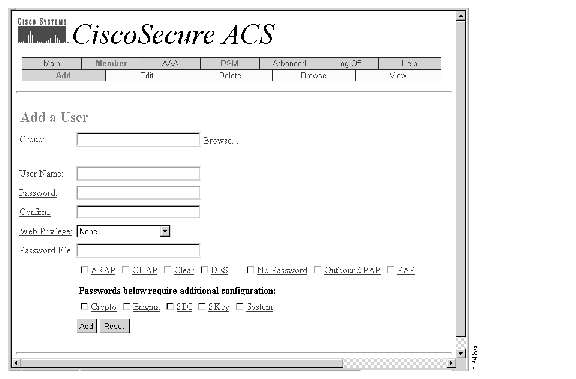
Step 8
Figure 4-4 Expanded Add A User Page
The additional fields in the Add a User page include several new authentication methods:
•
•
•
•
•
•
•
•
Note
•
•
•
Each of these encryption types requires custom configurations. For more information on S/Key, CRYPTOCard, Enigma, and SDI, see "Token Server Support."
Note
Step 9
Step 10
•
•
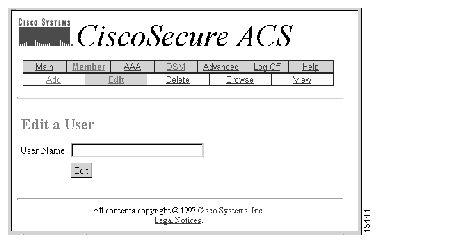
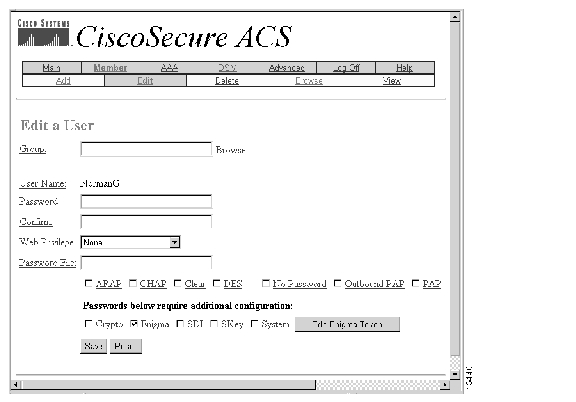
Editing a User Profile
Use the Edit a User web page to modify the configuration of an existing user profile:
Step 1
Figure 4-5 Initial Edit a User Page
Step 2
If you don't know the name of the user you want to edit, click Browse at the top of the menu to access the edit menu. See the "Browsing Groups and Users" section for details.
Step 3
The full Edit a User page appears.
Figure 4-6 The Full Edit a User Page
Step 4
Note
If you need to search the database for the correct group, click Browse... to the right of the field. The Browse screen will appear. For more information about using the Browse function, refer to the "Browsing Groups and Users" section.
Step 5
•
•
•
An asterisk will appear for each letter you type.
Step 6
The Password and Confirm entries must agree. If the entry in the Password field does not agree with the entry in the Confirm field, you will be prompted to retype.
Step 7
•
•
•
•
Note
Step 8
Step 9
•
•
•
•
•
•
•
Step 10
•
•
•
Note
•
•
Note
Step 11
•
•
If you select Save, a confirmation of the edit appears.
Step 12
Deleting a User Profile
Use the Delete a User button to delete a user from the CiscoSecure database:
Step 1
Figure 4-7 Delete a User Page
Step 2
If you don't know the name of the user you want to delete, click Browse at the top of the menu and delete the user through that option. For more on the Browse option, refer to the "Browsing Groups and Users" section.
Step 3
Step 4
Step 5
Browsing Groups and Users
The Browse option can be used to review the CiscoSecure ACS database for both users and groups. Through this option, you can:
•
•
•
To access a user or group directly, use the View option. See the "Viewing Groups and Users" section for more information.
To browse the CiscoSecure database:
Step 1
Figure 4-8 Browse Page
This screen consists of two sections:
•
•
In addition to names, each section contains several icons. The names to the right of these icons serve as links to other menu options within the program.
Step 2
For more on deciphering the meaning of the terms and statistics appearing in the profiles, refer to the "Viewing Groups and Users" section.
Step 3
a.
b.
c.
Step 4
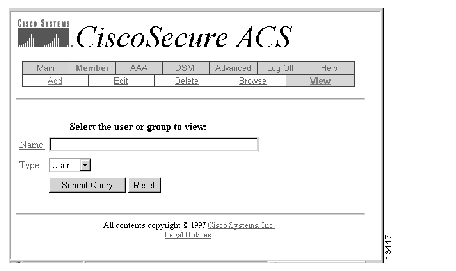
Viewing Groups and Users
Use the View option to see the profile for a selected user or group. Depending on the complexity of the values assigned to a particular user or group, the profile can contain many different attributes, each of which is defined in this section.
To view a selected profile:
Step 1
Figure 4-9 View User or Group Identification Prompt
Step 2
•
•
Step 3
If you can't remember the name, click Browse to look through the entire database.
Step 4
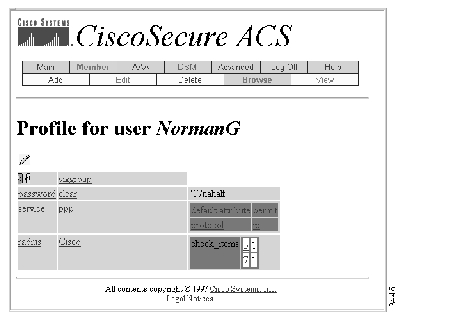
Figure 4-10 Profile Information Page—Simple Example
This provides a profile of the selected user or group. While the example profile above is relatively simple, the profile can contain a great deal of information on the attributes and values assigned to the selected user or group.
To learn more about an attribute, click on the attribute word. Each attribute word is linked to its definition.
Step 5
The profile seen on the View screen can contain information on any number of attributes assigned to a selected user or group. Attributes are derived from several internetworking protocols, including TACACS+ and RADIUS.
Attributes are normally arranged by rows with greater levels of detail arranged in columns from left to right of each row. For example, the Password attribute usually follows the rows identifying the profile_id, profile_cycle, and group name. In the password row, there are a number of columns which from right to left define: the attribute name, the password type, the password value, the beginning and ending dates when this password is effective.
In many cases, the profile won't be more complicated than the profile shown in Figure 4-10. There are occasions, however, when profiles can be far more complex, particularly when a large number of authentication and response attributes have been assigned for a particular user or group. In such cases, the profile might look more like the example in Figure 4-11.
Figure 4-11 Profile Information Page—Complex Example
As Figure 3-11 shows, a great deal of diverse information can be contained in a profile. This includes:
•
•
•
•
User-Level Functions (Changing a Password)
CiscoSecure users have two ways of connecting to the CiscoSecure ACS for the purpose of changing their personal passwords.
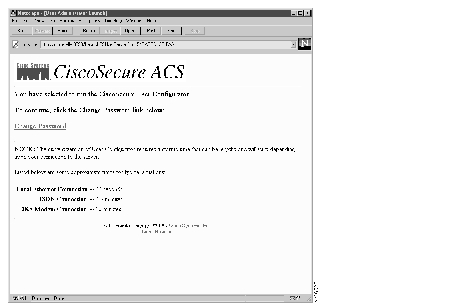
Changing a Password through the Web
CiscoSecure users to whom you assign web privilege (privilege level 1) have the ability to access the CiscoSecure CSUser web page for the purpose of changing their individual password.
Note
CiscoSecure users with web privilege can access this web page as follows:
Step 1
Step 2
•
http://your_server/cs
where your_server is the host name (or the fully qualified domain name, FDQN, if host name and FDQN differ) of the SPARCstation where you installed the CiscoSecure ACS. You can also substitute the SPARCstation's IP address for your_server.
•
https://your_server/cs
where your_server is the host name (or the fully qualified domain name, FDQN, if host name and FDQN differ) of the SPARCstation where you installed the CiscoSecure ACS. You can also substitute the SPARCstation's IP address for your_server.
Note
The CiscoSecure ACS user logon page displays.
Figure 4-12
User-Level Screen
Step 3
A new screen appears.
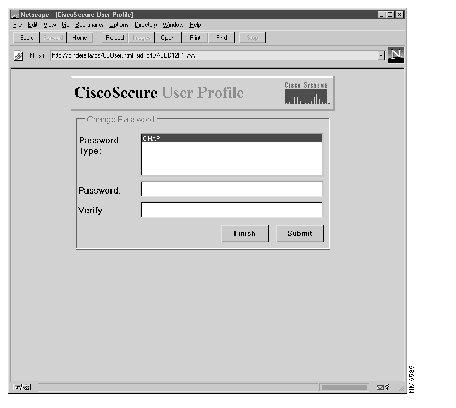
Figure 4-13 User-Level Password Change
Step 4
Enter a new password in the Password field. Valid characters for passwords are:
•
•
•
Step 5
Step 6
Step 7
Changing a TACACS+ Login Password via VTY or Telnet
Users can change their own login passwords during a VTY or Telnet session if the NAS through which they are accessing the network is using the TACACS+ protocol.
Step 1
Step 2
Step 3
Step 4
Step 5
Step 6
Step 7
Note
Future Passwords
If a future password is specified for a user, the user will not be able to log on with the future password until the date specified as the "from" date. After the date specified as the "until" date, the password is invalid, and the user will no longer be able to log on with it.
Logging Off the CiscoSecure Administrator Interface
To exit the Administrator program, click Logoff.
•
•
Note
Note
Starting and Stopping the CiscoSecure ACS Software
Normally the CiscoSecure ACS software starts up automatically when you shut down and restart the SPARCstation where it is installed. There are times, however, where you might want to start CiscoSecure ACS manually or shut it down without shutting down the entire SPARCStation.
Step 1
Step 2
•
# /etc/rc2.d/S80CiscoSecure
•
# /etc/rc0.d/K80CiscoSecure
Caution
Configuring the CiscoSecure AutoRestart Feature
The CiscoSecure ACS startup process has been enhanced to autorestart the CiscoSecure ACS if its AAA or DBServer components abnormally abort. To provide this functionality, a new process, "CiscoAuto," is started during CiscoSecure startup. If the AAA or DBServer component aborts, CiscoAuto detects this event and performs a CiscoSecure restart. During this process, the following events occur:
1.
2.
3.
The AutoRestart feature can be customized or disabled by specifying several command-line switches with the S80CiscoSecure startup command. The switches are as follows:
•
Disables AutoRestart. If used, CiscoSecure will not restart if the AAA server or DBServer aborts. The AutoRestart feature is on by default.
Example: S80CiscoSecure noauto
•
Disables the autosave of core files during restart. If used, the CiscoSecure ACS will not save the core files into the $BASEDIR/corefiles directory during restart. Any core files contained in the DBServer and CSU directories will remain in their respective directories.
Example: S80CiscoSecure nosavecore
Instructs CiscoAuto not to save the core files in the event of an abort and restart.
Example: S80CiscoSecure nosavecore 5
Instructs CiscoAuto to check the AAA server component every 5 seconds and, in the event of a shutdown and restart, not to save the core files.
•
Sets the sample monitoring time. Sample time is the number of seconds between checking if the AAA server has aborted. When not supplied, the default is 30 seconds. To set the sampling time, provide a numeric value with the command-line switch.
Example: S80CiscoSecure 5
Checks that the AAA server is running every 5 seconds.
Example: S80CiscoSecure 60
Checks once a minute that the AAA server is running.
![]()
![]()
![]()
![]()
![]()
![]()
![]()
![]()
Posted: Wed Feb 16 10:28:18 PST 2005
All contents are Copyright © 1992--2005 Cisco Systems, Inc. All rights reserved.
Important Notices and Privacy Statement.