|
|

Table Of Contents
Configuring Initial Test Group and User Profiles
Overview of Initial Test Configuration
Setting Up an Initial Group and User Profile
Setting Up a Test Group and User Profile with TACACS+ Attributes
Setting Up a Test Group and User Profile with RADIUS Attributes
Testing the User Login and Authentication
Configuring Initial Test Group and User Profiles
This chapter contains instructions on using the graphical CiscoSecure ACS 2.3 Administrator web pages and the Java-based CiscoSecure Administrator advanced configuration program to set up an initial group profile and user account to test authentication. The topics covered in this chapter include:
•
Overview of Initial Test Configuration
•
–
–
•
After completing and verifying initial configuration of your CiscoSecure ACS software in this chapter, you can expand and customize your access control system following directions in "Basic User and ACS Management," "Advanced Group and User Management," and "Configuring Initial Test Group and User Profiles."
Note
Overview of Initial Test Configuration
To achieve the fastest installation and configuration of the CiscoSecure ACS, Cisco recommends the following steps (described in detail in the next sections):
1.
2.
3.
After installing and verifying your initial configuration, you can expand and customize your access control system following directions in "Basic User and ACS Management," and "Configuring Initial Test Group and User Profiles."
Setting Up an Initial Group and User Profile
If you are installing CiscoSecure ACS for the first time, and have no user or group profiles already configured, your next step, after installing and starting the ACS software, is to set up an initial test user profile and configure your NAS to support this profile. The procedures to carry this out vary according to whether you are assigning TACACS+ protocol attributes or RADIUS protocol attributes to the user profile.
Setting Up a Test Group and User Profile with TACACS+ Attributes
In this section, you will use the Java-based CiscoSecure Administrator advanced configuration program and the CiscoSecure ACS Add a User web page and configure a NAS to set up and support an initial test group profile and user profile with TACACS+ protocol attributes.
Physical Testing Setup
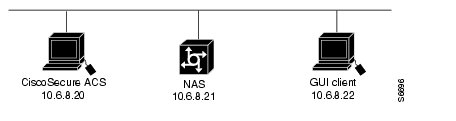
For testing purposes, locate the CiscoSecure ACS, the host NAS, and a login workstation on the same Ethernet segment. (See Figure 3-1.)
Figure 3-1 CiscoSecure Recommended Test Setup
Note
Set Up a TACACS+ Group Profile through the CiscoSecure Administrator
Using the CiscoSecure Administrator, you will create an initial test group profile. Using TACACS+ protocol attributes, you will name the profile "T_Shell_Group," and enable Telnet login by enabling all commands and attributes associated with shell service.
Step 1
http://your_server/cswhere your_server is the host name (or the fully qualified domain name, FDQN, if host name and FDQN differ) of the SPARCstation where you installed the CiscoSecure ACS. You can also substitute the SPARCstation's IP address for your_server.
Step 2
username: superuserpassword: changemeStep 3
The CiscoSecure Administrator advanced configuration program might require several minutes to load.
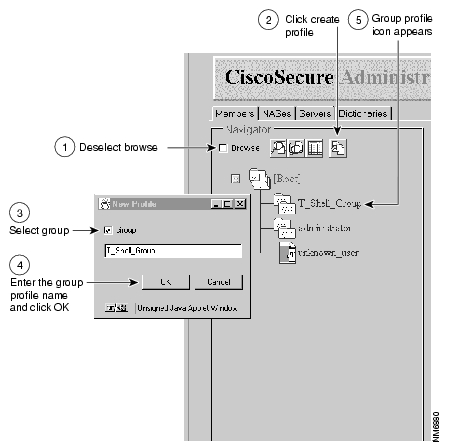
Step 4
a.
b.
c.
d.
e.
Figure 3-2 Creating a Test GROUP Profile
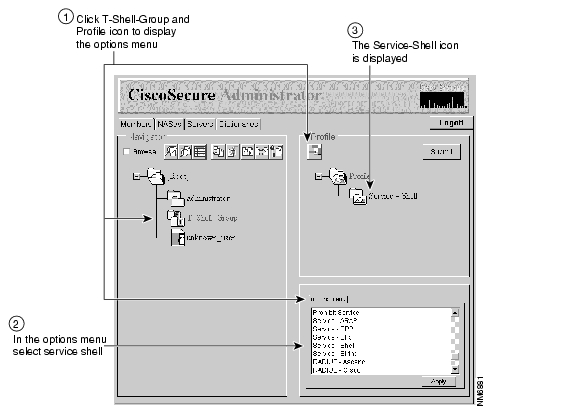
Step 5
a.
b.
Figure 3-3 Specifying Shell Service
Step 6
Step 7
Set Up a TACACS+ User Profile through the CiscoSecure Administrator
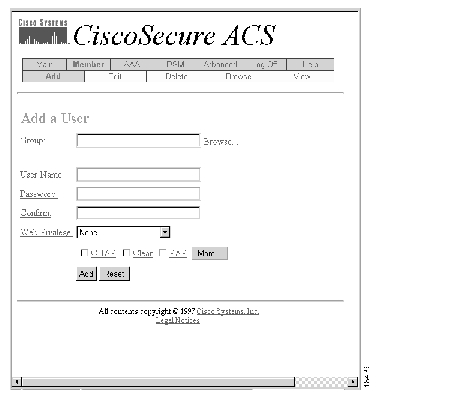
Using the CiscoSecure ACS Add a User web page, you will now create an initial test user profile. Using TACACS+ protocol attributes, you will name the profile "T_User," assign it a clear text password, "Cisco" and enable Telnet login by assigning it to the T_Shell_Group profile.
Step 1
http://your_server/cswhere your_server is the host name (or the fully qualified domain name, FDQN, if host name and FDQN differ) of the SPARCstation where you installed the CiscoSecure ACS. You can also substitute the SPARCstation's IP address for your_server.
Step 2
username: superuserpassword: changemeStep 3
The Add a User web page appears.
Figure 3-4 Add a User Page
Step 4
Step 5
Step 6
Step 7
Step 8
Step 9
Enter NAS Commands for the TACACS+ User Profile
From a network workstation, log in to the host NAS. Bring up the configuration window and input the following configuration commands:
aaa new-modelaaa authentication login default tacacs+ enableaaa authentication login no_tacacs lineaaa authorization exec tacacs+ if-authenticatedenable password cisco!tacacs-server host acs_ip_addresstacacs-server key secret-key!line con 0login authentication no_tacacspassword ciscowhere:
acs_ip_address is the IP address of the CiscoSecure ACS.
secret_key is the secret TACACS+ NAS key that you entered for the NAS during the CiscoSecure ACS installation.
Note
Specifying an Enable Password
An enable password will allow a user to carry out expanded system administrator-level EXEC operations. To specify an enable password for a given user:
Step 1
Step 2
Step 3
Step 4
Step 5
Step 6
Step 7
aaa authen enable tacacs+ enableSetting Up a Test Group and User Profile with RADIUS Attributes
In this section, you will use the CiscoSecure Administrator advanced configuration program and the CiscoSecure ACS Add a User web page and configure a NAS to set up an initial test group profile and test user profile with RADIUS protocol attributes.
Physical Testing Setup
For testing purposes, locate the CiscoSecure ACS, the host NAS, and a login workstation on the same Ethernet segment.
Figure 3-5 CiscoSecure Recommended Test Setup
Set Up a RADIUS Group Profile through the CiscoSecure Administrator
Using the CiscoSecure Administrator, you will create an initial group profile. Using RADIUS protocol attributes, you will name the profile "R_Shell_Group," and enable Telnet login.
Step 1
http://your_server/cswhere your_server is the host name (or the fully qualified domain name, FDQN, if host name and FDQN differ) of the SPARCstation where you installed the CiscoSecure ACS. You can also substitute the SPARCstation's IP address for your_server.
Step 2
username: superuserpassword: changemeStep 3
The advanced configuration program might require a few minutes to load.
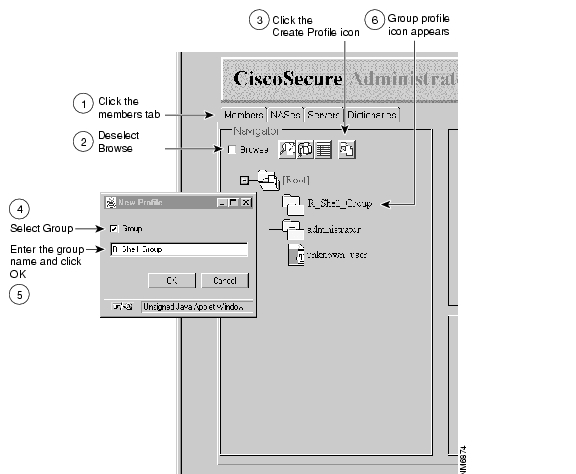
Step 4
a.
b.
c.
d.
e.
f.
g.
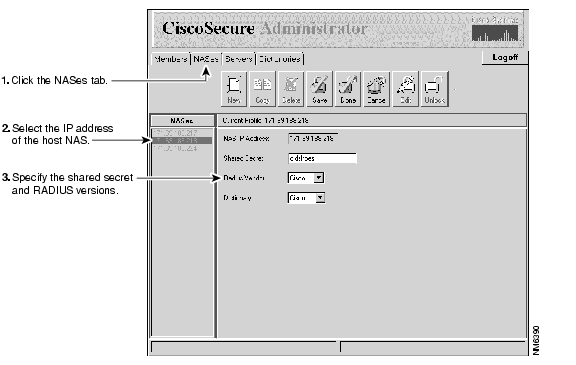
Figure 3-6 Specifying the Host NAS and RADIUS Version
Step 5
a.
b.
c.
d.
e.
f.
Figure 3-7 Creating a Test Group Profile
Step 6
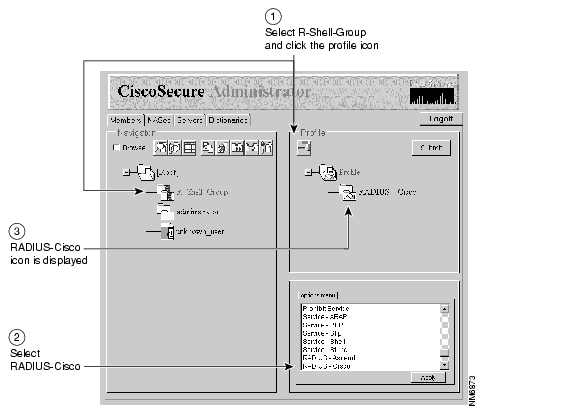
a.
b.
Figure 3-8 Specifying RADIUS-Cisco Dictionary
Step 7
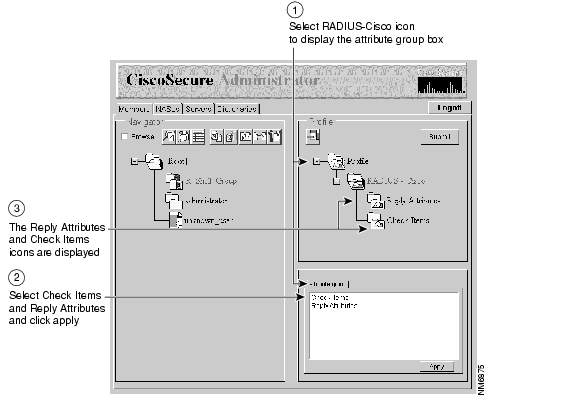
a.
b.
Figure 3-9 Specifying the Reply Attributes
Step 8
Step 9
a.
b.
c.
d.
e.
Step 10
Step 11
Set Up a RADIUS User Profile through the CiscoSecure ACS
Using the CiscoSecure ACS Add a User web page, you will now create an initial test user profile. You will name the profile "R_User," assign it a clear text password, "Cisco" and enable Telnet login by assigning it to the R_Shell_Group profile.
Step 1
http://your_server/cswhere your_server is the host name (or the fully qualified domain name, FDQN, if host name and FDQN differ) of the SPARCstation where you installed the CiscoSecure ACS. You can also substitute the SPARCstation's IP address for your_server.
Step 2
username: superuserpassword: changemeStep 3
The Add a User web page appears.
Figure 3-10 Add a User Page
Step 4
Step 5
Step 6
Step 7
Step 8
Step 9
Enter NAS Commands for the RADIUS User Profile
From a network workstation, log in to the host NAS. Bring up the configuration window and enter the following configuration commands:
aaa new-modelaaa authentication login default radius enableaaa authentication login no_radius localaaa authorization exec radius if-authenticatedenable password cisco!username root password cisco!radius-server host acs_ip_addressradius-server key secret_key!line con 0login authentication no_radiuswhere:
•
•
Note
Testing the User Login and Authentication
In this last section, you will verify your test user's login and authorization:
Step 1
Step 2
Step 3
Step 4
![]()
![]()
![]()
![]()
![]()
![]()
![]()
![]()
Posted: Wed Feb 16 10:16:58 PST 2005
All contents are Copyright © 1992--2005 Cisco Systems, Inc. All rights reserved.
Important Notices and Privacy Statement.