|
|

Table Of Contents
Advanced Group and User Management
Starting the Advanced Configuration Program
Creating a User Profile in Advanced Configuration Mode
Assigning TACACS+ Attributes to a Group or User Profile
Assigning RADIUS Attributes to a Group or User Profile
RADIUS Attributes Used in User Profiles
Fully Enabling the RADIUS-Cisco11.3 Dictionary
Assigning Access Control Privilege Levels
Copying a Group or User Profile
Displaying a Profile in Text Format
Interpreting a User Profile in Text Format
Displaying a System Summary and Expired Passwords
Editing the unknown_user Default Profile
Uses of the unknown_user Profile
Logging Off the CiscoSecure Administrator Interface
Advanced Group and User Management
This chapter contains the instructions for advanced configuration of group and user profiles.
The CiscoSecure Administrator advanced configuration program enables you to carry out more advanced and specialized operations: creating user groups and direct assignment of TACACS+ and RADIUS attributes to customize user and group session parameters in more detail than is possible in the CiscoSecure Access Control Server (ACS) web interface mode.
This chapter covers the following topics:
•
Starting the Advanced Configuration Program
•
•
•
•
•
•
•
•
•
•
Note
Starting the Advanced Configuration Program
You can start the Java-based CiscoSecure Administrator advanced configuration program from any of the CiscoSecure ACS Administrator web pages.
In the CiscoSecure ACS web menu bar of the CiscoSecure ACS web interface, click Advanced and then click Advanced again. The Java-based CiscoSecure Administrator advanced configuration program appears. It might require a few minutes to load.
Note
Figure 5-1 The CiscoSecure Administrator Advanced Configuration Program
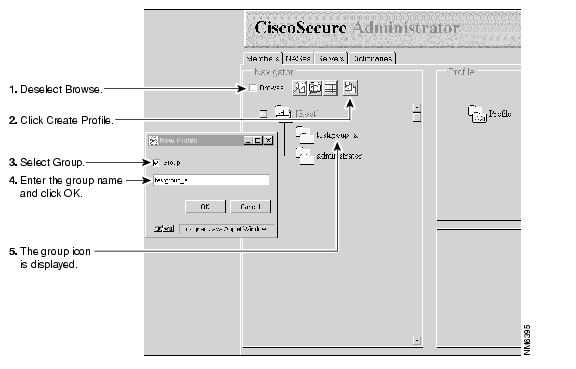
Creating a Group Profile
Use the CiscoSecure Administrator advanced configuration program to create and configure group profiles. Cisco recommends creating group profiles to configure detailed authentication, authorization, and accounting requirements for large numbers of similar users. After the group profile is defined, you can use the CiscoSecure ACS Add a User web page to quickly add simple user profiles to the group profile. The advanced requirements you configured for the group will apply to each member user.
To create a group profile:
Step 1
Step 2
•
•
If the group that you want to be the parent is itself a child group, first click on its parent group's folder to display it.
Step 3
Step 4
Step 5
•
•
Figure 5-2 Creating a Group Profile
Creating a User Profile in Advanced Configuration Mode
You can also use the CiscoSecure Administrator advanced configuration mode to create and configure a user profile. You might do this to customize the user profile's authorization and accounting related attributes in more detail than is possible through the Quick User Add page.
To create a user profile:
Step 1
Step 2
•
•
Step 3
Step 4
Step 5
Step 6
•
•
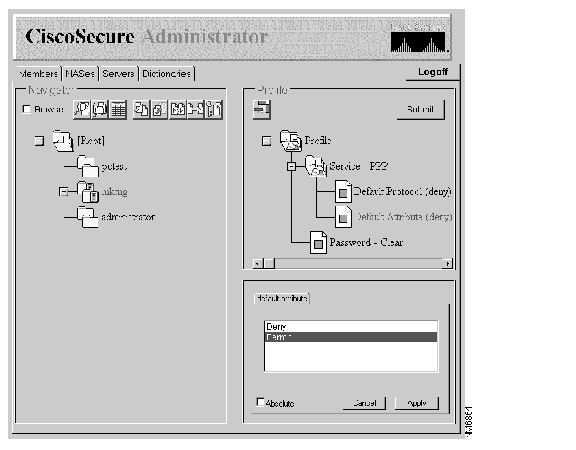
Assigning TACACS+ Attributes to a Group or User Profile
To assign specific TACACS+ services and attributes to a group or user profile:
Step 1
Step 2
A list or dialog box that contains attributes applicable to the selected profile or service appears in the window at the bottom right of the screen. The information in this window changes depending on what you have selected in the Profile pane.
Step 3
The service is added to the profile.
Step 4
Note
Step 5
Step 6
Refer to the Common TACACS+ Attributes for a listing of the most frequently used TACACS+ protocols and services.
Figure 5-3 Assigning TACACS+ Attributes to a Profile
Common TACACS+ Attributes
If necessary, use Table 5-1 as a guide when assigning TACACS+ attributes to a user or group profile.
Table 5-1 TACACS+ Attributes
service
Indicates that this is an authorization request for starting a primary service.
slip, ppp, arap, shell
protocol
Network protocol that is a subset of the service. This attribute must be specified when the service is PPP1 to indicate that a protocol is being brought up as a secondary service.
lcp, ip, ipx, atalk, vines, unknown
cmd
Indicates the command name for a shell command that is to be run.
NULL = shell itself
cmd-arg
Indicates an argument for the shell command that is to be run. Multiple cmd-arg attributes can be specified and are order dependent.
acl (access control list)
ASCII number representing a connection access list. Used only when service = shell and cmd = NULL.
inacl
ASCII number for an interface input access list.
outacl
ASCII number for an interface output access list.
zonelist
Numeric zonelist value. Applicable to AppleTalk only.
addr
Network address.
addr-pool
Name of an address pool from which the NAS2 should assign an address.
routing
Specifies whether routing information is to be propagated to and accepted from this interface.
Boolean value
route
Indicates a route that is to be applied to this interface. Values must be of the form:
dst_address mask routing_addrIf routing_addr is missing, the current interface will be used.
timeout
Sets a value, in minutes, after which a session is terminated. Does not work for PPP. A value of zero indicates no timeout. This is NOT available on Cisco IOS Release 11.0, but is available on Cisco IOS Release 11.1 and 11.2. Used for ARAP3 .
0 - nn where
0 = no timeout
idletime
Sets a value, in minutes, after which an idle session is terminated. Does not work for PPP. A value of zero indicates no timeout. This is NOT available on Cisco IOS Release 11.0, but is available on Cisco IOS Releases 11.1 and 11.2.
0 - nn where
0 = no timeout
autocmd
Auto-command to run. Used only when service = shell and cmd = NULL.
noescape
Prevents user from using an escape character. Used only when service=shell and cmd=NULL.
Boolean
nohangup
Do no disconnect after an automatic command. Used only when service=shell and cmd=NULL.
Boolean
priv_lvl
Privilege level to be assigned.
1 - 15
callback-dialstring
Number the NAS will call back.
NULL = dialstring
callback-line
Line the NAS uses to call back the user.
callback-rotary
Rotary number to use for a callback.
nocallback-verify
Indicates a connection doesn't require authentication after callback.
1
1 PPP = Point-to-Point Protocol.
2 NAS = network access server.
3 ARAP = Appletalk Remote Access Protocol.
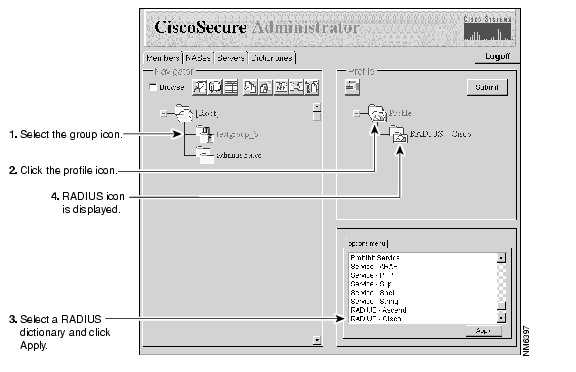
Assigning RADIUS Attributes to a Group or User Profile
To assign specific RADIUS attributes to a group or user profile:
Step 1
a.
b.
Figure 5-4 Assigning a RADIUS Dictionary to a Group or User
Step 2
Note
a.
b.
c.
Note
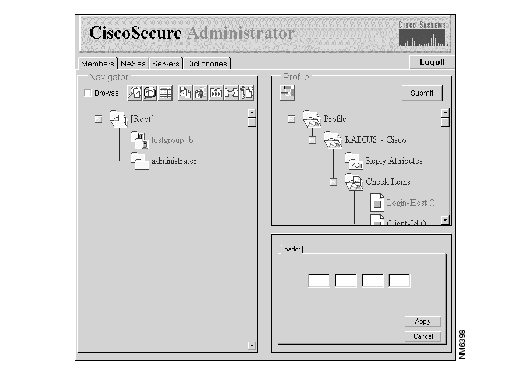
Step 3
a.
b.
Note
c.
Caution
Figure 5-5 Assigning Check Items and Reply Attributes to a RADIUS Profile
Step 4
For more information on specific RADIUS attributes, see the "RADIUS Attributes Used in User Profiles" section.
RADIUS Attributes Used in User Profiles
Table 5-2 lists the RADIUS attributes that are most commonly used in user profiles. This list is not an exhaustive list of the attributes supported by all vendors such as Ascend, Cisco, and Livingston and does not include any accounting attributes. This table only attempts to list the standard RADIUS attributes that are meaningful for use in a user profile. The table gives a description of each attribute and an explanation of how the attribute might be used in a user profile. Wherever applicable, special information is provided on Cisco's support for the attribute in current versions of Cisco IOS software.
Caution
Fully Enabling the RADIUS-Cisco11.3 Dictionary
The RADIUS-Cisco11.3 dictionary includes Cisco's set of vendor-proprietary extended RADIUS attributes. To take full advantage of this version, configure the associated NAS as follows:
•
•
radius-server host hostname|ip-address non-standardWhere hostname | ip-address is the FQDN or IP address of the CiscoSecure ACS assigned to this NAS.
•
radius-server configurenasFor a description of the vendor-proprietary attributes themselves, see "RADIUS Vendor-Proprietary Attributes," in the appendix "RADIUS Attributes" in the document Security Configuration Guide, accessible at the Cisco documentation web site at the following URL:
http://www.cisco.com/univercd/cc/td/doc/product/software/ios113ed
/113ed_cr/secur_c/scprt6/index.htm
Assigning Access Control Privilege Levels
The superuser administrator can use the web privilege= attribute to assign a level of access control privilege to CiscoSecure users.
Step 1
Step 2
•
•
•
•
Note
Step 3
Copying a Group or User Profile
Use the Copy a Profile button to add a group or user whose profile is a duplicate of an existing username or group profile:
Step 1
Step 2
Figure 5-6 Copy a Profile Button
Step 3
Step 4
Step 5
Finding a Group or User
To find a group or user profile:
Step 1
Figure 5-7 Find a Group or User Button
Step 2
The profile of the group or user you selected is placed in a temporary folder that appears at the top of the list of users. Use this folder as a "shortcut" to the groups or users to work with during this session.
Note
Step 3
Displaying a Profile in Text Format
To display a group or user profile in text format, go to the Members tab of the CiscoSecure Administrator advanced configuration program, select the user or group profile whose text format you want to display, and click the Display a Profile button.
Figure 5-8 Display a Profile Button
Information similar to that shown in Figure 5-9 will display.
Figure 5-9 CiscoSecure Profile Window
The information displayed is the same information as that shown in the Profile window, but it is shown in CiscoSecure ACS 1.0 format.
Interpreting a User Profile in Text Format
The text format is a representation of the actual data that is stored in the RDBMS. Reading the text format of a user or group profile is a quick way of understanding the TACACS+ or RADIUS-based attributes of a user profile.
In the following example user profile, configured through the Java-based CiscoSecure Advanced configuration program, the text format indicates that the user ga_simpson:
•
•
user = ga_simpson {password = clear "sesame1"service = shell {cmd = show {permit version}cmd = telnet {permit "10\.6\.8\.11"}}}The curly braces { } in the above expression enclose either:
•
cmd = telnet {permit "10\.6\.8\.11"}•
service = shell {cmd = show {permit version}cmd = telnet {permit "10\.6\.8\.11"}}
Note
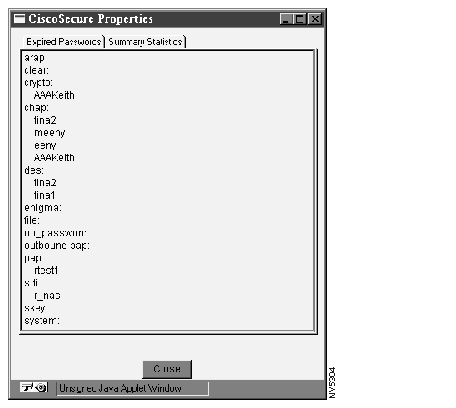
Displaying a System Summary and Expired Passwords
To display a summary of the system's statistics, go to the Members tab of the CiscoSecure Administrator advanced configuration program and click the Display System Summary and Expired Passwords button. You can also click this button to display users with expired passwords by password type.
Figure 5-10 Display System Summary and Expired Passwords Button
The CiscoSecure Properties window opens. To view the system summary, click the Summary Statistics tab. (See Figure 5-11.)
Figure 5-11 CiscoSecure Summary Statistics Window
To view expired passwords, click the Expired Passwords tab. (See Figure 5-12.)
Figure 5-12 CiscoSecure Expired Passwords Window
Moving a Profile
Use the Move a Profile button to move a group or user to a different or new group. This is useful, for example, to change an employee from one department to another.
To move a profile:
Step 1
Step 2
Step 3
Figure 5-13 Move a Profile Button
Step 4
Note
Unlocking a Profile
Use the Unlock a Profile button to unlock a record that became locked inadvertently. When a profile is locked, a keyhole icon displays next to the group's folder icon. Profiles are locked when they are being updated; however, it is possible to have a locked record that is not in use, such as when the computer is rebooted while updating a profile.
To unlock a profile:
Step 1
Step 2
Step 3
Figure 5-14 Unlock a Profile Button
Deleting a Profile Attribute
To delete a profile attribute from a group or user profile:
Step 1
Step 2
Step 3
Step 4
Step 5
Figure 5-15 Delete a Profile Attribute Button
Step 6
Step 7
Editing the unknown_user Default Profile
The CiscoSecure ACS unknown_user default profile feature enables access to users not specified (unknown) in the CiscoSecure database. The unknown_user profile can support unknown users requesting authentication via both the TACACS+ and RADIUS protocol.
When you install the CiscoSecure ACS, the unknown_user profile is empty, but you can edit it to provide a default profile for non-CiscoSecure users dialing in to a supported NAS.
Edit the unkown_user default profile as follows:
Step 1
Step 2
Step 3
Step 4
You can edit the unknown_user profile like any other user profile. See the section " Creating a User Profile in Advanced Configuration Mode" earlier in this chapter for details on assigning attributes through the CiscoSecure Administrator advanced configuration program.
Uses of the unknown_user Profile
The effect that this unknown_user profile has on unknown users dialing in to the network varies depending on how the client NAS is configured. For example, the unknown_user profile shown in Figure 5-16 is not configured for RADIUS and therefore does not allow any access to unknown users who are communicating with CiscoSecure via NASes enabled for RADIUS protocol only.
Figure 5-16 Customized unknown_user Profile Configuration
For TACACS+ the default unknown_user profile shown in Figure 5-16 authenticates any users who are configured in the UNIX authentication system on which the ACS is running.
The concept of the Default Profile is useful if you already have a large number of users defined in another authentication system, such as the UNIX /etc/passwd and /etc/shadow files or a Security Dynamics, Inc. ACE Server.
The unknown_user profile enables you to grant users specified in these other authentication systems immediate access to the network without having to respecify them in CiscoSecure database. For example, the following default profile might be used to authorize a shell on the NAS via RADIUS for users who are configured in an ACE Server but not yet specified in the CiscoSecure database:
unknown_user = {radius = Cisco {check_items = {2 = sdi}reply_attributes = {6 = 6}}}Additionally, the unknown_user profile can be used to grant guest access to the network for unknown users. The following unknown_user profile might be used to allow guests to log in without a password via TACACS+:
unknown_user = {password = no_passwordservice = shell {}}If there is no unknown_user profile declared, then users not declared in the CiscoSecure database cannot be authenticated or authorized to use any service when dialing in to the CiscoSecure ACS client NASes.
Note
Logging Off the CiscoSecure Administrator Interface
To exit the Administrator program, click Logoff.
•
•
Note
![]()
![]()
![]()
![]()
![]()
![]()
![]()
![]()
Posted: Wed Feb 16 10:24:59 PST 2005
All contents are Copyright © 1992--2005 Cisco Systems, Inc. All rights reserved.
Important Notices and Privacy Statement.