|
|

Table Of Contents
Authentication via a Token Server Example
Corresponding Administrator Requirements
Authenticating One-Time Password Cards via PPP
Configuring the NAS for Token Card Support
Working with CRYPTOCard Authentication
Obtaining CRYPTOCard RB-1 Tokens
Creating a CRYPTOCard Directory
Initializing the Physical CRYPTOCards
Using the CRYPTOCard in a Typical Logon Sequence
Working with S/Key Authentication
Setting Up a CiscoSecure User for S/Key Use
Working with SecurID Authentication
ACE/Server for Windows NT Setup
Configuring Users for Secure Computing Token Card Use
Setting a User's Initial SafeWord Configuration
Editing a User's Existing SafeWord Configuration
Configuring a User's SafeWord Authentication Method
Configuring a User's SafeWord Access (Authorization)
Configuring a User's SafeWord Aliases
Enabling Group Administrator Access to the SafeWord Configuration Pages
Using CiscoSecure's Token Card Support with RADIUS
Adding Token Card Support After Installing CiscoSecure ACS
Token Server Support
This chapter provides information on using token servers and one-time password authentication with the CiscoSecure Access Control Server (ACS) and includes the following sections:
•
Authentication via a Token Server Example
•
•
•
•
•
•
•
Token servers, used in conjunction with the appropriate token cards (also known as one-time password cards), add a new layer of security. Each token card, about the size of a credit card, is programmed to a specific user and each user has a unique personal identification number (PIN) that can generate a password keyed strictly to the corresponding card.
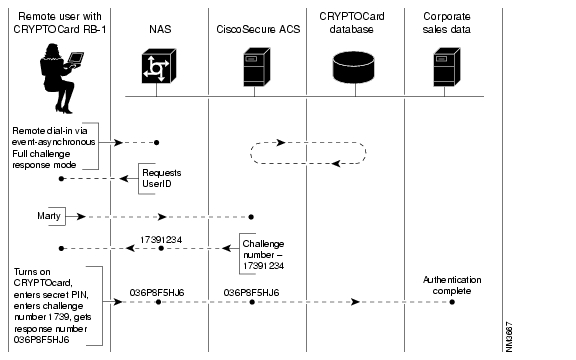
One-time password authentication takes place between the specified token server and the user. Figure 12-1 shows how a remote user can authenticate to the CiscoSecure ACS by means of a token card.
Figure 12-1 Remote Access to a CiscoSecure ACS via a Token Card
The token card database is usually considered part of the CiscoSecure ACS, although the two can be separate from each other depending on your preferences.
CiscoSecure ACS software supports authentication from these authentication servers:
•
•
•
For each token server you plan to support, make sure you have properly installed the corresponding software before installing the CiscoSecure ACS. For example, if you plan to support the SecurID ACE/Server, confirm that you have installed ACE/Server software before installing the CiscoSecure ACS. Or, if you plan to support SafeWord from Secure Computing, confirm that you have installed SafeWord Access Server software before installing the CiscoSecure ACS.
Note
Authentication via a Token Server Example
To provide better understanding of using token servers with CiscoSecure ACS software, the following example shows the procedure for a user, Hank, who authenticates as an asynchronous user to the network's CiscoSecure ACS:
1.
User Access VerificationUsername: Hank
Note
2.
User Access VerificationUsername: HankChallenge: 5128Enter Response:3.
User Access VerificationUsername: HankChallenge: 5128Enter Response:From the token cardThis challenge-response password represents the final verification needed to authenticate Hank to the CiscoSecure ACS.
Corresponding Administrator Requirements
Based on the previous scenario, before the user Hank can attempt a remote connection, the administrator must first:
1.
Note
2.
user = Hank {password = Enigma}In this case, Hank would be required to give a different DES Gold Card password every time he logs in.
Authenticating One-Time Password Cards via PPP
If you configured the profile to use a token passcode (a secure username) and to use the Point-to-Point Protocol (PPP) with the Password Authentication Protocol (PAP) or Challenge Handshake Authentication Protocol (CHAP) for remote-node login, the user of that profile must supply the passcode in the username field in the format:
username* passcodeFor example, consider a user profile called Joe. If you configure Joe's profile for Service-PPP, Password-PAP, and Password-crypto, Joe needs to enter the passcode in the User Name field in the following format:
Figure 12-2 Sample Login Screen for Profile Configured for Service-PPP (PAP) and Password-Crypto
Note
Enter the PAP password in the Password field.
Figure 12-3 Sample Login Screen for Profile Configured for Service-PPP (CHAP) and Password-Crypto
Finally, consider that you configured Joe's profile to authenticate by means of a one-time password card in combination with Service-PPP and Password-CHAP. In this case, Joe needs to enter the passcode in the User Name field and enter the CHAP password in the Password field. Depending on what you specified for the CHAP password, Joe's login screen would look similar to the one shown in Figure 12-3.
Configuring One-Time Password Entry at the Password Prompt via PPP
It is now possible to assign TACACS+ attributes in such a way as to enable PPP and PAP protocol OTP users to log in with more convention entries, entering username at the username prompt and entering the OTP at the password prompt. For example:
username:pameaganpassword:546323Using the Java-based CiscoSecure Administrator advanced configuration program, configure your PPP and PAP protocol OTP users with TACACS+ attributes.
Use the main options menu to configure your users with TACACS+ attributes (for example: Service-PPP, Password-PAP, Password-crypto).
•
•
Even though you've assigned a dummy string in your users' Password-PAP attribute, they do not enter it during login. In fact, users are not required to know what their dummy string is.
Configuring the NAS for Token Card Support
CiscoSecure ACS support for token card-generated one-time password (OTP) logins requires the host NAS be configured with a minimum 10 second TACACS+ timeout setting:
tacacs-server timeout 10The default setting of one second will cause OTP logins to fail a large percentage of the time.
Enabling Token Caching
The CiscoSecure ACS token caching feature enables CiscoSecure to cache the one-time password (OTP) of users logging in through a token server, allowing those users to reuse their "one-time-password," for the duration of their original session, a specified length of time, or combination of both. The CiscoSecure ACS token-caching feature can apply to both TACACS+ and RADIUS-enabled network access servers (NASes) and the ACS.
To enable token caching:
Step 1
Step 2
Step 3
•
•
•
Step 4
Caution
Working with CRYPTOCard Authentication
This section provides the instructions you need to use the CRYPTOCard token server with your CiscoSecure ACS.
Support for CRYPTOCard is built into the CiscoSecure ACS. However, before remote users can successfully dial in with CRYPTOCard, you need to perform three essential steps:
1.
2.
3.
Obtaining CRYPTOCard RB-1 Tokens
To obtain your CRYPTOCard RB-1 token cards, send your request directly to:
CRYPTOCard, Inc. at 1649 Barclay Blvd., Buffalo Grove, IL 60089Telephone: 847-459-6500 or toll free 1-800-307-7042Fax: 847-459-6599e-mail: token@cryptocard.com.http://www.cryptocard.com/After receiving your request, a CRYPTOCard representative will quickly refer you to the proper distributor or reseller in your area. CRYPTOCard is free from export controls.
While you are waiting to receive the physical CRYPTOCard RB-1 token cards, you can create a CRYPTOCard directory so that you can establish users within the CiscoSecure ACS database, as described in the next section.
Creating a CRYPTOCard Directory
In order to use the CRYPTOCards, you must establish a unique directory within your CiscoSecure ACS database. This directory will store the names of CRYPTOCard users.
To create a CRYPTOCard directory that can be accessed by the CiscoSecure ACS database:
Step 1
Step 2
# vi ccsecretStep 3
Step 4
# cd /$base/CSUThis is the directory where all CiscoSecure ACS files are stored. This directory contains two essential files that support CRYPTOCard: initcard and initfile.
Step 5
# ./initfileYou are prompted to enter a username. This will be the name of the CiscoSecure ACS user who will authenticate to the CiscoSecure ACS by means of CRYPTOCard.
Step 6
# Enter username (7 or 8 alphanumeric characters): Frank12You are next prompted to enter a value for Option Field 1, Option Field 2, and Option Field 3. After you enter a value for an option field, you are immediately prompted to enter a value for the next option value field.
Note
For each option field, you will select three digits from the corresponding range of values shown in parentheses. Use commas to separate values.
Step 7
Enter 3 digits for Option Field 1 [(0-3), (1), (0)] 1,1,0Enter 3 digits for Option Field 2 [(0-3), (0-7), (0-7)] 1,3,5Enter 3 digits for Option Field 3 [(0-1), (0-7), (1)] 1,0,1Step 8
Enter the user key, most significant byte first...You are now asked to enter values that will be used later when you initialize the physical token cards. The user key entered in the database and the user key loaded in the token must be identical. The whole key is 64 bits long, and it is entered as eight fields of 3 octal digits each, with each field representing one byte. Just as you were prompted previously to enter digits from a given range, you will once again enter values. This time, however, you will be prompted for key bytes rather than option fields, as shown in the following example:
Enter the key byte 1 in 3 octal digits (000 to 377) 111Enter the key byte 2 in 3 octal digits (000 to 377) 111Enter the key byte 3 in 3 octal digits (000 to 377) 111Enter the key byte 4 in 3 octal digits (000 to 377) 111Enter the key byte 5 in 3 octal digits (000 to 377) 111Enter the key byte 6 in 3 octal digits (000 to 377) 111Enter the key byte 7 in 3 octal digits (000 to 377) 111Enter the key byte 8 in 3 octal digits (000 to 377) 111After entering key byte 8, you are prompted to enter the user ID, as follows:
Enter userid:Frank12Step 9
Step 10
# Serial Number: 310104001At this point, you have completed the process of enabling the CRYPTOCard token card for the user Frank.
The following will display:
File /etc/CC/CCinit is updated for user FrankWant to update /etc/CC/ccinit for another user? [Y/N]If you enter Y, you return to step 6 where you can specify another CRYPTOCard user. If you enter N, you return to the UNIX prompt.
Step 11
Step 12
$BASE/CSU/initcard -u Frank12Initializing the Physical CRYPTOCards
You need to issue a physical CRYPTOCard to each user that you specified in the CRYPTOCard directory from the previous section. Furthermore, you need to initialize each CRYPTOCard, as follows:
Step 1
You see the word "locked" to indicate that the card is ready to be initialized. The cards display this prompt when they are new or when someone has entered a number of incorrect PINs that exceeds the limit.
Step 2
You are prompted for options regarding your preferences for certain operating parameters including PIN Entry Feedback, challenge-response mode, invalid PIN entry limit, minimum PIN length, automatic switch-off timeout and prompt language. The options for operating parameters are shown in Table 12-1, Table 12-2, and Table 12-3.
Table 12-1 CRYPTOCard Option Field 1
First Digit (MSB)
-PIN entry feedback options
0
No PIN entry feedback, PIN is fixed at time of issue
1
PIN entry feedback, PIN can be changed
2
Not valid
3
PIN entry feedback, PIN is fixed at time of issue
Second Digit1
1
Must be set to 1 for CiscoSecure ACS
Third Digit (LSB)
0
Must be set to 0 for CiscoSecure ACS
1 These settings affect the operation of the CiscoSecure ACS as well as the CRYPTOCard RB-1 token. All other settings affect operation of the token only.
Table 12-2 CRYPTOCard Option Field 2
First Digit (MSB)1
-Authentication Mode and User ID Options
0
Full challenge mode, no user ID required
1
Full challenge mode, user ID required
2
Event synchronous mode, no user ID required
3
Event synchronous mode, user ID required
Second Digit
-Number of PIN Entry Attempts
0
Unlimited number of attempts allowed
1-7
Indicates number of failed attempts allowed before token reverts to `Locked' state
Third Digit (LSB)
-Minimum PIN Length
0
8-digit PIN required
1
Not allowed
2
Not allowed
3-7
Indicates minimum number of digits in PIN
1 These settings affect the operation of the CiscoSecure ACS as well as the CRYPTOCard RB-1 token. All other settings affect operation of the token only.
Step 3
Enter 3 digits for Option Field 1 [(0-3), (1), (0)] 1,1,0 `Enter 3 digits for Option Field 2 [(0-3), (0-7), (0-7)] 1,3,5 `Enter 3 digits for Option Field 3 [(0-1), (0-7), (1)] 1,0,1 `After the arrow key is pressed for each option field, a prompt appears indicating the number of the next option field.
Step 4
The prompt Key1 appears.
Step 5
Enter the key byte 1 in 3 octal digits (000 to 377) 111 `Enter the key byte 2 in 3 octal digits (000 to 377) 111 `Enter the key byte 3 in 3 octal digits (000 to 377) 111 `Enter the key byte 4 in 3 octal digits (000 to 377) 111 `Enter the key byte 5 in 3 octal digits (000 to 377) 111 `Enter the key byte 6 in 3 octal digits (000 to 377) 111 `Enter the key byte 7 in 3 octal digits (000 to 377) 111 `Enter the key byte 8 in 3 octal digits (000 to 377) 111 `The display on the token card should go blank.
Step 6
The prompt UserID appears.
Step 7
In other words, enter the user ID as a series of eight, 3-digit octal values each terminated by the arrow key. Each 3-digit value represents a standard ASCII-designated character and the valid octal values range from 040 to 177.
This includes the uppercase and lowercase alphabet as well as numbers, punctuation marks, and special characters. Leading zeros must be entered explicitly. See the following example:
Enter character 1 (most significant) in 3 octal digits (000 to 377) 106 `Enter character 2 in 3 octal digits (000 to 377) 162 `Enter character 3 in 3 octal digits (000 to 377) 141 `Enter character 4 in 3 octal digits (000 to 377) 156 `Enter character 5 in 3 octal digits (000 to 377) 153 `Enter character 6 in 3 octal digits (000 to 377) 071 `Enter character 7 in 3 octal digits (000 to 377) 067 `Enter character 8 in 3 octal digits (000 to 377) 040 `The display on the token card should go blank.
Step 8
The User ID just entered should appear.
Step 9
The New PIN prompt should appear on the token display.
Step 10
Step 11
The prompt Card OK appears.
Step 12
The initialization is complete.
For security reasons, the card and the PIN should be sent to the end user separately.
Note
Using the CRYPTOCard in a Typical Logon Sequence
For the purpose of example, a remote user, Hank will go through the following logon sequence when dialing in to CiscoSecure ACS by means of a CRYPTOCard:
1.
2.
The user ID or username appears on the card.
Hank sets up a connection to his primary office using remote access software and enters his username as follows:
User Access VerificationUsername: Hank3.
The challenge is a string of 5 to 8 digits displayed on Hank's computer, as follows:
User Access VerificationUsername: HankChallenge: 12345678Enter Response4.
User Access VerificationUsername: HankChallenge: 12345678Enter Response: 34567890This challenge-response password represents the final verification needed to authenticate Hank to the CiscoSecure ACS.
Working with S/Key Authentication
The S/Key one-time password system from Bellcore provides secure authentication over networks that are subject to eavesdropping. S/Key prevents the user's secret password from ever crossing the network during authentication. Because S/Key is easy to integrate, many security-sensitive networks use it as their password security system.
S/Key user passwords are assigned through S/Key utilities.
Within the Java-based CiscoSecure Administrator advanced configuration program, you can configure a user profile to incorporate an assigned S/Key password, set a time limit on that password, and specify the CiscoSecure privilege level (user, group administrator, or system administrator) to which the password allows access.
S/Key Example Login
The following example shows the procedure for a user, identified as Sue, who authenticates to the CiscoSecure ACS NAS:
1.
User Access VerificationUsername: sues/key 97 fr09072Password:CiscoSecure ACS observes that Sue needs to supply an S/Key password.
2.
Based on the verification display, CiscoSecure ACS instructed the NAS to display the sequence number, 97, and a seed, fr09072, which will be used by a separate program to initiate the encryption process leading to an S/Key password.
Sue notes the sequence number and seed, then pauses from her interaction with the NAS in order to generate a password. She will generate the password by entering the sequence number and seed, along with her secret password, into an S/Key calculator program.
3.
% key 97 fr09072Enter secret password: <secret_password>The secret password is any string of at least 10 alphanumeric characters generated by Sue, for Sue, and known only by Sue.
4.
CRAG BAKE MOLT JEAN JIBE OFTThe one-time S/Key password is always expressed as a sequence of six short English words. Note how the one-time password is generated without any secret information crossing the network.
This second password will be used to authenticate Sue to the CiscoSecure ACS. Sue now returns to her interaction with the NAS. She enters the S/Key password and is authenticated, as follows:
Password: CRAG BAKE MOLT JEAN JIBE OFT5.
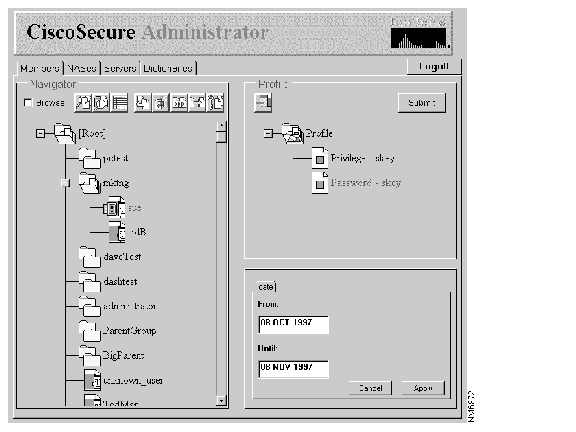
Setting Up a CiscoSecure User for S/Key Use
Use the Java-based CiscoSecure Administrator advanced configuration program to incorporate a user's S/Key assignment into CiscoSecure.
In Figure 12-4, the CiscoSecure Administrator settings specify the time period during which CiscoSecure ACS allows Sue to login to the network with her S/Key generated password.
Figure 12-4 S/Key Time Period Specification
In Figure 12-5, the CiscoSecure Administrator settings specify the CiscoSecure privilege level that user Sue is granted after she inputs the correct S/Key-generated passwords.
Figure 12-5 S/Key Privilege Level Specification
In this case, Sue would be required to give a different S/Key password every time she logs in and every time she enables at level 15.
Follow the procedures in the next section, " Establishing S/Key Users" to set up the actual S/Key passwords that your users will use.
Establishing S/Key Users
After setting up your CiscoSecure users for S/Key usage (see " Setting Up a CiscoSecure User for S/Key Use"), take the following steps to prepare to install and use S/Key:
Step 1
#/etc/rc2.d/S80CiscoSecureStep 2
The keyinit program initializes the S/Key system for that user.
If you want S/Key users to run keyinit, first confirm that all S/Key users have UNIX accounts on the system from which they are running keyinit and the CiscoSecure ACS daemon. In addition, you should inform the S/Key users about the following points prior to running keyinit:
•
•
•
Note
As an option to having users initialize their own S/Keys, you can initialize their S/Keys for them. As an administrator logged in as root, you can initialize S/Key passwords for established users by entering the following command:
#keyinit usernameIn the next step, each S/Key user will run the keyinit program to initialize the S/Key system for that user.
Step 3
% keyinitPassword: <UNIX password>[Adding sue]Enter secret password: <secret password>When the keyinit program asks Sue for a secret password, she can supply any mix of 10 or more alphanumeric characters.
Again secret password: <secret password>ID sue s/key is 99 fr05065Next login password: SKI INCA HONE NEE MESS LEAFNow Sue can use S/Key with the CiscoSecure ACS software.
S/Key also accounts for previous iterations of keyinit, providing assurance for the user that someone has not altered the system. As a result, the next time that Sue enters the keyinit command, she will see a display similar to the following:
% keyinitPassword: <UNIX password>[Updating sue]Old key: fr05064Enter secret password: <secret password>Again secret password: <secret password>ID sue s/key is 99 fr05065Next login password: SKI INCA HONE NEE MESS LEAF
Note
Working with SecurID Authentication
To use CiscoSecure ACS with the SecurID ACE/Server, you must purchase and install SecurID ACE/ Server software and obtain SecurID one-time-password tokens. This section summarizes setup information for a SecurID server and client to function with CiscoSecure ACS. However, always refer to the documentation that came with your SecurID ACE/Server software for details or questionable procedures.
About the SecureID ACE/Server
During the installation of your ACE/Server software, if you elect not to use the Secure Dynamics, Inc. (SDI) default directory name recommended by the SDI installation documentation, then you must set up the /etc/sdace.txt directory as described in the following procedure.
During the installation of the SDI ACE/Server software, you will have configured a way to resolve host names and services. The following installation prompt will have been displayed:
Do you want to resolve hosts and services by name?•
•
Depending on how you elected to resolve hostnames and services, follow these steps:
Step 1
Step 2
Step 3
•
•
ACE/Server Setup
This section summarizes the CiscoSecure ACS configuration for ACE/Server setup.
Step 1
Step 2
Step 3
Note
When the first authentication takes place from the CiscoSecure ACS to the ACE/Server, the ACE/Server sends the node secret file to its client, the CiscoSecure ACS. The application programming interface of the CiscoSecure ACS stores this node secret file in the same directory as the sdconf.rec file. The name of this node secret file corresponds to the name used in the /etc/services file to associate a name, port number, protocol, and alias name to a service.
For example, if you set up a service name of "eatabug 5566/udp," then the name of the secret node file on the client (the CiscoSecure ACS) will be "eatabug." This name is in the sdconf.rec file so the SDI API can function.
Note
When you run the sdadmin program, use the Add Client option to add the CiscoSecure ACS to the client list. Also, enable the User Activation option to ensure that all users configured on the ACE/Server are granted access to the CiscoSecure ACS.
The sdconf.rec file is encrypted and this is why the CiscoSecure ACS installation does not attempt to recreate this record based on queries and answers from the user during installation. To ensure that the client is working properly with the sdconf.rec file of the SDI ACE/Server, you must copy sdconf.rec to the specified directory of the CiscoSecure ACS during installation.
If you need to set up CiscoSecure on a ACE/Server for Windows NT, go to the next section.
ACE/Server for Windows NT Setup
Before you configure CiscoSecure ACS for UNIX with ACE/Server for Windows NT, first make sure these conditions are met:
•
•
Then take the following steps:
Step 1
a.
b.
tar -xvf col_clnt.tarc.
./sdsetup -clientd.
Step 2
Step 3
Copyright 1990, 1991, 1992, 1993, 1994, 1995, 1996, 1997 bySecurity Dynamics Technologies Inc.ACE/Server v 2.3---ALL RIGHTS RESERVED---Client ConfigurationACE/Server VERSION: v 2.3 [011]Config File Version: 7CLIENT RETRY: 5 timesCLIENT TIMEOUT: 5 secDES ENCRYPTION: enabledMASTER SERVER: HAL1MASTER SERVER ADDRESS: 10.8.0.3CLIENT NAME: TheRockCLIENT ADDRESS: 171.69.188.235SLAVE SERVER: not configuredAUTHENTICATION SERVICE: securidPORT NUMBER: 5500ADDRESSES: By IP address in ACE/Server databaseStep 4
Step 5
a.
b.
c.
Note
d.
Step 6
a.
b.
TheRock# more hosts## Internet host table#127.0.0.1 localhost171.69.188.235 TheRock loghost171.69.188.231 sunfreak10.8.0.1 therock-prv10.8.0.3 HAL1c.
Step 7
Note
Configuring Users for Secure Computing Token Card Use
If you have configured the CiscoSecure ACS to support the Secure Computing token card, you can use the CiscoSecure ACS SafeWord Profile web page to configure CiscoSecure users for Secure Computing token card authentication. After you configure a user for Secure Computing token card authentication through CiscoSecure ACS, that user is configured for both CiscoSecure and SafeWord. No further configuration of that user is necessary.
Caution
Setting a User's Initial SafeWord Configuration
To initially configure a user's SafeWord profile, you need to enable access to that user's SafeWord configuration pages.
Step 1
Step 2
Step 3
Step 4
The the SafeWord Profile fields include:
•
You can make additional modifications to this ID. See your SafeWord documentation for SafeWord constrictions.
•
•
•
Step 5
The following options are displayed.
•
•
•
Editing a User's Existing SafeWord Configuration
To edit a user's existing SafeWord configuration, use the Edit Enigma Token button on the user's Edit a Profile web page.
Step 1
If a SafeWord profile has already been configured for that user, the Edit Enigma Token button is displayed.
Step 2
Step 3
Step 4
The fields include:
•
•
•
Step 5
The following options are displayed:
•
•
•
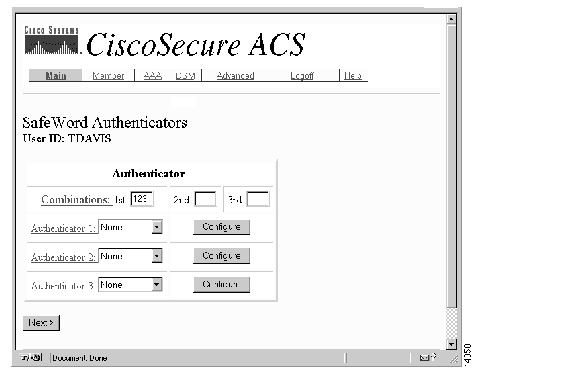
Configuring a User's SafeWord Authentication Method
Using the user's SafeWord Authenticators page, you can specify one or more SafeWord authentication methods to apply to the user profile, the order in which the authentication methods are applied, and the parameters for that method.
To configure an authentication method:
Step 1
Figure 12-6 SafeWord Authenticators Page
Step 2
•
•
•
•
Step 3
Step 4
Step 5
Step 6
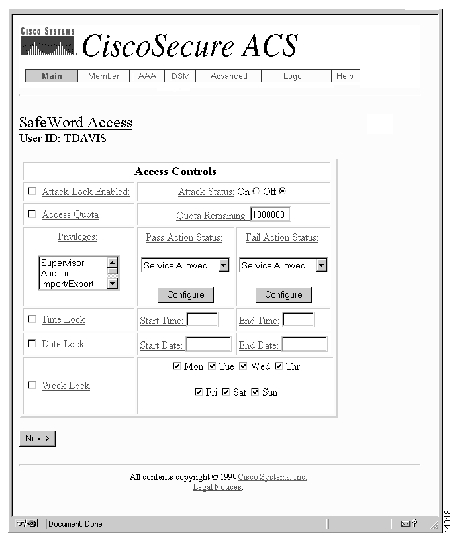
Configuring a User's SafeWord Access (Authorization)
Using the user's SafeWord Access page, you can specify the time conditions under which the user can access the network, set attack lock thresholds, set privilege levels, and set actions to be executed in event of login success or failure.
Step 1
Figure 12-7 SafeWord Access Page
Step 2
Step 3
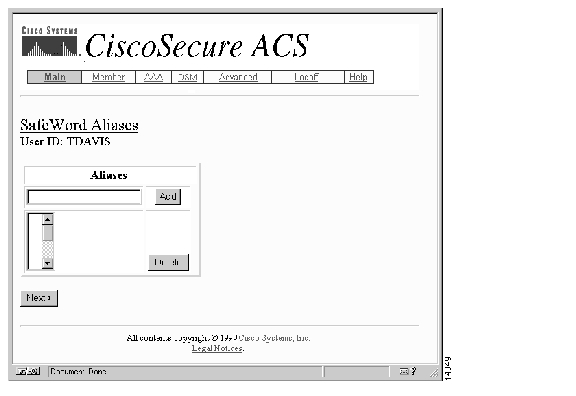
Configuring a User's SafeWord Aliases
Using the user's SafeWord Aliases page, you can specify the alternative names under which the current user can log in to the network.
To configure a user's alias:
Step 1
Figure 12-8 SafeWord Aliases Page
Step 2
Step 3
Step 4
Enabling Group Administrator Access to the SafeWord Configuration Pages
When CiscoSecure is installed, only users with system administrator privilege can access the CiscoSecure ACS SafeWord Profile, SafeWord Authenticators, SafeWord Access, and SafeWord Aliases web pages.
The system administrator can grant users with group administrator privilege access to these pages by editing the turbo.conf file on the CiscoSecure ACS.
To enable group administrator access to the SafeWord configuration pages:
Step 1
Step 2
Step 3
[SafeWord]isInstalled=yesGroupAdminAllowed=yesStep 4
Step 5
a.
#/etc/rc0.d/K80CiscoSecureb.
#/etc/rc2.d/S80CiscoSecure
Using CiscoSecure's Token Card Support with RADIUS
Under most circumstances, the CiscoSecure ACS should support use of RADIUS with token cards. However, if you experience problems with the password—for example, if the program prompts you for the password 2 or more times—then you should try creating a new attribute to handle the problem, as follows:
Step 1
Step 2
attr=200, type=enum...Step 3
Step 4
Note
Adding Token Card Support After Installing CiscoSecure ACS
The easiest way is to specify which token cards you want to support during the installation of CiscoSecure ACS. However, if you declined to specify token card support when you initially installed CiscoSecure ACS, you can still add support for Secure Computing (formerly Enigma Logic) or Security Dynamics (SDI) token cards by editing a configuration file, as described in the following steps.
Step 1
ciscosecure-sun% cd $BASEDIR (where $BASEDIR is the directory where CiscoSecure ACS is
installed)
ciscosecure-sun% lsCSU DOCS bin config logfiles odbc utilsDBServer SYBSsa50 classes java ns-home sybaseciscosecure-sun% cd configciscosecure-sun% lsCSConfig.ini CSU.cfg DefaultProfileStep 2
Step 3
#vi CSU.cfgStep 4
•
AUTHEN config_external_authen_symbols = {
{
"./libsdi.so","sdi"
}
,
}
Note
•
AUTHEN config_external_authen_symbols = {
{
"./libenigma.so","enigma"
}
,
}You must also update the libenigma.conf file located in $BASEDIR/CSU. The libenigma.conf file must contain the IP address of the Safeword Server, for example:
02 SafeWord Authen. Server Name:xxx.xxx.xxx.xxx 0 0 7482where xxx.xxx.xxx.xxx is the server's IP address.
Step 5
Step 6
# /etc/rc0.d/K80CiscoSecureStep 7
# /etc/rc2.d/S80CiscoSecureSupport for the token cards you specified is now available.
Step 8
Send the following command to the NAS:
tacacs+ timeout 10
![]()
![]()
![]()
![]()
![]()
![]()
![]()
![]()
Posted: Wed Feb 16 09:48:45 PST 2005
All contents are Copyright © 1992--2005 Cisco Systems, Inc. All rights reserved.
Important Notices and Privacy Statement.