|
|

Product Number: CISCO-WT2772-MAA=
This document explains how to remove and replace the multipoint wireless transverter component of a Cisco broadband fixed wireless multipoint headend system, and includes instructions for powering down the transverter, removing an installed transverter, installing a new transverter, and reinstating the power to the new transverter.
 |
Note Use this document in conjunction with the Cisco uBR7200 Series Universal Broadband Router Hardware Installation Guide and Cisco uBR7200 Series Universal Broadband Router Software Configuration Guide, both of which shipped with your Cisco uBR7200 series router, and the Cisco uBR7200 Series Multipoint Wireless Modem Card and Subsystem Installation document that shipped with your point-to-multipoint wireless modem card. These documents are also available online and on the documentation CD-ROM. |
This document includes the following sections:
The Cisco IOS software running on your router contains extensive features and functionality. The effective use of many of these features is easier if you have more information. For additional information on configuring and maintaining the Cisco uBR7200 series router, the following documentation resources are available:
 |
Note You can access Cisco IOS software configuration documentation on the World Wide Web at http://www.cisco.com, http://www-china.cisco.com, or http://www-europe.cisco.com. |
The wireless transverter is the control and data interface to the headend subsystems. It provides power amplification and up/down conversion between the IF and RF frequencies.
The headend transverter consists of the following components:
Figure 1 shows the connectors on the transverter. Table 1 describes their use.
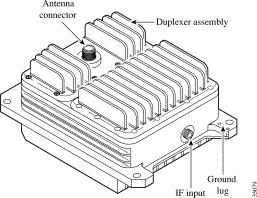
| Connector | Type | Input/Output | Function |
|---|---|---|---|
Antenna connector | N-type weatherized (female) | Input and Output | Antenna connection |
IF input | N-type weatherized (female) | Input and Output | Carries transmit and receive IF signals, input power, and IF reference frequency |
Ground lug | Two-hole compression | — | Ground |
This section provides a list of parts and tools you need to remove and replace a wireless transverter. This section also includes safety and ESD-prevention guidelines to help you avoid injury to yourself and damage to the equipment.
To remove and replace the wireless transverter, you need the following tools and parts. If you need additional equipment, contact a service representative for ordering information.
 |
Note Some N-type connectors require specific tools. Obtain this information from your cable vendor. |
 |
Note If the optional hail shields have been installed, remove them first. Refer to the instructions that shipped with the shields. |
The following are safety guidelines that you should observe when working with any equipment that connects to electrical power or telephone wiring.
| |||
Waarschuwing | Dit waarschuwingssymbool betekent gevaar. U verkeert in een situatie die lichamelijk letsel kan veroorzaken. Voordat u aan enige apparatuur gaat werken, dient u zich bewust te zijn van de bij elektrische schakelingen betrokken risico's en dient u op de hoogte te zijn van standaard maatregelen om ongelukken te voorkomen. Voor vertalingen van de waarschuwingen die in deze publicatie verschijnen, kunt u het gedeelte Regulatory Compliance and Safety Information (Informatie over naleving van veiligheids- en andere voorschriften) raadplegen in dit document. | ||
Varoitus | Tämä varoitusmerkki merkitsee vaaraa. Olet tilanteessa, joka voi johtaa ruumiinvammaan. Ennen kuin työskentelet minkään laitteiston parissa, ota selvää sähkökytkentöihin liittyvistä vaaroista ja tavanomaisista onnettomuuksien ehkäisykeinoista. Tässä julkaisussa esiintyvien varoitusten käännökset löydät tämän asiakirjan Regulatory Compliance and Safety Information -osasta (määräysten noudattaminen ja tietoa turvallisuudesta). | ||
Attention | Ce symbole d'avertissement indique un danger. Vous vous trouvez dans une situation pouvant causer des blessures ou des dommages corporels. Avant de travailler sur un équipement, soyez conscient des dangers posés par les circuits électriques et familiarisez-vous avec les procédures couramment utilisées pour éviter les accidents. Pour prendre connaissance des traductions d'avertissements figurant dans cette publication, consultez la section Regulatory Compliance and Safety Information (Conformité aux règlements et consignes de sécurité) de ce document. | ||
Warnung | Dieses Warnsymbol bedeutet Gefahr. Sie befinden sich in einer Situation, die zu einer Körperverletzung führen könnte. Bevor Sie mit der Arbeit an irgendeinem Gerät beginnen, seien Sie sich der mit elektrischen Stromkreisen verbundenen Gefahren und der Standardpraktiken zur Vermeidung von Unfällen bewußt. Übersetzungen der in dieser Veröffentlichung enthaltenen Warnhinweise finden Sie im Abschnitt "Regulatory Compliance and Safety Information" (Informationen zu behördlichen Vorschriften und Sicherheit) in diesem Dokument. | ||
Avvertenza | Questo simbolo di avvertenza indica un pericolo. La situazione potrebbe causare infortuni alle persone. Prima di lavorare su qualsiasi apparecchiatura, occorre conoscere i pericoli relativi ai circuiti elettrici ed essere al corrente delle pratiche standard per la prevenzione di incidenti. La traduzione delle avvertenze riportate in questa pubblicazione si trova nella documento Regulatory Compliance and Safety Information (Conformità alle norme e informazioni sulla sicurezza) nel presente documento. | ||
Advarsel | Dette varselsymbolet betyr fare. Du befinner deg i en situasjon som kan føre til personskade. Før du utfører arbeid på utstyr, må du vare oppmerksom på de faremomentene som elektriske kretser innebærer, samt gjøre deg kjent med vanlig praksis når det gjelder å unngå ulykker. Hvis du vil se oversettelser av de advarslene som finnes i denne publikasjonen, kan du se i avsnittet Regulatory Compliance and Safety Information (Overholdelse av forskrifter og sikkerhetsinformasjon) i dette dokumentet. | ||
Aviso | Este símbolo de aviso indica perigo. Encontra-se numa situação que lhe poderá causar danos físicos. Antes de começar a trabalhar com qualquer equipamento, familiarize-se com os perigos relacionados com circuitos eléctricos, e com quaisquer práticas comuns que possam prevenir possíveis acidentes. Para ver as traduções dos avisos que constam desta publicação, consulte a secção Regulatory Compliance and Safety Information (Informação de Segurança e Disposições Reguladoras) neste documento. | ||
¡Advertencia! | Este símbolo de aviso significa peligro. Existe riesgo para su integridad física. Antes de manipular cualquier equipo, considerar los riesgos que entraña la corriente eléctrica y familiarizarse con los procedimientos estándar de prevención de accidentes. Para ver una traducción de las advertencias que aparecen en esta publicación, consultar la sección titulada Regulatory Compliance and Safety Information (Información sobre seguridad y conformidad con las disposiciones reglamentarias) que aparece en este documento. | ||
Varning! | Denna varningssymbol signalerar fara. Du befinner dig i en situation som kan leda till personskada. Innan du utför arbete på någon utrustning måste du vara medveten om farorna med elkretsar och känna till vanligt förfarande för att förebygga skador. Om du vill se översättningar av de varningar som visas i denna publikation, se avsnittet "Efterrättelse av föreskrifter och säkerhetsinformation" i detta dokument. | ||
Follow these basic guidelines when working with any electrical equipment:
Use the following procedures to remove and replace the transverter.
 |
Warning Only trained and qualified personnel should be allowed to install, replace, or service this equipment. This equipment contains an energy hazard. Disconnect the system before servicing. To see translations of the warnings that appear in this publication, refer to the "Regulatory Compliance and Safety Information" section in this document. |
 |
Warning Do not work on the system or connect or disconnect cables during periods of lightning activity. To see translations of the warnings that appear in this publication, refer to the "Regulatory Compliance and Safety Information" section in this document. |
 |
Warning A radiation hazard may exist within a specific radius around the center point of the antenna. Table 2 associates antenna gain (in dBi) with a minimum acceptable distance according to FCC rules. Determine the gain of the antenna and use Table 2 to locate the minimum acceptable distance from the center point of the antenna. To see translations of the warnings that appear in this publication, refer to the "Regulatory Compliance and Safety Information" section in this document. |
| Antenna Gain (dBi) | EIRP (dBm) | EIRP (W) | Minimum Acceptable Distance under FCC Rules—Uncontrolled Environment (m) | Minimum Acceptable Distance under FCC Rules—Controlled Environment (m) |
|---|---|---|---|---|
10 | 43 | 20.0 | 0.4 | 20 cm |
11 | 44 | 25.1 | 0.4 | 20 cm |
12 | 45 | 31.6 | 0.5 | 20 cm |
13 | 46 | 39.8 | 0.6 | 0.3 |
14 | 47 | 50.1 | 0.6 | 0.3 |
15 | 48 | 63.1 | 0.7 | 0.3 |
16 | 49 | 79.4 | 0.8 | 0.4 |
17 | 50 | 100.0 | 0.9 | 0.4 |
18 | 51 | 125.9 | 1.0 | 0.4 |
19 | 52 | 158.5 | 1.1 | 0.5 |
20 | 53 | 199.5 | 1.3 | 0.6 |
21 | 54 | 251.2 | 1.4 | 0.6 |
22 | 55 | 316.2 | 1.6 | 0.7 |
23 | 56 | 398.1 | 1.8 | 0.8 |
24 | 57 | 501.2 | 2.0 | 0.9 |
25 | 58 | 631.0 | 2.2 | 1.0 |
26 | 59 | 794.3 | 2.5 | 1.1 |
27 | 60 | 1000.0 | 2.8 | 1.3 |
28 | 61 | 1258.9 | 3.2 | 1.4 |
29 | 62 | 1584.9 | 3.6 | 1.6 |
30 | 63 | 1995.3 | 4.0 | 1.8 |
To remove an installed wireless transverter, complete the following procedures:
The wireless transverter should be removed only when it is not transmitting a signal. Use the procedures established at your installation, and the shut command, to shut down the wireless link from the transverter that you are replacing.
To disconnect the DC power from the individual transverter, complete the following steps:

Step 2 Tape the power/breaker switch for the transverter in the OFF position.
 |
Warning Before performing any of the following procedures, ensure that DC power to the transverter you will be working on is turned OFF. To ensure that the power to the specific transverter is OFF, locate the power/breaker switch on the front of power feed panel that services that transverter, push the switch into the OFF position, then tape the switch in the OFF position. To see translations of the warnings that appear in this publication, refer to the "Regulatory Compliance and Safety Information" section in this document. |
 |
Warning When installing or replacing the unit, the ground connection must always be made first and disconnected last. To see translations of the warnings that appear in this publication, refer to the "Regulatory Compliance and Safety Information" section in this document. |
To remove the cables from the transverter, complete the following steps:
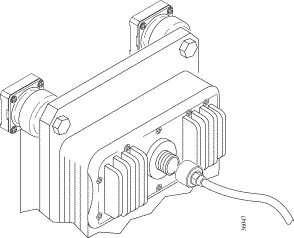
Step 2 Remove the IF cable from the IF input connection (see Figure 4).
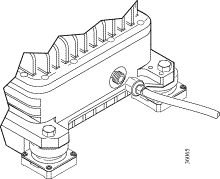
Step 3 Remove the two screws securing the ground lug (see Figure 5).
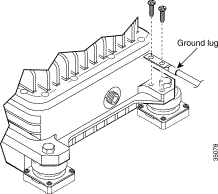
 |
Caution Never leave the transverter unattended with the fasteners removed. |
To remove the transverter from the antenna mast, complete the following steps:
 |
Note Do not remove the four shock mounts, which remain attached to the transverter. Do not loosen the mounting brackets or remove them from the antenna mast. |
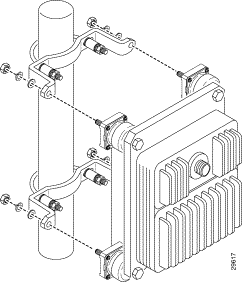
Step 2 Grip the transverter with both hands and pull it away from the mounting brackets until all four of the shock mount bolts are free of the brackets.
If you will be transferring the duplexer to a new transverter, remove the duplexer and transfer it using the instructions shipped with the duplexer, or the instructions in the Cisco uBR7200 Series Multipoint Wireless Modem Card and Subsystem Installation document that shipped with your multipoint wireless modem card.
To replace the transverter, use the following procedures:
1. Installing the Duplexer in the Transverter
2. Assembling the Shock Mounts
3. Installing the Shock Mounts
To install the duplexer in the transverter, refer to the instructions that shipped with the duplexer, or to the instructions in the Cisco uBR7200 Series Multipoint Wireless Modem Card and Subsystem Installation document that shipped with your multipoint wireless modem card.
To assemble each of the four shock mounts, complete the following steps:
 |
Note The hex bolt slot holds the head of the bolt in place when the nut is fastened to the bolt. |
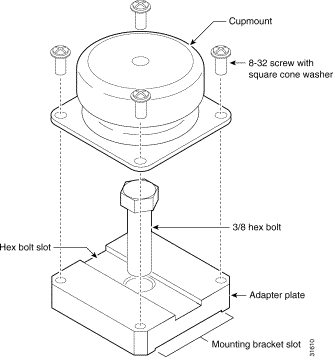
Step 2 Place the cupmount on top of the adapter plate, lining up the holes in the cupmount with the holes in the adapter plate (see Figure 7).
Step 3 Use the four screws with the square cone washers to securely attach the cupmount to the adapter plate (see Figure 7). Using the torque driver with the number 2 Phillips bit, tighten the screws to between 16 and 20 inch-pounds of torque.
To attach each of the four shock mounts to the transverter, complete the following steps:
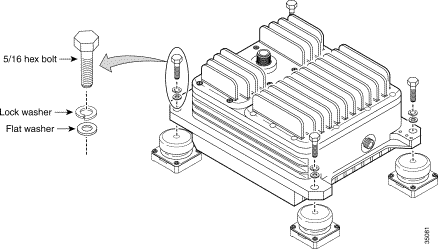
Step 2 Line up the center hole in each cupmount with a transverter mounting hole (see Figure 8).
Step 3 Attach each shock mount to the transverter with the hex bolt and washers (see Figure 8), but do not fully tighten the bolts until after the shock mounts are properly aligned. The mounting brackets seat correctly in the mounting bracket slots only when the shock mounts are properly aligned. Improper alignment prevents the mounting bracket from seating correctly, which could allow the shock mount to slide across the mounting bracket and move the transverter.
Step 4 Align each shock mount so that the mounting bracket slot on the shock mount is parallel to one of the shorter sides of the transverter (see Figure 9). The mounting bracket slots on the upper shock mounts must be parallel to the top of the transverter. The mounting bracket slots on the lower shock mounts must be parallel to the bottom of the transverter.
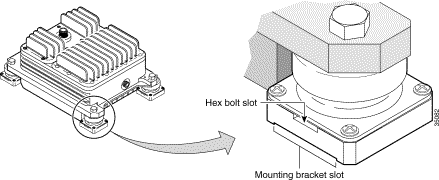
Step 5 Tighten each hex bolt to between 7 and 8 foot-pounds of torque.
Step 6 Make sure that the mounting bracket slot on each shock mount is still positioned correctly.
Step 7 When the shock mounts are attached to the transverter, they must not touch the fins on the back of the transverter. Check all four shock mounts to make sure that none of them is touching the transverter fins (see Figure 10).

 |
Caution Never leave the transverter unattended with the fasteners removed. |
 |
Note Each transverter at a headend site with multiple antennas should be installed far enough from all antennas (see Table 2) so that any transverter can be replaced without having to shut down the transmission signal from another antenna. |
To mount the replacement transverter on the antenna mast, complete the following steps:

Step 2 Push the transverter toward the mast until the mounting brackets mate with the mounting bracket slots on the shock mounts.
Step 3 Make sure that the mounting brackets are seated correctly in the corresponding mounting bracket slots on all four shock mounts. If a mounting bracket does not seat correctly in the slot on any shock mount, you must realign that shock mount then secure it again to between 7 and 8 foot-pounds of torque (refer to the "Installing the Shock Mounts" section).
Step 4 Make sure that the head of each hex bolt is still seated correctly (refer to the "Assembling the Shock Mounts" section).
Step 5 Place a washer and nut on each bolt, then finger-tighten the nut (see Figure 11).
Step 6 Make sure that the mounting brackets are still seated correctly in the mounting bracket slots on the shock mounts.
Step 7 Tighten all four nuts to 15 foot-pounds of torque.
To attach the cables to the new transverter, complete the following steps:

Step 2 Connect the IF cable to the IF input connector (see Figure 13).
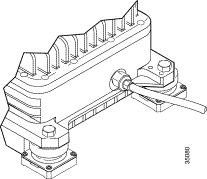
Step 3 Connect the RF cable leading to the antenna to the N-type antenna connector in the middle of the duplexer (see Figure 14).
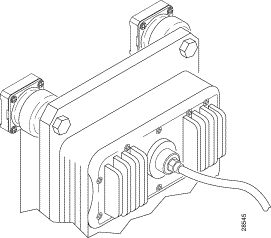
Step 4 After connecting the cables, install the cable-connection weatherproofing included with the transverter on the IF input and the antenna cable connections.
 |
Note Do not use common electrical tape, or similar types of tape, as weatherproofing because the resulting seal is not adequate. These types of tape do not withstand sunlight well. They also leave a gummy residue when they are removed. |
To reinstate the power, complete the following steps:
Step 2 Reinstate power by moving the power/breaker switch to the ON position (see Figure 15).

Using the procedures established at your installation, reinstate the wireless link with the no shut command.
This completes the procedure for removing and replacing the transverter in a Cisco broadband fixed wireless multipoint system headend.
This section provides international agency compliance, safety, and statutory information regarding the removal and replacement of the Cisco broadband fixed wireless point-to-multipoint system transverter.
The following paragraphs describe requirements and information based on FCC rules.
This Cisco product has been tested and complies with the limits for a Class A digital device, pursuant to Part 15 and Part 21 of the FCC Rules. These limits are designed to provide reasonable protection against harmful interference when the equipment is operated in a commercial environment. This equipment generates, uses, and can radiate radio-frequency energy and, if not installed and used in accordance with the instruction manual, can cause harmful interference to radio transmissions.
This section repeats in multiple languages the warnings found in this document.
| |||
Waarschuwing | Alleen getraind en gekwalificeerd personeel mag deze uitrusting installeren, vervangen of onderhouden. Deze uitrusting bevat energierisico's. Ontkoppel het systeem voordat u het onderhoudt. | ||
Varoitus | Tämän laitteen asennuksen, vaihdon tai huollon saa suorittaa ainoastaan koulutettu ja pätevä henkilökunta. Laitteessa on sähköiskuvaara. Irrota järjestelmä ennen huoltoa. | ||
Attention | Cet équipement ne doit être installé, remplacé ou entretenu que par du personnel d'entretien qualifié et formé. Cet équipement contient de l'énergie électrique potentiellement dangereuse. Débrancher le système avant tout entretien/révision. | ||
Warnung | Gerät nur von geschultem, qualifiziertem Personal installieren, auswechseln oder warten lassen. Im Gerät liegt gefährliche Spannung an. Vor allen Wartungsarbeiten Gerät vom Netz trennen. | ||
Avvertenza | Questo apparato può essere installato, sostituito o revisionato solo da personale qualificato e competente. Questo apparecchio presenta pericolo di scosse elettriche. Scollegare il sistema prima di procedere alla revisione. | ||
Advarsel | Dette utstyret skal bare monteres, skiftes ut eller vedlikeholdes av kvalifisert personell som har gjennomgått opplæring. Det kan være fare for elektrisk støt forbundet med dette utstyret. Kople fra systemet før igangsetting av vedlikeholdsarbeid. | ||
Aviso | Apenas pessoal treinado e qualificado deve ser autorizado a instalar, substituir ou fazer a revisão deste equipamento. Este equipamento constitui risco de choque eléctrico. Desligar o sistema antes de efectuar qualquer serviço de revisão. | ||
¡Advertencia! | Solamente el personal calificado debe instalar, reemplazar o reparar este equipo, ya que existe riesgo de descarga eléctrica. Desenchufe el sistema antes de proceder al mantenimiento del mismo. | ||
Varning! | Endast utbildad och behörig personal får utföra installation, utbyte eller service av denna utrustning. Denna utrustning kan medföra fara för elstöt. Koppla ifrån systemet innan service utförs. | ||
| |||
Waarschuwing | Tijdens onweer dat gepaard gaat met bliksem, dient u niet aan het systeem te werken of kabels aan te sluiten of te ontkoppelen. | ||
Varoitus | Älä työskentele järjestelmän parissa äläkä yhdistä tai irrota kaapeleita ukkosilmalla. | ||
Attention | Ne pas travailler sur le système ni brancher ou débrancher les câbles pendant un orage. | ||
Warnung | Arbeiten Sie nicht am System und schließen Sie keine Kabel an bzw. trennen Sie keine ab, wenn es gewittert. | ||
Avvertenza | Non lavorare sul sistema o collegare oppure scollegare i cavi durante un temporale con fulmini. | ||
Advarsel | Utfør aldri arbeid på systemet, eller koble kabler til eller fra systemet når det tordner eller lyner. | ||
Aviso | Não trabalhe no sistema ou ligue e desligue cabos durante períodos de mau tempo (trovoada). | ||
¡Advertencia! | No operar el sistema ni conectar o desconectar cables durante el transcurso de descargas eléctricas en la atmósfera. | ||
Varning! | Vid åska skall du aldrig utföra arbete på systemet eller ansluta eller koppla loss kablar. | ||
| |||
| Antenna Gain (dBi) | EIRP (dBm) | EIRP (W) | Minimum Acceptable Distance under FCC Rules - Uncontrolled Environment (m) | Minimum Acceptable Distance under FCC Rules - Controlled Environment (m) |
|---|---|---|---|---|
10 | 43 | 20.0 | 0.4 | 20 cm |
11 | 44 | 25.1 | 0.4 | 20 cm |
12 | 45 | 31.6 | 0.5 | 20 cm |
13 | 46 | 39.8 | 0.6 | 0.3 |
14 | 47 | 50.1 | 0.6 | 0.3 |
15 | 48 | 63.1 | 0.7 | 0.3 |
16 | 49 | 79.4 | 0.8 | 0.4 |
17 | 50 | 100.0 | 0.9 | 0.4 |
18 | 51 | 125.9 | 1.0 | 0.4 |
19 | 52 | 158.5 | 1.1 | 0.5 |
20 | 53 | 199.5 | 1.3 | 0.6 |
21 | 54 | 251.2 | 1.4 | 0.6 |
22 | 55 | 316.2 | 1.6 | 0.7 |
23 | 56 | 398.1 | 1.8 | 0.8 |
24 | 57 | 501.2 | 2.0 | 0.9 |
25 | 58 | 631.0 | 2.2 | 1.0 |
26 | 59 | 794.3 | 2.5 | 1.1 |
27 | 60 | 1000.0 | 2.8 | 1.3 |
28 | 61 | 1258.9 | 3.2 | 1.4 |
29 | 62 | 1584.9 | 3.6 | 1.6 |
30 | 63 | 1995.3 | 4.0 | 1.8 |
Waarschuwing | Binnen een bepaalde afstand tot het centrale punt van de antenne kan sprake zijn van stralingsgevaar. In tabel ziet u de verhouding tussen antennevermogen (in dBi) en minimaal aan te houden afstand volgens FCC-voorschriften. Bepaal het vermogen van de antenne en kijk vervolgens in de tabel welke afstand tot het centrale punt van de antenne minimaal moet worden aangehouden. |
| Antennevermogen (dBi) | EIRP (dBm) | EIRP (W) | Minimaal aan te houden afstand volgens FCC-voorschriften - Ongecontroleerde omgeving (meters) | Minimaal aan te houden afstand volgens FCC-voorschriften - Gecontroleerde omgeving (meters) |
|---|---|---|---|---|
10 | 43 | 20.0 | 0.4 | 20 cm |
11 | 44 | 25.1 | 0.4 | 20 cm |
12 | 45 | 31.6 | 0.5 | 20 cm |
13 | 46 | 39.8 | 0.6 | 0.3 |
14 | 47 | 50.1 | 0.6 | 0.3 |
15 | 48 | 63.1 | 0.7 | 0.3 |
16 | 49 | 79.4 | 0.8 | 0.4 |
17 | 50 | 100.0 | 0.9 | 0.4 |
18 | 51 | 125.9 | 1.0 | 0.4 |
19 | 52 | 158.5 | 1.1 | 0.5 |
20 | 53 | 199.5 | 1.3 | 0.6 |
21 | 54 | 251.2 | 1.4 | 0.6 |
22 | 55 | 316.2 | 1.6 | 0.7 |
23 | 56 | 398.1 | 1.8 | 0.8 |
24 | 57 | 501.2 | 2.0 | 0.9 |
25 | 58 | 631.0 | 2.2 | 1.0 |
26 | 59 | 794.3 | 2.5 | 1.1 |
27 | 60 | 1000.0 | 2.8 | 1.3 |
28 | 61 | 1258.9 | 3.2 | 1.4 |
29 | 62 | 1584.9 | 3.6 | 1.6 |
30 | 63 | 1995.3 | 4.0 | 1.8 |
Varoitus | Tietyllä etäisyydellä antennin ympärillä voi olla säteilyvaara. Taulukossa yhdistetään antennin vahvistus (dBi) FCC:n sääntöjen mukaiseen hyväksyttävään vähimmäisetäisyyteen. Määritä antennin vahvistus ja katso taulukosta hyväksyttävä vähimmäisetäisyys antennin keskiöstä. |
| Antennin vahvistus (dBi) | EIRP (dBm) | EIRP (W) | FCC:n sääntöjen mukainen hyväksyttävä vähimmäisetäisyys - valvomaton ympäristö (m) | FCC:n sääntöjen mukainen hyväksyttävä vähimmäisetäisyys - valvottu Ympäristö (m) |
|---|---|---|---|---|
10 | 43 | 20.0 | 0.4 | 20 cm |
11 | 44 | 25.1 | 0.4 | 20 cm |
12 | 45 | 31.6 | 0.5 | 20 cm |
13 | 46 | 39.8 | 0.6 | 0.3 |
14 | 47 | 50.1 | 0.6 | 0.3 |
15 | 48 | 63.1 | 0.7 | 0.3 |
16 | 49 | 79.4 | 0.8 | 0.4 |
17 | 50 | 100.0 | 0.9 | 0.4 |
18 | 51 | 125.9 | 1.0 | 0.4 |
19 | 52 | 158.5 | 1.1 | 0.5 |
20 | 53 | 199.5 | 1.3 | 0.6 |
21 | 54 | 251.2 | 1.4 | 0.6 |
22 | 55 | 316.2 | 1.6 | 0.7 |
23 | 56 | 398.1 | 1.8 | 0.8 |
24 | 57 | 501.2 | 2.0 | 0.9 |
25 | 58 | 631.0 | 2.2 | 1.0 |
26 | 59 | 794.3 | 2.5 | 1.1 |
27 | 60 | 1000.0 | 2.8 | 1.3 |
28 | 61 | 1258.9 | 3.2 | 1.4 |
29 | 62 | 1584.9 | 3.6 | 1.6 |
30 | 63 | 1995.3 | 4.0 | 1.8 |
Attention | Des risques d'irradiation sont possibles dans un rayon spécifique autour de l'antenne. Le tableau associe le gain d'antenne (exprimé en dBi) à une distance minimale acceptable conformément aux normes de la FCC. Évaluez le gain d'antenne et utilisez le tableau 1 pour déterminer la distance minimale acceptable de l'antenne. |
| Gain d'antenne (dBi) | PIRE (dBm) | PIRE (W) | Distance minimale acceptable conformément aux normes de la FCC - Environnement non contrôlé (m) | Distance minimale acceptable conformément aux normes de la FCC - Environnement contrôlé (m) |
|---|---|---|---|---|
10 | 43 | 20.0 | 0.4 | 20 cm |
11 | 44 | 25.1 | 0.4 | 20 cm |
12 | 45 | 31.6 | 0.5 | 20 cm |
13 | 46 | 39.8 | 0.6 | 0.3 |
14 | 47 | 50.1 | 0.6 | 0.3 |
15 | 48 | 63.1 | 0.7 | 0.3 |
16 | 49 | 79.4 | 0.8 | 0.4 |
17 | 50 | 100.0 | 0.9 | 0.4 |
18 | 51 | 125.9 | 1.0 | 0.4 |
19 | 52 | 158.5 | 1.1 | 0.5 |
20 | 53 | 199.5 | 1.3 | 0.6 |
21 | 54 | 251.2 | 1.4 | 0.6 |
22 | 55 | 316.2 | 1.6 | 0.7 |
23 | 56 | 398.1 | 1.8 | 0.8 |
24 | 57 | 501.2 | 2.0 | 0.9 |
25 | 58 | 631.0 | 2.2 | 1.0 |
26 | 59 | 794.3 | 2.5 | 1.1 |
27 | 60 | 1000.0 | 2.8 | 1.3 |
28 | 61 | 1258.9 | 3.2 | 1.4 |
29 | 62 | 1584.9 | 3.6 | 1.6 |
30 | 63 | 1995.3 | 4.0 | 1.8 |
Warnung | In einem bestimmten Umkreis des Antennenmittelpunkts besteht Strahlungsgefahr. In Tabelle ist die Antennenverstärkung (in dBi) in Zusammenhang mit der zulässigen Mindestentfernung laut Bestimmungen der FCC (Bundes-Kommunikations- Kommission der USA) angegeben. Bestimmen Sie die Verstärkung der Antenne, und finden Sie anhand von Tabelle die zulässige Mindestentfernung vom Antennenmittelpunkt heraus. |
| Antennenverstärkung (dBi) | EIRP (dBm) | EIRP (W) | Zulässige Mindestentfernung nach FCC-Bestimmungen - Unkontrollierte Umgebung (m) | Zulässige Mindestentfernung nach FCC-Bestimmungen - Kontrollierte Umgebung (m) |
|---|---|---|---|---|
10 | 43 | 20.0 | 0.4 | 20 cm |
11 | 44 | 25.1 | 0.4 | 20 cm |
12 | 45 | 31.6 | 0.5 | 20 cm |
13 | 46 | 39.8 | 0.6 | 0.3 |
14 | 47 | 50.1 | 0.6 | 0.3 |
15 | 48 | 63.1 | 0.7 | 0.3 |
16 | 49 | 79.4 | 0.8 | 0.4 |
17 | 50 | 100.0 | 0.9 | 0.4 |
18 | 51 | 125.9 | 1.0 | 0.4 |
19 | 52 | 158.5 | 1.1 | 0.5 |
20 | 53 | 199.5 | 1.3 | 0.6 |
21 | 54 | 251.2 | 1.4 | 0.6 |
22 | 55 | 316.2 | 1.6 | 0.7 |
23 | 56 | 398.1 | 1.8 | 0.8 |
24 | 57 | 501.2 | 2.0 | 0.9 |
25 | 58 | 631.0 | 2.2 | 1.0 |
26 | 59 | 794.3 | 2.5 | 1.1 |
27 | 60 | 1000.0 | 2.8 | 1.3 |
28 | 61 | 1258.9 | 3.2 | 1.4 |
29 | 62 | 1584.9 | 3.6 | 1.6 |
30 | 63 | 1995.3 | 4.0 | 1.8 |
Avvertenza | Potrebbe esistere un pericolo di radiazione all'interno di un raggio specifico attorno al punto centrale dell'antenna. La tabella associa l'aumento di potenza dell'antenna (in dBi) con una distanza accettabile minima secondo i regolamenti FCC. Determinare l'aumento di potenza dell'antenna e usare la tabella per individuare la distanza accettabile minima dal punto centrale dell'antenna. |
| Aumento di potenza dell'antenna (dBi) | EIRP (dBm) | EIRP (W) | Distanza minima accettabile secondo i regolamenti FCC - Ambiente non controllato (m) | Distanza minima accettabile secondo i regolamenti FCC - Ambiente controllato (m) |
|---|---|---|---|---|
10 | 43 | 20.0 | 0.4 | 20 cm |
11 | 44 | 25.1 | 0.4 | 20 cm |
12 | 45 | 31.6 | 0.5 | 20 cm |
13 | 46 | 39.8 | 0.6 | 0.3 |
14 | 47 | 50.1 | 0.6 | 0.3 |
15 | 48 | 63.1 | 0.7 | 0.3 |
16 | 49 | 79.4 | 0.8 | 0.4 |
17 | 50 | 100.0 | 0.9 | 0.4 |
18 | 51 | 125.9 | 1.0 | 0.4 |
19 | 52 | 158.5 | 1.1 | 0.5 |
20 | 53 | 199.5 | 1.3 | 0.6 |
21 | 54 | 251.2 | 1.4 | 0.6 |
22 | 55 | 316.2 | 1.6 | 0.7 |
23 | 56 | 398.1 | 1.8 | 0.8 |
24 | 57 | 501.2 | 2.0 | 0.9 |
25 | 58 | 631.0 | 2.2 | 1.0 |
26 | 59 | 794.3 | 2.5 | 1.1 |
27 | 60 | 1000.0 | 2.8 | 1.3 |
28 | 61 | 1258.9 | 3.2 | 1.4 |
29 | 62 | 1584.9 | 3.6 | 1.6 |
30 | 63 | 1995.3 | 4.0 | 1.8 |
Advarsel | Det kan være strålingsfare innen en viss radius rundt senterpunktet av antennen. Tabell sammenligner antennens kraft (in dBi) med den minste akseptable avstanden i henhold til FCC-direktivene. Finn ut antennens kraft og bruk Tabell til å lokalisere den minste akseptable avstanden fra senterpunktet av antennen. |
| Antennekraft (dBi) | EIRP (dBm) | EIRP (W) | Minste akseptable avstand ihht. FCC-direktiv - Ukontrollert miljø (m) | Minste akseptable avstand ihht. FCC-direktiv - Kontrollert Miljø (m) |
|---|---|---|---|---|
10 | 43 | 20.0 | 0.4 | 20 cm |
11 | 44 | 25.1 | 0.4 | 20 cm |
12 | 45 | 31.6 | 0.5 | 20 cm |
13 | 46 | 39.8 | 0.6 | 0.3 |
14 | 47 | 50.1 | 0.6 | 0.3 |
15 | 48 | 63.1 | 0.7 | 0.3 |
16 | 49 | 79.4 | 0.8 | 0.4 |
17 | 50 | 100.0 | 0.9 | 0.4 |
18 | 51 | 125.9 | 1.0 | 0.4 |
19 | 52 | 158.5 | 1.1 | 0.5 |
20 | 53 | 199.5 | 1.3 | 0.6 |
21 | 54 | 251.2 | 1.4 | 0.6 |
22 | 55 | 316.2 | 1.6 | 0.7 |
23 | 56 | 398.1 | 1.8 | 0.8 |
24 | 57 | 501.2 | 2.0 | 0.9 |
25 | 58 | 631.0 | 2.2 | 1.0 |
26 | 59 | 794.3 | 2.5 | 1.1 |
27 | 60 | 1000.0 | 2.8 | 1.3 |
28 | 61 | 1258.9 | 3.2 | 1.4 |
29 | 62 | 1584.9 | 3.6 | 1.6 |
30 | 63 | 1995.3 | 4.0 | 1.8 |
Aviso | Pode existir perigo de radiação dentro de um raio específico no ponto central da antena. A Tabela associa o ganho de antena (em dBi) a uma distância mínima aceitável de acordo com as normas FCC. Determine o ganho da antena e utilize a Tabela para localizar a distância mínima aceitável a partir do ponto central da antena. |
| Ganho de antena (dBi) | EIRP (dBm) | EIRP (W) | Distância mínima aceitável ao abrigo das normas FCC - Ambiente não controlado (m) | Distância mínima aceitável ao abrigo das normas FCC - Ambiente controlado (m) |
|---|---|---|---|---|
10 | 43 | 20.0 | 0.4 | 20 cm |
11 | 44 | 25.1 | 0.4 | 20 cm |
12 | 45 | 31.6 | 0.5 | 20 cm |
13 | 46 | 39.8 | 0.6 | 0.3 |
14 | 47 | 50.1 | 0.6 | 0.3 |
15 | 48 | 63.1 | 0.7 | 0.3 |
16 | 49 | 79.4 | 0.8 | 0.4 |
17 | 50 | 100.0 | 0.9 | 0.4 |
18 | 51 | 125.9 | 1.0 | 0.4 |
19 | 52 | 158.5 | 1.1 | 0.5 |
20 | 53 | 199.5 | 1.3 | 0.6 |
21 | 54 | 251.2 | 1.4 | 0.6 |
22 | 55 | 316.2 | 1.6 | 0.7 |
23 | 56 | 398.1 | 1.8 | 0.8 |
24 | 57 | 501.2 | 2.0 | 0.9 |
25 | 58 | 631.0 | 2.2 | 1.0 |
26 | 59 | 794.3 | 2.5 | 1.1 |
27 | 60 | 1000.0 | 2.8 | 1.3 |
28 | 61 | 1258.9 | 3.2 | 1.4 |
29 | 62 | 1584.9 | 3.6 | 1.6 |
30 | 63 | 1995.3 | 4.0 | 1.8 |
¡Advertencia! | Existe riesgo de radiación en un área específica alrededor del punto central de la antena. La Tabla asocia la ganancia de antena (en dBi) con una distancia mínima aceptable de acuerdo con las normas de la FCC. Determina la ganancia de la antena y utiliza la Tabla para establecer la distancia mínima aceptable desde el punto central de la antena. |
| Ganancia de la antena (dBi) | PIRE (dBm) | PIRE (W) | Distancia mínima aceptable según las normas de la FCC - Entorno sin control (m) | Distancia mínima aceptable según las normas de la FCC - Entorno controlado (m) |
|---|---|---|---|---|
10 | 43 | 20.0 | 0.4 | 20 cm |
11 | 44 | 25.1 | 0.4 | 20 cm |
12 | 45 | 31.6 | 0.5 | 20 cm |
13 | 46 | 39.8 | 0.6 | 0.3 |
14 | 47 | 50.1 | 0.6 | 0.3 |
15 | 48 | 63.1 | 0.7 | 0.3 |
16 | 49 | 79.4 | 0.8 | 0.4 |
17 | 50 | 100.0 | 0.9 | 0.4 |
18 | 51 | 125.9 | 1.0 | 0.4 |
19 | 52 | 158.5 | 1.1 | 0.5 |
20 | 53 | 199.5 | 1.3 | 0.6 |
21 | 54 | 251.2 | 1.4 | 0.6 |
22 | 55 | 316.2 | 1.6 | 0.7 |
23 | 56 | 398.1 | 1.8 | 0.8 |
24 | 57 | 501.2 | 2.0 | 0.9 |
25 | 58 | 631.0 | 2.2 | 1.0 |
26 | 59 | 794.3 | 2.5 | 1.1 |
27 | 60 | 1000.0 | 2.8 | 1.3 |
28 | 61 | 1258.9 | 3.2 | 1.4 |
29 | 62 | 1584.9 | 3.6 | 1.6 |
30 | 63 | 1995.3 | 4.0 | 1.8 |
Varning! | Strålningsrisk kan finnas inom en angiven omkrets runt antennens mittpunkt. Tabell visar riktfaktor (i dBi) med ett minsta godtagbart avstånd enligt FCC-reglerna. Avgör antennens riktfaktor och använd Tabell för att hitta minsta godtagbara avstånd från antennens mittpunkt. |
| Riktfaktor (dBi) | EIRP (dBm) | EIRP (W) | Minsta godtagbara avstånd enligt FCC-reglerna - Ej kontrollerad miljö (m | Minsta godtagbara avstånd enligt FCC-reglerna - Kontrollerad miljö (m) |
|---|---|---|---|---|
10 | 43 | 20.0 | 0.4 | 20 cm |
11 | 44 | 25.1 | 0.4 | 20 cm |
12 | 45 | 31.6 | 0.5 | 20 cm |
13 | 46 | 39.8 | 0.6 | 0.3 |
14 | 47 | 50.1 | 0.6 | 0.3 |
15 | 48 | 63.1 | 0.7 | 0.3 |
16 | 49 | 79.4 | 0.8 | 0.4 |
17 | 50 | 100.0 | 0.9 | 0.4 |
18 | 51 | 125.9 | 1.0 | 0.4 |
19 | 52 | 158.5 | 1.1 | 0.5 |
20 | 53 | 199.5 | 1.3 | 0.6 |
21 | 54 | 251.2 | 1.4 | 0.6 |
22 | 55 | 316.2 | 1.6 | 0.7 |
23 | 56 | 398.1 | 1.8 | 0.8 |
24 | 57 | 501.2 | 2.0 | 0.9 |
25 | 58 | 631.0 | 2.2 | 1.0 |
26 | 59 | 794.3 | 2.5 | 1.1 |
27 | 60 | 1000.0 | 2.8 | 1.3 |
28 | 61 | 1258.9 | 3.2 | 1.4 |
29 | 62 | 1584.9 | 3.6 | 1.6 |
30 | 63 | 1995.3 | 4.0 | 1.8 |
| |||
Waarschuwing | Voordat u een van de onderstaande procedures uitvoert, dient u te controleren of de stroom op het gelijkstroomcircuit is uitgeschakeld. Om u ervan te verzekeren dat alle stroom is UITgeschakeld, kiest u op het schakelbord de stroomverbreker die het gelijkstroom circuit bedient, draait u de stroomverbreker naar de UIT positie en plakt u de schakelaarhendel van de stroomverbreker met plakband in de UIT positie vast. | ||
Varoitus | Varmista ennen seuraavien toimenpiteiden suorittamista, että tasavirtapiirin virta on KATKAISTU. Varmistaaksesi, että virta on KATKAISTU täysin, paikanna tasavirrasta huolehtivassa kojetaulussa sijaitseva suojakytkin. Käännä suojakytkin KATKAISTU-asentoon. Teippaa suojakytkimen varsi niin, että kytkin pysyy KATKAISTU-asennossa. | ||
Attention | Avant d'effectuer l'une des procédures décrites ci-dessous, vérifiez que le circuit alimenté en courant continu n'est plus sous tension. Pour vous en assurer, localisez le disjoncteur situé sur le panneau de service du circuit en courant continu, désactivez-le (OFF) et, à l'aide d'un ruban adhésif, bloquez la poignée du disjoncteur en position OFF. | ||
Warnung | Vor Ausführung der folgenden Vorgänge ist sicherzustellen, daß der Transverter, mit dem Sie arbeiten, nicht mit Strom versorgt wird. Um sicherzustellen, daß der Strom abgestellt ist, machen Sie auf der Vorderseite der Schalttafel den Stromschalter für den Transverter ausfindig, stellen Sie den Schalter auf AUS, und kleben Sie den Schaltergriff mit Klebeband in der AUS-Stellung fest. | ||
Avvertenza | Prima di svolgere una qualsiasi delle procedure seguenti, verificare che il circuito in corrente continua non sia alimentato. Per verificare che tutta l'alimentazione sia scollegata (OFF), individuare l'interruttore automatico sul quadro strumenti che alimenta il circuito CC, mettere l'interruttore in posizione OFF e fissarlo con nastro adesivo in tale posizione. | ||
Advarsel | Før du utfører noen av disse prosedyrene, må du kontrollere at strømtilførselen til transformatoren du skal bruke, er slått AV. Dette gjøres ved å lokalisere strømbryteren foran på brytertavlen som betjener transformatoren, deretter trykker du bryteren inn i AV-stilling og fester bryteren med teip i AV-stilling. | ||
Aviso | Antes de executar qualquer um dos seguintes procedimentos, certifique-se de que a fonte de alimentação de corrente contínua para o transversor em que irá trabalhar está DESLIGADA. Para se certificar de que toda a alimentação para esse transversor foi DESLIGADA, localize o disjuntor no painel que alimenta esse transversor e coloque-o na posição OFF (Desligado) e, em seguida, segure o disjuntor nessa posição com fita isoladora. | ||
¡Advertencia! | Antes de proceder con los siguientes pasos, comprobar que la alimentación del circuito de corriente continua (CC) con el que se va a trabajar esté cortada (OFF). Para ello, localizar el interruptor de corriente en la parte frontal del panel que alimenta al circuito, cambiar el interruptor automático a la posición de Apagado (OFF) y sujetar con cinta adhesiva la palanca del interruptor automático en posición de Apagado (OFF). | ||
Varning! | Innan du utför någon av följande procedurer måste du kontrollera att strömförsörjningen till likströmskretsen är bruten. Kontrollera att all strömförsörjning är BRUTEN genom att slå AV det överspänningsskydd som skyddar likströmskretsen och tejpa fast överspänningsskyddets omkopplare i FRÅN-läget. | ||
| |||
Waarschuwing | Bij installatie of vervanging van het toestel moet de aardverbinding altijd het eerste worden gemaakt en het laatste worden losgemaakt. | ||
Varoitus | Laitetta asennettaessa tai korvattaessa on maahan yhdistäminen aina tehtävä ensiksi ja maadoituksen irti kytkeminen viimeiseksi. | ||
Attention | Lors de l'installation ou du remplacement de l'appareil, la mise à la terre doit toujours être connectée en premier et déconnectée en dernier. | ||
Warnung | Der Erdanschluß muß bei der Installation oder beim Austauschen der Einheit immer zuerst hergestellt und zuletzt abgetrennt werden. | ||
Avvertenza | In fase di installazione o sostituzione dell'unità, eseguire sempre per primo il collegamento a massa e disconnetterlo per ultimo. | ||
Advarsel | Når enheten installeres eller byttes, må jordledningen alltid tilkobles først og frakobles sist. | ||
Aviso | Ao instalar ou substituir a unidade, a ligação à terra deverá ser sempre a primeira a ser ligada, e a última a ser desligada. | ||
¡Advertencia! | Al instalar o sustituir el equipo, conecte siempre la toma de tierra al principio y desconéctela al final. | ||
Varning! | Vid installation eller utbyte av enheten måste jordledningen alltid anslutas först och kopplas bort sist. | ||
The following sections provide sources for obtaining documentation from Cisco Systems.
You can access the most current Cisco documentation on the World Wide Web at the following sites:
Cisco documentation and additional literature are available in a CD-ROM package, which ships with your product. The Documentation CD-ROM is updated monthly and may be more current than printed documentation. The CD-ROM package is available as a single unit or as an annual subscription.
Cisco documentation is available in the following ways:
If you are reading Cisco product documentation on the World Wide Web, you can submit technical comments electronically. Click Feedback in the toolbar and select Documentation. After you complete the form, click Submit to send it to Cisco.
You can e-mail your comments to bug-doc@cisco.com.
To submit your comments by mail, for your convenience many documents contain a response card behind the front cover. Otherwise, you can mail your comments to the following address:
Cisco Systems, Inc.
Document Resource Connection
170 West Tasman Drive
San Jose, CA 95134-9883
We appreciate your comments.
Cisco provides Cisco.com as a starting point for all technical assistance. Customers and partners can obtain documentation, troubleshooting tips, and sample configurations from online tools. For Cisco.com registered users, additional troubleshooting tools are available from the TAC website.
Cisco.com is the foundation of a suite of interactive, networked services that provides immediate, open access to Cisco information and resources at anytime, from anywhere in the world. This highly integrated Internet application is a powerful, easy-to-use tool for doing business with Cisco.
Cisco.com provides a broad range of features and services to help customers and partners streamline business processes and improve productivity. Through Cisco.com, you can find information about Cisco and our networking solutions, services, and programs. In addition, you can resolve technical issues with online technical support, download and test software packages, and order Cisco learning materials and merchandise. Valuable online skill assessment, training, and certification programs are also available.
Customers and partners can self-register on Cisco.com to obtain additional personalized information and services. Registered users can order products, check on the status of an order, access technical support, and view benefits specific to their relationships with Cisco.
To access Cisco.com, go to the following website:
The Cisco TAC website is available to all customers who need technical assistance with a Cisco product or technology that is under warranty or covered by a maintenance contract.
If you have a priority level 3 (P3) or priority level 4 (P4) problem, contact TAC by going to the TAC website:
P3 and P4 level problems are defined as follows:
In each of the above cases, use the Cisco TAC website to quickly find answers to your questions.
To register for Cisco.com, go to the following website:
http://www.cisco.com/register/
If you cannot resolve your technical issue by using the TAC online resources, Cisco.com registered users can open a case online by using the TAC Case Open tool at the following website:
http://www.cisco.com/tac/caseopen
If you have a priority level 1(P1) or priority level 2 (P2) problem, contact TAC by telephone and immediately open a case. To obtain a directory of toll-free numbers for your country, go to the following website:
http://www.cisco.com/warp/public/687/Directory/DirTAC.shtml
P1 and P2 level problems are defined as follows:

![]()
![]()
![]()
![]()
![]()
![]()
![]()
![]()
Posted: Fri Dec 15 10:18:25 PST 2000
Copyright 1989-2000©Cisco Systems Inc.