|
|

Table Of Contents
Troubleshooting Autonomous Access Points
Checking the Autonomous Access Point LEDs
Default SSID and Radio Behavior
Low Power Condition for Autonomous Access Points
Configuring Power Using the CLI
Configuring the Access Point System Power Settings Using a Browser
Resetting to the Default Configuration
Using the Web Browser Interface
Reloading the Access Point Image
Obtaining the Access Point Image File
Connecting to the Access Point Console Port
Obtaining the TFTP Server Software
Troubleshooting Autonomous Access Points
This chapter provides troubleshooting procedures for basic problems with the autonomous access point (model: AIR-AP1131AG or AIR-AP1131G). For the most up-to-date, detailed troubleshooting information, refer torefer to the Cisco Technical Support and Documentation website at the following URL:
http://www.cisco.com/en/US/products/hw/wireless/tsd_products_support_category_home.html
Sections in this chapter include:
•
Checking the Autonomous Access Point LEDs
•
•
•
•
•
•
Checking the Autonomous Access Point LEDs
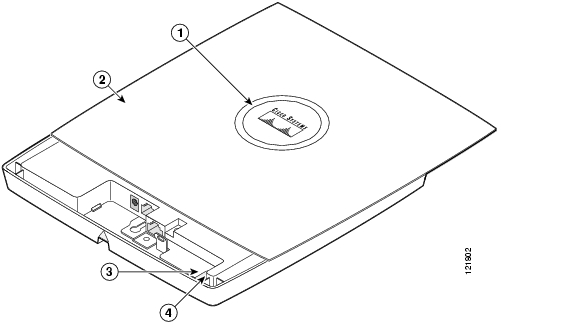
If your autonomous access point is not working properly, check the Status LED on the top panel or the Ethernet and Radio LEDs in the cable bay area. You can use the LED indications to quickly assess the unit's status. Figure 3-1 shows the access point LEDs (for additional information refer to the Event Log using the access point browser interface).
Figure 3-1 Access Point LEDs
Note
Note
Note
The LED signals are listed in Table 3-1.
Table 3-1 LED Signals
Status LED
Operating status
Green
—
—
Ethernet link is operational.
Blinking green
—
—
Transmitting or receiving Ethernet packets.
—
Blinking green
—
Transmitting or receiving radio packets.
—
—
Blinking
dark blueSoftware upgrade in progress
Association status
—
—
Light green
Normal operating condition, but no wireless client devices are associated with the unit.
—
—
Blue
Normal operating condition, at least one wireless client device is associated with the unit.
Cisco IOS errors
Blinking amber
—
—
Transmit or receive Ethernet errors.
—
Blinking amber
—
Maximum retries or buffer full occurred on the radio.
Red
Red
Amber
Software failure; try disconnecting and reconnecting unit power.
—
—
Amber
General warning, insufficient inline power (see the "Low Power Condition for Autonomous Access Points" section).
Boot loader status
Green
Green
Green
DRAM memory test ok.
Off
Blinking green
Blue-green
Initialize Flash file system.
Off
Green
Pink
Flash memory test ok.
Green
Off
Dark blue
Ethernet test ok.
Green
Green
Green
Starting Cisco IOS.
Boot loader warnings
Off
Off
Yellow
Ethernet link not operational.
Red
Off
Yellow
Ethernet failure.
Amber
Off
Yellow
Configuration recovery in progress
(Mode button pressed for 2 to 3 seconds).Off
Red
Pink
Image recovery
(Mode button pressed for 20 to 30 seconds).Blinking green
Red
Blinking pink and off
Image recovery in progress and Mode button is released.
Boot loader errors
Red
Red
Red
DRAM memory test failure.
Off
Red
Blinking red and blue
Flash file system failure.
Off
Amber
Blinking red and blue-green
Environment variable (ENVAR) failure.
Amber
Off
Blinking red and yellow
Bad MAC address.
Red
Off
Blinking red and off
Ethernet failure during image recovery.
Amber
Amber
Blinking red and off
Boot environment error.
Red
Amber
Blinking red and off
No Cisco IOS image file.
Amber
Amber
Blinking red and off
Boot failure.
Checking Basic Settings
Mismatched basic settings are the most common causes of lost connectivity with wireless clients. If the access point does not communicate with client devices, check the following areas.
Default IP Address Behavior
When you connect an 1130AG access point running Cisco IOS Release 12.3(2)JA or later software with a default configuration to your LAN, the access point requests an IP address from your DHCP server, and if it does not receive an IP address, it continues to send requests indefinitely.
Default SSID and Radio Behavior
In Cisco IOS Relese 12.3(2)JA2 and earlier, the access point radios are enabled by default and the default SSIDs are tsunami.
In Cisco IOS Release 12.3(4)JA and later, the access point radios are disabled by default, and there are no default SSIDs. You must create an SSID and enable the radio before the access point will allow wireless associations from other devices. These changes to the default configuration improve the security of newly installed access points. Refer to the Cisco IOS Software Configuration Guide for Cisco Aironet Access Points for instructions on configuring the SSID and the "Enable Radio Interfaces" section for instructions on enabling the radio interfaces.
Enable Radio Interfaces
To enable the radio interfaces, follow these instructions:
Step 1
Step 2
Step 3
Step 4
Step 5
Step 6
Step 7
Step 8
Step 9
Step 10
SSID
Wireless clients attempting to associate with the access point must use the same SSID as the access point. If a client device's SSID does not match the SSID of an access point in radio range, the client device will not associate. The access point default SSID is tsunami. Refer to the Cisco IOS Software Configuration Guide for Cisco Aironet Access Points for instructions on how to configure an SSID.
Note
WEP Keys
The WEP key you use to transmit data must be set up exactly the same on your access point and any wireless devices with which it associates. For example, if you set WEP Key 3 on your client adapter to 0987654321 and select it as the transmit key, you must also set WEP Key 3 on the access point to exactly the same value. The access point does not need to use Key 3 as its transmit key, however.
Refer to the Cisco IOS Software Configuration Guide for Cisco Aironet Access Points for instructions on setting the access point's WEP keys.
Security Settings
Wireless clients attempting to authenticate with your access point must support the same security options configured in the access point, such as EAP or LEAP, MAC address authentication, Message Integrity Check (MIC), WEP key hashing, and 802.1X protocol versions.
If a wireless client is unable to authenticate with your access point, contact the system administrator for proper security settings in the client adapter and for the client adapter driver and firmware versions that are compatible with the access point settings.
Note
Low Power Condition for Autonomous Access Points
Warning
The access point can be powered from the 48-VDC power module or from an in-line power source. The access point supports the IEEE 802.3af power standard, Cisco Pre-Standard PoE protocol, and Cisco Intelligent Power Management for in-line power sources.
For full operation, the access point requires 12.95 W of power. The power module and Cisco Aironet power injectors are capable of supplying the required power for full operation, but some inline power sources are not capable of supplying 12.95 W. Also, some high-power inline power sources, might not be able to provide 12.95 W of power to all ports at the same time.
Note
Note
On power up, the access point is placed into low power mode (both radios are disabled), Cisco IOS software loads and runs, and power negotiation determines if sufficient power is available. If there is sufficient power then the radios are turned on; otherwise, the access point remains in low power mode with the radios disabled to prevent a possible over-current condition. In low power mode, the access point activates the Status LED low power error indication, displays a low power message on the browser and serial interfaces, and creates an event log entry (see the "Checking the Autonomous Access Point LEDs" section and "Inline Power Status Messages" section).
Intelligent Power Management
The access point requires 12.95 W of power for full power operation with both radios, but only needs 6.3 W of power when operating in low power mode with both radios disabled. To help avoid an over-current condition with low power sources and to optimize power usage on Cisco switches, Cisco developed Intelligent Power Management, which uses Cisco Discovery Protocol (CDP) to allow powered devices (such as your access point) to negotiate with a Cisco switch for sufficient power.
The access point supports Intelligent Power Management and as a result of the power negotiations, the access point will either enter full power mode or remain in low power mode with the radios disabled.
Note
Some Cisco switches that are capable of supplying sufficient power require a software upgrade to support Intelligent Power Management. If the software upgrade is not desired, you can configure the access point to operate in pre-standard compatibility mode and the access point automatically enters full power mode if these Cisco switches are detected in the received CDP ID field.
When the access point determines that sufficient power is not available for full power operation, an error message is logged and the Status LED turns amber to indicate low power mode (see the "Checking the Autonomous Access Point LEDs" section and the "Inline Power Status Messages" section).
Tip
If your inline power source is not able to supply sufficient power for full operation, you should consider these options:
•
•
•
Inline Power Status Messages
These messages are logged on the console port by the access point to report the power condition:
•
•
•
•
•
•
•
HUB inline power source—This message indicates the access point is operating at full power because it has detected multiple Cisco devices. The access point power is being supplied from a power injector or a non-Cisco power source because a Cisco power source does not forward CDP packets.•
Note
•
Note
•
CONFIGURED <platform name> (<MAC address>)—This message indicates the access point is in low power mode with all radios disabled and has detected a CDP device that is unable to supply sufficient power to the access point.The< platform name> indicates the CDP device detected by the access point. The <MAC address> indicates the MAC address of the CDP device, typically, the switch port.
Note
Following the low power status message, two extra messages are displayed on the console port or when using a Telnet session that identify the actions needed to resolve this low power problem:
–
(where <platform name> indicates the CDP device detected by the access point and
<Ethernet port> indicates the Ethernet port of the CDP device.–
•
CONFIGURED_ON_ANOTHER_PORT <platform name> (<MAC address>)—This message indicates the access point is in low power mode with all radios disabled and has detected a CDP device that is unable to supply sufficient power to the access point. A power injector has been configured, but it is for another port. It is likely that the access point has been relocated and has not been reconfigured for a new power injector.The <platorm name> indicates the CDP device detected by the access point. The <MAC address> indicates the MAC address of the CDP device, typically, the switch port.
Note
Following the low power status message, two extra messages are displayed when using the console port or a Telnet session that identify the actions needed to resolve this low power problem:
1.
(where <platform name> indicates the CDP device detected by the access point and
<Ethernet port> indicates the Ethernet port of the CDP device.2.
•
The< platform name> indicates the Cisco platform detected by the access point. The <MAC address> indicates the MAC address of the switch port.
Note
•
Caution
Configuring Power Using the CLI
Intelligent Power Management support is dependent on the version of software resident in the Cisco switch that is providing power to the access point. Each Cisco switch should be upgraded to support Intelligent Power Management. Until the software is upgraded, you can configure the access point to operate with older Cisco switch software using the following Cisco IOS CLI command:
[no]power inline negotiation {prestandard source |injector {installed | override | H.H.H}}(prestandard source indicates the Cisco switch does not support Intelligent Power Management. injector installed indicates a power injector is installed on the current switch port. injector override indicates a power injector is installed and the access point is configured to override the inline power checks. When you move the access point, H.H.H is used to specify the MAC address of the new switch port where the access point was moved. A MAC address of 0.0.0 is invalid.)
Caution
Note
When using the p;ower inline negotiation injector override command, you must use a power injector to prevent possiblly overloading underpowered power sources.
You can use this Cisco IOS CLI command to inform the access point of the following:
•
•
•
Caution
Note
Refer to Table 3-2 for information on when to use this special Cisco IOS command and the corresponding Cisco switch power command.
Table 3-2 Using Cisco IOS Commands
AC power module
None required
power inline never
Cisco switch that supports Intelligent Power Management1
no power inline negotiation prestandard source
no power inline negotiation injector
power inline auto
Cisco switch that does not support Intelligent Power Management1
power inline negotiation prestandard source
no power inline negotiation injector
power inline auto
Power injector2 used with a Cisco switch that supports Intelligent Power Management1
None required3
power inline never4
Power injector2 used with a Cisco switch that does not support Intelligent Power Management1
no power inline negotiation prestandard source
power inline negotiation injector installed
power inline never
Power injector used with a non-Cisco switch
None required
-
802.3af compliant non-Cisco switches
None required
-
1 You should check the release notes for your Cisco power source to determine which Cisco IOS release supports Intelligent Power Management. Support for Intelligent Power Management might not be currently available for your Cisco power source.
2 Power injector must be AIR-PWRINJ3 or AIR-PWRINJ-FIB.
3 The Cisco switch uses Intelligent Power Management to inform the access point of the power injector being used.
4 Cisco switches that support Intelligent Power Management always configure the use of a power injector at the switch.
Issuing the Cisco IOS Command Using the CLI
Follow these steps to issue the Cisco IOS command for your power scenario:
Step 1
Step 2
•
•
•
•
Step 3
Step 4
Step 5
Step 6
Configuring the Access Point System Power Settings Using a Browser
You can also use your browser to set the access point System Power Settings.
Note
Note
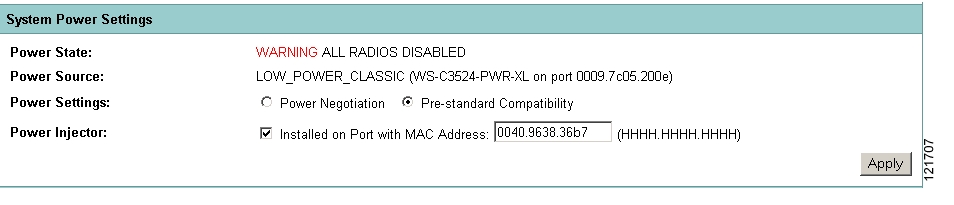
Figure 3-2 shows the system power setting options and indicates the power status of the access point.
Figure 3-2 System Power Settings
Caution
Table 3-3 lists the access point system power settings and the Cisco switch power commands for several power options.
Table 3-3 Access Point System Power Settings and Cisco Switch Commands
AC power module
Configuration changes are not required
power inline never
Cisco switch that supports Intelligent Power Management1
Power Settings:
Power Negotiation (selected)
Power Injector:
Installed on Port with MAC Address (unchecked)
power inline auto
Cisco switch that does not support Intelligent Power Management1
Power Settings:
Pre-standard Compatibility (selected)
Power Injector:
Installed on Port with MAC Address (unchecked)
power inline auto
Power injector2 used with a Cisco switch that supports Intelligent Power Management1
Power Settings:
Power Negotiation (selected)
Power Injector:
Installed on Port with MAC Address (unchecked)
power inline never3
Power injector2 used with a Cisco switch that does not support Intelligent Power Management1
Power Settings:
Power Negotiation (selected)
Power Injector:
Installed on Port with MAC Address (checked)
power inline never
Power injector used with a non-Cisco switch
Configuration changes are not required
-
802.3af compliant non-Cisco switches
Configuration changes are not required
-
1 You should check the release notes for your Cisco power source to determine which Cisco IOS release supports Intelligent Power Management. Support for Intelligent Power Management might not be currently available for your Cisco power source.
2 Power injector must be AIR-PWRINJ3 or AIR-PWRINJ-FIB.
3 Cisco switches that support Intelligent Power Management always configure the use of a power injector at the switch.
Follow these steps to configure your access point power settings using the browser interface:
Step 1
Step 2
a.
b.
Step 3
a.
b.
c.
Step 4
a.
b.
Note
Step 5
Step 6
Note
Running the Carrier Busy Test
You can use the carrier busy test to determine the least conjested channel for a radio interface (802.11g or 802.11a). You should typically run the test several times over several days to obtain the best results and to avoid temporary activity spikes.
Note
Note
Follow these steps to activate the carrier busy test:
Step 1
Step 2
Step 3
Step 4
Step 5
When the test completes, the results are displayed on the screen. For each of the channel center frequencies, the test produces a value indicating the percentage of time that the channel is busy.
Running the Ping Test
You can use the ping test to evaluate the link to and from an associated wireless device. The ping test provides two modes of operation:
a.
b.
Follow these steps to activate the ping test:
Step 1
Step 2
Step 3
Step 4
Step 5
a.
b.
Step 6
a.
b.
c.
When the test has completed, the test results are displayed at the bottom of the page. You should check for any lost packets that can indicate a problem with the wireless link. For best results, you should also perform this test several times.
Resetting to the Default Configuration
If you forget the password that allows you to configure the access point, you may need to completely reset the configuration. You can use the MODE button on the access point or the web-browser interface.
Note
For additional information on access point default behavior, refer to the "Default IP Address Behavior" section and the "Default SSID and Radio Behavior" section.
Using the MODE Button
Follow these steps to delete the current configuration and return all access point settings to the factory defaults using the MODE button:
Step 1
Step 2
Step 3
Step 4
Step 5
Note
Using the Web Browser Interface
Follow these steps to delete the current configuration and return all access point settings to the factory defaults using the web browser interface.
Step 1
Note
Note
Step 2
Step 3
Step 4
Step 5
Step 6
Step 7
Note
Step 8
Reloading the Access Point Image
If your access point has a firmware failure, you must reload the complete access point image file using the Web browser interface or by using the MODE button. You can use the browser interface if the access point firmware is still fully operational and you want to upgrade the firmware image. However, you can use the MODE button when the access point has a corrupt firmware image.
Using the MODE Button
You can use the MODE button on the access point to reload the access point image file from an active Trivial File Transfer Protocol (TFTP) server on your network or on a PC connected to the access point Ethernet port.
Note
Note
Follow these steps to reload the access point image file:
Step 1
Step 2
Step 3
Step 4
Step 5
Step 6
Step 7
Step 8
Step 9
Step 10
Web Browser Interface
You can also use the Web browser interface to reload the access point image file. The Web browser interface supports loading the image file using HTTP or TFTP interfaces.
Note
Browser HTTP Interface
The HTTP interface enables you to browse to the access point image file on your PC and download the image to the access point. Follow these instructions to use the HTTP interface:
Step 1
Note
Note
Step 2
Step 3
Step 4
Step 5
Step 6
Step 7
For additional information, click the Help icon on the Software Upgrade screen.
Browser TFTP Interface
The TFTP interface allows you to use a TFTP server on a network device to load the access point image file. Follow these instructions to use a TFTP server:
Step 1
Note
Note
Step 2
Step 3
Step 4
Step 5
Step 6
Step 7
Step 8
Step 9
Step 10
For additional information click the Help icon on the Software Upgrade screen.
Obtaining the Access Point Image File
The access point image file can be obtained from the Cisco.com software center using these steps:
Step 1
http://tools.cisco.com/support/downloads/pub/MDFTree.x?butype=wireless
Step 2
Step 3
Step 4
Step 5
Step 6
Step 7
Step 8
Step 9
Step 10
Step 11
Step 12
Step 13
Step 14
Step 15
Step 16
Step 17
Connecting to the Access Point Console Port
The console port is enabled during power up for diagnostic and monitoring purposes, which might be helpful if the access point is unable to associate to a controller. You can connect a PC to the console port using a DB-9 to RJ-45 serial cable.
Caution
Note
Follow these steps to view the power up sequences by connecting to the access point console port:
Step 1
Step 2
Figure 3-3 Console Port Location
Step 3
When you have finished using the console port, you must remove the serial cable from the access point.
Obtaining the TFTP Server Software
You can download TFTP server software from several web sites. Cisco recommends the shareware TFTP utility available at this URL:
Follow the instructions on the website for installing and using the utility.
![]()
![]()
![]()
![]()
![]()
![]()
![]()
![]()
Posted: Thu Apr 26 01:46:10 PDT 2007
All contents are Copyright © 1992--2007 Cisco Systems, Inc. All rights reserved.
Important Notices and Privacy Statement.