|
|

This chapter provides information how on to administer E-CDN application software. This chapter contains the following sections:
The System screen provides options for rebooting your device and reconfigure your system. (See Figure 4-1.) To reboot a CDN device, perform the following steps:
Step 2 Make sure that the correct device is displayed in the Device Selector drop-down list.
Step 3 To reboot the selected device, click System Reboot. It may take up to 10 minutes for your device to reboot.
Use any of the following procedures to reconfigure your Content Distribution Manager, Content Routers, and Content Engines when the Content Distribution Manager IP address has changed. It is critical that you have some plan for redirecting your Content Engines and Content Routers to your Content Distribution Manager before changing the Content Distribution Manager IP address, and that you monitor the status of your Content Engines and Content Routers throughout the transition period to confirm that all devices are ultimately able to connect to the Content Distribution Manager at its new address.
The four approved methods for reconfiguring your E-CDN application devices following a Content Distribution Manager change of address are:
 |
Note Refer to the Cisco Application and Content Networking Software Command Reference for a description of E-CDN CLI commands. Note that any settings in the E-CDN CLI commands must match corresponding settings in the E-CDN GUI-based interface. |
This reconfiguration option is available to customers using Domain Name System (DNS) to connect to their E-CDN application devices.
|
Note If you are using DNS, reconfiguring your Content Engines, Content Routers, and Content Distribution Manager using the DNS-based solution is preferable to the other methods discussed here, because it is simpler to implement and requires little or no administrative intervention. |
To reconfigure your Content Engines and Content Routers if you are using DNS, perform the following steps:
Step 2 Access the administrative user interface of your DNS server software and change the IP address of the Content Distribution Manager DNS name to match the new IP address of the Content Distribution Manager.
Step 3 Return to the Content Distribution Manager and choose
Devices > Device Editor > System. The System screen appears.
Step 4 Make sure that the Content Distribution Manager is listed in the Device Selector field. If it is not, expand the drop-down list and choose the Content Distribution Manager from the devices listed.
Step 5 Click System Reboot to reboot your Content Distribution Manager and reconnect it to your network using the new IP address.
Step 6 Wait until your Content Engine and Content Router devices are pointed to the new address of the Content Distribution Manager.
Approximately 45 minutes after your Content Distribution Manager comes back online at its new address and is no longer available at its prior address, your Content Engines and Content Routers will begin going offline. The Content Engines and Content Routers automatically use the DNS name of the Content Distribution Manager to locate the device at its new IP address.
Step 7 Click Device Console. Monitor your Content Engines and Content Routers and verify that each device is able to locate the Content Distribution Manager and come back online.
Step 8 If some devices are not able to resolve the new address, use the Installation Wizard to manually point them to the location of the Content Distribution Manager. See the "Installation Wizard-Based Reconfiguration" section. Refer to the Cisco Content Delivery Networking Products Getting Started Guide for more information about the Installation Wizard.
If you are not using DNS on your network, you can provide your Content Engines and Content Routers with the new address of the Content Distribution Manager using the Alternate IP Address field on the TCP/IP screen. This field stores the new address of the Content Distribution Manager before the Content Distribution Manager has actually changed addresses. Content Engines and Content Routers that are unable to connect to the Content Distribution Manager at its original address look for the alternate IP address, and then try to reach the Content Distribution Manager at that location.
To configure the alternate IP address for your Content Distribution Manager:
Step 2 Verify that the Content Distribution Manager appears in the Device Selector drop-down list. If the Content Distribution Manager does not appear, expand the drop-down list and choose the Content Distribution Manager.
Step 3 Click the Specify an IP address, port, subnet mask, and gateway option.
The current IP address of the Content Distribution Manager appears in the IP Address field.
Step 4 Without changing any of the information displayed, place the cursor in the Alternate IP Address field and enter the new IP address for the Content Distribution Manager in valid "dotted quad" format, for example:
Step 5 Click Save Changes to save the address.
Step 6 Wait approximately 1 hour before moving the Content Distribution Manager to the address you entered in the Alternate IP Address field.
When an hour has passed, you can change the actual Content Distribution Manager IP address by using the Content Distribution Manager Device Editor or the Cisco E-CDN application Installation Wizard, or by reconfiguring your DHCP server. Enter the new IP address of the Content Distribution Manager into the IP Address field in the TCP/IP screen. This address should match the address in the Alternate IP Address field.
See the "Editing TCP/IP Settings" section for further instructions on changing the IP address of CDN devices.
Step 7 Click Save Changes.
Step 8 Choose Devices > Device Editor > System. The System screen appears.
Step 9 Make sure that the Content Distribution Manager is listed in the Device Selector drop-down list. If it is not, expand the drop-down list and choose the Content Distribution Manager from the devices listed.
Step 10 Click System Reboot to reboot the Content Distribution Manager and reconnect it to your network using the new IP address.
Step 11 Wait for the Content Engine and Content Router devices to point to the new address of the Content Distribution Manager.
Approximately 45 minutes after your Content Distribution Manager comes back online at its new address and is no longer available at its prior address, your Content Engines and Content Routers will begin going offline. The Content Engines and Content Routers automatically use the DNS name of the Content Distribution Manager to resolve the address of the Content Distribution Manager to its new IP address.
Step 12 Click Device Console. Monitor your Content Engines and Content Routers and verify that each device is able to locate the Content Distribution Manager and come back online.
Step 13 If one or more devices are not able to resolve the new address of the Content Distribution Manager, use the Installation Wizard to manually point them to the location of the Content Distribution Manager. See the next section, "Installation Wizard-Based Reconfiguration."
The Cisco E-CDN application Installation Wizard can be used to reconfigure your Content Distribution Manager, Content Routers, or Content Engines. Use the Installation Wizard if you are unable to successfully move your Content Distribution Manager to a new IP address using the Content Distribution Manager user interface, or if one or more Content Engines failed to locate the Content Distribution Manager at its new address after you followed the instructions in the "DNS-Based Reconfiguration" section or the "Content Distribution Manager-Based Reconfiguration" section.
To manually reconfigure a Content Distribution Manager, Content Router, or Content Engine using the Installation Wizard, perform the following steps:
The Installation Wizard screen appears.
Step 2 Click Next to advance to the next step in the Installation Wizard.
The Select a Device screen lists all CDN devices on the subnet by their device ID or by a user-friendly name previously assigned using the Installation Wizard.
Step 3 Choose the first device you want to configure and click Next to advance to the next step in the Installation Wizard.
Step 4 If you have not already done so, enter a user-friendly name in the field provided.
This name supplements the alphanumeric device ID or MAC address and makes it easier to identify the device when you use the Installation Wizard or Content Distribution Manager user interface.
Step 5 Click Next to advance to the next step in the Installation Wizard.
The Content Distribution Manager screen appears.
Step 6 Use the fields provided to point your Content Engine or Content Router to the Content Distribution Manager's new IP address on your network. You must complete this step in order for your device to be able to communicate with the rest of the E-CDN application and begin receiving media. Do one of the following:
Step 7 Click Next to advance to the next step in the Installation Wizard to indicate whether or not you are using a DHCP server.
The Obtain Network Settings Automatically (DHCP) screen appears.
Step 8 Perform one of the following actions:
The Network Settings screen appears.
The DNS-Domain Name Server screen appears.
Step 9 Perform one of the following actions:
Click Next to advance to the next step in the Installation Wizard to identify your proxy server (if one exists).
The Proxy Server screen appears.
Step 10 Perform one of the following actions:
The Secure Proxy Server screen appears.
Step 11 Perform one of the following actions:
The Proxy Exceptions List screen appears.
Step 12 Perform one of the following actions:
The Proxy Exceptions screen appears.
Step 13 Review the configuration settings for your CDN device.
 |
Tip If you want to copy the information for use in another application, document, or e-mail, click Copy info to copy the configuration settings to your Windows clipboard. You can then paste the information into another Windows application. |
The Configuration Status screen appears.
Step 14 Perform one of the following actions:
|
Note It may take a few moments for the device to integrate the new configuration settings and come back online. Monitor the status messages provided in the Configuring screen and verify that your device is able to come online properly. |
The machine status indicator located beneath the Copy info button will turn green and read "online."
Step 15 Once the device status is "online," click More to return to the Select a Device screen and configure another of your CDN devices, or click Exit to close the Installation Wizard.
If the device fails to come online, click Back to step backward in the Installation Wizard and review your configuration settings.
After initial device configuration, the Content Distribution Manager user interface can be used to modify the configuration settings on any of your devices. See the "Setting Up Content Delivery Network Devices" section for detailed instructions on configuring your Content Distribution Manager, Content Routers, or Content Engines using the Content Distribution Manager user interface.
This section describes the procedure for moving Content Engines and Content Routers from one Content Distribution Manager administrative domain to another.
To move a device between administrative Content Distribution Manager domains, you must perform the following actions:
1. Reset the device to factory settings.
2. Remove the device from the current administrative Content Distribution Manager domain.
3. Assign a new administrative Content Distribution Manager domain, using the Installation Wizard graphical user interface (GUI) or ACNS 4.1 software command-line interface (CLI).
4. Approve the device in the new administrative Content Distribution Manager domain.
To reset the device to factory settings, perform the following steps:
where device-ip-address is the IP address of the device that you wish to move to a new domain.
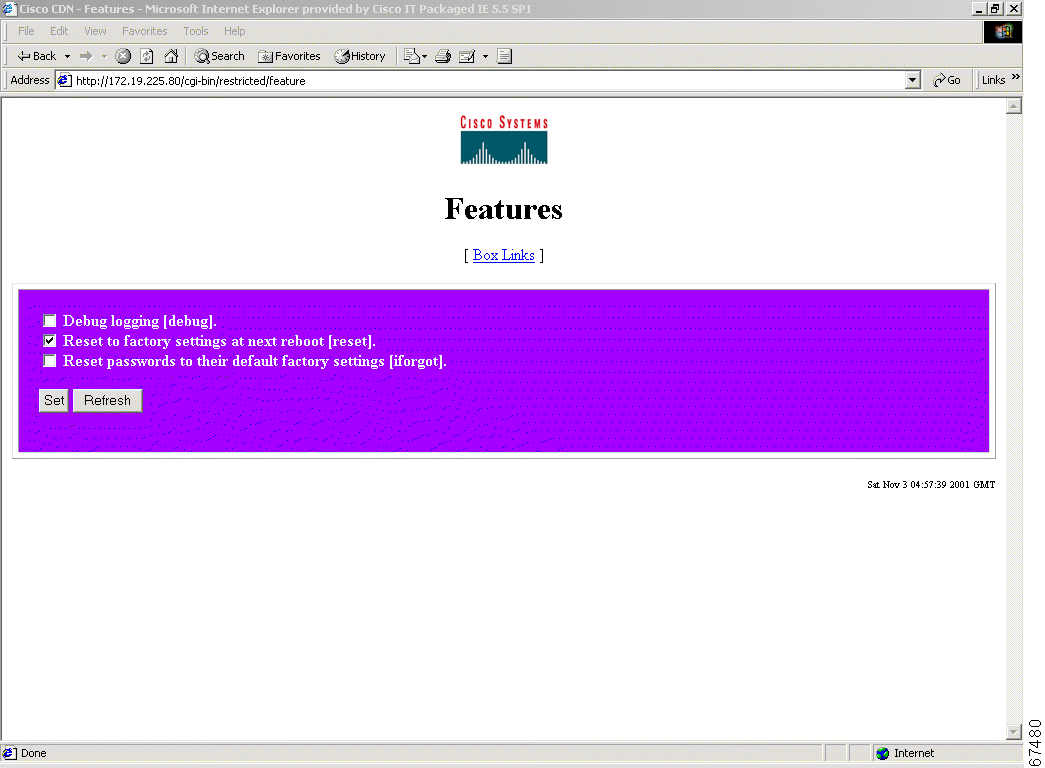
Step 2 Enter the administrator username and password and then click OK. The Features screen for the device appears. (See Figure 4-2.)
Step 3 On the Features screen, check the Reset to factory settings at reboot [reset] check box to reset the device to factory settings and click Set.
Step 4 Reset the device using one of the following methods:
where device-ip-address is the IP address of the device that you want to reboot.
To remove the device from the current administrative Content Distribution Manager domain, perform the following steps:
where cdm-ip-address is the IP address of the Content Distribution Manager currently associated with the device that is being moved to a new domain.
Step 2 Enter the administrator username and password and then click OK. The Cisco Content Distribution Manager screen appears.
Step 3 Click Device Console to view all devices associated with this Content Distribution Manager.
Step 4 On the Device Console screen, click the Edit button for the device that is being moved to a new domain. The Identification screen appears.
Step 5 On the Identification screen, click the Remove Device button.
Step 6 Click Yes to confirm removal of the device.
There are two ways to assign a new administrative Content Distribution Manager domain:
To assign a new administrative Content Distribution Manager domain using the Installation Wizard, perform the following steps:
Step 2 Locate the setup.exe file and double-click it to install the Installation Wizard.
Step 3 After the Installation Wizard has been automatically installed, go to C:/Program Files/Cisco Systems/CDN Wizard/cdnwiz.exe. Double-click the cndwiz.exe file to launch the Installation Wizard. The Cisco Content Delivery Network Installation Wizard screen appears.
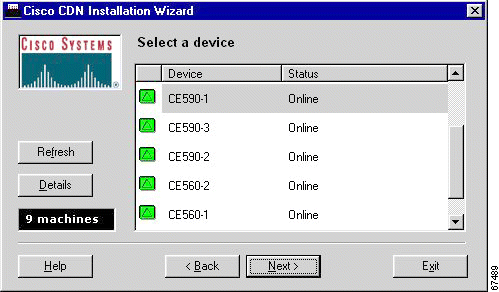
Step 4 Click Next to advance to the Select a Device screen, which lists all E-CDN application devices on the subnet by their device ID or by a user-friendly name previously assigned when the Installation Wizard was used to initially install the E-CDN application (See Figure 4-3.)
|
Note The Installation Wizard shows you only devices that are connected to the same local segment as the Windows PC that is running the Installation Wizard program. |
Step 5 When the device that you removed begins rebooting (because you reset the device to factory settings), a red circle appears next to the device name. After the device has rebooted and is running, a yellow triangle appears next to the device name in the Installation Wizard console with the following message:
Choose the device and click Next to advance to the Name screen.
Step 6 Click Next to accept the Name screen settings and advance to the Content Distribution Manager screen. (See Figure 4-4.)
Step 7 From the Content Distribution Manager screen, perform one of the following actions:
Step 8 If the port number of the Content Distribution Manager is other than the default of 80, enter the new port number in the field provided.
Step 9 Click Next to advance to the Obtain Network Settings Automatically (DHCP) screen.
Step 10 Click Next to accept the Obtain Network Settings Automatically (DHCP) screen settings and advance to the DNS-Domain Name System screen.
Step 11 Click Next to accept the DNS-Domain Name System screen settings and advance to the Proxy Server screen.
Step 12 Click Next to accept the Proxy Server screen settings and advance to the Secure Proxy Server screen.
Step 13 Click Next to advance to the Settings screen to review the configuration settings for your Content Engine or Content Router.
After you click Finish in the Installation Wizard, a status box appears with configuration information. Ultimately, you see the device status as "online." However, if the device is a new Content Engine or Content Router, or if it previously existed but was moved to a different Content Distribution Manager administrative domain, then it must first be approved within the Content Distribution Manager GUI before the device status changes to online.
Step 14 From the Configuration Status screen, perform one of the following actions:
You are now ready to approve the device in the new administrative domain using the Content Distribution Manager GUI.
To assign a new administrative Content Distribution Manager domain using the ACNS 4.1 software CLI, perform the following steps:
Step 2 Use the ecdn cdm ip command in global configuration mode to associate the device with the IP address and (optionally) the port number of the new Content Distribution Manager. For example,
You are now ready to approve the device in the new administrative domain using the Content Distribution Manager GUI.
To approve the device in the new administrative Content Distribution Manager domain, perform the following steps:
where cdm-ip-address is the IP address of the new Content Distribution Manager that you wish to associate with the device being moved.
Enter the administrator username and password and then click OK. The Cisco Content Distribution Manager screen appears.
Step 2 Choose Devices > Device Console to view all devices associated with the new Content Distribution Manager. (See Figure 4-6.)
Step 3 On the Devices Device Console screen, click the Edit button for the device that you moved to the Content Distribution Manager domain. The Device Editor Identification screen appears.
Step 4 On the Device Editor Identification screen, check the Approve check box and then click the Save Changes button.
Step 5 Choose Devices > Device Console to verify that the status of the device that you moved is online (a green light icon is displayed).
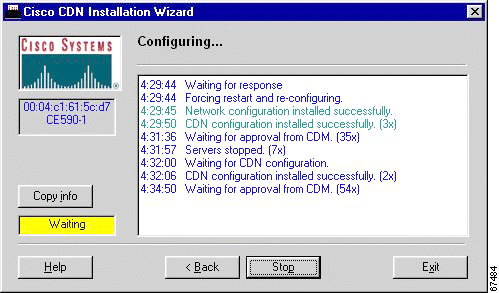
Step 6 You can also view the Configuration Status screen (see Figure 4-7) for that device in the Installation Wizard to confirm that the device was moved successfully. The following message indicates a successful move:
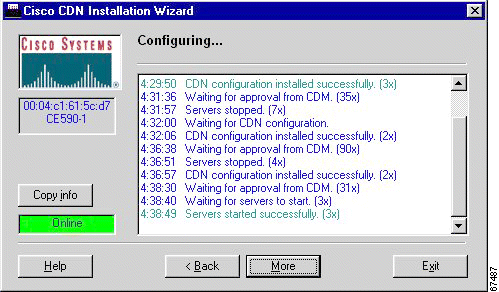
Step 7 Click Exit. The Select a Device screen appears. (See Figure 4-8.)
Step 8 Verify that the status of the device that you moved is online (a green triangle is next to the device name).
The Content Distribution Manager provides the capability for tape backup and restoration to protect against lost data and to provide service recovery.
We recommend that you do a backup before performing any software upgrades.
|
Note You must be running an X11 server on your PC client to use the Backup/Restore Utility (BRU). In this procedure, we use Reflection X as an example of an X11 server. |
To use the backup feature, perform the following steps:
Step 2 Load the DLT tape IV cartridge into the DLT7000 tape drive on your device.
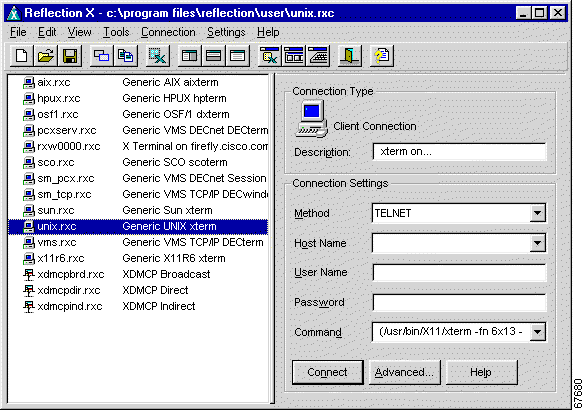
Step 3 In order to access the backup interface, you must first launch an X11 server application on your PC client. If you are using Reflection X, the X Client Manager screen appears. (See Figure 4-9.)
Step 4 Click Generic UNIX xterm.
Step 5 On the same PC client as your X11 server application, launch your web browser and enter the following URL, where cdm-ip-address is the IP address of the Content Distribution Manager that contains the tape backup hardware:
Enter the administrator username and password and then click OK. The Cisco Content Distribution Manager screen appears.
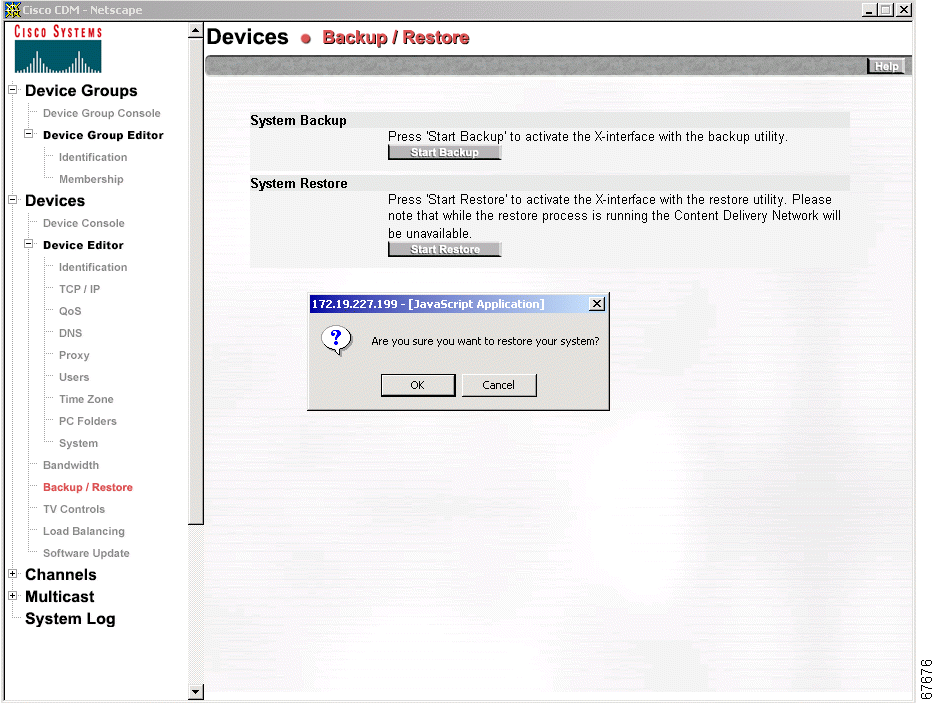
Step 6 Choose Devices > Backup/Restore. The Devices Backup/Restore screen appears. (See Figure 4-10.)
Step 7 On the Devices Backup/Restore screen, click the Start Backup button, and then click OK to confirm. The Backup/Restore Utility main screen may take up to a minute to open.
|
Note If the Backup/Restore Utility main screen does not appear, verify that you have an X11 server running on your PC. |
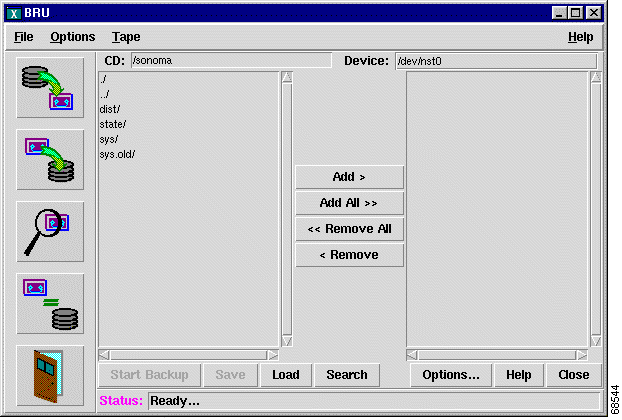
Step 8 The Backup/Restore Utility main screen appears. Click the first icon in the left column, which represents backing up from disk to tape. The File Listing screen appears. (See Figure 4-11.)
 |
Caution Do not click the Full button. Clicking the Full button automatically backs up temporary system files. If you then perform a restore operation, the temporary system files from the backup will overwrite any subsequent temporary system files. If this occurs, your system will fail. |
Step 9 You must perform the backup in the /sonoma directory. Choose all folders listed in the left-hand column that contain the name "state" and add them to the backup list. (Click Add to include these folders in the right-hand column backup list.)
|
Note In order to back up all of your data, you must add to the backup list all folders in the /sonoma directory that contain the name "state" (/sonoma/state, /sonoma/state1, and so forth). |
Step 10 Click Start Backup. The Backup Progress screen appears.
Step 11 On the Backup Progress screen, enter an archive label for your backup and restore tape that is shorter than 52 characters and then click Create Backup. The Backup Estimate screen appears. (See Figure 4-12.)
Step 12 The Backup/Restore Utility always estimates the number of cartridges necessary to complete the operation as one. Therefore, you must manually estimate the number of needed cartridges by dividing the total amount of data by 35 GB. Each cartridge can store up to 35 GB of data. Click Continue to begin the backup. The Backup Progress screen appears. (See Figure 4-13.)
The Status line at the bottom of the Backup/Restore Utility screen indicates the status of the backup.
Step 13 When the progress bar in the Backup Progress screen reaches 100 percent, the backup has been completed. Click the Done button and then remove the tape by pressing the unload button on the DLT7000 tape drive.
To use the restore feature, follow these steps:
Step 2 Click Generic UNIX xterm.
Step 3 Insert the tape cartridge containing the backup into the Content Distribution Manager.
Step 4 On the same PC client as your X11 server application, launch your web browser and enter the following URL, where cdm-ip-address is the IP address of the Content Distribution Manager that contains the tape backup hardware:
Enter the administrator username and password and then click OK. The Cisco Content Distribution Manager screen appears.
Step 5 Choose Devices > Backup/Restore. The Backup/Restore screen appears. (See Figure 4-10.)
Step 6 On the Backup/Restore screen, click the Start Restore button, and then click OK to confirm. The Backup/Restore Utility main screen may take up to a minute to open.
At this time, the Content Distribution Manager stops serving media to users.
|
Note If the Backup/Restore Utility main screen does not appear, verify that you have an X11 server running on your PC. |
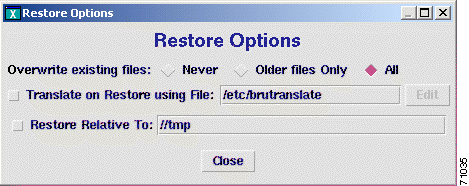
Step 7 To set the Restore option, choose Options > Restore Options to display the Restore Options screen. Change the Overwrite existing files option from Older files Only to All and click Close to save the changes. (See Figure 4-14.) The Backup/Restore Utility main screen appears.
Step 8 On the Backup/Restore Utility main screen, click the second icon in the left column, which represents restoring from tape to disk.
A Device Info screen appears on top of the Backup/Restore Utility main screen.
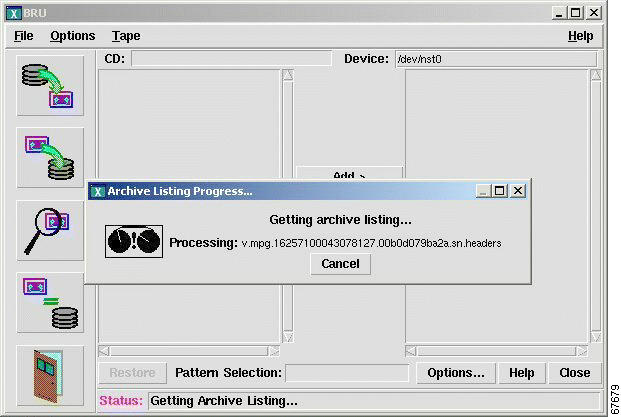
Step 9 On the Device Info screen, click OK. The Archive Listing Progress screen appears. (See Figure 4-15.)
Wait while the Backup/Restore Utility creates an archive listing.
Step 10 After the archive listing has appeared, click the Add All button to restore all files and then click the Restore button.
The Restore Progress screen appears and displays the files being restored. (See Figure 4-16.)
Step 11 When the restore process ends, this error message may appear:
Ignore this error message and click Cancel. The Backup/Restore Utility main screen remains.
Step 12 On the Backup/Restore Utility main screen, click the Done button.
Step 13 To exit the Backup/Restore Utility, click the icon representing an open door.
The Content Distribution Manager then reconciles all the records of the old Content Distribution Manager MAC address with the MAC address of the new Content Distribution Manager.
Step 14 Launch your web browser and enter the following URL, where cdm-ip-address is the IP address of the Content Distribution Manager that contains the tape backup hardware:
Enter the administrator username and password and then click OK. The Cisco Content Distribution Manager screen appears.
In the Content Distribution Manager GUI, verify the following items:
The following error message appears as a popup window. The message corresponds to an error condition encountered by the Content Distribution Manager in attempting to carry out a requested action.
Error Message Rewinding Failed! Perhaps you have an incorrect
setting for `rewindcmd' in your /etc/brutab file.
Explanation Generally, this message is displayed if the external DLT tape drive is not recognized by the Content Distribution Manager. If the Content Distribution Manager is rebooted when the DLT tape drive is powered off, the Content Distribution Manager does not recognize the tape drive. In Content Distribution Managers with internal tape drives, this message appears only if the tape drive is defective, if the power or SCSI cable needs to be reseated, or if the SCSI bus is not properly configured.
Recommended Action Insert the tape to fix the problem, and then reboot the Content Distribution Manager.
Explanation The tape drive is empty: the tape has not been inserted yet.
Recommended Action Check to see whether the tape has been inserted into the drive. If not, insert the tape.
Explanation The tape is dirty or the heads in the tape drive are dirty.
Recommended Action Use a cleaning tape to clean the heads.
Explanation For a CDM-4630 with an external tape drive, you must reboot the CDM-4630 while the tape drive is powered down.
Recommended Action Power up the tape drive and reboot the CDM-4630.
To maintain your DLT tape drive in good condition, use the cleaning cartridge provided with the DLT tape drive. An LED on the front of the DLT tape drive illuminates to indicate when it is time to use the cleaning cartridge.
The following files log ACNS 4.1 software information:
You can view system error messages from the System Log screen. If you perform an operation that fails, a file import for example, a message appears in the system log explaining why the import failed.
Once viewed, messages can be removed from the system log.
To view and remove system log error messages, perform the following steps:
Step 2 Check the check box next to error messages that you want to remove from the system log. Check All to choose all of the files or None to clear your selections.
Step 3 Click Remove.
The E-CDN application log contains detailed information regarding the E-CDN application and can be viewed in two different ways:
The content access log is located on the Content Distribution Manager and contains information regarding content that has been accessed through all Content Engines by a client through HTTP (Content Engine Play and Content Distribution Manager Play options), RealMedia (RealPlay option), or with the TV-out feature (in the case of Content Engines that support this feature).
The log file is created every day shortly after midnight and contains the following entries: content title, content identifier, client address, server name, server identifier, start time, end time, aborted, server type, and appliance IP address.
|
Note This log file does not contain access to WMT played content. For a log of WMT played content, see the WMT access log. |
The content access log can be accessed from a client through any of the following methods, where cdm-ip-address is the IP address of the Content Distribution Manager:
This log contains Windows Media Technologies (WMT) played content and is created at each individual device that streams Windows media. It is not included in the content access log.
This is a standard Windows Media type log file, conforming to the W3C standard for an enhanced log file. The contents of this log file are defined in each file's header as follows:
To access the file, use Windows to map a drive to the Content Engine and change to the vod_out directory.
|
Note For Windows NT, you may need to use the Content Distribution Manager user interface to create a user called "nobody" and log in as that user before mapping a drive from Windows to the Content Engine. |
![]()
![]()
![]()
![]()
![]()
![]()
![]()
![]()
Posted: Mon Mar 24 16:23:09 PST 2003
All contents are Copyright © 1992--2002 Cisco Systems, Inc. All rights reserved.
Important Notices and Privacy Statement.