|
|

Through the Content Distribution Manager user interface, you have complete control over media distribution on your Enterprise CDN. This chapter provides information on the basic procedures that apply to working with the E-CDN application, including how to import media, how to preview and edit media, how to replicate and manage media, and how to play video directly to a TV monitor.
This chapter contains the following sections:
Channels allow content to be organized into logical content groups. Once created, channels are subscribed to by Content Engines, which receive, store, and distribute the media imported to the channels.
Channels are created and reside on the Content Distribution Manager. It is not possible to create channels on Content Engines or Content Routers.
To add a channel, perform the following steps:
Step 2 Click Add Channel.
A new channel with the default name "Channel#" is added to the Channel Console list.
To assign a name to the new channel, see the "Editing a Channel" section .
To remove a channel, perform the following steps:
Step 2 Check the Remove check box next to the channel that you want to remove.
Step 3 Click Remove Channel.
If you are unclear about the meaning of a channel setting, see Table 3-1.
To edit a channel, perform the following steps:
Step 2 Click Edit next to the channel that you want to edit. The Channel Editor Channel Settings screen appears. (See Figure 3-1.)
Step 3 Enter or modify the channel settings as required.
Step 4 Click Save Changes.
 |
Note The multicast server referred to in the E-CDN application documentation is the Digital Fountain Server. Refer to the Digital Fountain documentation for procedures pertaining to the multicast server that cannot be performed through the Content Distribution Manager user interface. |
The multicast feature enables you to distribute media efficiently by allowing different devices to receive a stream of media content simultaneously. This is done by setting up a multicast address to which different devices, configured to receive content from the same channel, can subscribe. The delivering device sends content to this multicast address, from which it becomes available to all subscribed receiving devices. Setting up channels that are multicast-enabled allows you to conserve bandwidth.
To add a multicast server, perform the following steps:
Step 2 Click Add Multicast Server.
A new entry for a multicast server appears.
See the next section, "Editing Multicast Server Settings," to edit the settings of the new multicast server.
To edit the settings of a multicast server, perform the following steps:
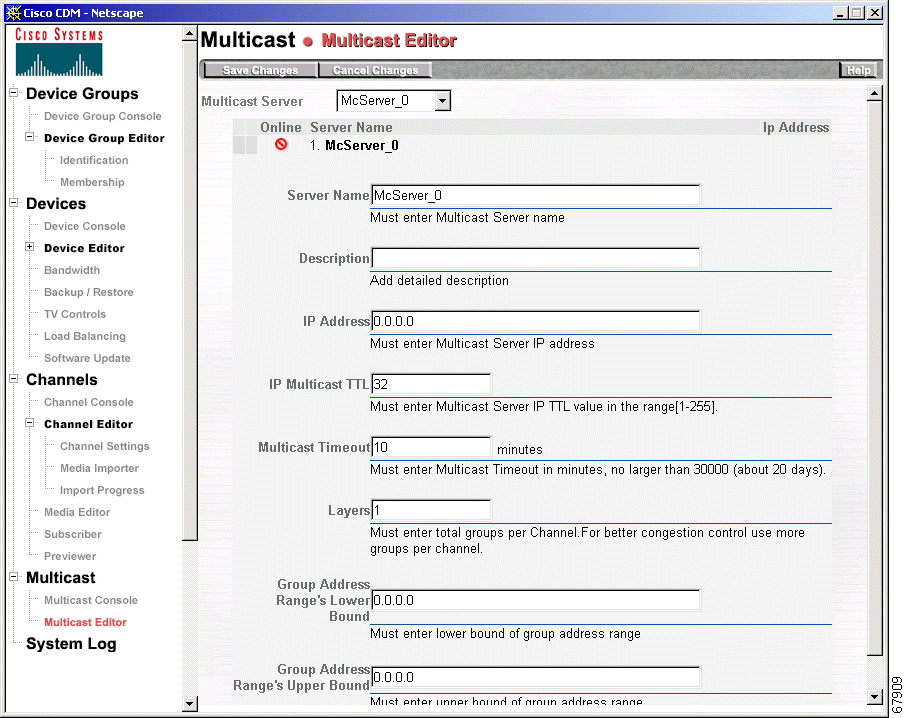
Step 2 Click the Edit button next to the multicast server whose settings you want to edit. The Multicast Editor screen appears. (See Figure 3-2.)
|
Note When editing multicast server settings, make sure that you are working with the correct server. To ensure that you are editing the correct multicast server, always go to the Multicast Console first and proceed from there. |
Step 3 Enter or modify the server settings as required.
Step 4 Click Save Changes to save the settings or click Cancel Changes to return to the default settings.
To remove a multicast server, perform the following steps:
Step 2 Check the Remove check box next to the multicast server that you want to remove.
Step 3 Click Remove Multicast Server.
Table 3-2 describes multicast server properties.
Table 3-2 Multicast Server Properties
Once you have created a content channel, you subscribe Content Engines to the channel. By subscribing a Content Engine to a channel, you ensure that media files in that channel are replicated to the subscribed Content Engine and that users desiring the content in the channel can be served from the device.
Content Routers do not distribute content to users and, with the exception of the MANUAL_UPGRADE channel, are not subscribed to content channels.
To assign a Content Engine to a channel, perform the following steps:
Step 2 Make sure that the correct channel is displayed in the Channel Selector drop-down list. If it is not, choose the correct channel from the drop-down list.
Step 3 Under the heading Unsubscribed Devices, check the check box next to each available Content Engine that you want to subscribe, or click All to select all of the available Content Engines; click None to clear your selections.
|
Note Content Routers appear on the list of devices only when the selected channel is the MANUAL_UPGRADE channel. Content Routers cannot subscribe to content channels other than the MANUAL_UPGRADE channel. |
Step 4 Click Subscribe to add the selected Content Engines to the list of those subscribed to the channel displayed in the Channel Selector drop-down list. Your selection is displayed in the list of subscribed Content Engines.
To remove a Content Engine from the subscribed list, perform the following steps:
Step 2 Make sure that the correct channel is displayed in the Channel Selector drop-down list. If it is not, choose the correct channel from the drop-down list.
Step 3 Under the heading Subscribed Devices, check the check box next to each Content Engine that you want to remove, or click All to choose all Content Engines on the list; click None to clear your selections.
Step 4 Click Unsubscribe.
The Content Engine is removed from the list of Content Engines subscribed to the selected channel and moved back to the Unsubscribed Devices list.
The process of importing new media to your E-CDN application is simple. New media files and folders are copied to a predetermined channel directory. Channel directories are named to correspond to the channel they represent, and are located within the Import directory on your Content Distribution Manager. (See Figure 3-4.)
Periodically, the Content Distribution Manager polls the Import directory. Media files placed in channel directories since the Content Distribution Manager's last polling are marked for import to the appropriate Content Distribution Manager channel. Once they are marked for import, the status of these media files can be viewed using the Import Progress option accessible from the Channels menu.
Once you have imported a file, you can preview the transferred file using the Previewer option on the Channels menu.
There are a number of ways to transfer media to your Content Distribution Manager for import to the E-CDN application. The approved methods for transferring media files and folders are:
When preparing your Content Distribution Manager to import media files that rely on nested directories of supporting files, all directory structures and supporting files must be copied to, or re-created in, the appropriate channel directory on the Content Distribution Manager. This ensures that during import, the Content Distribution Manager properly imports and stores both the media file and any supporting files required for proper playback.
|
Note Following import, all directories you created remain in the channel directory. These can either be left in place or deleted without affecting playback of the imported media. |
For example, if you are importing a Synchronized Multimedia Integration Language (SMIL) media file called myfile.smi, the home directory of the files might contain the media file (myfile.smi) at the root level as well as one or more nested folders containing sound, text, and video. Your channel directory must re-create this structure exactly.
You can use FTP to copy or move files and file directories to the designated channel directory within your Content Distribution Manager Import directory.
Before you transfer files and directories for import using FTP, you need to know the following:
To move or copy files using FTP, perform the following steps:
Step 2 Connect to your Content Distribution Manager.
|
Note If you are using a dedicated FTP application, create a new profile and fill in the Content Distribution Manager connection information, including the IP address, administrative username, and password. If your FTP application permits, enter /import as the initial directory. |
Step 3 When prompted, log on to your Content Distribution Manager using your administrative username and password.
Step 4 Navigate to the Import directory on your Content Distribution Manager and then to the channel directory for the channel into which you will be importing your media files. For example:
Step 5 If you are importing media that relies on nested directories for playback (such as SMIL files or Macromedia Director files), re-create the directory structure used by the files within your channel directory. You can accomplish this using your FTP client's "new folder" feature or you can create a folder manually, for example:
Step 6 Before transferring media files to your channel directory, verify that you are in "binary transfer" mode rather than ASCII. Many FTP applications use an "auto-detect" feature to determine how to send files. However, if you are provided with transfer options, make sure the "binary" option is selected, or manually type the command:
Step 7 Copy media files from their original location to the channel-specific Import directory on your Content Distribution Manager machine. If the media files you copied rely on nested directories, make sure that you have accurately re-created the nested directory structure in your channel import directory and that all dependent files are also copied to the appropriate subdirectory in your channel's Import directory.
Once you have copied media to your channel directory, wait for the Content Distribution Manager to detect the files and then begin the import process. You can view the progress of file imports by launching the Content Distribution Manager and choosing Channels > Channel Editor > Import Progress.
If your workstation is running Microsoft Windows and you can see the Content Distribution Manager device in the Windows Network Neighborhood or My Network Places, you can transfer files to the appropriate channel directory for import simply by dragging and dropping them using Windows Explorer. Files placed in a channel directory in this manner will automatically be imported to the appropriate Content Distribution Manager channel.
|
Note You must be using Microsoft Windows to drag and drop a file with Windows Explorer, and you must log on to the Content Distribution Manager using a CDN administrator account with the same login name as the account used to access your corporate LAN. This will enable you to access the Import directory when prompted. |
To drag and drop media files to your import folder, perform the following steps:
The instructions for importing media appear.
Under the heading "Using PC Folders for Importing," locate the name of the Content Distribution Manager machine on your network. The name appears in the format CISCO-[xxxx], where [xxxx] refers to the last four characters of the MAC address of the machine.
Step 2 Use Windows Explorer to navigate to the local or network directory containing the media files and directories that you wish to import.
Step 3 Choose the media files and any nested directories that you wish to import.
Step 4 Copy or cut the files you wish to import from their current location.
Step 5 Use Windows Explorer to locate the Content Distribution Manager machine on your LAN and navigate to the \import\channel_name directory, where channel_name is the name of the channel to which you will be importing your media files. If you are prompted to log in, enter the username and password for the CDN administrator account. Remember that the administrative username must match your network login in order to gain access to the import directory.
Step 6 Paste the files you cut or copied into the channel-specific import directory. Verify that all files you wish to import were copied. If you are importing directories, make sure that the full directory structure was copied along with its content.
Step 7 Once you have copied media to your channels import directory, wait for the Content Distribution Manager to detect the files and then begin the import process. You can view the progress of file imports by launching the Content Distribution Manager and choosing Channels > Channel Editor > Import Progress.
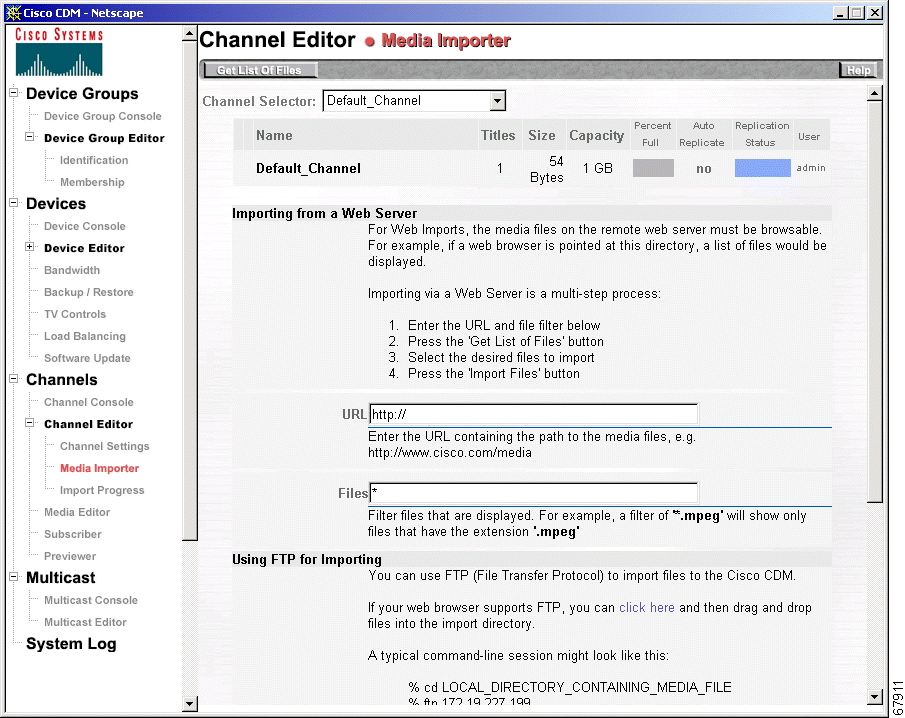
From the Media Importer screen, you can copy media files from a web server on the Internet. You must be able to browse and get a directory listing of the media files through the web server.
|
Note It is not possible to import directories to the Content Distribution Manager using the Importing from a Web Server option in the Media Importer. |
To access the Media Importer and initiate a web server transfer, perform the following steps:
Step 2 Make sure that the correct channel is displayed in the Channel Selector drop-down list. If it is not, choose the correct channel from the drop-down list. Some general information about the selected channel is displayed.
Step 3 In the URL field, enter the URL containing the path to the media files.
Step 4 In the Files field, specify the name or type of files that you want to import. What you enter here is used to build a list of files from which you select files to import.
Choose all media files by using the asterisk (*) in the Files field, or enter a filter for file types. For example, *.mpg will return all MPEG files in the directory you specified.
Step 5 Click the Get List of Files button.
A list of files matching the criteria you entered in the Files field appears.
Step 6 Choose the files you want to import, and then click Import Files.
Step 7 Choose Channels > Channel Editor > Import Progress to follow the file transfer progress. See the "Monitoring Progress" section for more detailed information.
In addition to the methods for importing media files outlined above, it is possible to edit channel content programmatically using simple scripts and HTML commands passed to a Common Gateway Interface (CGI) program named remoteCmd.
In order to take advantage of this feature, you must have the remoteCmd program installed on the machine serving as your Content Distribution Manager, and you must observe the syntax guidelines explained in the following sections when sending requests to the program.
When requests are received by the remoteCmd program, the program calls the web-based CDN import mechanism to handle the media.
Use the following syntax when creating an add-new-media request to programmatically place content in a channel import directory for upload to your Content Distribution Manager.
The procedure for removing content from a channel using the remoteCmd program is similar to that for adding new media to a channel.
Use the following syntax when creating a remove-media request:
For instructions on evaluating the status of your remove-media request after it has been sent, see the next section, "Evaluating the Status of Your Add or Remove Request ."
User requests to add media to a channel or remove media from a channel will result in either a success or an error message. The result of each request you make is captured in a STATUS field and can be displayed in one of three formats:
To display the status of your request, add the following statement at the end of your request URL, where format is replaced by one of the three format abbreviations outlined above:
For example, a sample remove request asking for results displayed using JavaScript might read:
The following message is returned if the request has been posted without error:
If an error is encountered, the error condition is returned in the STATUS field, along with other error message text.
To monitor the progress of a file transfer, perform the following steps:
Step 2 Status files are automatically updated every 10 seconds. Clicking Cancel Import cancels imports currently in progress.
You use the Content Distribution Manager Previewer option to preview your imported media before distributing these files throughout the CDN.
By clicking the thumbnail image representing a media file, you can play the file from your Content Distribution Manager to verify correct media content and quality before replicating the media file.
After replicating a media file, you can also play the file from a Content Engine. By clicking a thumbnail image or the CE Play link, media is streamed directly from the Content Engine using your preferred media server, for example, the RealMedia or Windows Media servers.
For RealServer playback, a RealServer G2 on the Content Engine streams the media. The RealServer G2 combined with the RealPlayer client on the desktop for playback provides the additional ability to fast-forward and rewind the file while viewing. Similarly, for Windows Media playback, the Windows Media Server running on the Content Engine combines with the Windows Media Player client to deliver viewing and playback options.
To access the Previewer and preview media directly from the Content Distribution Manager, perform the following steps:
Step 2 Click a channel icon to view the media files of the selected channel in a separate window. (See Figure 3-5.)
Step 3 Locate the media file that you wish to preview and click the CDM Preview link next to the media thumbnail image.
You are prompted for your username and password.
Step 4 Enter this information and click OK.
Media begins to play on your workstation's designated media player.
If an error message appears, see "Error Messages."
To view a media file after replication, perform the following steps:
Step 2 Click a channel icon to view the list of media file thumbnail images for the selected channel.
|
Note In order to be able to test Content Engine, RealServer, or WMT Server playback, the IP address of the machine your browser is running on must be in the coverage zone of a Content Engine. |
Step 3 A new window opens, displaying the media files in the selected channel. (See Figure 3-5.) Choose one of the four options for viewing media files:
The appropriate viewing client (for example, RealPlayer for RealServer, or the Windows Media Player for the WMT Server) opens. You may be prompted to enter your CDN username and password a second time before viewing the media file.
If an error message appears, see "Error Messages."
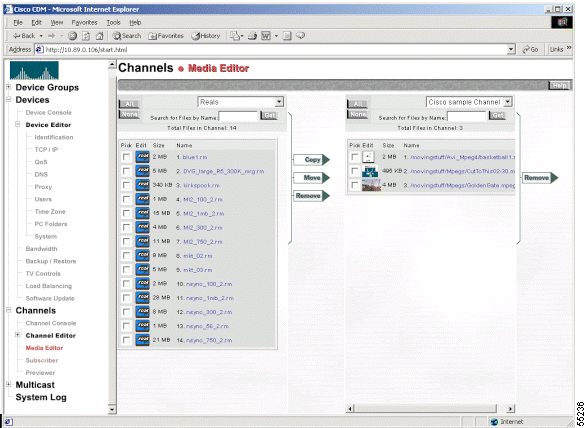
From the Channels Media Editor screen (see Figure 3-6), you can edit the data for your imported media before distributing these files throughout the Enterprise CDN. You can change media names, descriptions, bit rates, and thumbnail images; control media replication; and copy, move, and remove media files. See the "Replicating Media" section for more information. Table 3-3 provides details on the media file properties that can be modified when you edit media.
Table 3-3 Media File Properties
To edit a media name and description, bit rate, or thumbnail, perform the following steps:
Step 2 To search for a file, enter the full or partial name of the file in the Search for Files by Name field. If using the Netscape browser, click Get. If using the Internet Explorer browser, click Get or press the Enter key.
Step 3 Click the Edit thumbnail image for the media file you want to change or edit. Fields for the media file's properties appear. (See Table 3-3.)
Step 4 Enter the new name, description, bit rate, or thumbnail.
|
Note Changing the name also changes the playback URL and invalidates existing web pages that use the old name. |
Step 5 Click Save Changes.
Clicking Cancel Changes returns all values to their previous settings when you last clicked Save Changes.
To copy media from channel to channel, perform the following steps:
Step 2 From the drop-down list on the left, choose the channel from which you want to copy media.
Step 3 To search for a file, enter the full or partial name of the file in the Search for Files by Name field. If using the Netscape browser, click Get. If using the Internet Explorer browser, click Get or press the Enter key.
Step 4 Check the Pick check box next to each file that you want to copy.
Step 5 Click All to choose all of the files or None to clear your selections.
Step 6 From the drop-down list on the right, choose the channel into which you want to copy media.
Step 7 Click Copy.
To move media from channel to channel, perform the following steps:
Step 2 From the drop-down list on the left, choose the channel from which you want to move media.
Step 3 To search for a file, enter the full or partial name of the file in the Search for Files by Name field. If using the Netscape browser, click Get. If using the Internet Explorer browser, click Get or press the Enter key.
Step 4 Check the Pick check box next to each file that you want to move. Click All to choose all of the files or None to clear your selections.
Step 5 From the drop-down list on the right, choose the channel into which you want to copy media.
Step 6 Click Move.
To remove media from a channel, perform the following steps:
Step 2 Make sure that the correct channel is displayed in the appropriate drop-down list box. If it is not, choose the correct channel from the list.
Step 3 To search for a file, enter the full or partial name of the file in the Search for Files by Name field. If using the Netscape browser, click Get. If using the Internet Explorer browser, click Get or press the Enter key.
Step 4 Check the Pick check box next to each file that you want to remove. Click All to select all of the files or None to clear your selections.
Step 5 Click Remove. You are prompted to confirm that you want to remove the selected media.
For any given media file, the Content Distribution Manager administrator has the ability to define custom HTML error pages for the following error conditions:
|
Note A coverage zone is the area that a Content Engine is authorized to serve based upon IP address, typically the local portion of your intranet or subnet. |
Before defining custom HTML error messages for the above conditions, create the HTML pages that will be displayed.
To select a file for each of the above conditions, performing the following steps:
Step 2 Make sure that the correct channel is displayed in the drop-down list. If it is not, choose the correct channel from the drop-down list.
Step 3 Click Edit for the file you want to edit.
Fields displaying the media file properties are displayed.
See Table 3-3for a description of each option.
Step 4 Go to the section labeled Custom HTML Error Pages and enter the necessary alternative URL in the text fields provided.
Using a process called replication, the Content Distribution Manager distributes media to each Content Engine in the network. Once accessed in the Media Editor, individual media files can be replicated from the Content Distribution Manager to a selected Content Engine device.
|
Note To mark content within a channel for replication, the Content Engine must be subscribed to the channel. |
To replicate individual media files from a CDN channel to subscribed Content Engines, perform the following steps:
Step 2 Make sure that the correct channel is displayed in the appropriate drop-down list. If it is not, choose the correct channel from the drop-down list.
Step 3 Click the Edit thumbnail image for the file you want to edit.
Fields displaying the media file properties are displayed.
See Table 3-3 for a description of each option.
Step 4 Check the Replicate check box.
Step 5 Click Save Changes.
Clicking Cancel Changes returns all values to their previous settings when you last clicked Save Changes.
The selected file is replicated to all Content Engines subscribed to that channel.
To replicate all media currently in a channel to subscribed Content Engines, perform the following steps:
Step 2 Make sure that the correct channel is displayed in the Channel Selector field. If it is not, choose the correct channel from the drop-down list.
Some general information about the selected channel is displayed.
Step 3 Click Replicate All Media.
When the Content Distribution Manager replicates files to the Content Engines, filenames that contain special characters may be altered. Some special characters are removed from the filename; others are replaced with different characters. Table 3-4 summarizes how special characters in filenames are handled during replication.
If a filename does not contain an extension and all the characters in the filename are removed, the file is renamed "content." For example, a file named & would be renamed content, but a file named &.txt would be renamed .txt.
Table 3-4 Special Characters in Filenames
| Special Character | Is Removed | Is Replaced with | Is Unchanged |
|---|---|---|---|
|
Note These instructions allow you to only remove content from the subscribed Content Engine on this channel. Content from the Content Distribution Manager is not removed. To remove content from the Content Distribution Manager, see the "Removing Media from a Channel" section. |
To remove all media currently in a channel from a subscribed Content Engine, perform the following steps:
Step 2 Make sure that the correct channel is displayed in the Channel Selector field. If it is not, choose the correct channel from the drop-down list.
Some general information about the selected channel is displayed.
Step 3 Click Remove All Media.
You are prompted to confirm your decision to remove all media files from this channel.
Step 4 Click OK.
Once you have successfully imported media files to the channels established on the Content Distribution Manager, you are ready to link that content to your website or corporate LAN.
|
Note To import media files to the Content Distribution Manager, choose Channels > Channel > Editor Import Media. See the "Importing Media" section for more information. |
To embed CDN media URLs in web pages, perform the following steps:
Step 2 Click a channel thumbnail image to view the media files that have been added to that channel.
A separate browser window opens, listing all media files subscribed to that channel.
Step 3 Choose the desired URL that appears to the right of the filename for the media.
Step 4 Right-click and choose Copy. Alternatively, right-click the Content Distribution Manager Preview hypertext link for the media file, and choose the Copy Shortcut option from the menu that appears.
Step 5 With the URL for the media copied to your clipboard, open the HTML editor used to maintain your web pages.
Step 6 Locate the position on the web page where you wish the link to the CDN media to appear.
Step 7 Create a new HTML anchor link at the proper location that points to the CDN media. Your link should be in the format:
where "URL" is the URL you copied from the Channel Previewer and image_or_text_file_name is the content the user clicks to activate the CDN media link.
Step 8 Paste the URL you copied into the tag so that the link points to the CDN media. Then save the changes you made to the web page and post the page to the Internet or your intranet.
Content Engines equipped with an integrated Moving Picture Experts Group 1 (MPEG-1) decoder can play media files using National Television Standards Committee (NTSC) or Phase Alternation Line (PAL) video signals. This enables the Content Engine to play video directly to a TV monitor in applications such as kiosks, cable TV systems, and video walls. Playback is controlled from any web browser and has VCR-like controls, including the ability to create looping playlists.
|
Note To use the video-out feature, you must have a device with an integrated MPEG decoder card. |
Content Engines can be configured to output video using either the NTSC or PAL standard.
To designate the video format that will be used when delivering content from a Content Engine to a video device, perform the following steps:
Step 2 Choose the name of the Content Engine that you wish to modify from the Device Selector drop-down list.
Step 3 Click Video Type and choose the correct video output format for the device you are using. Your options are NTSC or PAL. NTSC is the default.
Step 4 Click Save Changes.
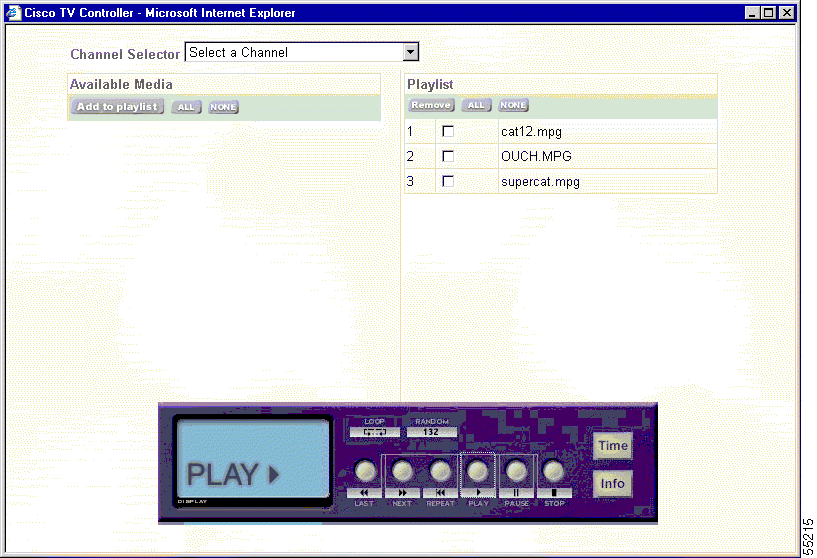
Playlists enable you to pull together series of media files from different channels and play them in a defined order on any video-out enabled device.
To access the TV controller from the Content Distribution Manager user interface and add media to a playlist, perform the following steps:
Step 2 Click the name of the Content Engine that you want to access. Each Content Engine name is a link.
Step 3 Enter your username and password.
The Content Distribution Manager TV controller appears in a separate window. (See Figure 3-7.)
Step 4 Make sure that the correct channel is displayed in the Channel Selector drop-down list. If it is not, choose the correct channel from the drop-down list.
Step 5 Under the heading Available Media, check the check box next to each available media file that you want to add to the playlist. Click All to choose all of the files or None to clear the selections.
Step 7 To add media from another channel to the playlist, click the Channel Selector drop-down list and choose a different channel, and then repeat Step 5 through Step 6.
Once you have created your playlist, click the PLAY button on the TV controller to play the media files on the playlist. Use the NEXT, LAST, and REPEAT buttons to move from file to file within the playlist.
See the next section, "Setting the Start and Stop Times for Media Playlists," for information on setting a schedule for your media playlist.
To access the playlist time controls and set a schedule of dates on which to play back your media playlist, perform the following steps:
Step 2 Once you have created your playlist, click the Time button on the TV controller console. The playlist time list appears and, below it, controls for scheduling playback times.
Step 3 In the time controls, place the cursor in the Month field in the row labeled Start time and enter the number of the month on which the scheduled media playback begins.
Step 4 Press the Tab key to move the cursor forward, and enter the remaining playback information.
All information must be in numeric format, though it is not necessary to use leading zeros. Click the AM or PM button to indicate what time of day you wish the playlist to start. For example, a Start time of 6:20 p.m. on October 5, 2000 would appear as:
Step 5 Repeat Step 3 and Step 4 for the row labeled Stop time to set the time at which the playlist will discontinue playback.
Step 6 Click Save Changes to add the start time and stop time you specified to the playlist time list. The times will appear on the list at the top of the TV Controller screen.
Clicking Cancel Changes resets the start time and stop time without adding any new playback times to the playlist time list.
Playlist playback times cannot be edited once they are created. To modify a playlist playback time, delete the time setting you wish to change and add a new setting with the correct times specified.
To modify the playlist time list, perform the following steps:
Step 2 With your time settings selected, click Remove to remove the time settings from the playlist time list. Click Remove All to delete all time settings from the playlist time list regardless of whether they are selected or not.
Step 3 You are prompted to confirm your decision to remove playback time settings. Click OK to confirm your choice or Cancel to return to the TV Controls screen without removing any time settings.
Step 4 See the "Building a Media Playlist for the TV Controller" section to create a time setting on your playlist with the correct start time and stop time.
To access the TV controller from the Content Distribution Manager and remove media from a playlist, perform the following steps:
Step 2 Choose a Content Engine name. If multiple TV out-enabled Content Engines are available, make sure to choose the correct Content Engine.
The Content Distribution Manager TV controller appears. (See Figure 3-7.)
Step 3 Make sure that the correct channel is displayed in the Channel Selector drop-down list. If it is not, choose the correct channel from the drop-down list.
Step 4 Under the heading Playlist, check the check box next to each playlist file that you want to remove from the playlist. Click All to choose all of the files or None to clear your selections.
Step 5 Click Remove.
Once you have created a media playlist using the TV controller, you can play the list of media at any time or schedule playback to occur on specific days and at predetermined times.
To display media from your playlist on a TV-out enabled device, perform the following steps:
Step 2 Using the TV controller console, click the Play button. If you want the TV controller to loop through the playlist without stopping, click the LOOP button on the console.
The TV controller display changes to indicate that the looping feature is enabled. While the looping feature is enabled, the TV controller plays all media files on the playlist in succession. Click the LOOP button a second time to toggle off the looping feature.
Step 3 To prevent a media file from being played, check the box next to the filename on the playlist and click Remove. The file is removed from the playlist.
To view information about a video that is playing, perform the following steps:
Step 2 With a media file from the playlist playing, click Info on the TV controller. You will see information on the file that is currently playing appear on the TV Controls screen.
This section describes how to perform the following tasks using the TV controller:
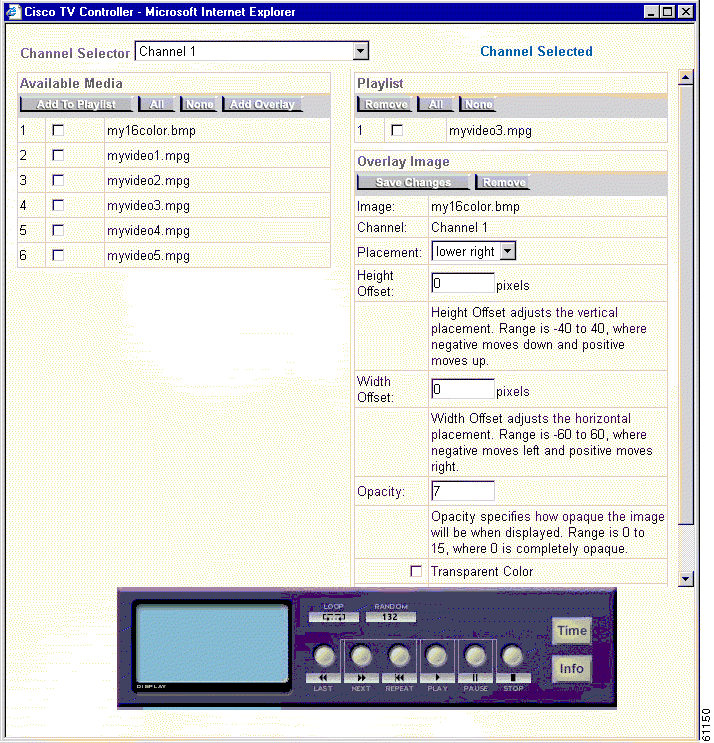
You can associate one overlay image with each playlist. The end user sees this image displayed in a determinable screen location when the playlist it is associated with is playing. This feature is useful for displaying logos.
You must first create a playlist to be able to associate an overlay image with it. For instructions on how to create a playlist using the TV controller, see the "Adding Programs to the Playlist" section.
To add an overlay image from the Content Distribution Manager, perform the following steps:
Step 2 Click the TV-out enabled device that has the playlist to which you want to add an overlay image.
Step 3 If prompted, enter a username and password and click OK.
Step 4 From the Channel Selector drop-down list, choose the channel that contains the image file you wish to use as an overlay image. A list of available media appears on the left.
Step 5 Check the check box next to the image file that you want to use as an overlay image.
Step 6 Click the Add Overlay button. The names of the image file and the channel from which it is obtained appear under the heading Overlay Image, which appears under the list of files with the heading Playlist.
You can now edit the parameters of the overlay image by specifying and adjusting where on the TV monitor it should appear, specifying the overall opacity of the image, and choosing whether or not you want to set one color to be transparent. For information on how to change the parameters, see the "Removing an Overlay Image from a Playlist" section or the "Changing the Parameters of a Playlist Overlay Image Using the TV Controller" section.
Step 2 Click the TV-out enabled device that has the playlist whose overlay image you want to modify.
Step 3 If prompted, enter a username and password.
Step 4 Under the Overlay Image heading, modify the parameters described in Table 3-5.
Table 3-5 Overlay Image Parameters
This section describes how to perform the following tasks using the TV controller and playlist programmatically:
To add a list of media files from a channel to the play list, enter the following URL:
To delete the list of media files belonging to the playlist, enter the following URL:
To clear the playlist, enter the following URL:
CE_IP is the IP address of the Content Engine.
To define start and stop times for playing the playlist, enter the following URL:
|
Note The start or stop time (in seconds from epoch) must be based on accurate Greenwich mean time (GMT)/Coordinated Universal Time (UTC); this is then translated into the local time of the TV-out device. |
To remove defined schedules from the playlist, enter the following URL:
|
Note The start or stop time (in seconds from epoch) must be based on accurate Greenwich mean time (GMT)/Coordinated Universal Time (UTC); this is then translated into the local time of the TV-out device |
To clear all schedules defined for the playlist, enter the following URL:
CE_IP is the IP address of the Content Engine.
To play the programs from the playlist, enter the following URL:
CE_IP is the IP address of the Content Engine.
To stop playback, enter the following URL:
CE_IP is the IP address of the Content Engine.
To pause playback, enter the following URL:
CE_IP is the IP address of the Content Engine.
To play the next program, enter the following URL while the playlist is playing:
CE_IP is the IP address of the Content Engine.
To play the previous program, enter the following URL while the playlist is playing:
CE_IP is the IP address of the Content Engine.
To restart playback, enter the following URL:
CE_IP is the IP address of the Content Engine.
To set the playlist to loop to the beginning of the playlist when it reaches the end, enter the following URL:
CE_IP is the IP address of the Content Engine.
flag is set to 1 or 0, to enable or disable the loop setting, respectively.
To set the playlist to play programs in random order, enter the following URL:
CE_IP is the IP address of the Content Engine.
flag is set to 1 or 0, to enable or disable the random order setting, respectively.
By default, Soft Stop is not enabled and the STOP command causes the currently playing video to abort before the playlist has been stopped. If you enable Soft Stop, a STOP command stops the currently playing song immediately, or stops after the currently playing song ends. To enable Soft Stop, enter the following URL:
CE_IP is the IP address of the Content Engine.
flag is set to 1 or 0, to enable or disable the Soft Stop setting, respectively.
You must first create a playlist to be able to associate an overlay image with it. For instructions on how to create a playlist using the TV controller, see the "Adding Programs to the Playlist" section.
To add an overlay image to a playlist and set its properties, enter the following URL:
CE_IP is the IP address of the Content Engine.
channel_name is the name of the channel from which the overlay image file is to be added to the playlist.
file_name is the name of the overlay image file.
placement is the region of the display where the overlay image should appear. Options are:
height_offset adjusts placement along the vertical axis. The valid range is from -40 to 40 pixels.
width_offset adjusts placement along the horizontal axis. The valid range is from -60 to 60 pixels.
opacity adjusts the opacity of the overlay image. The valid range is from 0 to 15.
transparent_color_flag is set to 1 or 0 to enable or disable the use of transparency, respectively. When enabled, the color of the pixel in the lower-left corner of the image is transparent over the entire image. When a transparency-enabled image is placed over a video, the background color of the overlay image is not visible against the video playing behind it. This is useful if you want to use a nonrectangular image as your overlay.
To remove an overlay image file from a playlist, enter the following URL:
CE_IP is the IP address of the Content Engine.
channel_name is the name of the channel from which the overlay image file is to be removed from the playlist. Because only one overlay image file is supported at any time, this is optional.
file_name is the name of the overlay image file to be removed from the playlist Because only one overlay image file is supported at any time, this is optional.
You can modify the properties of an overlay image while the playlist is playing, but the modified settings do not take effect until the next video in the playlist starts playing. To modify the properties of an overlay image, enter the following URL:
CE_IP is the IP address of the Content Engine.
channel_name is the name of the channel from which the overlay image file was added to the playlist.
file_name is the name of the overlay image file.
placement is the region of the display where the overlay image should appear. Your options are:
height_offset adjusts placement along the vertical axis. The valid range is from -40 to 40 pixels.
width_offset adjusts placement along the horizontal axis. The valid range is from -60 to 60 pixels.
opacity adjusts the opacity of the overlay image. The valid range is from 0 to 15.
transparent_color_flag is set to 1 or 0 to enable or disable the use of transparency, respectively. When enabled, the color of the pixel in the lower-left corner is transparent over the entire image.
This section discusses live splitting for both RealServer and WMT broadcasts. It also discussses enabling CDN back-channel multicasting on a LAN.
|
Note For information about enabling RealSubscriber and setting up a publisher RealServer, refer to the Cisco Content Delivery Networking Products Getting Started Guide. RealSubscriber is simply another name for RealServer that runs in a subscriber-only mode. |
To use the E-CDN application to split live RealServer broadcasts, the client (Content Engine) must specify the URL in the following format to contact the Content Distribution Manager:
http://<cdm_ip_address:cdm_port>/Cisco/<StudioID>/<ChannelID>/RealLive/
<source_IP>:<source_port>/<source_mount_point>/<source_filename>
http://mycdm.mycompany.com:80/Cisco/0002b31b62cb/RealLive/
realserver.mycompany.com:554/encoder/Livestream
|
Note RealSubscriber only works on streams where the origin RealServer has the Stream Splitting option enabled. |
For live streaming to work, the local Content Engine must be subscribed to the channel listed in the URL. The Content Distribution Manager automatically redirects the client to link to the split stream on a local Content Engine.
The first time the Content Engine receives a request, there will be an initial transaction between the Content Engine and the RealServer to establish the data flow for the split stream. Subsequent client requests will not require this transaction to recur.
This allows multiple clients to request the same content while not consuming more bandwidth on the back end than a single client would require.
By default, clients receive the split stream from the Content Engine by unicast. To multicast the split stream from the Content Engine to clients that are configured to receive multicast, the RealServer multicast feature can be enabled on the Content Engine.
For more information, see the next section, "Enabling CDN Back-Channel Multicasting on a LAN."
The Cisco E-CDN application includes support for LAN-based back-channel multicasting of media as part of its support for RealNetworks' RealServer
Version 8.01.
This feature, which is built into the RealServer Version 8.01 release, enables CDN installations to conserve network bandwidth by sending a single media stream to multiple clients on a LAN, rather than streaming media to each requesting client individually.
Back-channel multicasting streams content between the RealServer and clients while maintaining a simultaneous accounting control channel between each client and the RealServer. This extra control channel is used to transmit authentication information as well as client commands like "start" and "stop." Back-channel multicasting enables the RealServer to track client behavior and display statistics during viewing, including real-time data on the number of clients receiving a presentation.
Once enabled, back-channel multicasting is applied to all streams broadcast from your RealServer. Clients that have been preconfigured to use multicasting will do so, maximizing the bandwidth available to multicasting and unicasting clients alike.
Although you typically use the built-in administrative features of the RealServer to configure multicasting, it is possible to enable multicasting remotely from your Content Distribution Manager interface.
To use the Content Distribution Manager to enable multicasting:
where your_Content_Distribution_Manager_ip_address represents the IP address or DNS domain name of your Content Distribution Manager.
Step 2 With the Enable Multicast options displayed in your browser window, click the Enable Multicast drop-down list and choose Yes.
This enables the multicasting feature on the RealServer used by your Content Distribution Manager.
Step 3 In the IP Address Range fields, enter the range of addresses to which you will be sending multicast streams.
Step 4 Remember that broadcasts of video content require two addresses—one for video content and one for audio content. The RealServer uses the first available address in the range you specify. Refer to the RealServer Administration Guide Version 8.0 at the following URL for more information: http://www.service.real.com/help/library/guides/server8/realsrvr.htm .
Step 5 Set the maximum distance that streamed packets can travel over a network, as measured in hops from one multicast-enabled router to another, by entering a Time To Live value in the Time to Live field provided.
Each time a multicast data packet passes through a multicast-enabled router, its Time To Live value is decreased by 1. Once the value reaches 0, the multicast-enabled router discards the packet.
|
Note For typical networks, a Time To Live value of 16 is adequate to keep packets within the network. |
Step 6 Click Set when you are finished.
The multicast settings are saved back to the RealServer used by your Content Distribution Manager.
|
Note For information on enabling a WMT license, refer to the Cisco Content Delivery Networking Products Getting Started Guide. |
An E-CDN application user who does not have WCCP may require splitting of live requests for better performance. Such splitting is done by a Content Engine that is preferably nearest to the client. Dynamic routing of live media requests serves this purpose. The administrator needs to specify a URL in the following form:
http://<CDM-hostname:CDM-port>/Cisco/opt.wmt.<protocol>/<StudioID>/
<ChannelName>/wmtlive/<originServer:originPort>/<path>/
<livestream>.asfx
http://10.5.201.32:80/Cisco/opt.wmt.http/0006d7031ac/Test_Channel/
wmtlive/stream-ce.cisco.com/vod-14.asf.asfx
When you create a WMT multicast station configuration that points to pre-positioned E-CDN content which resides on the same Content Engine, use the following URL to access the content:
mms://<ce-ip>:<wmt-port>/preposition/<Channel_Name>/<file_name>
![]()
![]()
![]()
![]()
![]()
![]()
![]()
![]()
Posted: Mon Mar 24 16:22:48 PST 2003
All contents are Copyright © 1992--2002 Cisco Systems, Inc. All rights reserved.
Important Notices and Privacy Statement.