|
|

The Videum Capture application allows you to display video inputs from one of three video sources such as an attached camera, camcorder or VCR. Once the images and sounds are displayed, you can use Videum Capture to record audio, video, and capture still images. The captured audio and video can then be streamed by Cisco IP/TV.
To use Videum Capture to view and record audio, video, and still images, follow these steps:
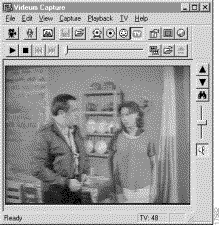
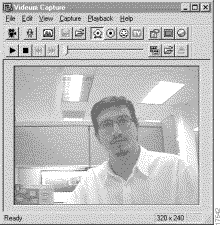
From all Windows operating systems, click Start then place the cursor over Videum Capture in the Program/Videum submenu. The Videum Capture window is displayed in Figure 3-1.

Note For your convenience, each of the toolbars can be undocked from the Videum Capture window. To do this, place the cursor over an open area of the toolbar and hold the left mouse button, then drag the toolbar to the desired location and release the left mouse button.
Each of the buttons and menu items are described in Table 3-1.
Table 3-1 Description of Capture Buttons and Menus.
Step 2 You can set the Videum Capture window to always be on top by choosing Always on Top from the View menu.
Step 3 The Videum Capture window has a status bar where instructions and other useful information is displayed, see Figure 3-1.
The Video Format and Video Source control panels available in the Windows NT version of Videum are shown in Figure 3-2 and Figure 3-3. They are selected by choosing Video Format from the Capture menu or toolbar or choosing Video Source from the Capture menu or toolbar.
The Format dialog allows you to set the capture dimensions, alignment, data format, and compression ratio. Detailed descriptions of each of the options is given in the previous section.
The Source dialog, which differs depending on your hardware, allows you to specify the video source and set the brightness, contrast, saturation, hue, gain, and white balance of the video image. Detailed descriptions of each of the options is given in the previous section.
To use the Video Control Panel, follow these steps:
Step 2 Select the video source, either camera, or VCR by pressing the appropriate radio button.
Table 3-2 Radio Buttons
Table 3-3 Compression Types
To set video, audio, and still image capture properties, follow these steps:
The Properties dialog box is displayed (see Figure 3-4).
Step 2 Select the capture frame rate and whether or not you want to capture audio along with your video.
If you are capturing audio, set the audio capture properties described in the next section once you finish setting the video properties.
Step 3 Set a capture time limit (optional).
A time limit ensures that your movie files do not become too large.
Step 4 Set a permanent capture file along with its initial size.
To set audio capture properties, follow these steps:
The Audio tab of the Properties dialog is shown in Figure 3-5.
Step 2 Use this tab to set the sound resolution, audio sampling rate, and the default audio capture file.
Check the stereo button if you want to record stereo audio; however, the stereo audio files are twice as large as the mono audio files.
You can set still image characteristics such as the image size, the image type, and the image orientation, either landscape or portrait using the Properties dialog box.
To set the still image attributes, follow these steps:
The Still Image tab of the Properties dialog is shown in Figure 3-6.
Step 2 Select one of the default image sizes or select a custom size by clicking the radio button and entering a size.
The size is reflected after the image is snapped and placed into a document.
Step 3 Select the image type, most commonly 24-bit color.
You can reduce the size of the image clip file by reducing the number of colors.
Step 4 Select the image orientation, portrait or landscape.
Step 5 When you are finished setting the still image options, click the OK button.
You are now ready to take still image clips with Videum Capture.
Step 6 Use the delay feature to automatically capture the image at a specified time.
To record an audio, video, or still image clip, follow these steps:
Alternatively, you could choose Record Video from the Capture menu. During the capture the elapsed time is displayed below the image on the Videum Capture window.

Step 2 To stop recording, click the Record Video button.
Step 3 A camera icon is displayed on the upper left side of the Videum Capture image indicating that a clip is available.
You have the option of placing the clip into a document, pressing the [Delete] key to delete the clip, or clicking the Save As button to save the clip.
Note Before you can capture another clip, you must either save it, place the existing clip into a document or choose Delete to delete his clip. For more information about placing clips, see "Adding an Insignia to Your Video Window"
Step 4 To save the file choose Save As from the File menu or click the Save As button to display the Save As dialog box. Name the captured file, specify the location where you want to store the file, and then click the OK button.
All video files are named with the.AVI extension. You can save recorded files to any location but they are saved by default to the desktop. The Save As dialog box also allows you to play the captured clip by clicking the button under the preview image.
Step 5 To record an audio clip, click the Record Audio button on the Videum Capture window shown in Figure 3-1.
A clip icon is displayed on the left side of the Videum Capture image indicating that a clip is available for placement. You must add it to a document, save it, or delete it before you can do another capture.
Step 6 To capture a still image clip, click the still image capture button on the Videum Capture window shown in Figure 3-1.
A clip icon is displayed on the left side of the Videum Capture image indicating that a clip is available for placement. You must add it to a document, save it, or delete it before you can do another capture.
Use the Time Lapse feature to take snapshots at regular intervals and assemble them into a movie.
To use the Time Lapse feature, follow these steps:
The Time Lapse dialog box is displayed in Figure 3-8.
Step 2 Select how often you want to record a clip and how long you want this movie to record. Then click the Start button to start recording a time lapse movie.
Once the movie is completed, a clip icon is available for inserting into other documents.
The Stop Motion feature allows you to take clips one frame at a time and assemble them into a movie. This is useful for claymation productions.
To use the Stop Motion feature, follow these steps:
The Stop Motion dialog box is displayed in Figure 3-9.
Step 2 Click the Frame button each time you want to record a frame.
Step 3 Click the Done button when you are finished recording frames for the stop motion movie.
Once the movie is completed, a clip icon is available for inserting into other documents.
The Insignia application allows you to add an existing insignia to your video capture window or create a new insignia for display on your video windows. You can create an insignia of your company logo and display it in black and white in any corner of the Videum video windows.
To add an existing insignia to your video window, follow these steps:
The Insignia dialog box is displayed (see Figure 3-10).
Step 2 Select an existing insignia from the list box and click the OK button.
The selected insignia is displayed on this dialog box and on your Videum Capture window in the location selected.
Step 3 To change the insignia location, make a selection from the Position drop downiest.
Use the Preview window to view the selected insignia in the chosen location.
To create a new insignia and add it to your video window, follow these steps:
The Videum Insignia Editor is displayed (see Figure 3-11).
Step 2 Select a name and the dimensions for the new insignia.
Step 3 Use the drawing Tools and Actions to create or edit an existing insignia.
Step 4 When you have finished creating or editing an insignia, click the Save button to return to the Insignia dialog box.
Select and position the new insignia as described in the section "Using an Existing Insignia."
![]()
![]()
![]()
![]()
![]()
![]()
![]()
![]()
Posted: Wed Apr 23 10:37:26 PDT 2003
All contents are Copyright © 1992--2002 Cisco Systems, Inc. All rights reserved.
Important Notices and Privacy Statement.