|
|

This chapter describes how to define on-demand, scheduled, and live-capture programs in the IP/TV Content Manager, and how to connect the Broadcast Server capture cards.
If you have configured the servers correctly, after defining a sample scheduled or on-demand program, you will be able to watch the program in IP/TV Viewer (see "Using IP/TV Viewer").
Note Both the Archive and Broadcast Servers can serve scheduled and on-demand programs. However, the Broadcast Server can only serve on-demand programs to a minimum number of viewers.
To define an on-demand program, the IP/TV Content Manager must communicate with the Archive Server and find all media files in the server's media root directory.
To verify communication between the IP/TV Content Manager and the Archive Server, follow these steps:
where contentmanagerhost is the name of the Control Server on which the IP/TV Content Manager is installed.
Step 2 From the IP/TV Content Manager main page, click the ServerWatch button.
Step 3 Confirm that the Archive Server you defined is listed and is in a managed state.
Note It takes a few seconds for the IP/TV Content Manager to connect with the servers. If the server is not listed, check to make sure you have correctly set up your Archive Server to be controlled by the IP/TV Content Manager (see "Setting Up Your Servers").
To create a sample on-demand program, complete the following steps from the IP/TV Content Manager:
The OnDemand Programs page appears.
Step 2 Click the New Program link on the task bar.
The New OnDemand Program page appears.
Step 3 Enter on-demand program information as follows:
(a). In the Title field, enter the name Sample Program.
(b). In the Multimedia Information section, click the Select media file button and select the media file sample.avi.
See "Creating a New OnDemand Program" in Chapter 4 of the IP/TV Content Manager manual for detailed information.
To create a scheduled program, complete the following steps from the IP/TV Content Manager:
The Scheduled Programs page appears.
Step 2 Click the New Program link on the task bar.
The New Scheduled Program page appears.
Step 3 Leave the Channel set to None and click the Create Program button.
Step 4 Enter scheduled program information as follows:
(a). In the Program Name field, enter Sample Program.
(b). In the Description field, enter Sample.
(c). In the Schedule section, select Play Continuously.
(d). In the Multimedia Source Information section, select Play this File, and enter the full path to the media file e:\avi\sample.avi.
(e). Select a server from the list.
See "Creating a Scheduled Program" in Chapter 4 of the IP/TV Content Manager manual for detailed information.
When you define a live-capture program, you must set the video format, audio format, data rate, and frame rate parameters to values appropriate to the video capture card and codec (compression/decompression) used by the Broadcast Server that will multicast the program. After defining a live-capture program, connect your audio and video outputs to the appropriate capture card inputs.
See "Live-capture Program Settings" in Chapter 4 of the IP/TV Content Manager manual for detailed information.
Note A high bit-rate codec produces higher quality video. The level of quality you choose is determined by network capacity. We recommend using the highest quality possible within the constraints of your network.
If you are setting up a live-capture program for high bit rate, use the following settings in the New Scheduled Program page of the IP/TV Content Manager:
If you are setting up a live-capture program for medium bit rate, use the following settings in the New Scheduled Program page of the IP/TV Content Manager:
Note By default, the capture resolution is set to 160 x 120 in the Winnov capture card. When you are creating a program for medium bit rate video, you must change the capture resolution to 320 x 240 in the capture card configuration. See the section "Changing the Capture Card Resolution" below.
To change the capture resolution for a medium bit rate program, follow these steps:
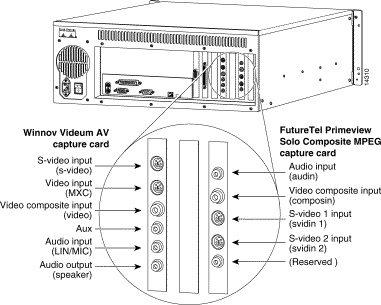
Step 2 Connect the video source to the Winnov capture card illustrated in Figure 5-1.
Step 3 Start IP/TV Server on the Broadcast Server.
Step 4 In the Program Listings window, double-click on the medium bit rate program.
Step 5 In the Capture Program Details window, click the red Stop button.
Step 6 Click the Configure button.
Step 7 In the Flashware Capture Device Configuration window, select Video Format in the Type pulldown menu.
Step 8 Click the Configure button.
Step 9 In the Video Capture Format Settings window, select 320 x 240 in the Standard pulldown menu.
Step 10 Click Ok.
Step 11 Click the Close button.
Step 12 In the Capture Program Details window, click the green Play button.
The live capture session begins, at a resolution of 320 x 240.
Note To define a low bit rate program after you have changed the capture card resolution to medium bit rate, follow the steps listed above, but change the capture dimensions back to the default of 160 x 120.
If you are setting up a live-capture program for low bit rate, use the following settings in the New Scheduled Program page of the IP/TV Content Manager:
After you define a live-capture program for high, medium, or low bit rate, connect the audio and video outputs of your device to the inputs of the appropriate capture card (see Figure 5-1).
Figure 5-1 shows the audio and video inputs for the FutureTel Primeview II and Winnov capture cards.
To connect a capture card, complete the following tasks:
Step 2 Connect your video output to the video input appropriate for your device.
Step 3 Set the capture card settings for high, medium, or low bit rate.
See "Capture Device Configuration Options" in Chapter 4 of the IP/TV Server Administration Guide for detailed information.
![]()
![]()
![]()
![]()
![]()
![]()
![]()
![]()
Posted: Thu Apr 24 11:35:26 PDT 2003
All contents are Copyright © 1992--2002 Cisco Systems, Inc. All rights reserved.
Important Notices and Privacy Statement.