|
|

Table Of Contents
GSS Administration and Troubleshooting
Modifying Network Configuration
Changing the Startup and Running Configuration
Loading the Startup Configuration from an External File
Creating and Managing GSSM Login Accounts
Creating and Managing GSS Login Accounts
Segmenting GSS Traffic by Interface
Filtering GSS Traffic Using Access Lists
Deploying GSS Devices Behind Firewalls
Configuring SNMP on Your GSS Network
Determining When and What Type of Backup to Perform
Performing a GSSM Database Backup
Upgrading the Cisco GSS Software
Step 1—Determine the Current Software Version
Step 3—Obtaining the Software Upgrade
Step 4—Upgrading Your GSS Devices
Downgrading and Restoring Your GSS Devices
Restoring an Earlier Software Version on Your GSS Devices
Restoring Your GSSM Database from a Backup
Restoring Your GSSM from a Full Backup
Viewing Third-Party Software Versions
Shared Keepalive Error Messages
Source Address List Error Messages
GSS Administration and Troubleshooting
This chapter covers the procedures necessary to properly manage and maintain your GSS devices, including login security, software upgrades, GSSM database administration, and GSSM error messages.
This chapter contains the following sections:
•
Advanced Device Configuration
•
•
•
•
Advanced Device Configuration
The sections that follow describe advanced configuration tasks.
Changing the GSSM Role
The Cisco GSS software supports the existence of multiple GSSMs on a single GSS network, with one GSSM acting as the active (or primary) GSSM and one acting as a backup (or standby) device that takes over the role of the primary GSSM if the primary device goes off line unexpectedly.
Using the CLI, you can manually switch the roles of your primary and standby GSSMs at any time.
Before switching GSSM roles, however, the conditions must be met:
•
•
Do not attempt to switch roles before both a primary and a standby GSSM have been configured and enabled.
Note
We recommend observing the following order when changing the roles of your primary and standby GSSMs:
1.
2.
3.
4.
5.
Use the following procedure to change the roles of your primary and standby GSSMs. These instructions assume that your primary GSSM is online and functional at the time you are switching GSSM roles. If this is not the case, ignore any steps that apply to the primary GSSM.
Step 1
Step 2
Step 3
gssm1.yourdomain.com> enableStep 4
gssm1.yourdomain.com# gssm primary-to-standbyStep 5
Step 6
gssm2.yourdomain.com> enableStep 7
gssm2.yourdomain.com# gssm standby-to-primaryYour GSSM will immediately begin functioning in its new role.
Step 8
Modifying Network Configuration
Once you have configured your GSS devices, you can use the CLI to modify those configuration settings.
To modify the network configuration of a GSS device:
Step 1
Step 2
gssm1.yourdomain.com> enableStep 3
gssm1.yourdomain.com# gss stopStep 4
gssm1.yourdomain.com# configuregssm1.yourdomain.com(config)#Step 5
gssm1.yourdomain.com(config-eth0)# no ip address 10.89.3.24
255.255.255.0
gssm1.yourdomain.com(config-eth0)# exitgssm1.yourdomain.com(config)#Once you have removed a setting, you can replace it by following the instructions in the "Configuring a Global Site Selector" section on page 2-5 and the "Configuring a GSSM" section on page 2-3.
Changing the Startup and Running Configuration
The network configuration for a GSS device includes:
•
•
•
•
•
•
•
•
•
Each GSS device tracks two such configurations:
•
•
Usually, the running configuration and the startup configuration are identical. However, once a configuration parameter is modified for any reason, the two must be reconciled using the CLI in one of the following ways:
•
•
To change the startup configuration for a GSS device:
Step 1
Step 2
gssm1.yourdomain.com> enablegssm1.yourdomain.com# configgssm1.yourdomain.com(config)#Step 3
gssm1.yourdomain.com(config)# hostname new.yourdomain.comnew.yourdomain.com(config)#Step 4
new.yourdomain.com(config)#write memoryAlternatively, you can use the copy command to achieve the same result, copying the running configuration to the startup configuration, for example:
new.yourdomain.com(config)#copy running-config startup-configLoading the Startup Configuration from an External File
In addition to copying your running configuration as a new startup configuration, internally you can also upload or download GSS device configuration information from an external file using the copy command.
Before attempting to load the startup configuration from a file, make sure that the file has been moved to a local directory on the GSS device.
To copy the GSS device startup configuration to or from a disk:
Step 1
Step 2
gssm1.yourdomain.com> enableStep 3
gssm1.yourdomain.com# copy disk startup-config filenamewhere filename is the name of the file containing the startup configuration settings.
Step 4
gssm1.yourdomain.com# copy startup-config disk filenamewhere filename is the name of the file that will be created to contain the startup configuration settings.
GUI Configuration
The GSS GUI provides you with a number of configuration options for modifying the behavior and performance of the GSSM web-based GUI.
Among the settings you can modify are:
•
•
•
To modify any GUI session settings:
Step 1
Step 2
Step 3
•
•
•
Step 4
Step 5
Security Configuration
Using the GSSM GUI, you can control access to the GSS product GUI. Using the CLI, you can control login access to individual GSS devices, as well as incoming traffic to your GSS devices.
The following sections detail the use of GSS security features.
Creating and Managing GSSM Login Accounts
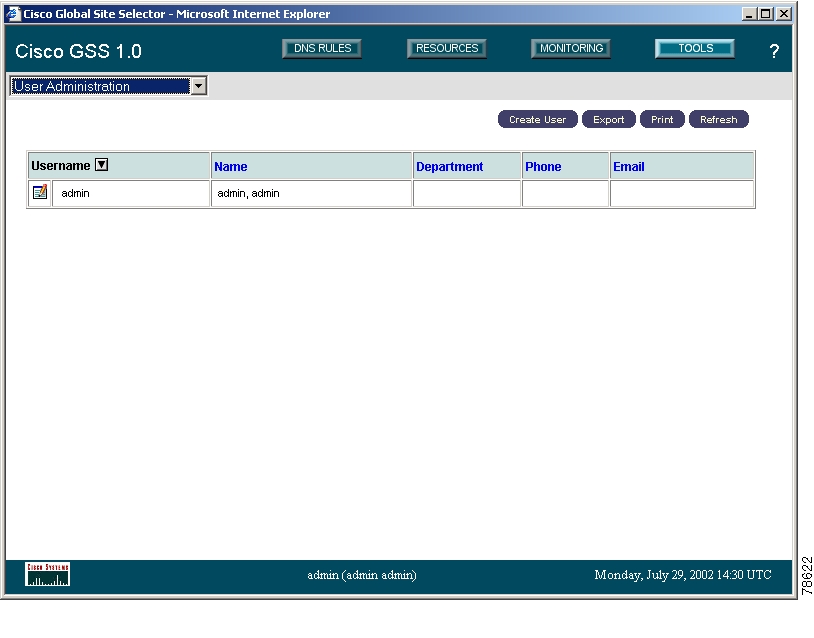
Using the user administration feature of the GSSM, you can create and maintain login accounts for the GSSM GUI. In addition to login name and password information, the user administration feature also allows you to maintain contact information for each user.
Creating a GSSM GUI User Account
To add a new GSSM user account:
Step 1
Step 2
Figure 3-1 GSSM User Administration Window
Step 3
Step 4
Step 5
Step 6
Step 7
Step 8
Step 9
•
•
•
•
•
Step 10
Modifying a GSSM GUI User Account
To modify an existing GSSM user account:
Step 1
Step 2
Step 3
Step 4
•
•
•
•
•
•
•
•
•
Step 5
Removing a GSSM GUI User Account
To delete an existing GSSM user account:
Step 1
Step 2
Step 3
Note
Step 4
Step 5
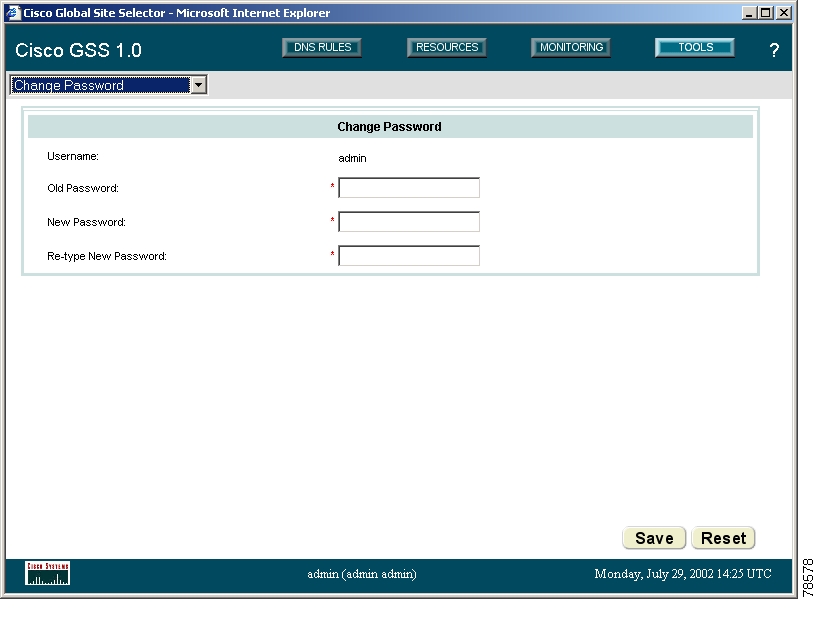
Changing Your GSSM GUI Password
Using the change password feature of the GSSM, you can change the password for the account that you used to log on to the GSSM. You must know the existing password for an account before you can change it to a new value.
To change your account password:
Step 1
Step 2
Figure 3-2 GSSM Change Password Window
Step 3
Step 4
Step 5
Step 6
Creating and Managing GSS Login Accounts
Using the CLI, you can set user access for each of your GSS devices, including the GSSM. User access to the CLI of your GSSs must be managed individually on each device.
Note
To following sections explain the steps necessary to administer user accounts on your GSSs.
Creating a GSS User Account Using the CLI
When creating user accounts from the CLI, you must specify the new login, password, and privilege level using a single command. You cannot create a new account without designating a value for each of these configuration settings. Refer to the Cisco Global Site Selector Command Reference for detailed information on the username command syntax and use.
To create a user or administrative login account that can access the CLI of one of your GSS devices:
Step 1
Step 2
gss1.yourdomain.com> enablegss1.yourdomain.com#Step 3
gss1.yourdomain.com# username paulr password mypwd privilege adminUser paulr added.Login names must start with a character and can be no longer than 32 characters. To create an administrative account, set the privilege level to admin. To create a user account, set the privilege level to user.
Step 4
Modifying a GSS User Account Using the CLI
When modifying a GSS user account using the CLI, use the same procedure that you used to create the account: entering the full username, password, and privilege level and substituting new values for the configuration settings that you wish to change.
Step 1
Step 2
gss1.yourdomain.com> enablegss1.yourdomain.com#Step 3
gss1.yourdomain.com# username paulr password newpwd privilege userUser paulr exists, change info? [y/n]: yStep 4
Deleting a GSS User Account Using the CLI
You must have administrative-level access to the GSS to delete login accounts.
To delete a login account:
Step 1
Step 2
gss1.yourdomain.com> enablegss1.yourdomain.com#Step 3
gss1.yourdomain.com# username paulr deleteUser paulr removed
Note
Step 4
Resetting CLI Passwords
If you accidentally forget the password for any of your CLI accounts such as the admin or debugshell logins, you can reset them, providing that you have physical access to the GSS device.
To reset a CLI password:
Step 1
Step 2
If necessary, refer to the Cisco Global Site Selector 4480 Hardware Installation Guide for instructions on powering up and powering down the GSS hardware.
As the device boots, output appears on the console terminal, for example:
The following will be displayed on the console terminal:Initializing memory. Please wait.BIOS Version: CE500 01.11BIOS Build date: 07/27/00Symbios, Inc. SDMS (TM) V4.0 PCI SCSI BIOS, PCI Rev. 2.0, 2.1Copyright 1995, 1998 Symbios, Inc.PCI-4.11.00HBA ID LUN VENDOR PRODUCT REV SYNC WIDE INT13 CYL/ HD/SEC--- -- --- -------- ---------------- ---- ---- ---- -----0 0 0 IBM DDYS-T18350M S80D 80.0 16 BOOT 1024/ 64/320 7 0 Symbios SYM53C895 0002 80.0 16Symbios, Inc. PCI boot ROM successfully installed!Cisco CE Booting From Flash.LILO boot:Step 3
LILO boot: ?gss1.0.0.0.17boot:
Note
Step 4
boot: gss1.0.0.0.17 singleThe GSS device continues to boot and then displays the bash# prompt.
Step 5
bash# mount /Cisco/merlot/safe-state -o remount,rwStep 6
•
–
bash# rm /Cisco/merlot/safe-state/passwd
Note
–
bash# reboot•
–
bash# cd /Cisco/merlot/safe-state–
bash# vi passwd–
–
bash# rebootSegmenting GSS Traffic by Interface
GSS devices come with two Ethernet interfaces. By default, GSS servers listen for traffic on both interfaces.
Note
However, for security reasons you may wish to limit GSS traffic to one interface, or segment traffic by constraining a certain type of traffic on a designated interface.
Using the access-list and access-group commands discussed in the "Filtering GSS Traffic Using Access Lists" section, you can limit traffic on either of your GSS interfaces.
For example, network management services like Telnet, SSH, and FTP listen on all active interfaces once they are enabled. To force these remote management servers to listen on only the second Ethernet interface, you would use the following CLI commands:
gss1.yourdomain.com> enablegss1.yourdomain.com#gss1.yourdomain.com# configgss1.yourdomain.com(config)#gss1.yourdomain.com(config)# access-list alist1 permit tcp any destination-port ftpgss1.yourdomain.com(config)# access-list alist1 permit tcp any destination-port sshgss1.yourdomain.com(config)# access-list alist1 permit tcp any destination-port telnetgss1.yourdomain.com(config)# access-group alist1 interface eth1By default, the above commands would limit the second interface (eth1) to the specified traffic. All other traffic to that interface would be refused.
To deny the same traffic on the first interface (eth0), you would use the following commands:
gss1.yourdomain.com(config)#gss1.yourdomain.com(config)# access-list alist1 deny tcp any destination-port ftpgss1.yourdomain.com(config)# access-list alist1 deny tcp any destination-port sshgss1.yourdomain.com(config)# access-list alist1 deny tcp any destination-port telnetgss1.yourdomain.com(config)# access-group alist1 eth0Filtering GSS Traffic Using Access Lists
Using built-in packet filtering features on the GSS, you can instruct your GSSs and GSSMs to permit or refuse specific packets that are received based on a combination of criteria that includes:
•
•
•
These packet-filtering tools, called access lists, are created and maintained from the GSS CLI. Access lists are essentially collections of filtering rules that are created using the access-list CLI command and can be applied to one or both of your GSS interfaces using the access-group command.
For detailed information on access list syntax options, refer to the section on the access-list, access-group, and show access-list commands in the Cisco Global Site Selector Command Reference. See the sections that follow for instructions on creating and maintaining access lists.
Creating an Access List
The term access list simply refers to one or more filtering rules that are grouped together. You can create any number of access lists on a given GSS device.
After you have created an access list, rules can be appended to or removed from the list at any time.
Note
To create an access list:
Step 1
Step 2
gss1.yourdomain.com> enablegss1.yourdomain.com#Step 3
gss1.yourdomain.com# configgss1.yourdomain.com(config)#Step 4
For example, to configure an access list named alist1 containing a rule that allows any traffic using the TCP protocol on port 80 on the GSS device, you would enter the following:
gss1.yourdomain.com(config)# access-list alist1 permit tcp any
destination-port eq 80
Refer to the Cisco Global Site Selector Command Reference for a detailed explanation of access-list command syntax.
Step 5
Associating an Access List with a GSS Interface
After you have created an access list, you must associate it with one or both of your GSS interfaces before it can be used to filter incoming traffic to that interface.
Note
The access-group command is used to associate an access list with a GSS interface.
Note
To associate access lists with an interface:
Step 1
Step 2
gss1.yourdomain.com> enablegss1.yourdomain.com#Step 3
gss1.yourdomain.com# configgss1.yourdomain.com(config)#Step 4
gss1.yourdomain.com(config)# access-group alist1 interface eth0Refer to the Cisco Global Site Selector Command Reference for a detailed explanation of access-group command syntax.
Step 5
Disassociating an Access List from a GSS Interface
After you have associated an access list with one or more of your GSS interfaces, you can dissociate it from that interface using the no form of the access-group command. Disassociating an access list from an interface removes any constraints that the list applied to traffic to that interface.
Note
To disassociate an access list from an interface:
Step 1
Step 2
gss1.yourdomain.com> enablegss1.yourdomain.com#Step 3
gss1.yourdomain.com# configgss1.yourdomain.com(config)#Step 4
gss1.yourdomain.com(config)# no access-group alist1 interface eth0Refer to the Cisco Global Site Selector Command Reference for a detailed explanation of access-group and no access-group command syntax.
Step 5
Adding Rules to an Access List
Once you have created one or more access lists, you can append rules to them at any time.
To add a rule to an access list:
Step 1
Step 2
gss1.yourdomain.com> enablegss1.yourdomain.com#Step 3
gss1.yourdomain.com# configgss1.yourdomain.com(config)#Step 4
gss1.yourdomain.com(config)# access-list alist1 deny tcp host
192.168.1.101
Refer to the Cisco Global Site Selector Command Reference for a detailed explanation of access-list command syntax.
Step 5
gss1.yourdomain.com(config)# show access-listaccess-list:alist1access-list alist1 permit tcp any destination-port eq 80access-list alist1 deny tcp host 192.168.1.101Step 6
Removing Rules from an Access List
Once you have created one or more access lists, you can remove rules from them at any time. Access lists must contain at least one rule. Removing the last rule from an access list removes the list itself from the GSS.
To remove a rule from an access list:
Step 1
Step 2
gss1.yourdomain.com> enablegss1.yourdomain.com#Step 3
gss1.yourdomain.com# configgss1.yourdomain.com(config)#Step 4
gss1.yourdomain.com(config)# no access-list alist1 deny tcp host
192.168.1.101
Refer to the Cisco Global Site Selector Command Reference for a detailed explanation of access-list command syntax.
Step 5
gss1.yourdomain.com(config)# show access-listaccess-list:alist1access-list alist1 permit tcp any destination-port eq 80Step 6
Viewing Access Lists
Use the show access-list command to view configured access lists, for example:
gss1.yourdomain.com(config)# show access-listaccess-list:alist1access-list alist1 permit tcp any destination-port eq 80Deploying GSS Devices Behind Firewalls
In addition to the packet-filtering features of the access-list and access-group commands discussed in the "Filtering GSS Traffic Using Access Lists" section, you can also deploy your GSS devices behind an existing firewall on your enterprise network.
Note
To configure your firewall to work with the GSS product, follow the guidelines in Table 3-1 to permit traffic through your firewall to the specified GSS ports. You may also want to use the access-list and access-group commands to enable authorized GSS traffic to the specified ports. By default, all ports not explicitly permitted in your access list are blocked by that interface once the list is associated.
To configure your GSS devices to function behind a firewall:
Step 1
Table 3-1 shows which GSS-related ports and protocols must be enabled for the product to function properly.
Step 2
Step 3
Configuring SNMP on Your GSS Network
Your GSS or GSSM contains an SNMP agent, ucd-snmp v4.2.3, that enables you to query your GSS devices for standard MIB resources found in MIB-II (RFC-1213) and HOST-RESOURCE-MIB (RFC-1514). SNMP runs on GSS port 161 by default.
MIB-II and HOST-RESOURCE-MIB definitions can be obtained from the following Cisco FTP sites:
ftp://ftp.cisco.com/pub/mibs/v1
ftp://ftp.cisco.com/pub/mibs/v2
Before you can begin using SNMP to monitor your GSS or GSSM, however, you must first enable the SNMP agent on your GSS device.
Enabling and Disabling SNMP
To enable the SNMP agent on your GSS device:
Step 1
Step 2
gss1.yourdomain.com> enablegss1.yourdomain.com#Step 3
gss1.yourdomain.com# configgss1.yourdomain.com(config)#Step 4
gss1.yourdomain.com(config)# snmp enableTo disable SNMP, use the no form of the command, for example:
gss1.yourdomain.com(config)# no snmp enableViewing SNMP Status
Once SNMP is enabled, you can view the status of your SNMP agent on your GSS device using the gss command.
To view the status of SNMP on your GSS device:
Step 1
Step 2
gss1.yourdomain.com> enablegss1.yourdomain.com#Step 3
gss1.yourdomain.com# gss statusCisco GSS(1.0.0.22.3) GSS Manager - primary [Mon Jul 22 23:51:10 UTC 2002]Normal Operation [runmode = 5]%CPU %MEM START PID SERVER0.0 0.3 Jul10 900 system0.0 0.4 Jul10 1170 database0.0 1.9 Jul10 1175 tomcat0.0 0.1 Jul10 1459 apache0.0 2.3 Jul10 1184 crm0.0 1.8 Jul10 1216 crdirector0.0 0.1 Jul10 1201 dnsserver0.0 0.1 Jul10 1240 keepalive0.0 0.1 Jul10 1220 boomerang0.0 2.4 Jul10 1035 nodemgr0.0 0.0 Jul10 419 syslogd--- --- --- --- ucd-snmpd [DISABLED]Step 4
Modifying the SNMP Port
Once enabled, SNMP runs on GSS port 161 by default. If you wish to change the port used for SNMP traffic, use the property command to change the SNMP port designation and then restart the GSS device.
To change the SNMP port from the default setting of 161:
Step 1
Step 2
gss1.yourdomain.com> enablegss1.yourdomain.com#Step 3
gss1.yourdomain.com# configgss1.yourdomain.com(config)#Step 4
gss1.yourdomain.com(config)# property set ServerConfig.ucd-snmpd.port
210
Step 5
gss1.yourdomain.com(config)# exitgss1.yourdomain.com# gss restart
Backing Up the GSSM
The GSSM database of your primary GSSM is the heart of your GSS network. The GSSM database maintains all network and device configuration information, as well the DNS rules that are used by your GSS devices to route DNS queries from users to available hosts.
Because it is so important to the continued operation of your GSS network, it is important that you make frequent backups of your primary GSSM and its database to ensure that if a sudden and unexpected power loss or media failure occurs, your GSSM configuration and database survive, and your GSSM can be quickly restored to operation.
The two types of backups that you can perform are:
•
•
Whenever you execute a backup on your GSSM, the Cisco GSS software automatically creates a tar archive ("tarball") of the necessary files. If you are performing a full backup, this file will have the FULL extension. If you are performing a database backup, the file will have the extension DB.
When you execute a database restore on your GSSM, this archive is automatically unpacked and the database is copied to the GSSM, overwriting the failed database that is there.
Backing up your GSSM database requires access to the GSS CLI and the completion of the following actions:
1.
2.
3.
4.
The following sections detail the steps that you need to take to complete each of these actions.
Determining When and What Type of Backup to Perform
Some general guidelines exist for when and how to back up your GSSM. If followed, they help ensure that you are never caught unprepared if you suffer a catastrophic loss of your GSSM.
When to Perform a Full Backup
You should perform a full backup of your GSSM in these situations:
•
•
•
When to Perform a Database Backup
You should perform a database backup of your GSSM in these situations:
•
•
Performing a Full GSSM Backup
You can perform a full GSSM backup at any time. Doing so does not interfere with the functioning of the GSSM or any of your other GSS devices.
Note
To perform a full backup of your GSSM:
Step 1
Step 2
gss1.yourdomain.com> enablegss1.yourdomain.com#Step 3
gss1.yourdomain.com# gssm backup full crmfullbkGSSM database backup succeeded [crmfullbk.full]Step 4
Either the secure copy (scp) or ftp commands can be used to move your full backup to a remote host, for example:
gss1.yourdomain.com# scp crmfullbk.full server.yourdomain.com:homePerforming a GSSM Database Backup
You can perform a database backup at any time. Doing so does not interfere with the functioning of the GSSM or any of your other GSS devices.
Note
To perform a database backup of your GSSM:
Step 1
Step 2
gss1.yourdomain.com> enablegss1.yourdomain.com#Step 3
gss1.yourdomain.com# gssm backup database crmdbbkGSSM database backup succeeded [crmdbbk.db]Step 4
Either the secure copy (scp) or ftp commands can be used to move your database backup to a remote host, for example:
gss1.yourdomain.com# scp crmdbbk.db server.yourdomain.com:home
Upgrading the Cisco GSS Software
Periodically, Cisco posts updated versions of the Cisco GSS software that offer new features or software patches for problems that have been identified in earlier versions. In order to upgrade to these new software versions, you must have access to the GSS download area of Cisco's software download site, Cisco.com, and be familiar with the proper procedure for updating your GSS devices, including the CLI commands required to execute the backup.
Cisco GSS software upgrades require that you complete the following actions:
1.
2.
3.
4.
5.
The following sections detail the steps that you need to take to complete each of these actions.
Step 1—Determine the Current Software Version
Before attempting to upgrade to a new software version, first verify which version of the Cisco GSS software you are running. Confirming the current software version will help you determine:
•
•
You can determine the software version running on any of your GSS devices either by logging on to those devices directly and using the CLI show version command, or by accessing the Global Site Selectors window on your GSSM GUI.
Determining the Current Software Version from the CLI
To determine the current software version using the CLI:
Step 1
Step 2
gss1.yourdomain.com> enablegss1.yourdomain.com#Step 3
gss1.yourdomain.com# show versionGlobal Site Selector (GSS)Copyright (c) 1999-2002 by Cisco Systems, Inc.Version 1.0(0.22.3)Compiled Tue Jul 9 16:56:08 2002 by atripath - changeset 25175uptime is 5 Days 2 Hours 31 Minutes and 18 secondsModel Number: GSS-3380-K9Determining the Current Software Version from the GSSM GUI
Step 1
Step 2
Step 3
Step 4
Step 5
Step 2—Backing Up the GSSM
Before you attempt to upgrade your Cisco GSS software, first make sure that you have a full backup of your GSSM that is current. That way, should the upgrade fail for some reason, you can quickly restore your GSS network to its current state.
See the "Performing a Full GSSM Backup" section for instructions on performing a full backup of your GSSM.
Step 3—Obtaining the Software Upgrade
Before you can upgrade your Cisco GSS software, you must first acquire the appropriate software upgrade file from Cisco.
In order to acquire the software upgrade from Cisco, you must first:
•
•
You must have a Cisco.com username and password before attempting to download a software upgrade from Cisco.com. In order to acquire a Cisco.com login, go to http://www.cisco.com and click the Register link.
Note
To add an upgrade file for the Cisco GSS:
Step 1
Step 2
The Cisco GSS software download window appears, listing the available software upgrades for the Cisco GSS software product.
Note
Step 3
Step 4
Step 5
Step 6
Step 7
Step 8
Step 9
Step 10
Step 4—Upgrading Your GSS Devices
Although the Cisco GSS software does not require you to upgrade your GSSs and GSSMs in any particular order, we recommend upgrading your GSS devices in the following sequence in order to safeguard your critical GSS data:
1.
2.
3.
When executing an upgrade, you use the CLI install command.
Before going forward with the installation of the software upgrade, the install command also does a validation check on the upgrade file, unpacks the upgrade archive, and installs the upgraded software. Finally, the install command stops and restarts the affected GSS device.
Note
To upgrade the Cisco GSS software on a GSS:
Step 1
Step 2
gss1.yourdomain.com> ftp host.yourdomain.comConnected to host.yourdomain.com.220 host.yourdomain.com FTP server (Version wu-2.6.1-0.6x.21) ready.Name (host.yourdomain.com:root): admin331 Password required for admin.Password:230 User admin logged in. Access restrictions apply.Remote system type is UNIX.Using ascii mode to transfer files.ftp> binaryftp> get(remote-file) gss.upg(local-file) gss.upglocal: gss.upg remote: gss.upg200 PORT command successful....Step 3
gss1.yourdomain.com> enablegss1.yourdomain.com#Step 4
gss1.yourdomain.com# install gss.upgPerforming software install. This will take a few minutes.Device will reboot when the install is complete.The GSS device reboots, causing you to lose any network CLI connections. Console connections remain active.
Step 5
Step 5—Verifying Your Upgrade
Use the following procedure to log on to your upgraded GSS device and verify that the upgrade was successfully completed.
Step 1
Step 2
gss1.yourdomain.com> enablegss1.yourdomain.com#Step 3
gss1.cisco.com# show versionGlobal Site Selector (GSS)Copyright (c) 1999-2002 by Cisco Systems, Inc.Version 1.0(0.22.3)Compiled Tue Jul 9 16:56:08 2002 by atripath - changeset 25175uptime is 5 Days 2 Hours 31 Minutes and 18 secondsModel Number: GSS-3380-K9Step 4
gss1.yourdomain.com> gss statusCisco GSS(1.0.0.22.3) GSS Manager - primary [Mon May 20 13:46:21 GMT 2002]Normal Operation [runmode = 5]%CPU %MEM START PID SERVER0.0 0.3 May17 813 system0.0 0.4 May17 1079 postgresql0.0 1.6 May17 1083 tomcat0.0 0.1 May17 1353 apache0.0 2.2 May17 1092 controller0.0 1.7 May17 1109 CrDirector0.0 0.1 May17 1110 selector0.0 0.1 May17 1122 kale0.0 0.0 May17 1140 boomserv0.0 1.7 May17 937 nodemgr0.0 0.0 May17 304 syslogd--- --- --- --- snmpd [DISABLED]--- --- --- --- ucd-snmpd [DISABLED]
Downgrading and Restoring Your GSS Devices
Should you encounter problems with a software upgrade, you can always restore an earlier version of the Cisco GSS software on your GSSs and GSSMs.
However, in order to restore an earlier version of your software, you must have backed up a version of your GSSM database that corresponds to that version. In other words, if you wish to downgrade from GSS Release 3 to GSS Release 1 software, there must be a GSS Release 1 database backup that you can restore; your GSS Release 3 database will not be able to run on the Release 1 platform because of changes in the database schema between releases.
When downgrading, use the following order of operations to safeguard your critical GSS data and properly restore your GSSM database:
1.
2.
3.
4.
5.
In addition, do not attempt to restore an earlier version of the software than the earliest database backup you have available. For example, if the earliest version of the Cisco GSS software that you have run is Release 2.0 and your earliest database backup is for Release 2.0, do not attempt to downgrade to a release of the software earlier than 2.0.
Restoring an Earlier Software Version on Your GSS Devices
To restore an earlier version of your Cisco GSS software, follow the instructions in the "Step 3—Obtaining the Software Upgrade" section, "Step 4—Upgrading Your GSS Devices" section, and "Step 5—Verifying Your Upgrade" section to acquire and then install the earlier software upgrade and meta files.
After you have downgraded the software on your GSSM, see the "Restoring Your GSSM Database from a Backup" to restore your backed up GSSM database.
Restoring Your GSSM Database from a Backup
You must have a backup of an earlier version of your database file in order to restore it to run with your downgraded Cisco GSS software. You should be aware that the GSS database schema often changes between versions. When you downgrade from a later to an earlier version of the GSSM database, any configuration changes that you entered through the GSSM subsequent to your last upgrade are lost, including configuration changes, device configuration information, and DNS rules.
See the "Backing Up the GSSM" section for details on performing a database backup of the GSSM.
Note
Use the following procedure to restore an earlier version of the GSSM from a backup:
Step 1
Step 2
Step 3
gss1.yourdomain.com> enablegss1.yourdomain.com#Step 4
gss1.yourdomain.com# gss stopgss1.yourdomain.com# gss statusCisco GSS(1.0.0.0.13) GSS Manager - primary [Mon May 20 14:21:16 GMT 2002]gss is not running.Step 5
gss1.yourdomain.com> gssm restore crmdbbk.dbStep 6
atcr1.yourdomain.com# gssm restore crmdbbk.dbThe existing database will be destroyed. Continue? [y/n]: yDeleting existing database...Creating database. This may take a few minutes...Restoring database...Backup file integrity validated. Timestamp = 2002-May-17-18:44:07Step 7
WARNING WARNING WARNINGRestoring the database will overwrite all existingsystem configuration. If running, the system willbe restarted during this process.Are you sure you wish to continue? [y/n]: yNo platform backup presentRestoring the database.GSSM database restore succeeded.Step 8
gss1.yourdomain.com# gss startSystem started.Step 9
Restoring Your GSSM from a Full Backup
When restoring the GSSM from a full backup as opposed to a database backup, you use the last full backup to restore the GSS device's network configuration settings as well as the encryption keys that are used to communicate with other GSS devices. Restoring the GSSM from a full backup should be done when you need to return the device to its exact configuration as of the last full backup. It is not necessary if you are simply rolling back the device to an earlier software version. Use the following procedure to restore an earlier version of the GSSM from a full backup:
Step 1
Step 2
Step 3
gss1.yourdomain.com> enablegss1.yourdomain.com#Step 4
atcr1.cisco.com# gss stopatcr1.cisco.com# gss statusCisco GSS(1.0.0.0.13) GSS Manager - primary [Mon May 20 14:21:16 GMT 2002]gss is not running.Step 5
gss1.yourdomain.com> gssm restore crmfullbk.fullStep 6
atcr1.cisco.com# gssm restore crmfullbk.fullThe existing database will be destroyed. Continue? [y/n]: yDeleting existing database...Creating database. This may take a few minutes...Restoring database...Backup file integrity validated. Timestamp = 2002-May-17-18:44:07Step 7
WARNING WARNING WARNINGRestoring the database will overwrite all existingsystem configuration. If running, the system willbe restarted during this process.Are you sure you wish to continue? [y/n]: yStep 8
This backup contains a backup of the platform configuration.'n' restores just the database. Restoring platform files requires a reboot.Restore Platform files? [y/n]: yRestoring the database.Restoring platform backup files.Reboot Device now? [y/n]: yGSSM database restore succeeded.You will be disconnected from the GSSM when it reboots.
Step 9
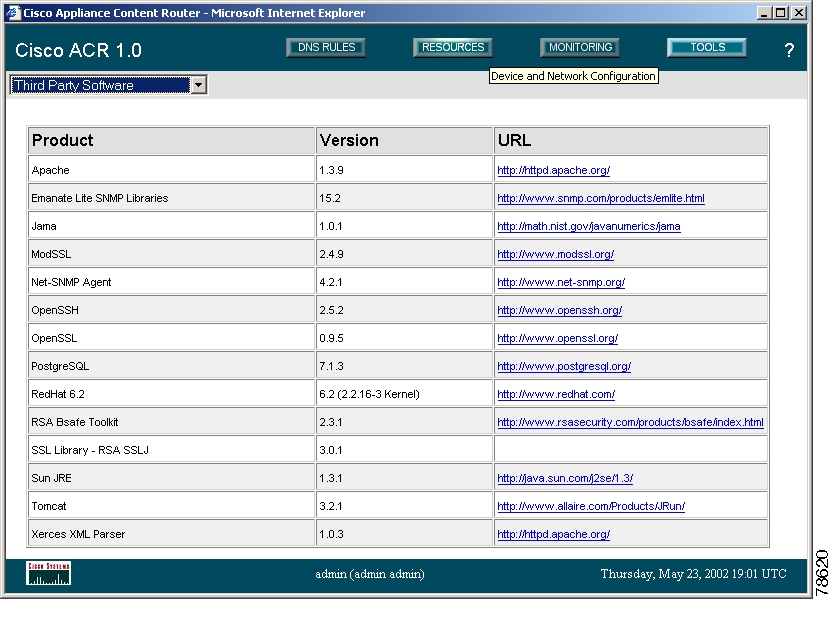
Viewing Third-Party Software Versions
The Cisco GSS software relies on a variety of third-party software products to operate properly. For that reason, the GSSM GUI provides a feature that easily allows you to track the third-party software used by the Cisco GSS software.
To view information on the third-party software currently running on your GSS:
Step 1
Step 2
•
•
•
Figure 3-3 GSSM Third-Party Software Window
GSS Error Messages
The following sections describe error messages that you may encounter when using the GSSM GUI to manage your GSS network. Error messages are organized by GSS component.
Answer Error Messages
Error Message    Invalid answer name. If entered, name must not be
the empty string.
Explanation The name that you entered for the answer is not valid. Answer names cannot be blank or contain blank spaces.
Recommended Action Enter a valid alphanumeric answer name of a least 1 and no more than 80 characters in length that does not contain spaces.
Error Message    Invalid answer name. Name length must not exceed 80
characters.
Explanation The answer name that you entered contains too many characters.
Recommended Action Enter a valid alphanumeric answer name of at least 1 and no more than 80 characters in length that does not contain spaces.
Error Message    Invalid CRA timing decay. Timing decay must be
between 1 and 10.
Explanation You entered an invalid number for the CRA timing decay.
Recommended Action Enter a number between 1 and 10. Lower timing decay values mean that more recent DNS races are weighted more heavily than older races. Higher decay values mean that the results of older races are weighted more heavily than more recent races.
Error Message    Invalid CRA static RTT value. Static RTT must be
between 0 and 1000.
Explanation You entered an invalid number for the static round-trip time (RTT). This is a manually entered value that is used by the GSS to represent the time it takes for traffic to reach and return from a host.
Recommended Action Enter a static RTT value between 0 and 1000.
Error Message    A VIP/Name Server/CRA-type answer named answer_name
already exists. If specified, name and type must uniquely
identify an answer.
Explanation You are trying to create an answer that already exists on the GSS. You cannot have two answers with the same name and answer type.
Recommended Action Assign a new name or answer type to your answer to make it unique.
Error Message    An unnamed VIP/Name Server/CRA-type answer having
address IP_address already exists. Name must be specified to
configure an answer with the same address as another answer.
Explanation You are trying to create an answer that already exists on the GSS. You cannot have two answers with the same name and IP address.
Recommended Action Assign a new name to your answer in order to make it unique.
Error Message    The maximum number of number VIP/Name
Server/CRA-type answers has been met.
Explanation You are attempting to create an answer when the maximum number of that type of answer has already been created.
Recommended Action Remove an existing answer of the same type.
Error Message CRA decay value must be specified.Explanation You are attempting to create a CRA answer type without specifying a decay value. The decay value is required to tell the GSS how to evaluate and weight DNS race results.
Recommended Action Enter a number between 1 and 10 for the CRA decay, with 1 causing the GSS to weigh recent DNS race results more heavily, and 10 telling it to weight them less heavily.
Error Message CRA static RTT must be specified.Explanation You are attempting to create a CRA answer type without specifying a static round-trip time (RTT) value. The RTT value is used to force the GSS to use a value that you supply as the round-trip time necessary to reach the requesting D-proxy.
Recommended Action Enter a number between 1 and 1000 for the CRA round-trip time in milliseconds.
Error Message    Invalid keepalive tag. Tag must be at least one
character in length.
Explanation You are attempting to create a VIP answer with a KAL-AP By Tag keepalive, but you have not specified a value for the tag in the field provided.
Recommended Action Enter an alphanumeric tag between 1 and 76 characters in the Tag field.
Error Message    Invalid keepalive tag. Tag length must not exceed
76 characters.
Explanation You are attempting to create a VIP answer with a KAL-AP By Tag keepalive, but you have specified a value for the tag that contains too many characters.
Recommended Action Enter an alphanumeric tag between 1 and 76 characters in the Tag field.
Error Message    NS-type answer IP Address has the same IP address as
GSS GSS_name. GSS IP addresses must not equal any NS-type
answers.
Explanation You are attempting to create a name server answer type with the same IP address as a GSS device on the same GSS network. Name server answers cannot use the same address as GSS devices belonging to the same GSS network.
Recommended Action Assign a valid IP address to your name server answer.
Answer Group Error Messages
Error Message    This answer group cannot be deleted because it is
referenced by number DNS rule balance clause(s).
Explanation You are attempting to delete an answer group that is being referenced by one or more DNS rules.
Recommended Action Modify any DNS rules that are referencing the answer group so that those rules do not point to the group, and then try again to delete the group.
Error Message Invalid answer group name. Name must be entered.Explanation You are attempting to create an answer group without assigning a name to that group. All answer groups must have names of at least one character.
Recommended Action Enter a name for the new answer group in the field provided, and then click Save.
Error Message    Invalid answer group name. Name length must not
exceed 80 characters.
Explanation You are attempting to assign the answer group an invalid name.
Recommended Action Enter an alphanumeric name for the answer group that is fewer than 80 characters and does not contain spaces.
Error Message    Invalid answer group name. Name must not contain
spaces.
Explanation You are attempting to assign the answer group an invalid name.
Recommended Action Enter an alphanumeric name for the answer group that is fewer than 80 characters and does not contain spaces.
Error Message    An answer group named name already exists. Name must
uniquely identify an answer group.
Explanation You are attempting to assign the answer group a name that is already being used by a different GSS device.
Recommended Action Enter a unique alphanumeric name for the answer group that is fewer than 80 characters and does not contain spaces.
Error Message    The maximum number of number answers per VIP/Name
Server/CRA-type group has been met.
Explanation You are attempting to add an answer to an answer group to which the maximum number of answers has already been assigned.
Recommended Action Remove an answer from the group, or add the answer to a group to which the maximum number of answers has not already been added.
DNS Rule Error Messages
Error Message    TTL must be specified for balance method associated
with CRA- or VIP-type answer group.
Explanation You are attempting to create a balance clause without specifying a Time To Live (TTL) for answers returned by the clause.
Recommended Action Enter a TTL value between 0 and 604,800 seconds.
Error Message    Invalid balance clause TTL. TTL must be between 0
and 604,800.
Explanation You are required to specify a Time To Live (TTL) value for answers provided by the balance clause that you are creating.
Recommended Action Enter a TTL value between 0 and 604,800 seconds.
Error Message    Invalid balance clause position. Position must be
between 0 and 2.
Explanation You are attempting to create a clause for your DNS rule that is out of sequence. The DNS Rule Builder provides options for three balance clauses, which must be created in order, with no gaps between clauses. For example, if you are using only one balance clause, it must appear in the first position. It cannot be listed in the second or third positions with the first position left blank.
Recommended Action Rearrange your balance clauses in the DNS Rule Builder so that they are listed in the proper order, with no gaps between them.
Error Message    Hash type must be specified for answer group using
hash balance method.
Explanation You are trying to create an answer group using the balance method "Hashed" with the selected answer, but you have not selected one (or more) hash methods: By Domain Name and By Source Address.
Recommended Action Select one or more of the available hash methods by checking the box corresponding to the methods that you wish to use with this balance clause.
Error Message    Balance clause Boomerang fragment size must be
specified.
Explanation You are attempting to create a balance clause using the boomerang balance method, but have not specified a fragment size in the Fragment Size field. The fragment size determines the preferred size of the boomerang race response that is produced by a match to a DNS rule and is sent to the requesting client.
Recommended Action Enter a fragment size between 28 and 1980 in the field provided. The fragment size must be divisible by 4.
Error Message    Invalid balance clause Boomerang fragment size.
Boomerang fragment size must be 0 or between 28 and 1980.
Explanation You are attempting to specify an unacceptable fragment size for this balance clause in the Fragment Size field.
Recommended Action Enter a valid fragment size. Fragment sizes must be between 28 and 1980, and must be divisible by 4.
Error Message    Invalid balance clause Boomerang fragment size.
Boomerang fragment size must be a multiple of 4.
Explanation You are attempting to specify a fragment for this boomerang balance clause that is within the acceptable range but not divisible by 4. Fragment sizes must be divisible by 4.
Recommended Action Enter a fragment size between 28 and 1980 that is also divisible by 4. Zero is also an acceptable fragment size.
Error Message    Balance clause Boomerang IP TTL value must be
specified.
Explanation You are attempting to create a balance clause the boomerang balance method, but have not specified an IP Time To Live (TTL) in the field provided. The IP TTL specifies the maximum number of network hops that can be used when returning a response to a CRA from a match on a DNS rule.
Recommended Action Enter an IP TTL between 1 and 255 in the field provided and then click Save.
Error Message    Invalid balance clause Boomerang IP TTL. Boomerang
IP TTL must be between 1 and 255.
Explanation You are attempting to create a balance clause using the boomerang balance method but have specified an invalid IP Time to Live (TTL).
Recommended Action Enter an IP TTL between 1 and 255 in the field provided and then click Save.
Error Message    Balance clause Boomerang maximum propagation delay
must be specified.
Explanation You are attempting to create a balance clause using the boomerang balance method but have not specified a maximum propagation delay (Max Prop. Delay) in the field provided. The maximum propagation delay specifies the maximum length of time (in milliseconds) that will be observed before the GSS forwards a Domain Name System (DNS) request to a content routing agent (CRA).
Recommended Action Enter a maximum propagation delay between 1 and 1000 milliseconds in the Max Prop. Delay field.
Error Message    Invalid balance clause Boomerang maximum
propagation delay. Boomerang maximum propagation delay must be
between 1 and 1000.
Explanation You are attempting to create a balance clause using the boomerang balance method but have not specified a valid maximum propagation delay (Max Prop. Delay) in the field provided.
Recommended Action Enter a maximum propagation delay between 1 and 1000 milliseconds in the Max Prop. Delay field.
Error Message    Balance clause Boomerang padding size must be
specified.
Explanation You are attempting to create a balance clause using the boomerang balance method but have not specified a pad size in the Pad Size field. The pad size is the amount of extra data (in bytes) included with each content routing agent (CRA) response packet and is used to evaluate CRA bandwidth as well as latency when routing decisions are made.
Recommended Action Enter a valid pad size between 0 and 2000 in the Pad Size field.
Error Message    Invalid balance clause Boomerang padding size.
Boomerang padding size must be between 0 and 2000.
Explanation You are attempting to create a balance clause using the boomerang balance method, but have specified an invalid pad size in the Pad Size field.
Recommended Action Enter a valid pad size between 0 and 2000 in the Pad Size field.
Error Message    Invalid balance clause Boomerang secret. If
specified, Boomerang secret must be between 1 and 64 characters
in length.
Explanation You are attempting to create a balance clause using the boomerang balance method but have specified an invalid secret in the Secret field. The boomerang secret is a text string consisting of between 1 and 64 characters that is used to encrypt critical data sent between the boomerang server and content routing agents (CRAs). This key must be the same for each configured CRA.
Recommended Action Enter a valid boomerang secret between 1 and 64 characters in the Secret field.
Error Message    Balance clause Boomerang server delay must be
specified.
Explanation You are attempting to create a balance clause using the boomerang balance method but have not specified a server delay in the Server Delay field. The boomerang server delay is the maximum delay (in milliseconds) that is observed before the boomerang server component of the GSS forwards the address of its "last gasp" server as a response to the requesting name server.
Recommended Action Enter a valid server delay between 32 and 999 milliseconds in the Server Delay field.
Error Message    Invalid balance clause Boomerang server delay.
Boomerang server delay must be between 32 and 999.
Explanation You are attempting to create a balance clause using the boomerang balance method but have specified an invalid server delay in the Server Delay field.
Recommended Action Enter a valid server delay between 32 and 999 milliseconds in the Server Delay field.
Error Message Invalid DNS rule name. Name must be entered.Explanation You are attempting to create a DNS rule without assigning a name to the rule. DNS rules must have names of between 1 and 100 characters.
Recommended Action Assign a name to your DNS rule using the Rule Name field and then try again to save the rule.
Error Message    Invalid DNS rule name. Name length must not exceed
100 characters.
Explanation You are attempting to assign a name to your DNS rule that is too long. The maximum length for DNS rules is 100 characters.
Recommended Action Enter a name for your DNS rule that is between 1 and 100 characters and then attempt to save the rule again.
Error Message Invalid DNS rule name. Name must not contain spaces.Explanation You are attempting to assign your DNS rule a name that contains spaces.
Recommended Action Enter a valid name for your DNS rule that is between 1 and 100 characters and does not contain spaces.
Error Message    A DNS rule using the specified source address list,
domain list, and matching query type already exists. Source
address list, domain list, and matching query type must uniquely
identify a DNS rule.
Explanation You are attempting to create a DNS rule that already exists. DNS rules must specify a unique combination of source address list, domain list, and matching query type.
Recommended Action Reconfigure your DNS rule so that it does not exactly match the preexisting rule and then save the rule.
Error Message    Duplicate answer group/balance method assignment
detected. A DNS rule cannot use the same answer group and balance
method in multiple balance clauses.
Explanation You are attempting to create two identical answer group and balance method clauses in your DNS rule. Each clause must use a unique combination of answer groups and balance methods.
Recommended Action Modify one of your answer group and balance method pairs so that it is no longer identical to the other and then save your DNS rule.
Error Message    Balance clause gap detected at position {0,1,2}.
Balance clauses must be specified sequentially without gaps.
Explanation You are attempting to create a clause for your DNS rule that is out of sequence. The DNS Rule Builder provides options for three balance clauses, which must be created in order, with no gaps between clauses. For example, if you are using only one balance clause, it must appear in the first position. It cannot be listed in the second or third positions with the first position left blank.
Recommended Action Rearrange your balance clauses in the DNS Rule Builder so that they are listed in the proper order, with no gaps between them.
Error Message    A DNS rule named DNS_Rule_name already exists. Name
must uniquely identify a DNS rule.
Explanation You are attempting to assign a name to the DNS rule that is already assigned to another rule. DNS rule names must be unique.
Recommended Action Assign the rule a name that is not already being used and then save the rule.
Domain List Error Messages
Error Message <domain name> must contain at least one character.Explanation You are attempting to add a domain to a domain list with an invalid name. Domains in domain lists must have names of at least one character.
Recommended Action Enter a name that is between 1 and 100 characters and then save your domain list.
Error Message <domain name> character limit exceeded.Explanation You are attempting to add a domain to a domain list using a name that is too long. Domains in domain lists cannot have names of more than 100 characters.
Recommended Action Enter a new domain name of no more than 100 characters and then save your domain list.
Error Message Domain specification must not exceed 128 characters.Explanation You are attempting to add a domain to your domain list with a name that is longer than 128 characters. Domain lists cannot contain domains with names longer than 128 characters.
Recommended Action Replace the domain with a domain name containing fewer than 128 characters and then save your domain list.
Error Message <domain name> must not contain spaces.Explanation You are attempting to add a domain to your domain list with a name that contains spaces. Domains in domain lists cannot have names that contain spaces.
Recommended Action Modify the domain name so that it does not contain spaces and then save your domain list.
Error Message    <domain name> is not a valid regular expression:
<regular expression syntax error message here>
Explanation You are attempting to add a domain name to a domain list with a name that contains invalid characters or formatting. Domain names in domain lists must be valid regular expressions.
Recommended Action Modify the domain name so that it is a valid regular expression and does not contain any invalid characters or formatting, for example, www.cisco.com or .*\.cisco\.com, and then save your domain list.
Error Message <domain name> must not begin or end with '.'Explanation You are attempting to add a domain to a domain list with a literal name that contains an invalid character at the beginning or end of the domain name.
Recommended Action Modify the domain name so that it does not contain a period at the beginning or end of the name and then save your domain list.
Error Message    <domain name> component must not begin or end with
'-'
Explanation You are attempting to add a domain to a domain list with a literal name that contains an invalid character at the beginning or end of one component of the domain name, for example, www.cisco-.com.
Recommended Action Modify the domain name so that it does not contain a dash (-) at the beginning or end of any segment of the name and then save your domain list.
Error Message    <domain name> contains invalid character
'<character>' (<ASCII value of the character>)
Explanation You are attempting to add a domain to a domain list with a name that contains an invalid text character. Domains belonging to domain lists must have names that are regular expressions.
Recommended Action Modify the domain name so that it does not contain an invalid text character and then save your domain list.
Error Message    This domain list cannot be deleted because it is
referenced by X DNS rule
Explanation You are attempting to delete a domain list that is being referenced by one or more DNS rules.
Recommended Action Modify any DNS rules that use the domain list so that they no longer reference it and then try again to delete the list.
Error Message Invalid domain list name. Name must be entered.Explanation You are attempting to create a domain list without a name. Domain lists must have names of at least one character.
Recommended Action Assign a name of at least 1 and no more than 80 characters to your domain list and then save it.
Error Message    Invalid domain list name. Name length must not
exceed 80 characters.
Explanation You are attempting to create a domain list with a name that is too long.
Recommended Action Assign a name of at least 1 and no more than 80 characters to your domain list and then save it.
Error Message    Invalid domain list name. Name must not contain
spaces.
Explanation You are attempting to create a domain list with a name that contains spaces. Domain list names cannot contain spaces.
Recommended Action Assign a name without spaces to your domain list. Names must consist of at least 1 and no more than 80 characters. Save your domain list when you have assigned it a valid name.
Error Message    A domain list named '<name>' already exists. Name
must uniquely identify a domain list.
Explanation You are attempting to assign a name to your domain list that has already been assigned to another domain list on the same GSS network.
Recommended Action Assign a unique name to your new domain list and then save the list.
Error Message    The maximum number of <limit> domains per list has
been met.
Explanation You are attempting to add a domain to your domain list when the maximum number of domains has already been added to that list.
Recommended Action Remove an existing domain from the domain list and then add the new domain. Alternatively, create a new domain list to hold the new domain and any subsequent domains that you wish to add.
Shared Keepalive Error Messages
Error Message Invalid CAPP hash secret. Secret must be entered.Explanation You are attempting to create a KAL-AP keepalive using a CAPP hash secret but have not specified a secret in the field provided.
Recommended Action Enter a CAPP hash secret of no more than 31 characters in the field provided.
Error Message    Invalid CAPP hash secret. Secret length must not
exceed 31 characters.
Explanation You are attempting to create a KAL-AP keepalive using a CAPP hash secret but have specified a secret that is too long.
Recommended Action Enter a CAPP hash secret of no more than 31 characters in the field provided.
Error Message Invalid HTTP HEAD response timeout.Explanation You are attempting to specify an HTTP HEAD response timeout that is invalid.
Recommended Action Enter a response timeout between 20 and 60 seconds in the HTTP HEAD response timeout field in the KeepAlive Properties window.
Error Message Response timeout must be between 20 and 60 seconds.Explanation You are attempting to specify an HTTP HEAD response timeout that is invalid.
Recommended Action Enter a response timeout between 20 and 60 seconds in the HTTP HEAD response timeout field in the KeepAlive Properties window.
Error Message    Invalid HTTP HEAD destination port. Destination port
must be between 1 and 65,535.
Explanation You are attempting to specify a port number for HTTP HEAD traffic that is invalid.
Recommended Action In the HTTP HEAD destination port field in the KeepAlive Properties window, enter a port number between 1 and 65,535 through which HTTP Head keepalive traffic will pass. The default port is 80.
Error Message    Invalid HTTP HEAD path. Path length must not exceed
256 characters.
Explanation You are attempting to specify an HTTP HEAD path that is not valid.
Recommended Action Enter a valid path shorter than 256 characters in the HTTP HEAD default path field in the KeepAlive Properties window.
Error Message    Invalid <keepalive type> minimum probe frequency.
Frequency must be between <min> and <max>.
Explanation You are attempting to specify a minimum probe interval for your keepalive type that is invalid.
Recommended Action Specify an interval (in seconds) within the range specified for that keepalive type in the KeepAlive Properties window. The interval range for the CRA keepalive type is between 1 and 60 seconds. For all other keepalive types, it is between 45 and 255 seconds.
Keepalive Error Messages
Error Message    Duplicate keepalive address detected. A keepalive
must not be configured to use the same primary and secondary
addresses.
Explanation You are trying to configure a KAL-AP keepalive that is identical to a keepalive of the same type that already exists.
Recommended Action Configure the KAL-AP keepalive to use a different primary and secondary address.
Error Message    Duplicate keepalive primary address
'<primaryaddress>' detected. An address can be used by at most
one KAL-AP type keepalive.
Explanation You are trying to configure a KAL-AP keepalive that uses the same primary IP address as a keepalive of the same type that already exists.
Recommended Action Configure the KAL-AP keepalive to use a primary IP address that is not already being used by another keepalive.
Error Message    Duplicate keepalive secondary address '<secondary
address>' detected. An address can be used by at most one KAL-AP
type keepalive.
Explanation You are trying to configure a KAL-AP keepalive that uses the same secondary IP address as a keepalive of the same type that already exists.
Recommended Action Configure the KAL-AP keepalive to use a secondary IP address that is not already being used by another keepalive.
Error Message    Duplicate keepalive detected. An HTTP HEAD keepalive
must not use the same address, destination path, host tag, and
port as another HTTP HEAD keepalive.
Explanation You are trying to configure an HTTP Head keepalive that features an identical configuration to that of another HTTP Head keepalive on your GSS network.
Recommended Action Configure the HTTP Head keepalive to use a unique configuration of address, destination path, host tag, and port.
Error Message    Duplicate keepalive detected. An ICMP keepalive must
not use the same address as another ICMP keepalive.
Explanation You are trying to configure an ICMP keepalive with an IP address that is identical to that of another ICMP keepalive on your GSS network.
Recommended Action Configure the ICMP to use a unique IP address.
Error Message    Invalid CAPP hash secret. Secret length must not
exceed 31 characters.
Explanation You are attempting to create a KAL-AP keepalive using a CAPP hash secret but have specified a secret that is too long.
Recommended Action Enter a CAPP hash secret of no more than 31 characters in the field provided.
Error Message    Invalid HTTP HEAD destination port. If specified,
destination port must be between 0 and 65,535.
Explanation You are attempting to specify a port number for HTTP HEAD traffic that is invalid.
Recommended Action In the HTTP HEAD destination port field in the KeepAlive Properties window, enter a port number between 1 and 65,535 through which HTTP Head keepalive traffic will pass. The default port is 80.
Error Message    Invalid HTTP HEAD host tag. Host tag length must not
exceed 128 characters.
Explanation You are attempting to create an HTTP HEAD host tag that is too long.
Recommended Action Enter an HTTP HEAD host tag of no more than 128 characters.
Error Message    Invalid HTTP HEAD path. If specified, path length
must not exceed 256 characters.
Explanation You are attempting to specify an HTTP HEAD path that is not valid.
Recommended Action Enter a valid path shorter than 256 characters in the HTTP HEAD default path field in the KeepAlive Properties window.
Location Error Messages
Error Message    The location is still being referenced by other
objects and cannot be removed.
Explanation You are attempting to delete a location that has answers or GSSs associated with it.
Recommended Action Dissociate any answers or GSSs from the location and then try again to delete it.
Error Message    There already exists a location named <name> in
region <region> with the same name. Please specify a different
location name.
Explanation You are attempting to create a location within this region when another location with the same name already exists.
Recommended Action Change the name of the location so that it is unique for the region.
Owner Error Messages
Error Message Invalid owner name. Name must be entered.Explanation You are attempting to create an owner without assigning the owner a name.
Recommended Action Owners must have a unique name. Enter a name for the owner in the field provided and then save the owner.
Error Message    Invalid owner name. Name length must not exceed
80 characters.
Explanation You are attempting to assign a name to an owner that is too long.
Recommended Action Assign your owner a name that is no longer than 80 characters.
Error Message    An owner named <owner name> already exists. Name
must uniquely identify an owner.
Explanation You are attempting to assign your owner a name that is already assigned to another owner on your GSS network.
Recommended Action Assign a unique name to your owner.
Region Error Messages
Error Message    The region is still being referenced by other
objects and cannot be removed.
Explanation You are attempting to delete a region that is associated with GSSs on your GSS network.
Recommended Action Disassociate the GSSs from the region and then try again to delete the region.
Error Message    There already exists a region named <region name>.
All region names have to be unique.
Explanation You are attempting assign a name to the region that is already being used by another region on your GSS network.
Recommended Action Assign a unique name to your region.
GSS Error Messages
Error Message    Maximum number of GSSMs exceeded. A GSS network can
contain at most 2 GSSMs.
Explanation You are attempting to enable a GSSM when there are already two GSSMs enabled on your GSS network.
Recommended Action If necessary, remove your standby GSSM from your GSS network and then try again to enable the GSSM.
Error Message    The maximum number of <size> <className> has been
met.
Explanation You are attempting to add a resource to your GSS network when the maximum number of that resource already exists.
Recommended Action Remove an existing resource of the same type and then try again to add the new resource.
Source Address List Error Messages
Error Message    Invalid source address block '<block string>'.
Address block must specify a host or a network.
Explanation You are attempting to specify an invalid source address range.
Recommended Action Enter a valid source address or block of source addresses. Source addresses cannot specify a multicast address list.
Error Message    Invalid source address block '<blockstring>'.
Address block must specify a class A, B, or C host or network.
Explanation You are attempting to specify an invalid source address range.
Recommended Action Enter a valid source address or block of source addresses. Source addresses cannot specify a multicast address list.
Error Message    Invalid source address list name. Name must be
entered.
Explanation You are attempting to create a source address list without assigning the list a name.
Recommended Action Enter a name for the source address list in the Name field.
Error Message    Invalid source address list name. Name length must
not exceed 80 characters.
Explanation You are attempting to create a source address list with a name that is too long.
Recommended Action Enter a valid name for the source address list that has fewer than 80 characters and does not contain spaces.
Error Message    Invalid source address list name. Name must not
contain spaces.
Explanation You are attempting to create a source address list with a name that contains spaces. Source address list names cannot contain spaces.
Recommended Action Enter a valid name for the source address list that has fewer than 80 characters and does not contain spaces.
Error Message    This source address list cannot be deleted because
it is referenced by <number> DNS rules.
Explanation You are attempting to delete a source address list that is referenced by one or more DNS rules.
Recommended Action Disassociate your DNS rules from the source address list using the DNS Rule Builder or DNS Rule Wizard and then attempt to delete the source address list again.
Error Message    A source address list named '<name>' already exists.
Name must uniquely identify a source address list.
Explanation You are attempting to create a new source address list using a name that is already being used by another source address list on your GSS network.
Recommended Action Assign a unique name to your source address list that is no more than 80 characters and does not contain spaces.
Error Message    The maximum number of 30 source address blocks per
list has been met.
Explanation You are attempting to add a source address block to the source address list, when the maximum of 30 source address blocks has already been added to the list.
Recommended Action Remove an existing source address block, or create a new source address list for the source address block that you wish to add.
User Error Messages
Error Message    There already exists a user account named <user
name>. All user accounts must have a unique username.
Explanation You are attempting to create a user account with a name identical to that of an existing account.
Recommended Action Assign your new user account a unique name.
Error Message    You cannot delete the account with username 'admin'.
This account must exist.
Explanation You are attempting to delete the admin user account.
Recommended Action This account cannot be deleted from the GSSM.
Error Message    Invalid answer load threshold. Load threshold must
be between 2 and 254.
Explanation You are attempting to assign an invalid load threshold to your answer in the LT field.
Recommended Action Assign a load threshold for the answer that is between 2 and 254 in the LT field.
Error Message Invalid answer order. Order must not be negative.Explanation You are attempting to assign a negative order number to your answer. The order must be a positive number.
Recommended Action Enter a nonnegative whole number for the order.
![]()
![]()
![]()
![]()
![]()
![]()
![]()
![]()
Posted: Mon Mar 21 11:18:25 PST 2005
All contents are Copyright © 1992--2005 Cisco Systems, Inc. All rights reserved.
Important Notices and Privacy Statement.