|
|

Table Of Contents
Starting the Cisco GSS Software and the GUI
Configuring a Global Site Selector
Enabling and Disabling SSH, Telnet, and FTP on a GSS Device
Global Server Load-Balancing Configuration
Preparing to Configure Request Routing
Creating and Modifying GSS Devices
Creating and Modifying Source Address Lists
Configuring and Modifying Domain Lists
Modifying Global Keepalive Properties
Configuring and Modifying Shared Keepalives
Configuring and Modifying Answers
Configuring and Modifying Answer Groups
Building and Modifying DNS Rules
Getting Started
This chapter is designed to provide you with all the information you need to configure your GSS devices to connect to your network, establish global server load-balancing resources and rules on the devices, and configure your existing DNS system to recognize and interact with your GSS devices.
This chapter contains the following sections:
•
Overview
•
Overview
GSSs need to be configured separately for:
•
•
Network connectivity is configured for each device using the CLI. Global server load balancing and DNS management are configured using the centralized GSSM GUI.
This chapter explains how to set up and configure network connectivity for your GSS devices, and how to configure global server load balancing using the GSSM.
For instructions on monitoring the performance of your GSS network once you have configured your GSS devices, see Chapter 4, "Monitoring GSS Performance."
For detailed instructions on the syntax and use of GSS command, refer to the Cisco Global Site Selector Command Reference.
Network Configuration
When setting up your GSS or GSSM for the first time, you must log in directly to the CLI on the GSS device.
Note
Once you have configured your GSS device to connect to your IP network, you can enable SSH and Telnet, which will make it possible for you to administer the GSS device remotely in the future.
Note
After you have enabled your GSSMs and GSSs, use the GSSM GUI to activate each device on your network. See the "Creating and Modifying GSS Devices" section for more information.
Configuring a GSSM
Before you can begin configuring request routing or adding GSSs to your GSS network, you must first have configured a primary GSSM with which the GSSs will be associated.
When configuring a GSSM, you need to configure both the network connectivity of the GSSM as well as the embedded GSS database that resides on the GSSM and holds GSS device and network configuration information. You must also indicate whether the GSSM will serve as the primary or redundant (standby) manager.
After you have enabled your primary GSSM, see the "Starting the Cisco GSS Software and the GUI" section to enable the device and the GSSM GUI.
Note
To configure a GSS device to act as a GSSM:
Step 1
Step 1 through Step 6 to enable your primary Ethernet interface and assign an IP address, gateway, and host name to your device.By default, the host name for GSS devices is localhost.localdomain. This changes once you configure the host name for the device.
Step 2
gssm1.yourdomain.com(config)# exitgssm1.yourdomain.com# gssm database createIf a database has already been created on this device, an error message appears, for example:
gssm1.yourdomain.com# gssm database createDatabase exists. Use [gssm database delete] to remove.Use the database delete command to delete the existing database and then repeat the gssm database create command to create a new GSS database. For example:
gssm1.yourdomain.com# gssm database deletegssm1.yourdomain.com# gssm database createStep 3
•
gssm1.yourdomain.com# gss enable gssm-primary•
gssm1.yourdomain.com# gss enable gssm-standby 192.168.1.110You must have a primary GSSM configured and enabled before you can enable a standby GSSM.
Step 4
gssm1.yourdomain.com# write memoryIf you fail to save your configuration changes, the device reverts to its previous settings when it reboots.
Step 5
After enabling the GSSM GUI, you can use it to activate each device on your network. See the "Creating and Modifying GSS Devices" section for more information.
Starting the Cisco GSS Software and the GUI
After you have enabled your GSS devices, you must start the Cisco GSS software. Starting the software is required before the device will begin acting as a GSSM or GSS, and before you can access the GSSM GUI.
To start the Cisco GSS software on your GSS devices:
Step 1
Step 2
gss1.yourdomain.com> enableStep 3
gss1.yourdomain.com# gss startYou can now access the GSSM GUI using your preferred web browser by pointing that browser to the URL of the GSSM. See the "Logging On to the GSSM GUI" section for information on logging on to and navigating the GSSM GUI.
Configuring a Global Site Selector
You must have configured and enabled your primary GSSM before you can begin configuring GSS devices that are neither primary nor standby GSSMs. If you have not already done so, see the "Configuring a GSSM" section for information on configuring and enabling your primary and standby GSSMs and the "Starting the Cisco GSS Software and the GUI" section for information on starting the GSSM GUI.
Note
To configure a GSS hardware device to act as a GSS:
Step 1
By default, the host name for GSS devices is localhost.localdomain. This changes once you configure the host name for the device.
Step 2
localhost.localdomain> enablelocalhost.localdomain# configlocalhost.localdomain(config)#Step 3
localhost.localdomain(config)# gss-communications ethernet 0Step 4
localhost.localdomain(config)# gss-communications ethernet 0localhost.localdomain(config-eth0)# ip address 10.89.3.24 255.255.255.0localhost.localdomain(config-eth0)# exitlocalhost.localdomain(config)#Step 5
Host(config)# hostname gss1.yourdomain.comgss1.yourdomain.com(config)# ip default-gateway 10.89.12.100Step 6
gss1.yourdomain.com(config)# ip name-server 128.10.12.1gss1.yourdomain.com(config)# ip name-server 128.100.12.1, 128.110.12.1Step 7
gss1.yourdomain.com(config)# exitgss1.yourdomain.com# gss enable gss crm1.yourdomain.comStep 8
gss1.yourdomain.com# write memoryIf you fail to save your configuration changes, the device reverts to its previous settings when it reboots.
Step 9
You may also wish to enable SSH on the GSS device after you have configured its network settings. This makes it possible to administer the device remotely in the future.
See the "Enabling and Disabling SSH, Telnet, and FTP on a GSS Device" section that follows for information on using the ssh and telnet commands to enable or disable those services.
Enabling and Disabling SSH, Telnet, and FTP on a GSS Device
In order to monitor the performance of your GSS devices and administer them once they are deployed, you must be able to access those devices.
Accordingly, once you have basic network connectivity on your GSS device you may want to use the CLI to enable remote access to the device using the SSH, Telnet, or FTP protocols.
To enable or disable SSH, Telnet, or FTP on your GSS device:
Step 1
Step 2
gssm1.yourdomain.com> enablegssm1.yourdomain.com# configgssm1.yourdomain.com(config)#Step 3
gssm1.yourdomain.com(config)# ssh enableStep 4
Step 5
gssm1.yourdomain.com(config)# telnet enablegssm1.yourdomain.com(config)# no telnet enableStep 6
gssm1.yourdomain.com(config)# write memoryStep 7
gssm1.yourdomain.com(config)# exitgssm1.yourdomain.com#
Logging On to the GSSM GUI
After you have configured and enabled your primary GSSM, you are ready to access the GSSM GUI by pointing your preferred web browser to the DNS name or IP address of the primary GSSM.
If you have not yet configured your primary GSSM and activated the Cisco GSS software, see the "Configuring a GSSM" section and the "Enabling and Disabling SSH, Telnet, and FTP on a GSS Device" section for instructions on completing these required steps.
Remember that the GSSM uses secure HTTP (HTTPS) to communicate with web clients. For example, if your primary GSSM is named gssm1.yourdomain.com, you would enter the following to bring up the GSSM GUI logon window and access the GUI:
https://gssm1.yourdomain.comWhen first logging on to the GSSM GUI, you can use the system default administrative account and password to access the GSSM GUI. See the instructions that follow for more detail.
After accessing the GUI, you can create and maintain additional user accounts and passwords using the user administration features of the GUI. See the "Creating and Managing GSSM Login Accounts" section on page 3-9 for more information on creating user accounts.
Note
To log on to the GSSM GUI:
Step 1
In the address field, enter the secure HTTP address of your GSSM. For example:
https://gssm1.cisco.com
Note
Step 2
Note
Step 3
•
•
The GSSM Welcome window appears. See the "Global Server Load-Balancing Configuration" section that follows for instructions on using the GSSM to configure content request routing on your GSS network.
Global Server Load-Balancing Configuration
Once you have created your GSS device and configured it to connect to your network, you are ready to begin configuring request routing and global server load balancing on your GSS network.
Global server load balancing on your GSS network is managed through a centralized GUI on the GSSM. Using this interface, you can identify your network resources (GSSs) and create the DNS rules that will be used to process incoming content requests.
See the "Understanding the GSSM GUI" section on page 1-33 for information on navigating the GSSM GUI.
Overview
Because you will be creating DNS rules that route incoming DNS requests to the most available data centers and resources on your network, you must configure the elements that will constitute your DNS rules before creating the rules themselves.
Use the following order in configuring your GSS devices and resources:
1.
2.
3.
4.
5.
6.
7.
8.
Preparing to Configure Request Routing
Make sure that you have configured your hardware devices. You must have a primary GSSM configured and enabled before you can configure request routing and server load balancing on the GSS network. Ideally, you have a standby GSSM configured as well.
See the "Network Configuration" section for more information. If you will be deploying GSSs in addition to your primary and standby GSSM, these devices will identify themselves to the GSSM and appear on the GSSM GUI when you click the Resources button and choose Global Site Selectors from the drop-down menu.
Organizing Your GSS Network
The GSSM provides you with a number of tools that allow you to group and organize resources on your GSS network. The sections below explain how to create and manage these organizational tools on your GSS network. These include:
•
•
•
The following sections explain how to create and manage locations, regions, and owners on your GSS network.
Creating and Modifying Locations and Regions
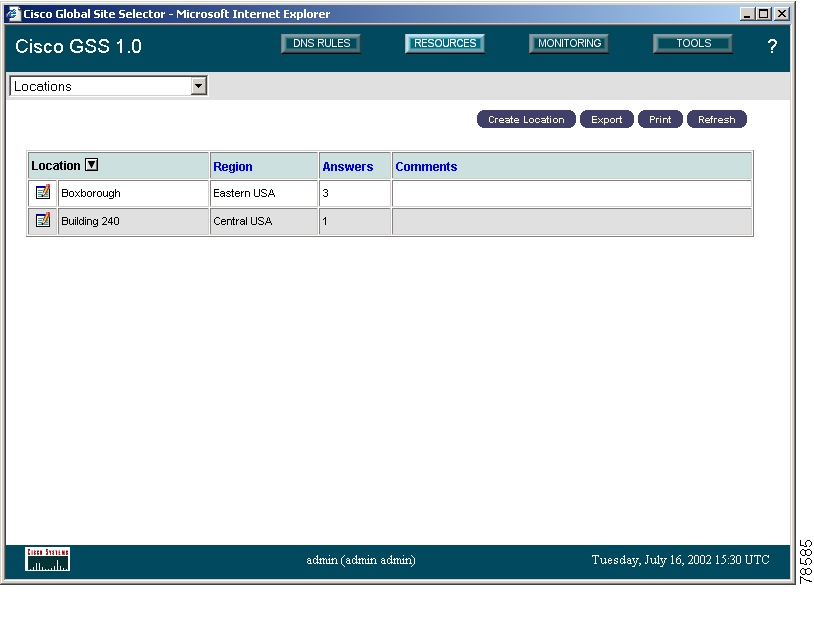
The process for creating and maintaining locations and regions is essentially identical, except that in addition to their other configuration information, locations are associated with regions in a many-to-one relationship. Use the following procedures to set up both regions and locations on your GSS network.
In addition to providing an organizational scheme for your GSS network, locations can also be used for bulk management of GSS resources, such as answers. See the "Suspending or Reactivating All Answers in a Location" section for more information.
Creating New Locations and Regions
To create a new location or region:
Step 1
Step 2
Figure 2-1 Locations List Window
Note
Step 3
Step 4
Step 5
Step 6
Step 7
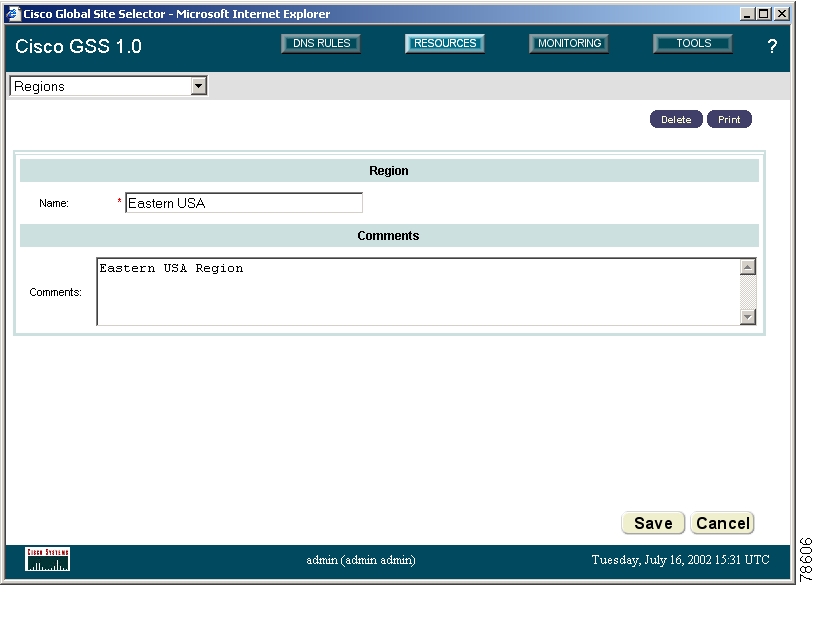
Modifying Locations and Regions
You can modify your locations and regions at any point after you create them using the GSSM GUI.
To modify regions and locations:
Step 1
Step 2
Figure 2-2 Modify Region Window
Step 3
Step 4
Step 5
Step 6
Step 7
Deleting Locations and Regions
You can delete locations and regions from the GSS using the GSSM GUI. Before you attempt to delete a region or location, be sure that you know what dependencies that resource has. For example, regions that have locations associated with them cannot be deleted. In addition, answers associated with locations that are deleted will automatically be associated with the "Unspecified" location.
To delete regions and locations:
Step 1
Step 2
Step 3
Step 4
Step 5
If an error appears, telling you that a GSS resource is still linked to this grouping, use the GSSM GUI to disassociate that resource and then try deleting the grouping again.
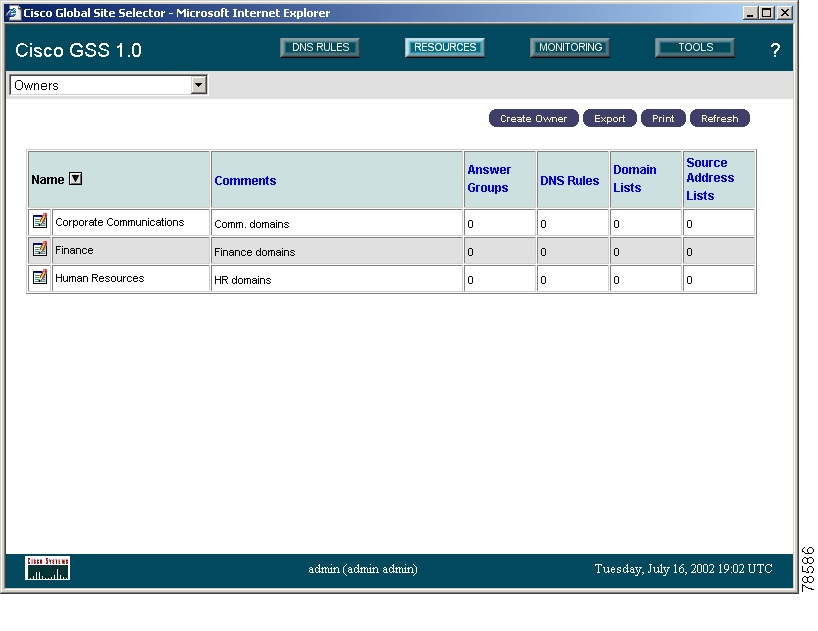
Creating and Modifying Owners
Owners are logical groupings for GSS network resources that correspond to business or organizational structures. For example, an owner might be a hosting customer, an internal department such as human resources, or an IT staff resource.
Owners are created and managed separately from either GSS or GSSM logins, and there is no necessary connection between the two.
As with locations, owner designations can be used for bulk management of GSS resources. See the "Suspending or Reactivating All Answers in an Answer Group Associated with an Owner" section or the "Suspending or Reactivating All DNS Rules Belonging to an Owner" section for information on using owners to manage your GSS network.
Use the following procedures to create and manage your GSS owners.
Creating New Owners
Step 1
Step 2
Figure 2-3 Owners List Window
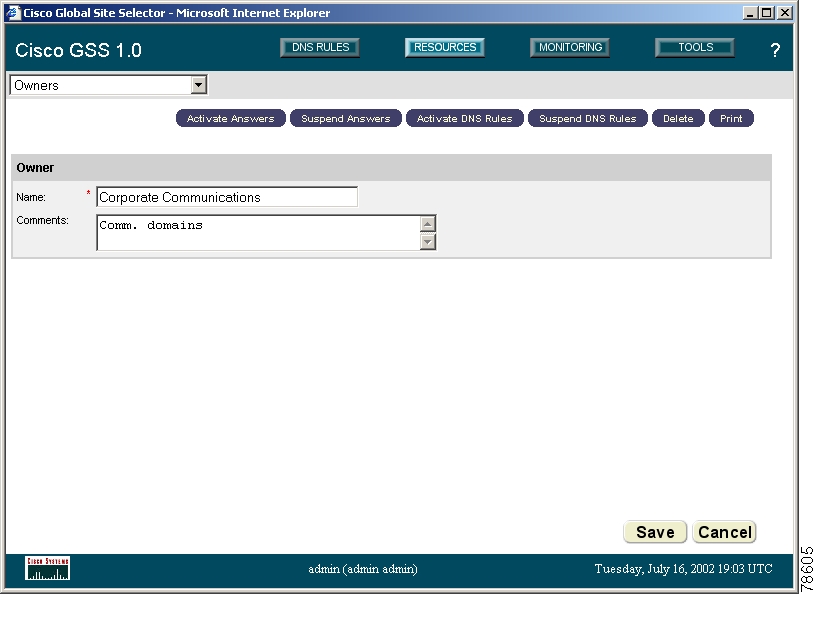
Step 3
Figure 2-4 Owners Details Window
Step 4
Step 5
Step 6
Modifying Owners
You can modify your owners at any point after you create them using the GSSM GUI.
To modify an owner:
Step 1
Step 2
Step 3
Step 4
Step 5
Step 6
Deleting Owners
You can delete an owner at any point after you create it using the GSSM GUI. Before you attempt to delete an owner, be sure that you know what dependencies that resource has. For example, answer groups, DNS rules, and domain lists associated with an owner will, if that owner is deleted, automatically be associated with the "System" owner account.
To delete an owner:
Step 1
Step 2
Step 3
Step 4
Grouping GSS Resources by Location, Region, and Owner
After you have created your locations, regions, and owners, you can begin using these tools to organize your GSS resources. To associate a particular resource with a location, region, or owner, edit the properties of that resource and then choose the location, region, or owner from the drop-down list provided. Table 2-1 indicates which GSS resources can be grouped by locations, regions, and owners.
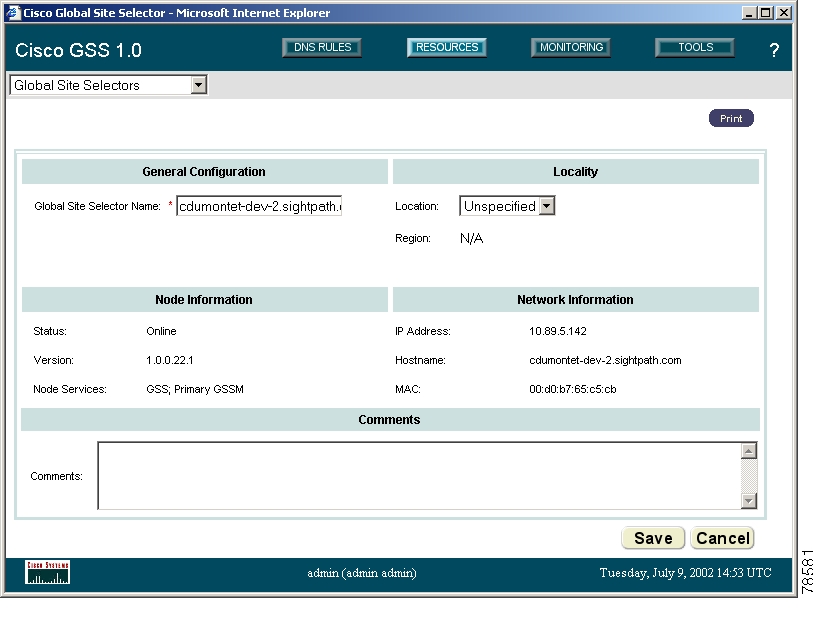
Creating and Modifying GSS Devices
The first step in configuring global server load balancing on your GSS network is to activate and configure your GSS devices. Using the Global Site Selectors feature of the GSSM GUI, you can activate GSS devices (GSSs and standby GSSMs) that have been added to your GSS network, name GSS devices, and delete them from the GSS network.
Activating Your GSS Devices
After you have configured your GSS devices to act as GSSs or GSSMs, you must activate those devices from the GSSM GUI before they can begin receiving and processing user requests.
The one exception to this rule is the primary GSSM, which does not need to be activated after it is initially configured.
To activate a GSS or a standby GSSM from the primary GSSM GUI:
Step 1
Step 2
Step 3
Figure 2-5 GSS Details Window
Step 4
Step 5
Assuming that the device is functioning properly and that network connectivity between the device and the GSSM is good, the status of the device changes to online the next time the GSSM polls the GSS. The default GSS poll rate is 5 minutes.
Step 6
Modifying GSS Device Configuration
You can modify the name and location of any of your GSS devices using the GSSM GUI. To modify other network information such as the host name, IP address, or role, however, you must access the CLI on the device.
To modify the name and location of a GSS device:
Step 1
Step 2
Step 3
Step 4
Step 5
Step 6
Deleting GSS Devices
With the exception of the primary GSSM, you can delete GSS devices from your network using the GSSM GUI. Deleting a GSS device such as a GSS or standby GSSM allows you to remove nonfunctioning GSS devices from your network, or to reconfigure and then reactivate a device should you encounter synchronization problems following a software upgrade or other configuration change.
To delete a GSS device:
Step 1
Step 2
Step 3
Step 4
Step 5
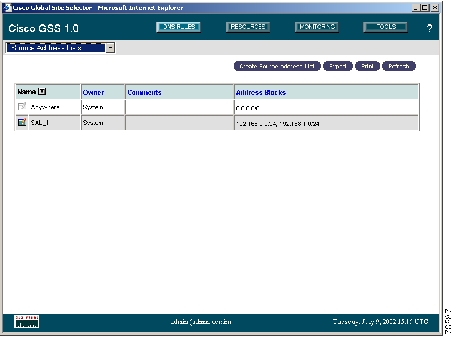
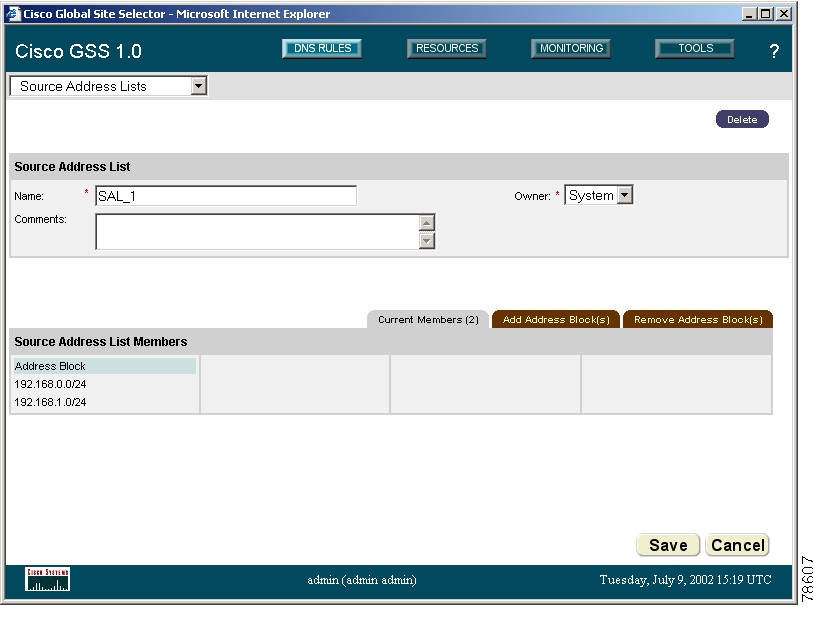
Creating and Modifying Source Address Lists
The second step in configuring routing on your GSS network is to define the addresses from which requests will be sent. This is accomplished through the creation of source address lists, which are collections of IP addresses or address blocks for known client DNS proxies (or D-proxies).
Note
Using the source address lists feature, you can enter one or more IP addresses, up to 30 addresses per list, representing DNS proxies from which requests will be originating.
In addition to adding individual addresses, the GSSM interface also allows you to enter IP address blocks conforming to the classless interdomain routing (CIDR) IP addressing scheme.
Creating Source Address Lists
To configure a source address list:
Step 1
Step 2
Figure 2-6 Source Address Lists Window
Step 3
Figure 2-7 Source Address List Details Window
Step 4
Step 5
Step 6
Step 7
192.168.100.0/24; 10.89.0.0/16; 10.68.10.1Step 8
Step 9
Step 10
You can add or remove addresses from the list at any time. See the "Modifying Source Address Lists" section that follows.
Modifying Source Address Lists
To modify an existing source address list:
Step 1
Step 2
Step 3
Step 4
Step 5
Step 6
Step 7
Deleting Source Address Lists
You cannot delete source address lists that are associated with an existing DNS rule. Before proceeding with the instructions below, first verify that none of your DNS rules reference the source address list that you will be deleting.
To delete a source address list from your GSS network:
Step 1
Step 2
Step 3
Step 4
Step 5
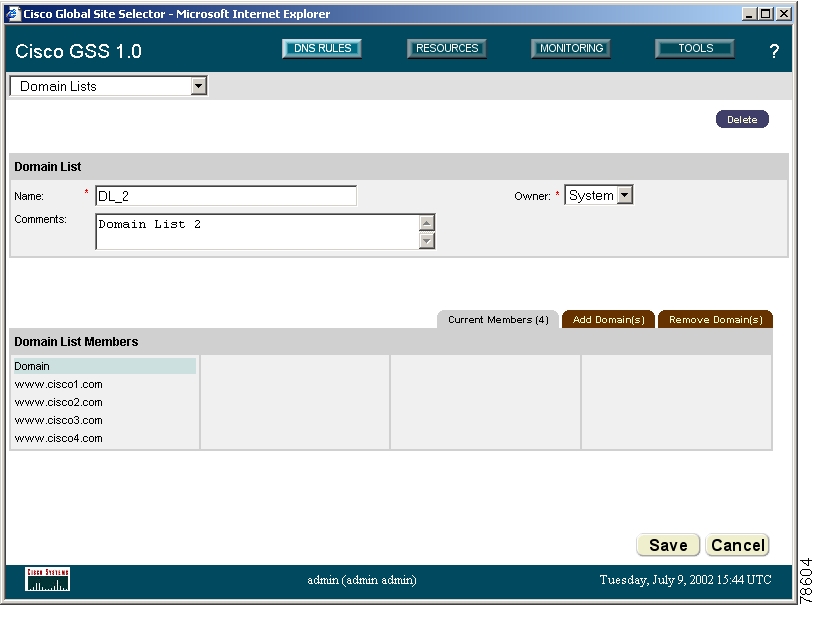
Configuring and Modifying Domain Lists
Domain lists are collections of domain names for Internet or intranet resources, sometimes referred to as "hosted domains," that are being requested by your users.
Domain lists contain one or more domain names that point to content for which the GSS is acting as the authoritative DNS server and for which you wish to use the GSS technology to balance traffic and user requests. Using the domain lists feature, you can enter complete domain names or any valid regular expression that specifies a pattern by which the GSS can match incoming addresses. For example, if you had only three hosted domains—www.cisco.com, support.cisco.com, and customer.cisco.com—for which the GSS was responsible, you might want to enter only those domains in your domain list, as follows:
www.cisco.com; support.cisco.com; customer.cisco.comHowever, if you had 20 or more possible domains for which the GSS was responsible—www1.cisco.com, www2.cisco.com, and so on—manually entering each address is prohibitive. In such a situation, you could create a wildcard expression that would cover all those domains, as follows:
.*\.cisco\.comAny request for a hosted domain that matches that pattern will be directed accordingly.
The Cisco GSS can support up to 1024 domains on any single server load-balancing device such as a Content Services Switch or Content Switching Module.
Creating Domain Lists
To create a domain list:
Step 1
Step 2
Figure 2-8 Domain Lists Window
Step 3
Figure 2-9 Domain List Details Window
Step 4
Step 5
Step 6
Step 7
www.cisco.com; .*\.fidelity\.comThese should be addresses of resources for which the GSS is acting as the authoritative DNS server.
Domain names that do not use wildcards cannot exceed 128 characters. For domain names with wildcards that are valid regular expressions, the GSS can match strings up to 256 characters long.
If you are entering multiple domain names, separate each one with a semicolon, for example:
www.cisco.com; support.cisco.com; cdn.cisco.comStep 8
Step 9
Step 10
You can add domains to or remove them from the list at any time. See the "Modifying Domain Lists" section that follows.
Modifying Domain Lists
To modify an existing domain list:
Step 1
Step 2
Step 3
Step 4
Step 5
Step 6
•
•
Step 7
Deleting Domain Lists
You cannot delete domain lists that are associated with an existing DNS rule. Before proceeding with the instructions below, first verify that none of your DNS rules reference the domain list that you will be deleting.
To delete a domain list from your GSS network:
Step 1
Step 2
Step 3
Step 4
Step 5
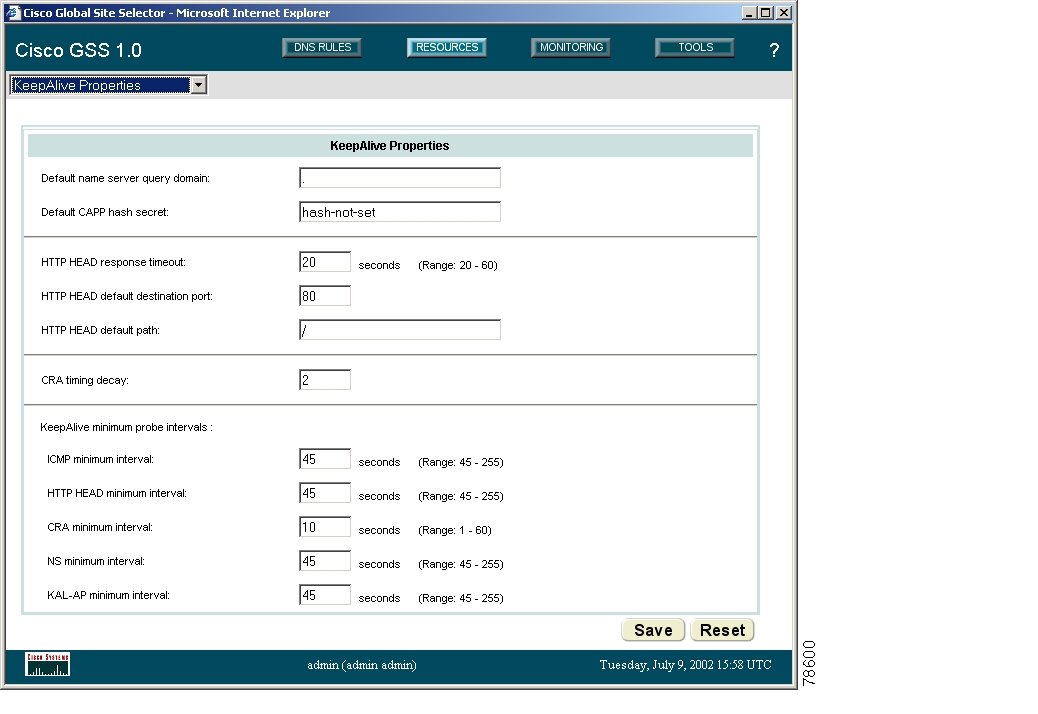
Modifying Global Keepalive Properties
Using fields available on the KeepAlive Properties window, you can modify your global GSS keepalive properties. These are the default or minimum values used by the GSS when no other value is specified by the user. Changing the global keepalive properties is optional.
To modify the GSS keepalive properties:
Step 1
Step 2
Figure 2-10 KeepAlive Properties Window
Step 3
Step 4
Step 5
Configuring and Modifying Shared Keepalives
Shared keepalives are keepalive objects that can be used to provide liveness information to the GSS for multiple VIP answer types.
Once created, shared keepalives are associated with VIPs when you create VIP answer types.
Should a shared keepalive fail to return a liveness status, all VIPs associated with that shared keepalive are assumed to be off line.
You must have a shared keepalive configured if you intend to use the KAL-AP keepalive method with a VIP answer; they are an option for both the ICMP and HTTP Head keepalive types.
Creating a Shared Keepalive
To create a shared keepalive:
Step 1
Step 2
Step 3
Step 4
•
•
•
Step 5
•
•
–
–
–
•
–
–
–
home/athurber/Step 6
Modifying a Shared Keepalive
Once you have configured your shared keepalives, they can be modified at any time using the GSSM user interface.
To modify an existing shared keepalive:
Step 1
Step 2
Step 3
Step 4
Step 5
Deleting a Shared Keepalive
To delete a shared keepalive from your GSS network, you must first disassociate any answers that are using the keepalive. Use the procedure that follows to disassociate your answers and remove a shared keepalive from your GSS network.
To delete a shared keepalive:
Step 1
Step 2
Step 3
Step 4
•
•
You are prompted to confirm your decision to disassociate all the answers from the existing shared keepalive.
Step 5
Step 6
Step 7
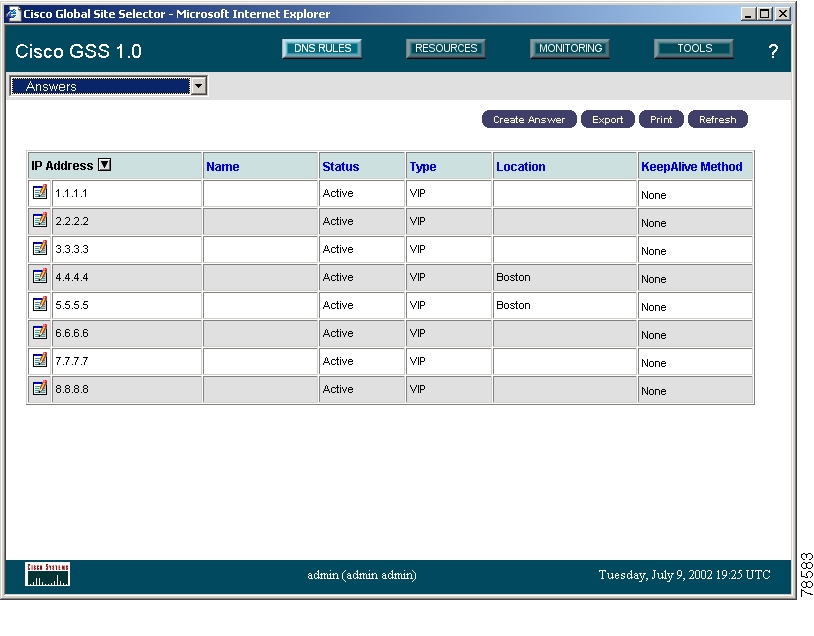
Configuring and Modifying Answers
Use the sections that follow to create and configure GSS answers to DNS queries. See the "Answers and Answer Groups" section on page 1-19 for information on each type of answer.
After you have configured your answers, see the "Configuring and Modifying Answer Groups" section for instructions on collecting those answers into groups from which individual answers will be chosen by your DNS rules.
Remember that the method of keepalive monitoring available to you varies with the resource type, as explained below.
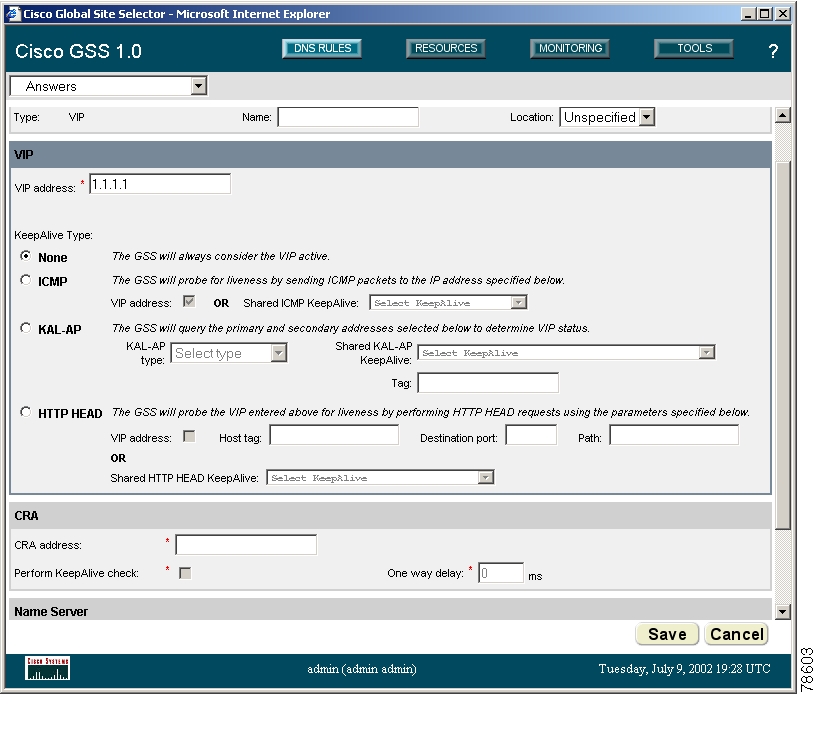
Creating a VIP Answer Type
The VIP answer type refers to a virtual IP address (VIP) associated with an SLB device such as a Content Services Switch or Content Switching Module. When it receives requests for content that is managed by an SLB, the GSS returns an A record containing the VIP of the SLB that manages that content.
When configuring a VIP answer type you have the option of configuring one of a variety of different keepalive types to test for that answer. For certain keepalives, such as KAL-AP, it is necessary to configure shared keepalives before configuring your answer. See the "Configuring and Modifying Shared Keepalives" section for more information on creating shared keepalives.
See the "Answers and Answer Groups" section on page 1-19 for more information on the VIP answer type.
To configure a VIP answer type:
Step 1
Step 2
Figure 2-11 Answers List Window
Step 3
Figure 2-12 Answers Details Window
Step 4
Note
Step 5
Step 6
Step 7
Step 8
Step 9
•
•
•
•
Step 10
•
•
–
–
•
–
–
Step 11
•
–
–
•
•
Step 12
Creating a CRA Answer Type
The content routing agent (CRA) answer type is designed to work with the GSS when the boomerang balance method has been selected.
Closeness is determined when multiple hosts reply to the requesting D-proxy simultaneously in what is referred to as a "DNS race." The GSS coordinates the start of the race so that all CRAs initiate their response at the exact same time. The first DNS reply to reach the D-proxy is chosen by the server as the host containing the answer.
To configure a CRA answer type:
Step 1
Step 2
Step 3
Step 4
Step 5
Step 6
Step 7
Step 8
10.10.10.1Step 9
Step 10
Note
When specified, this value is used to calculate a static round-trip time (RTT), with the one-way delay constituting one-half of the round-trip time that will be used for all DNS races involving this answer. Use the one-way delay value instead of the delay measured by the GSS keepalive engine.
Step 11
Creating a Name Server Answer Type
To configure a name server answer type:
Step 1
Step 2
Step 3
Step 4
Note
Step 5
Step 6
Step 7
Step 8
Step 9
Step 10
cisco.comIf no domain is specified, the GSS will query the default query domain. For instructions on configuring the default query domain, see the "Configuring and Modifying Shared Keepalives" section.
Step 11
Modifying an Answer
Once you have configured your answers, they can be modified at any time using the GSSM user interface.
To modify an existing answer:
Step 1
Step 2
Step 3
Step 4
Note
Step 5
Suspending or Reactivating an Answer
If you have created an answer but wish to temporarily stop the GSS from using it, you can use the suspend feature on the GSSM user interface to prevent that answer from being used by any of the currently configured DNS rules.
If you have already suspended an answer, use the activate feature to reactivate the answer.
To suspend or reactivate an answer:
Step 1
Step 2
Step 3
Step 4
If you are reactivating a suspended answer, click the Activate button.
Step 5
Suspending or Reactivating All Answers in a Location
Answers can be grouped and managed according to a GSS location that has been established and with which answers have been associated.
Using locations to manage your answers makes it easier for you to quickly suspend or activate answers in a particular area of your network, for example, shutting down one or more data centers for the purposes of software upgrades or regular maintenance.
The GSS automatically detects and routes requests around suspended answers.
To suspend or reactivate answers based on their location:
Step 1
Step 2
Step 3
Step 4
•
•
You are asked to confirm your decision to suspend or activate the answers.
Step 5
Deleting an Answer
If you have created an answer but wish to delete it from the GSS, you can use the delete feature on the GSSM GUI to remove that answer.
To delete an answer:
Step 1
Step 2
Step 3
Step 4
Step 5
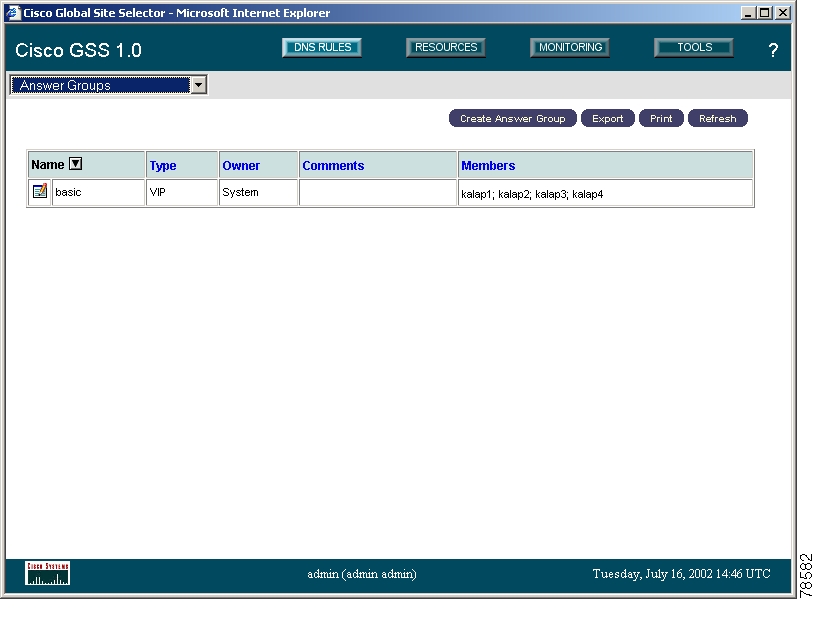
Configuring and Modifying Answer Groups
Answer groups are lists of GSS resources that are candidates to respond to DNS queries received from a user for a hosted domain. Using the DNS rules feature, these lists of network resources are associated with a particular balance method, which is used to resolve the request.
•
•
•
A DNS rule can have up to three balance clauses, each specifying a different answer group from which an answer can be chosen, after taking load threshold, order, and weight factors into account for each answer.
Before creating your answer groups, you must first have configured the answers that will make up those groups. See the "Configuring and Modifying Answers" section for more information on creating GSS answers.
Creating an Answer Group
The procedure for creating an answer group is the same, regardless of what type of answer group you are creating.
To create an answer group:
Step 1
Step 2
Figure 2-13 Answer Group List Window
Step 3
Figure 2-14 Answer Group Details Window
Step 4
Note
Step 5
Step 6
Step 7
•
•
•
Step 8
Step 9
Step 10
Step 11
Step 12
•
•
•
If you are unsure of the purpose of the order, weight, or load threshold settings, see the "Balance Method Options" section on page 1-25 for descriptions of each.
Step 13
You can add answers to or remove answers from the answer group at any time. See the "Modifying an Answer Group" section that follows for more information.
Modifying an Answer Group
Once you have created your answer groups, you can use the GSSM GUI to make modifications to their configurations, adding and removing answers, changing the order, weight, and load thresholds of individual answers, and so on.
Answers can belong to more than one answer group. However, once you have added answers to an answer group, you cannot change the type of an answer group (for example, from VIP to CRA).
To modify an answer group:
Step 1
Step 2
Step 3
Step 4
Note
Step 5
Step 6
•
–
–
–
•
–
–
–
•
Step 7
•
–
–
–
–
•
–
–
–
Step 8
Suspending or Reactivating an Answer Group
If you have created an answer group but wish to temporarily stop the GSS from directing requests to it, you can use the suspend answer feature on the GSSM user interface to temporarily suspend the answers that make up that group, thus preventing that answer group from being used by any of the currently configured DNS rules.
Note
If you have already suspended the answers in an answer group, use the activate answers feature to reactivate the answer group.
To suspend or reactivate an answer group:
Step 1
Step 2
Step 3
Step 4
If you are reactivating an answer group, click the Activate Answers button.
Step 5
Step 6
Suspending or Reactivating All Answers in an Answer Group Associated with an Owner
Answers that have been added to answer groups can be grouped and managed according to a GSS owner.
Using a GSS owner to manage your answer groups makes it easier for you to quickly suspend or activate related answers.
To suspend or reactivate all answers in answer groups associated with a GSS owner:
Step 1
Step 2
Step 3
Step 4
•
•
You are asked to confirm your decision to suspend or activate the answers.
Step 5
Deleting an Answer Group
If you have created an answer group but wish to delete it from the GSS, you can use the delete feature on the GSSM user interface to remove that answer.
Note
Deleting an answer group does not delete the answers contained in the group.
To delete an answer group:
Step 1
Step 2
Step 3
Step 4
Step 5
Building and Modifying DNS Rules
Once you have configured your source address lists, domain lists, answers, and answer groups, you are ready to begin constructing the DNS rules that will govern all global server load balancing on your GSS network.
When building DNS rules, you specify actions for the GSS to take when it receives a request from a known source (a member of a source address list) for a known hosted domain (a member of a domain list).
The DNS rule specifies which response (answer) will be given to the requesting user's local DNS host (D-proxy) and how that answer is chosen. One of a variety of balance methods is used to determine the best response to the request, based on the liveness and load of your GSS host devices.
Before creating your DNS rules, review the "Architecture" section on page 1-15.
DNS Rule Configuration Interface
The DNS rule area of the GSSM GUI does not correspond exactly to the list window and details window division described in the "Preparing to Configure Request Routing" section.
Because of the complexity of DNS rules, a slightly different interface scheme was adopted for the process of creating these rules. This scheme gives the user a choice of two interfaces for creating rules:
•
•
DNS Rule Builder
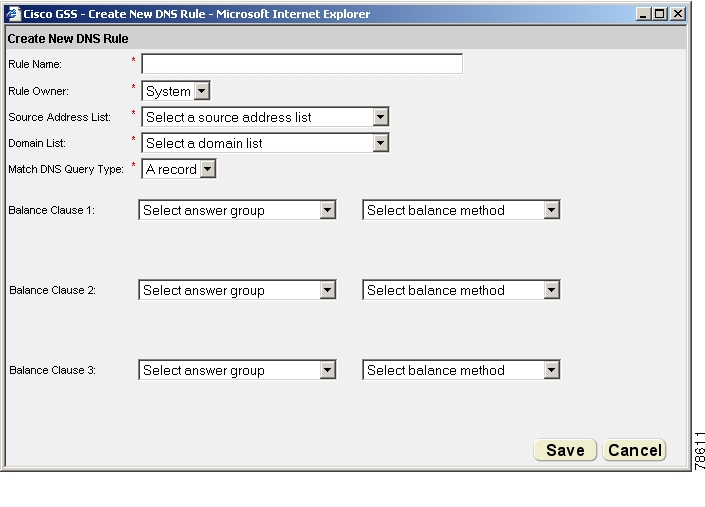
If you are an experienced GSS user, you can use the DNS Rule Builder (see Figure 2-15) to quickly assemble DNS rules from source address lists, domain lists, and answers (balance methods) that you have already created. Using the fields and drop-down menus provided, you can assign a name for your rule and then configure the rule with up to three balance methods.
Figure 2-15 DNS Rule Builder Window
Because the DNS Rule Builder is launched in its own window, you can leave it open and return to the GSSM GUI to review or add answers, answer groups, domain lists, and more. Any changes made to your GSS network configuration while the DNS Rule Builder is open are immediately reflected in the DNS Rule Builder. For example, an answer group added while the DNS Rule Builder window is open automatically appears in the drop-down list of answer groups.
To access the DNS Rule Builder, click the DNS RULES button and then click Open Rule Builder.
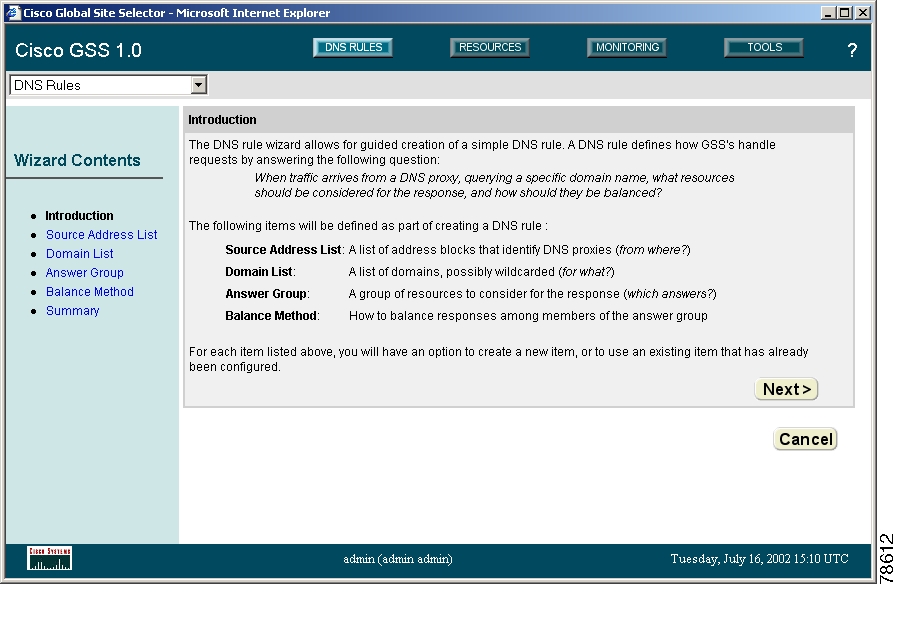
DNS Rule Wizard
The DNS Rule Wizard (see Figure 2-16) is an easy-to-use tool that walks you through the process of creating a DNS rule. Unlike the DNS Rule Builder, the DNS Rule Wizard provides explanations for each step in the rule authoring process. Like the DNS Rule Builder, the DNS Rule Wizard allows you to create source address lists, domain lists, answer groups, and balance methods on the fly.
Figure 2-16 DNS Rule Wizard Window
When you use the wizard, the Next and Back buttons step you forward and backward through the rule-building process. Alternatively, use the links under the Wizard Contents heading to jump back and forth to any step in the wizard.
Building DNS Rules Using the Wizard
To create a DNS rule using the DNS Rules Wizard:
Step 1
Figure 2-17 DNS Rules List Window
Step 2
Step 3
Step 4
•
•
•
Step 5
•
–
–
–
192.168.1.110/32; 192.168.10.0/24; 192.161.0.0/16•
Step 6
Step 7
•
•
Step 8
Do one of the following:
•
–
–
–
www.cisco.com; .*\.fidelity\.comAny request for a hosted domain that matches that pattern is directed accordingly.
–
•
Step 9
Do one of the following:
•
•
Step 10
•
–
–
–
–
•
You will be asked to configure your answer group or choose an existing answer group to respond to requests.
If you will be creating your own answer group and need to enter more addresses than there are IP Address fields, click the Add Page button at the bottom of the window to create additional spaces in which to enter addresses.
Use the page number links in the upper right corner of the Answer Group Configuration window to navigate back and forth between windows.
Step 11
•
–
–
–
–
–
•
–
–
•
–
–
–
–
For example, if answer A has a weight of 10 and answer B has a weight of 1, answer A will receive 10 requests for every 1 directed to answer B.
Step 12
Step 13
Do one of the following:
•
–
•
•
–
–
–
–
–
–
•
Step 14
Step 15
a.
b.
c.
–
–
d.
–
–
Step 16
Building DNS Rules Using the DNS Rule Builder
If you are comfortable with the process of building a DNS rule and have already configured your domain lists, answers, and answer groups, you can use the DNS Rule Builder to quickly assemble a DNS rule.
The DNS Rule Builder is a simplified interface that pulls together all the GSS elements needed to create new DNS rules. In addition to being simpler than the DNS Rule Wizard, the DNS Rule Builder allows you to configure multiple clauses for your DNS rule; that is, additional answer group and balance method pairs that can be tried in the event that the first answer group and balance method specified does not yield an answer.
To create a DNS rule using the DNS Rule Builder:
Step 1
Step 2
Step 3
Step 4
Step 5
Step 6
Step 7
•
•
Step 8
Step 9
•
–
–
•
–
–
–
–
–
–
–
Step 10
•
•
–
–
Step 11
Step 12
Suspending a DNS Rule
If you want to stop requests from being processed by a DNS rule on your GSS, use the suspend feature to temporarily deactivate the rule. You can use the suspend feature to temporarily halt traffic to particular answers while those resources are receiving maintenance and so on.
Once a rule has been suspended, you must reactivate it from the GSSM GUI before it can again be used to process incoming DNS queries.
To suspend a DNS rule:
Step 1
Step 2
Step 3
Step 4
Suspending or Reactivating All DNS Rules Belonging to an Owner
DNS rules can be grouped and managed according to a GSS owner that has been established and with which the DNS rules have been associated.
Using owners to manage your DNS rules makes it easier for you to quickly suspend or activate rules related to a particular group or department within your organization (for example HR or sales) without needing to individually edit each rule that serves that entity.
To suspend or reactivate DNS rules belonging to an owner:
Step 1
Step 2
Step 3
Step 4
•
•
You are asked to confirm your decision to suspend or activate all the DNS rules associated with this owner.
Step 5
Deleting a DNS Rule
To delete a DNS rule:
Step 1
Step 2
Step 3
Step 4
Configuring DNS Rule Filters
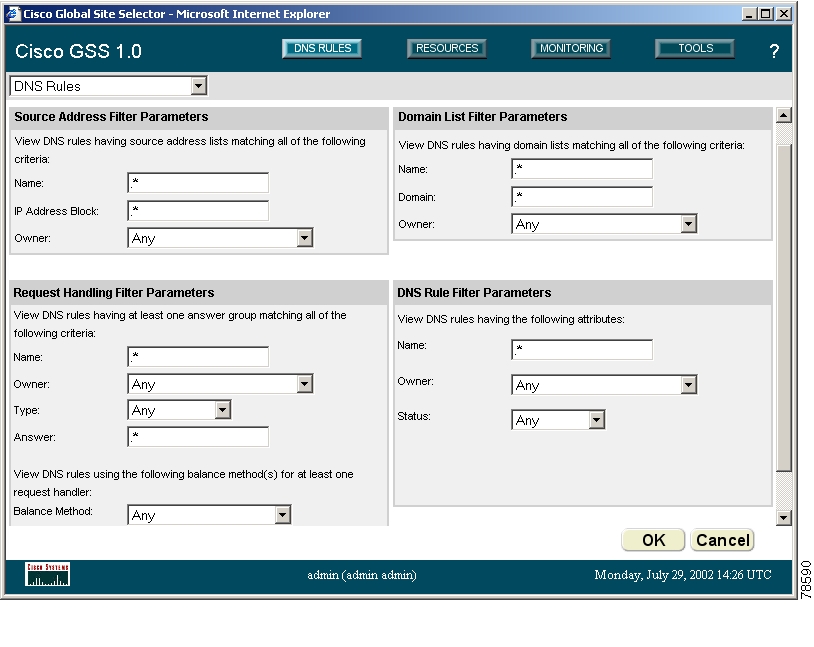
As your GSS network grows, so will your collection of DNS rules for handling traffic to and from your network. In time, it may become difficult to locate the rules that you need. For that reason, the GSS GUI provides filters that can be applied to your DNS rules, allowing you to view only those rules that have the properties you are interested in. For example, you can create a filter that will limit your view of the DNS rules to include only those that involve a certain source address list or domain list, use a certain balance method, are owned by a particular user, or have a status of "active."
To configure a DNS rule filter:
Step 1
Step 2
Figure 2-18 DNS Rule Filter List Window
Step 3
Step 4
Removing DNS Rule Filters
Use the Show All button to remove any filters that have been applied to your DNS rules. The Show All button removes all filters, displaying a complete list of DNS rules on your GSS network.
To remove DNS rule filters:
Step 1
Step 2
Upstream DNS Configuration
Once you have configured your GSS devices to connect to your network and have created the logical resources (source address lists, domain lists, answers and answer groups, and DNS rules) required for global server load balancing, you are ready to complete the final step that will integrate your new global server load-balancing device into your network's DNS infrastructure and start delivering user queries to your GSS: modifying your upstream DNS servers to delegate parts of your name space to your GSSs.
Note
Modifying your DNS servers to accommodate your GSS devices involves the following steps:
1.
2.
Example 2-1 provides an example of a DNS zone configuration file for a fictitious cisco.com domain that has been modified to delegate primary DNS authority for three domains to two GSS devices. Relevant lines are shown in bold type.
In Example 2-1, the delegated domains are:
•
•
•
The GSS devices are:
•
•
Example 2-1 Sample BIND Zone Configuration File Delegating GSSs
cisco.com. IN SOA ns1.cisco.com. postmaster.cisco.com. (2001111001 ; serial number36000 ; refresh 10 hours3600 ; retry 1 hour3600000 ; expire 42 days360000 ; minimum 100 hours ); Corporate Name Servers for cisco.comIN NS ns1.cisco.com.IN NS ns2.cisco.com.ns1 IN A 161.44.157.209ns2 IN A 161.44.150.100; Sub-domains delegated to GSS Networkwww IN NS gss1.cisco.comIN NS gss2.cisco.commedia IN CNAME wwwftp IN NS gss1.cisco.comIN NS gss2.cisco.com; "Glue" A records with GSS interface addresses; IN Cisco GSS Dallasgss1 IN A 100.1.2.3; IN Cisco GSS Londongss2 IN A 122.1.2.3; Sample Mail Exchanger records (also need glue)cisco.com. IN MX 10 proxy0.cisco.comcisco.com. IN MX 20 proxy1.cisco.comWhen reviewing this zone file, remember that there are any number of possible GSS deployments that you can use, some of which may suit your needs and your network better than the example listed. For example, instead of having all subdomains shared by all your GSS devices, you may want to allocate specific subdomains to specific GSSs.
![]()
![]()
![]()
![]()
![]()
![]()
![]()
![]()
Posted: Mon Mar 21 11:23:12 PST 2005
All contents are Copyright © 1992--2005 Cisco Systems, Inc. All rights reserved.
Important Notices and Privacy Statement.