|
|

This chapter describes how to mount and cable the Cisco CTE 1450.
This section provides instructions for trained service technicians installing one or more Cisco CTE 1450 systems in a rack. This guide includes procedures for the two-post flush-mount rack kits. The instructions assume the Cisco CTE 1450 and the accessory kit have already been removed from the shipping container and that the contents have been verified.
 |
Caution When installing multiple systems in a rack, complete all of the procedures for one system before beginning to install the next system. |
To install the Cisco CTE 1450 in a rack, perform the following steps:
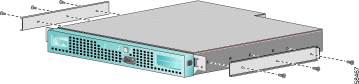
Using the six M4 Phillips pan-head screws provided, attach one chassis-support bracket to each side of the chassis. See Figure 3-1.
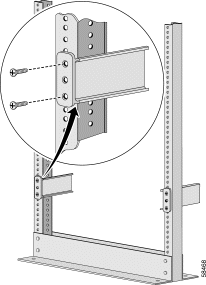
Step 2 Using four 12-24 x 3/4-inch screws (not provided), secure the rack-mount brackets to the rack.
Because not all holes in a rack are equidistant, it is possible to misalign the brackets. To avoid this problem, make sure that the three holes of the brackets line up exactly with the holes in the rack. See Figure 3-2.
Step 3 Remove the front bezel.
Step 4 Put the chassis into the rack.
Slide the chassis-support brackets into the rack-mount brackets.
|
Caution The rack-mount kit is not intended for use as a slide rail system. You must complete the installation of the front-mount bracket assembly by securely fastening the chassis into the rack. |
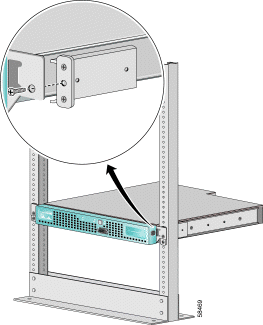
Step 5 Fasten the chassis in the rack.
Fasten the front flanges of the chassis to the rack.See Figure 3-3. When you are done, the chassis should not slide on the channel bar.
Step 6 Replace the front bezel.
This section describes how to make ground connections to prevent electric shock to the user and to meet regulatory requirements.
|
|||
|
|||
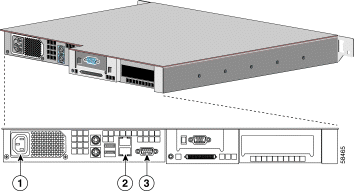
Connect the provided power cord to the AC power receptacle on the back panel, and connect Ethernet network cables to your SLB, switch, or server using the Ethernet connectors on the back panel. (See Figure 3-4.) You can use one or both Ethernet ports depending on the desired configuration. For port configuration details, refer to the Quick Start Guide: Cisco CTE 1400 Series Telephony Application Gateway (TAG) and Design Studio and the Cisco Content Transformation Engine 1400 Series Configuration Note Release 2.5.
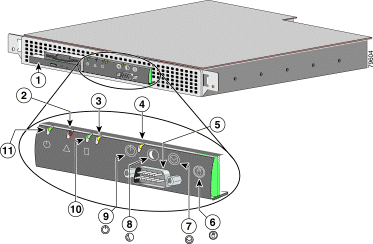
To power on the Cisco CTE 1450 after connecting the power, press the power button shown in Figure 3-5.
| 1 | 7 | ||
| 2 | 8 | ||
| 3 | 9 | ||
| 4 | 10 | ||
| 5 | 11 | ||
| 6 |
The first time that you power on the CTE, you are prompted for basic connection information. You will need to know the following information:
To configure the CTE for the first time:
After about five minutes, the CTE Serial Console appears on the computer terminal.
Step 2 Set and verify the root password when prompted. The password must be 8 or more characters.
Step 3 Enter the IP address and netmask for Interface 0 when prompted.
Step 4 Enter the IP address of the gateway device when prompted.
Step 5 If you use name resolution, enter the IP address for the DNS server when prompted. Otherwise, press Enter to leave the value unset.
Step 6 You can define two other DNS servers when prompted if you wish. To leave these values unset, press Enter at each prompt.
Step 7 Enter the name, if any, that you want to use as your default domain name, such as www.fox.com.
Step 8 Verify that the settings you have entered are correct.
If they are correct, type yes when asked to commit your changes.
If they are not correct, type no when asked to commit your changes, then type 0 (Express Setup) to reenter the settings.
Step 9 To test the connection, verify that the CTE can ping the connected network device: Enter option 1 (Configure Network Interface) and then option 6 (Ping).
If the ping is successful, you have completed the initial configuration. If the ping is not successful, check your connections, return to the serial console Main Menu, and type 0 (Express Setup) to change settings as needed.
To complete the CTE configuration, refer to the CTE Administration Guide.
The hardware installation process is complete. To use the Cisco CTE 1450 system, you will need to install CTE Design Studio and configure the Cisco CTE 1450 as described in the Quick Start Guide: Cisco CTE 1400 Series Telephony Application Gateway (TAG) and Design Studio and the Cisco Content Transformation Engine 1400 Series Configuration Note Release 2.5.
If there are any signs of a hardware problem during the configuration process, see "Troubleshooting."
![]()
![]()
![]()
![]()
![]()
![]()
![]()
![]()
Posted: Thu Mar 20 17:37:52 PST 2003
All contents are Copyright © 1992--2002 Cisco Systems, Inc. All rights reserved.
Important Notices and Privacy Statement.