|
|

This chapter describes how to install the Secure Content Accelerator as a free-standing or rack-mount unit. Network deployment suggestions are included.
This chapter contains the following sections:
Before you select an installation site for the Secure Content Accelerator, read the electrical, environmental, and physical requirements as described in Appendix A.
To install the Secure Content Accelerator, you need the following tools and equipment:
The Secure Content Accelerator shipment contains the following items:
To unpack the Secure Content Accelerator:
1. Remove all enclosed packing materials. Save the packing materials in case you need to repack the Secure Content Accelerator later.
2. Remove all accessories from the shipping carton.
3. Check the accessories against the items listed in the section "Shipment Contents".
Prior to installing the Secure Content Accelerator, observe the following installation requirements:
Before you begin, you will need the mounting brackets and six screws shipped with the Secure Content Accelerator, a #2 Phillips screwdriver, rack-mounting screws and an appropriate screwdriver.
1. Position the Secure Content Accelerator with the front panel facing you.
2. Position a mounting bracket on one side of the chassis, aligning the holes in the bracket with the screw holes on the chassis.
3. Secure the bracket to the chassis with three screws and the Phillips screwdriver.
4. Repeat steps 2 and 3 to install a mounting bracket on the other side of the chassis.
5. Raise the Secure Content Accelerator to the installation height. Align the screw holes of the mounting brackets with the holes on the equipment rack.
6. Use the appropriate screwdriver and screws to secure each mounting bracket to each side of the rack.
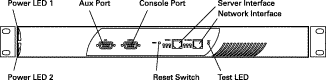
The front panel of the Secure Content Accelerator, shown in Figure 2-1, contains the following connectors, switches, and LEDs:
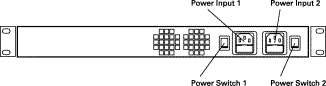
The rear panel of the Secure Content Accelerator, shown in Figure 2-2, contains the following connectors and switches:
| LED Name | Color | State | Indicates |
|---|---|---|---|
LK | Green | Off | No link established |
On | Link established | ||
TX | Amber | Blinking | Transmit activity detected |
RX | Green | Blinking | Receive activity detected |
White | Off | Power supply is not working | |
On | Power supply is working | ||
Test | Amber | Off | Self-diagnostics are successful |
On | Self-diagnostics are running |
The Secure Content Accelerator is powered by dual AC power supplies. Before you install the power cords, ensure that you have read Appendix A for electrical specifications.
1. Ensure that the Secure Content Accelerator power switches are in the 0 (off) position.
2. Attach the power cables to the Secure Content Accelerator by plugging the AC power cord connector into the power receptacle at the rear panel.
3. Plug the power cords into dedicated three-wire grounding receptacles.
4. Switch the power switches to the 1 (on) position.
 |
Note Connect the power supplies to different circuits to further ensure appliance availability. |
This section describes how to attach the Secure Content Accelerator to Ethernet.
1. Connect the "Network" port to the Internet.
2. Connect the "Server" port to the servers.
3. Check the LK LEDs for connection viability. If one or both LK LEDs are not lit, see Appendix B for troubleshooting suggestions.
The following examples demonstrate how the Secure Content Accelerator can be integrated into a network.
A single Secure Content Accelerator provides SSL offloading and processing for an entire server farm, as shown in Figure 2-3.
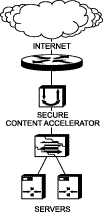
1. Install the appliance as instructed previously.
2. Connect the "Network" Ethernet interface to the Internet.
3. Connect the "Server" Ethernet interface to Web server access.
Secure Content Accelerator devices can be installed in front of or behind a load balancer. If the load balancer is using URL- or cookie-related load balancing, install the appliance in front of the load balancer. In this configuration, the load balancer receives clear text packets decrypted by the SSL device. Figure 2-4 shows a typical installation.
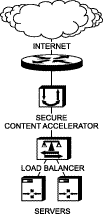
1. Install the appliance as instructed previously.
2. Connect the "Network" Ethernet interface to the Internet. Connect the "Server" Ethernet interface to the load balancer.
For information about configuring the Secure Content Accelerator in conjunction with the CSS 11000 Series Content Services Switch (hereinafter referred to as the CSS), see "Use with the CSS".
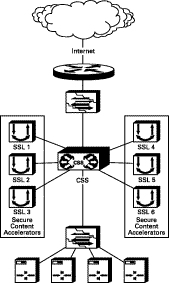
This deployment is the simplest to configure because it requires no specific inter-operational configuration on either the Secure Content Accelerator or the CSS. However, the deployment provides a low level of scalability, based upon the capacity of the CSS. An example deployment is shown in Figure 2-5.

The CSS is used to front-end one or more Secure Content Accelerator devices. Because the Secure Content Accelerator is a Layer 2 device, it must be configured to ensure that bridge loops are not created. If multiple Secure Content Accelerator devices are used, each must be attached to a separate VLAN on the CSS and/or the upstream Layer 2 switch. The Secure Content Accelerator intercepts all port 443 traffic for the IP addresses configured on it, decrypts the traffic, and forwards it as clear text on another TCP service port to the CSS. All port 80 traffic is bridged transparently to the CSS. Table 2-2 shows basic configuration actions for both the CSS and Secure Content Accelerator.
| CSS Configuration | Secure Content Accelerator Configuration |
|---|---|
|
|
The following listing shows a sample configuration for the CSS.
!Generated on 11/18/2000 11:01:18
!Active version: ap0400007s

configure

!*************************** GLOBAL ***************************
  bridge spanning-tree disabled
  no restrict web-mgmt

  ip route 0.0.0.0 0.0.0.0 10.176.11.1 1

!************************* INTERFACE *************************
interface ethernet-8
  bridge vlan 8

!************************** CIRCUIT **************************
circuit VLAN1
  ip address 10.176.10.1 255.255.255.0

circuit VLAN8
  ip address 10.176.11.2 255.255.255.0

!************************** SERVICE **************************
service s1
  ip address 10.176.10.10
  protocol tcp
  active

service s2
  ip address 10.176.10.11
  protocol tcp
  active

service s3
  ip address 10.176.10.12
  protocol tcp
  active

service s4
  ip address 10.176.10.13
  protocol tcp
  active

!*************************** OWNER ***************************
owner test

  content http-non-secure-port-80
    vip address 10.176.11.100
    protocol tcp
    port 80
    url "/*"
    add service s1
    add service s2
    add service s3
    add service s4
    active

  content http-secure-port-81
    vip address 10.176.11.100
    add service s1
    add service s2
    add service s3
    add service s4
    protocol tcp
    port 81
    url "/secure/*"
    active
The transparent sandwich deployment is moderately difficult to configure with good scalability. A minimum of two CSS devices are required. Figure 2-6 shows a typical deployment.

The upstream CSS is configured as if the Secure Content Accelerator devices are transparent caches with redirection at Layer 4. Port 80 traffic is forwarded via Layer 3 to the downstream CSS, avoiding any potential Port 80 bottleneck at the Secure Content Accelerator level. Because the Secure Content Accelerator is a Layer 2 device, it must be configured to ensure that bridge loops are not created.
The Secure Content Accelerator intercepts all port 443 traffic for the IP addresses configured on it, decrypts the traffic, and forwards it as clear text on another TCP service port to the downstream CSS. The downstream CSS is configured with Layer 5 rules for all origin servers and multiple ECMP routes, each to a different upstream VLAN. The default ECMP configuration is to prefer ingress, ensuring that outbound traffic needing to be encrypted is routed to the Secure Content Accelerator responsible for decrypting traffic for that session. Outbound Port 80 traffic bypasses the Secure Content Accelerator devices completely.
Traffic "sourced" from a server in the server farm can be routed through one of the Secure Content Accelerator devices. There is no way to differentiate between equal cost paths without mapping to an ingress flow. Table 2-3 shows basic configuration actions for the CSS devices and Secure Content Accelerator.
| Upstream CSS Configuration | Secure Content Accelerator Configuration | Downstream CSS Configuration |
|---|---|---|
|
|
|
The following is a sample configuration for the upstream CSS.
!Generated on 11/18/2000 11:03:28
!Active version: ap0400007s

configure

!*************************** GLOBAL ***************************

  ip route 0.0.0.0 0.0.0.0 10.100.1.1 1
  ip route 10.176.10.0 255.255.255.0 10.176.11.0

!************************* INTERFACE *************************
interface ethernet-2
  bridge vlan 2

interface ethernet-3
  bridge vlan 3

interface ethernet-4
  bridge vlan 4

interface ethernet-5
  bridge vlan 5

interface ethernet-6
  bridge vlan 6

interface ethernet-7
  bridge vlan 7

interface ethernet-8
  bridge vlan 8

!************************** CIRCUIT **************************
circuit VLAN1

  ip address 10.176.1.1 255.255.255.0

circuit VLAN2

  ip address 10.176.2.1 255.255.255.0

circuit VLAN3

  ip address 10.176.3.1 255.255.255.0

circuit VLAN4

  ip address 10.176.4.1 255.255.255.0

circuit VLAN5

  ip address 10.176.5.1 255.255.255.0

circuit VLAN6

  ip address 10.176.6.1 255.255.255.0

circuit VLAN7

  ip address 10.176.11.1 255.255.255.0

circuit VLAN8

  ip address 10.100.132.101 255.255.0.0

!************************** SERVICE **************************
service ssl1
  port 443
  protocol tcp
  ip address 10.176.1.3
  type transparent-cache
  active

service ssl2
  port 443
  protocol tcp
  ip address 10.176.2.3
  type transparent-cache
  active

service ssl3
  port 443
  protocol tcp
  ip address 10.176.3.3
  type transparent-cache
  active

service ssl4
  port 443
  protocol tcp
  ip address 10.176.4.3
  type transparent-cache
  active

service ssl5
  port 443
  protocol tcp
  ip address 10.176.5.3
  type transparent-cache
  active

service ssl6
  port 443
  protocol tcp
  ip address 10.176.6.3
  type transparent-cache
  active

!*************************** OWNER ***************************
owner test

  content ssl
    protocol tcp
    port 443
    add service ssl1
    add service ssl2
    add service ssl3
    add service ssl4
    add service ssl5
    add service ssl6
    active
The following is a sample configuration for the downstream CSS.
!Generated on 11/18/2000 11:01:18
!Active version: ap0400007s

configure

!*************************** GLOBAL ***************************
  bridge spanning-tree disabled
  no restrict web-mgmt

  ip route 0.0.0.0 0.0.0.0 10.176.1.1 1
  ip route 0.0.0.0 0.0.0.0 10.176.2.1 1
  ip route 0.0.0.0 0.0.0.0 10.176.3.1 1
  ip route 0.0.0.0 0.0.0.0 10.176.4.1 1
  ip route 0.0.0.0 0.0.0.0 10.176.5.1 1
  ip route 0.0.0.0 0.0.0.0 10.176.6.1 1
  ip route 0.0.0.0 0.0.0.0 10.176.11.1 1

!************************* INTERFACE *************************
interface ethernet-2
  bridge vlan 2

interface ethernet-3
  bridge vlan 3

interface ethernet-4
  bridge vlan 4

interface ethernet-5
  bridge vlan 5

interface ethernet-6
  bridge vlan 6

interface ethernet-7
  bridge vlan 7

interface ethernet-8
  bridge vlan 8

!************************** CIRCUIT **************************
circuit VLAN2

  ip address 10.176.2.3 255.255.255.0

circuit VLAN3

  ip address 10.176.3.3 255.255.255.0

circuit VLAN4

  ip address 10.176.4.3 255.255.255.0

circuit VLAN5

  ip address 10.176.5.3 255.255.255.0

circuit VLAN6

  ip address 10.176.6.3 255.255.255.0

circuit VLAN7

  ip address 10.176.10.1 255.255.255.0

circuit VLAN8

  ip address 10.176.11.2 255.255.255.0

circuit VLAN1

  ip address 10.176.1.3 255.255.255.0

!************************** SERVICE **************************
service s1
  ip address 10.176.10.10
  protocol tcp
  active

service s2
  ip address 10.176.10.11
  protocol tcp
  active

service s3
  ip address 10.176.10.12
  protocol tcp
  active

service s4
  ip address 10.176.10.13
  protocol tcp
  active

!*************************** OWNER ***************************
owner test

  content http-non-secure-port-80
    vip address 10.176.11.100
    protocol tcp
    port 80
    url "/*"
    add service s1
    add service s2
    add service s3
    add service s4
    active

  content http-secure-port-81
    vip address 10.176.11.100
    add service s1
    add service s2
    add service s3
    add service s4
    protocol tcp
    port 81
    url "/secure/*"
    active
The one-armed non-transparent proxy deployment is complex to configure, but it provides a high degree of scalability. If IP address accounting is required, use the command log-url when configuring the Secure Content Accelerator. This command instructs the device to write a client access log to a specific host. The resulting log file can be utilized by all popular log analysis tools. Figure 2-7 shows a typical deployment.
In this deployment the CSS is configured with both Layer 4 and Layer 5 rules. For each VIP configured on the CSS for services terminating on the Secure Content Accelerator, a service must be defined for the Secure Content Accelerator devices, each with a different destination port definition.
The Secure Content Accelerator does not use the IP address to ensure traffic is sent to the correct server because the CSS changes the destination IP address to that of the Secure Content Accelerator. The Secure Content Accelerator is configured only at Layer 4. This configuration requires setting multiple destination IP/destination port pairs on the Secure Content Accelerator. Bridge loops are not created because all port 443 traffic terminates on Secure Content Accelerator devices each connected to the CSS via a single port. Table 2-4 shows basic configuration actions for both the CSS and Secure Content Accelerator.
| CSS Configuration | Secure Content Accelerator Configuration |
|---|---|
|
|
Below is a sample configuration for the CSS.
!Generated on 11/18/2000 17:38:37
!Active version: ap0400007s

configure


!*************************** GLOBAL ***************************
  bridge spanning-tree disabled

  ip route 0.0.0.0 0.0.0.0 10.100.1.1 1

!************************* INTERFACE *************************
interface ethernet-7
  bridge vlan 7

interface ethernet-8
  bridge vlan 8

!************************** CIRCUIT **************************
circuit VLAN1

  ip address 10.176.1.1 255.255.255.0

circuit VLAN7

  ip address 10.176.10.1 255.255.255.0

circuit VLAN8

  ip address 10.100.132.101 255.255.0.0

!************************** SERVICE **************************
service s1
  ip address 10.176.10.10
  protocol tcp
  active

service s2
  ip address 10.176.10.11
  protocol tcp
  active

service s3
  ip address 10.176.10.12
  protocol tcp
  active

service s4
  ip address 10.176.10.13
  protocol tcp
  active

service ssl1-443
  port 443
  protocol tcp
  ip address 10.176.1.3
  active

service ssl1-444
  ip address 10.176.1.3
  protocol tcp
  port 444
  active

service ssl2-443
  port 443
  protocol tcp
  ip address 10.176.1.4
  active

service ssl2-444
  port 444
  protocol tcp
  ip address 10.176.1.4
  active

service ssl3-443
  port 443
  protocol tcp
  ip address 10.176.1.5
  active

service ssl3-444
  port 444
  protocol tcp
  ip address 10.176.1.5
  active

service ssl4-443
  port 443
  protocol tcp
  ip address 10.176.1.6
  active

service ssl4-444
  port 444
  protocol tcp
  ip address 10.176.1.6
  active

service ssl5-443
  port 443
  protocol tcp
  ip address 10.176.1.7
  active

service ssl5-444
  port 444
  protocol tcp
  ip address 10.176.1.7
  active

service ssl6-443
  port 443
  protocol tcp
  ip address 10.176.1.8
  active

service ssl6-444
  port 444
  protocol tcp
  ip address 10.176.1.8
  active

!*************************** OWNER ***************************
owner test

  content http-secure-port-81
    vip address 10.176.11.100
    add service s1
    add service s2
    add service s3
    add service s4
    protocol tcp
    port 81
    url "/secure/*"
    active

  content http-non-secure-port-80
    vip address 10.176.11.100
    add service s1
    add service s2
    add service s3
    add service s4
    protocol tcp
    port 81
    url "/*"
    active

  content ssl
    vip address 10.176.11.100
    protocol tcp
    port 443
    add service ssl1-443
    add service ssl2-443
    add service ssl3-443
    add service ssl4-443
    add service ssl5-443
    add service ssl6-443
    active

  content ssl-444
    protocol tcp
    vip address 10.176.11.101
    port 443
    add service ssl2-444
    add service ssl1-444
    add service ssl3-444
    add service ssl4-444
    add service ssl5-444
    add service ssl6-444
    active
The one-armed transparent proxy deployment is the most complex to configure, but it provides a high degree of scalability and extended features, including IP address accounting. Figure 2-8 shows a typical deployment.

This deployment has several constraints:
Table 2-5 shows basic configuration actions for both the CSS and Secure Content Accelerator.
| CSS Configuration | Secure Content Accelerator Configuration |
|---|---|
|
|
Below is a sample configuration for the CSS.
!Generated on 11/28/2000 16:15:49
!Active version: ap0400007s

configure

!*************************** GLOBAL ***************************

  acl enable

  ip route 0.0.0.0 0.0.0.0 10.176.50.1 1
  ip route 0.0.0.0 0.0.0.0 10.176.1.3 1
  ip route 0.0.0.0 0.0.0.0 10.176.2.3 1
  ip route 0.0.0.0 0.0.0.0 10.176.3.3 1
  ip route 0.0.0.0 0.0.0.0 10.176.4.3 1
  ip route 0.0.0.0 0.0.0.0 10.176.5.3 1
  ip route 0.0.0.0 0.0.0.0 10.176.6.3 1
  ! network management station static route
  ip route 10.176.50.100 255.255.255.255 10.176.50.1 1

!************************* INTERFACE *************************
interface ethernet-2
  bridge vlan 2

interface ethernet-3
  bridge vlan 3

interface ethernet-4
  bridge vlan 4

interface ethernet-5
  bridge vlan 5

interface ethernet-6
  bridge vlan 6

interface ethernet-7
  bridge vlan 7

interface ethernet-8
  bridge vlan 8

!************************** CIRCUIT **************************
circuit VLAN1

  ip address 10.176.1.1 255.255.255.0

circuit VLAN2

  ip address 10.176.2.1 255.255.255.0

circuit VLAN3

  ip address 10.176.3.1 255.255.255.0

circuit VLAN4

  ip address 10.176.4.1 255.255.255.0

circuit VLAN5

  ip address 10.176.5.1 255.255.255.0

circuit VLAN6

  ip address 10.176.6.1 255.255.255.0

circuit VLAN7

  ip address 10.176.10.1 255.255.255.0

circuit VLAN8

  ip address 10.176.50.2 255.255.255.0

!************************** SERVICE **************************
service s1
  ip address 10.176.10.10
  protocol tcp
  active

service s2
  ip address 10.176.10.11
  protocol tcp
  active

service s3
  ip address 10.176.10.12
  protocol tcp
  active

service s4
  ip address 10.176.10.13
  protocol tcp
  active

service ssl1
  port 443
  protocol tcp
  ip address 10.176.1.3
  type transparent-cache
  no cache-bypass
  active

service ssl2
  port 443
  protocol tcp
  type transparent-cache
  no cache-bypass
  ip address 10.176.2.3
  active

service ssl3
  port 443
  protocol tcp
  type transparent-cache
  no cache-bypass
  ip address 10.176.3.3
  active

service ssl4
  port 443
  protocol tcp
  type transparent-cache
  no cache-bypass
  ip address 10.176.4.3
  active

service ssl5
  port 443
  protocol tcp
  type transparent-cache
  no cache-bypass
  ip address 10.176.5.3
  active

service ssl6
  port 443
  protocol tcp
  type transparent-cache
  no cache-bypass
  ip address 10.176.6.3
  active

service upstream-router
  ip address 10.176.50.1
  type transparent-cache
  active

!*************************** OWNER ***************************
owner test

  content http-secure-port-81
    vip address 10.176.11.100
    add service s1
    add service s2
    add service s3
    add service s4
    protocol tcp
    port 81
    url "/secure/*"
    active

  content http-non-secure-port-80
    vip address 10.176.11.100
    add service s1
    add service s2
    add service s3
    add service s4
    protocol tcp
    port 80
    url "/*"
    active


  content ssl
    protocol tcp
    port 443
    add service ssl1
    add service ssl2
    add service ssl3
    add service ssl4
    add service ssl5
    add service ssl6
    vip address 10.176.11.100
    active

!**************************** ACL ****************************
acl 8
  clause 10 permit any any destination any
  apply circuit-(VLAN8)

acl 7
  clause 10 permit any any destination any
  apply circuit-(VLAN7)

acl 6
  clause 10 permit any any destination any eq 443
  clause 20 permit any any destination any eq 81
  clause 30 permit tcp any destination any eq 2932
  clause 40 permit udp any destination any eq 2932
  clause 50 permit udp any eq 2932 destination any prefer upstream-router
  clause 99 permit any any destination any
  apply circuit-(VLAN6)
  apply circuit-(VLAN5)
  apply circuit-(VLAN4)
  apply circuit-(VLAN3)
  apply circuit-(VLAN2)
  apply circuit-(VLAN1)
A version of the configuration utility is stored on the SSL appliance. You may use a serial or Telnet connection or a Web browser to use the device-stored version for configuration. To install the remote configuration manager, follow the appropriate instructions below.
|
Note Certain functions are not available in all configuration methods. See Appendix C for more information. |
You must be logged into the system as a root user before installing the software.
1. Insert the CD-ROM into the computer CD-ROM drive.
2. Enter the following commands:
mount -o map=off /mnt/cdrom
cd /mnt/cdrom/Linux/i386
./install_csca
To run the configuration manager, enter csacfg at a Linux shell prompt.
You must be logged into the system as a root user before installing the software.
1. Insert the CD-ROM into the computer CD-ROM drive.
2. Enter the following command:
pkgadd -d /cdrom/cdrom0/Solaris/Sparc
3. Respond to the following screen prompt, pressing Enter to install the software:
The following packages are available:

1.  CSCAconfg     Cisco Configuration Manager

Select package(s) you wish to process (or "all" to process all packages). (default: all) [?,??,q]
4. Type q to exit after installation.
To run the configuration manager, enter csacfg at a Unix shell prompt.
1. Insert the CD-ROM into the computer CD-ROM drive.
2. Double-click the My Computer icon to open it.
3. Double-click the CD icon.
4. Double-click the MSWin icon to open the directory.
5. Double-click the WinNT4 icon (Windows NT) or Win2K icon (Windows 2000) to open the directory.
6. Double-click the setup.exe application to run it. An Install Shield application opens. Follow the instructions on the screen to install the configuration manager and OpenSSL.
To start the configuration manager, use the Start menu and point to Programs>Cisco Systems> Cisco Secure Content Acc. Manager, or double-click the shortcut on the desktop.
You must make changes to your existing Web pages before users can access them.
1. Install and configure the Secure Content Accelerator.
2. Create a non-secure ("http://"-prefixed) Web page as an entry point for the Web site. Include some method of transferring the user to the secure ("https://"-prefixed) URL. You may use a button, hypertext link, image map, automatic redirection, or any other method you choose.
3. If your site does not use relative links, change the "http://" portion of every link (including graphic links) to "https://"; otherwise, links should remain the same.
|
Note If you are using IIS and have a redirection in your Web page, the URL must have a trailing slash ("/") to work properly, e.g., <href="/issamples/default/learn/">. |
![]()
![]()
![]()
![]()
![]()
![]()
![]()
![]()
Posted: Mon Aug 19 22:08:22 PDT 2002
All contents are Copyright © 1992--2002 Cisco Systems, Inc. All rights reserved.
Important Notices and Privacy Statement.

