|
|

This chapter describes how to use the configuration manager to configure the SSL appliance. Refer to Chapter 3 for a brief introduction to how the Cisco Secure Content Accelerator appliance works with components of the SSL protocol and description of the information you need to begin configuration.
This chapter contains the following sections:
Whether used via serial or telnet connection or remotely, the command line interface configuration manager provides greater control over the SSL appliance than the QuickStart or Secure Server wizard alone.
The configuration manager allows you to control hardware and SSL portions of the appliance through a discreet mode and submode system as shown in the hierarchy diagram in Figure 5-1.
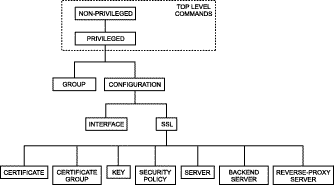
To configure items in a submode, activate the submode by entering a command in the mode above it. For example, to set the network interface speed or duplex you must first enter enable, configure, then interface network. To return to the higher Configuration mode, simply enter end or exit or press CTRL+D. The finished command returns to the Top Level from any mode. Appendix C lists all commands for SSL devices.
 |
Note The system prompts displayed by the configuration manager vary slightly depending upon the management session type used. Unless specifically stated otherwise, all prompts displayed in this chapter reflect those encountered with the remote configuration manager. |
Cisco Secure Content Accelerator devices allow easy, flexible configuration without compromising the security of your network or their own configuration.
SSL devices are shipped without passwords. Setting passwords is important because the device can be administered over a network. For more information about passwords, see the commands password access and password enable in Appendix C.
Access lists control which computers can attach to a specific device. No access lists exist when you first install the Secure Content Accelerator. You can restrict the computers allowed to manage the appliance by adding their IP addresses to one or more access lists for each device. For more information about configuring access lists, see the commands show access-list, access-list, snmp access-list, remote-management access-list, telnet access-list, and web-mgmt access-list in Appendix C.
To further protect the configuration security, you can specify that remote (non-serial and non-telnet) configuration sessions be encrypted using AES, DES, or ARC4. See remote-management encryption in Appendix C.
 |
Caution All configuration is lost when using the factory default reset. |
1. Attach the included null modem cable to the appliance port marked "CONSOLE". Attach the other end of the null modem cable to a serial port on the configuring computer.
2. Launch any terminal emulation application that communicates with the serial port connected to the appliance. Use these settings: 9,600 baud, 8 data bits, no parity, 1 stop bit, no flow control.
3. Press Return. Initial information is displayed followed by an SCA> prompt.
4. Enter Privileged and Configuration modes and set the IP address using the following commands. Replace the IP address in the example with the appropriate one.
SCA> enable
SCA# configure
(config[SCA])# ip address 10.1.2.5
(config[SCA])#
|
Note When prompted to supply a file name during serial management, you must supply it as a URL in the form of HOST/PATH/FILENAME using the http://, https://, ftp://, or tftp:// prefix. |
1. Initiate a telnet session with the IP address previously assigned to the appliance.
2. An SCA> prompt is displayed.
|
Note When prompted to supply a file name during a telnet management session, you must supply it as a URL in the form of HOST/PATH/FILENAME using the http://, https://, ftp://, or tftp:// prefix. |
Use the appropriate instructions below to run the CLI configuration manager.
Enter csacfg at a Linux shell prompt.
Enter csacfg at a Unix shell prompt.
To start the configuration manager, use the Start menu and point to Programs>Cisco Systems and click Cisco Secure Content Acc. Manager, or double-click the shortcut on the desktop.
Type Key Name Version MacAddr IPaddr
Cisco Secure Content Accelerator devices are listed with the "CSS-SCA" device type. Note the MAC address of the device you wish to configure. It is used with the "CS-" prefix to identify a specific device when giving commands in the format CS-macaddress, where macaddress is the MAC address of the device.
|
Note Identify an unnamed device as a specific appliance, match the last six digits of the serial number with the MAC address shown. |
For example, entering show device list returns the following list of unattached devices:
CSS-SCA	Ru	sslDev1	...
CSS-SCA	Ru	sslDev2	...
CSS-SCA	Ru	sslDev3	...
CSS-SCA	Ru	sslDev4	...
To attach the configuration manager to the device sslDev3, enter this command:
on sslDev3 attach
The auto completer function can assist data entry. See "Editing and Completion Features" in Appendix C for details for using editing and auto completer features.
csacfg> group myGroup create
(group[myGroup])> device sslDev1
(group[myGroup])> device sslDev2
(group[myGroup])> device sslDev4
(group[myGroup])> info
group name: myGroup
number of devices: 3
	device: sslDev1
	device: sslDev2
	device: sslDev4
(group[myGroup])>
To remove a device from the group, use the no form of the command:
(group[myGroup])> no device sslDev2
Enter end to leave Group configuration mode. To send commands to every device in the group, use the on prefix.
on myGroup attach
set on-prefix myGroup
After entering this command, you do not need to use the on prefix when addressing the default target. For example, the on myGroup attach command becomes attach. You can still address another group instead of the default; simply specify its name following the on prefix. Change the on prefix target by re-entering the command, identifying the new group. View the on prefix target by entering show profile.
|
Note Individual devices can also be set as the on prefix default target. Any command without the on prefix defaults to the group or device specified by the set on-prefix command. |
For more information about Group Configuration commands, see "Group Configuration Command Set" in Appendix C.
When you configure an appliance to perform SSL offloading you are actually setting up one or more logical secure servers whose SSL-related configurations reside in the appliance. Each logical secure server has several attributes:
|
Note The remote configuration instructions in this example assume only one Cisco Secure Content Accelerator is available for configuration or that you have set the on-prefix to a single device. If you have more than one SSL device available for configuration, refer to section "Specif ying Devices" presented previously in this chapter for device identification directions. |
1. Initiate a serial management session, and set the IP address of the device to 10.1.2.5.
SCA> enable
SCA# config
(config[CSS-SCA])# ip address 10.1.2.5
(config[CSS-SCA])#
2. If you wish to configure the server using the serial connection, continue with step 3.
|
Note For the remainder of these examples, system prompts are displayed as remote configuration prompts. |
3. Use the following commands to enter Privileged and Configuration modes and change the name of the SSL appliance to myDevice.
SCA> enable
SCA> configure
(config[CS-10-1-2-3])> hostname myDevice
(config[CS-10-1-2-3])> end
SCA> configure
(config[myDevice])>
4. Set the default router.
(config[myDevice])> ip route default 10.1.2.1
(config[myDevice])>
5. Set an enable password to protect the appliance configuration. The password is requested whenever the enable command is given.
(config[myDevice])> password enable
Enter new password:
Confirm password:
(config[myDevice])> end
SCA>
1. Enter Privileged, Configuration, and SSL Configuration modes.
SCA> enable
SCA> configure
(config[myDevice])> ssl
(config-ssl[myDevice])>
(config-ssl[myDevice])> key myKey create
(config-ssl-key[myKey])> pem keyFile
(config-ssl-key[myKey])> end
(config-ssl[myDevice])>
|
Note Use the der command when using DER-encoded keys and certificates, the net-iis command when using keys exported from IIS 4. |
(config-ssl[myDevice])> cert my create
(config-ssl-cert[myCert])> pem certFile
(config-ssl-cert[myCert])> end
(config-ssl[myDevice])>
(config-ssl[myDevice])> secpolicy myPol create
(config-ssl-secpolicy[myPol])> crypto strong
(config-ssl-secpolicy[myPol])> end
(config-ssl[myDevice])>
5. Enter Server Configuration mode and create a server named myServer. Assign the IP address 10.1.2.4. Assign port 443 for monitoring for SSL connections and port 81 for sending clear text. Assign the key, certificate, and security policies just created. Then exit to Top Level mode.
(config-ssl[myDevice])> server myServer create
(config-ssl-server[myServer])> ip address 10.1.2.4
(config-ssl-server[myServer])> sslport 443
(config-ssl-server[myServer])> remoteport 81
(config-ssl-server[myServer])> key myKey
(config-ssl-server[myServer])> cert myCert
(config-ssl-server[myServer])> secpolicy myPol
(config-ssl-server[myServer])> finished
SCA>
6. Save the configuration to flash memory. If it is not saved, the configuration is lost during a power cycle or if the reload command when used.
SCA> write flash
SCA>
|
Note You can review the configuration of the currently edited SSL object (key, certificate, certificate chain, security policy, or server) by using the info command in the appropriate mode. |
This example describes how to use the configuration manager to set up a backend server.
1. Enter Privileged, Configuration, and SSL Configuration modes.
SCA> enable
SCA> configure
(config[myDevice])> ssl
(config-ssl[myDevice])>
2. Enter Backend Server Configuration mode and create a backend server named myBackServ.
(config-ssl[myDevice])> backend-server myBackServ create
(config-ssl-backend[myBackServ])>
3. Assign an IP address and netmask to the backend server.
(config-ssl-backend[myBackServ])> ip address
4. Assign port 443 for SSL traffic and port 80 for clear text traffic.
(config-ssl-backend[myBackServ])> localport 80
(config-ssl-backend[myBackServ])> remoteport 443
(config-ssl-backend[myBackServ])> secpolicy strong
6. Exit to Privileged mode, and save the configuration to flash memory. If it is not saved, the configuration is lost during a power cycle or when the reload command is used.
(config-ssl-backend[myBackServ])> finished
SCA> write flash
SCA>
This example describes how to use the configuration manager to set up a reverse-proxy server.
1. Enter Privileged, Configuration, and SSL Configuration modes.
SCA> enable
SCA> configure
(config[myDevice])> ssl
(config-ssl[myDevice])>
2. Enter Reverse-Proxy Server Configuration mode and create a server named myRevServ.
(config-ssl[myDevice])> reverse-proxy-server myRevServ create
(config-ssl-rproxy[myRevServ])>
3. Assign port 8080 for clear text traffic.
(config-ssl-rproxy[myRevServ])> localport 8080
(config-ssl-rproxy[myRevServ])> secpolicy strong
5. Exit to Privileged mode and save the configuration to flash memory. If it is not saved, the configuration is lost during a power cycle or when the reload command is used.
(config-ssl-rproxy[myRevServ])> finished
SCA> write flash
SCA>
|
Note When using this configuration, client browsers must be set to use this device as a proxy. |
1. Initiate a serial management session, and enter Privileged and Configuration modes.
myDevice> enable
myDevice# config
2. Set the remote management encryption method, selecting DES, and enter a passphrase (shared secret).
(config[myDevice])# remote-management encryption DES
(config[myDevice])# remote-management shared-secret
Enter shared secret:
Verify shared secret:
(config[myDevice])#
When you attempt to attach to the SSL appliance using the remote configuration manager, this prompt is displayed:
myDevice requires secure communication.
Enter passphrase for myDevice:
Enter the passphrase set previously.
You can change the TCP/UDP service port to be used when communicating with the device for management with the remote configuration manage. The TCP/UDP service port can be configured using any of the configuration connection options. You must save the configuration to flash and reboot for the port information to take effect.
(config[myDevice])# remote-management port 8089
(config[myDevice])# finished
myDevice# write flash
myDevice# reload
When the remote configuration manager is started, or the basic discover command is entered, the device is not found. You must enter the discover command using the TCP service port as an argument. The following command tells the configuration manager to use port 8089 to look for Cisco Secure Content Accelerator devices.
SCA> discover port 8089
The device is listed following a show device list command. Attach to the device configured in this example using the following command:
SCA> attach ip 10.1.2.3 port 8089
|
Note If the device has been discovered by the Secure Content Accelerator, you can attach to it by name, e.g., attach myDevice. |
If a passphrase has been configured for the device, you are prompted for it. Return the device management TCP service port by entering this command in Configuration mode:
(config[myDevice])# remote-management port default
1. Attach to the device or module (remote only) and enter Privileged and Configuration modes.
SCA> enable
SCA> configure
(config[myDevice)>
2. Create an access list allowing management access to all IP addresses.
(config[myDevice)]> access-list 1 permit 0.0.0.0 255.255.255.255
3. Create an access list denying access from computers on a specific subnet.
(config[myDevice)> access-list 2 deny 10.1.3.0 0.0.0.255
4. Create an access list allowing access from a single computer.
(config[myDevice])> access-list 3 permit 10.1.4.5 0.0.0.0
5. Assign the second access list to the remote management subsystem.
(config[myDevice])> remote-management access-list 2
6. Assign the third access list to the telnet subsystem, allowing management access only from the specific IP address.
(config[myDevice])> telnet access-list 3
7. Exit to Privileged mode and save the configuration to flash memory. If it is not saved, the configuration is lost during a power cycle or when the reload command is used.
(config[myDevice])> finished
SCA> write flash
SCA>
(config[myDevice])> interface network
(config-if[network])> duplex full
(config-if[network])> speed 100
(config-if[network])> finished
SCA>
|
Note You must specify that your certificate work with both Microsoft and Netscape browsers when requesting it from the CA. Otherwise, the server cannot support both browsers. |
The name of the SSL device is myDevice. The name of the secure logical server is server1. The name of the DER-encoded, intermediary CA certificate is CACert. The name of the PEM-encoded certificate generated by the intermediary CA is localCertFile. The name of the certificate group is CACertGroup.
1. Initiate a management session as described previously.
2. Attach the configuration manager (remote only) and enter Privileged and Configuration modes.
SCA> enable
SCA> configure
(config[myDevice)>
3. Enter SSL Configuration mode and create an intermediary certificate named CACert, entering into Certificate Configuration mode. Load the DER-encoded file into the certificate object, and return to SSL Configuration mode.
(config[myDevice])> ssl
(config-ssl[myDevice])> cert CACert create
(config-ssl-cert[CACert])> der CACert
(config-ssl-cert[CACert])> end
(config-ssl[myDevice])>
4. Create a certificate named localCert, load the PEM-encoded certificate file, and return to SSL Configuration mode.
(config-ssl[myDevice])> cert localCert create
(config-ssl-cert[localCert])> pem localCertFile
(config-ssl-cert[localCert])> end
(config-ssl[myDevice])>
5. Enter Certificate Group Configuration mode, create the certificate group CACertGroup, load the certificate object CACert, and return to SSL Configuration mode.
(config-ssl[myDevice])> certgroup CACertGroup create
(config-ssl-certgroup[CACertGroup])> cert CACert
(config-ssl-certgroup[CACertGroup])> end
(config-ssl[myDevice])>
6. Enter Server Configuration mode, create the logical secure server server1, assign an IP address, SSL and clear text ports, a security policy myPol, the certificate group CACertGroup, certificate localCert, key localKey (compatible with the local certificate), and exit to Privileged mode.
(config-ssl[myDevice])> server server1 create
(config-ssl-server[server1])> ip address 10.1.2.4
(config-ssl-server[server1])> localport 443
(config-ssl-server[server1])> remoteport 81
(config-ssl-server[server1])> secpolicy myPol
(config-ssl-server[server1])> certgroup chain CACertGroup
(config-ssl-server[server1])> cert localCert
(config-ssl-server[server1])> key localKey
(config-ssl-server[server1])> finished
SCA>
7. Save the configuration to flash memory. If it is not saved, the configuration is lost during a power cycle or when the reload command is used.
SCA> write flash
SCA>
1. Initiate a management session as described previously.
2. Attach the configuration manager (remote only) and enter Privileged and Configuration modes.
3. Enter SSL Configuration mode.
(config[myDevice])> ssl
(config-ssl[myDevice])>
4. Specify the PKCS#7 file to import, indicating the appropriate encoding (in this example, PEM). In this example, the name of the certificate group to create is myCertGroup. The certificate prefix is impt. (The certificate prefix is optional.)
(config-ssl[myDevice])> import pkcs7 myCertGroup pem impt certfile.pem
5. The file is imported, and certificates and a certificate group are generated. The certificates are named incrementally from impt_1 to impt_N, where N is the number of certificates in the PKCS#7 file. The certificate with the highest incremented number is the server certificate.
|
Note See the entry in Appendix C for additional command options. |
To further ensure transaction security, client or server certificate authentication can be configured on servers. Backend and reverse-proxy servers can be configured for server certificate authentication; basic secure servers can be configured for client certificate authentication. To use either of these certificate authentication methods, a certificate group must have been created.
Server certification authentication can be configured on both backend and reverse-proxy servers. The configuration procedure for both server types is nearly identical. This example demonstrates how to configure an existing backend server for server certificate authorization using the certificate group servTrustGroup. The domain name (for backend server configuration only) is www.mycorp.com. Several options are available for authentication errors to ignore. In this example the backend server is set to not ignore errors, resulting in immediate disconnection.
1. Initiate a management session as described previously.
2. Attach the configuration manager (remote devices only) and enter Privileged and Configuration modes.
SCA> enable
SCA> configure
(config[myDevice])>
3. Enter SSL Configuration mode and Backend Server Configuration mode for the server myBackServ.
(config[myDevice])> ssl
(config-ssl[myDevice])> backend-server myBackServ
(config-ssl-backend[myBackServ])>
4. Enter the following commands to enable server certificate authentication, set the handling authentication of errors to the most stringent level, and assign the certificate group to use for comparison. (The final command must be entered on a single line.)
(config-ssl-backend[myBackServ])> serverauth enable
(config-ssl-backend[myBackServ])> serverauth ignore none
(config-ssl-backend[myBackServ])> certgroup serverauth servTrustGroup
5. Enter a domain name to use for certificate comparison. This is necessary only for backend servers when server certificate authentication is not set to ignore domain name errors. (The final command must be entered on a single line.)
(config-ssl-backend[myBackServ])> serverauth domain-name "www.mycorp.com"
6. Exit to Privileged mode, and save the configuration to flash memory. If it is not saved, the configuration is lost during a power cycle or when the reload command is used.
(config-ssl-backend[myBackServ])> finished
SCA> write flash
SCA>
Client certification authentication can be configured on basic secure servers. This example demonstrates how to configure an existing server for client certificate authorization using the certificate group clientTrustGroup. Several options are available for authentication error handling. In this example, the server is set to handle all errors by disconnecting the SSL session and redirecting the client to a standard HTML error page.
1. Initiate a management session as described previously.
2. Attach the configuration manager (remote devices only) and enter Privileged and Configuration modes.
SCA> enable
SCA> configure
(config[myDevice])>
3. Enter SSL Configuration mode and Server Configuration mode for the server myServ.
(config[myDevice])> ssl
(config-ssl[myDevice])> server myServ
(config-ssl-server[myServ])>
4. Enter the following commands to enable client certificate authentication, set the handling of authentication of errors, and assign the certificate group to use for comparison.
(config-ssl-server[myServ])> clientauth enable
(config-ssl-server[myServ])> clientauth error all failhtml
(config-ssl-server[myServ])> certgroup serverauth clientTrustGroup
(config-ssl-server[myServ])> certgroup verifydepth 1
5. Exit to Privileged mode, and save the configuration to flash memory. If it is not saved, the configuration is lost during a power cycle or when the reload command is used.
(config-ssl-server[myServ])> finished
SCA> write flash
SCA>
RSA private keys, certificates, and certificate signing requests can be generated directly on the device.
SCA> enable
SCA> configure
(config[myDevice])> ssl
(config-ssl[myDevice])> key myGenKey create
(config-ssl-key[myGenKey])>
2. Enter the following command to generate a 1024-bit key using the seed string lemon. The key is displayed once using DES encryption. The resulting key is stored on the device as well as exported to a PEM-encoded file named mykey.pem. (This command must be entered on one line.)
(config-ssl-key[myGenKey])> genrsa bits 1024 encrypt des seed lemon output mykey.pem
SCA> enable
SCA> configure
(config[myDevice])> ssl
(config-ssl[myDevice])>
2. Enter the following command to generate a certificate using the key created in the previous example. An MD5 digest is displayed and the certificate is saved in a file named myGenCert. (This command must be entered on one line.)
(config-ssl[myDevice])> gencsr key myGenKey digest md5 output myGenCert
1. Initiate a management session as described previously.
2. Attach the configuration manager (remote only) and enter Privileged and Configuration modes.
SCA> enable
SCA> configure
3. Enter SNMP data and enable SNMP. Access-list 1 has already been created. (See Appendix C for information for using the access-list command.) Return to Privileged mode.
(config[myDevice])> snmp enable
(config[myDevice])> snmp access-list 1
(config[myDevice])> snmp location "Main Office"
(config[myDevice])> snmp contact "Administrator"
(config[myDevice])> snmp default community ITS_Office
(config[myDevice])> snmp trap-host v1 10.1.2.4
(config[myDevice])> snmp trap-type generic
(config[myDevice])> end
SCA>
4. Save the configuration to flash memory. If not saved, the configuration is lost during a power cycle or when the reload command is used.
SCA> write flash
SCA>
Cisco Secure Content Accelerator devices support Routing Information Protocol (RIP) versions 1 and 2. This example demonstrates how to enable RIP version 1 packet usage.
1. Initiate a management session as described previously.
2. Attach the configuration manager (remote only) and enter Privileged and Configuration modes.
SCA> enable
SCA> configure
3. Enable reception and processing of RIP version 1 packets. Then return to Privileged mode.
(config[myDevice])> rip v1
(config[myDevice])> end
SCA>
4. Save the configuration to flash memory. If not saved, the configuration is lost during a power cycle or if the reload command is used.
SCA> write flash
SCA>
|
Note The steps in this example are abbreviated to show only relevant changes from the standard SSL server setup. |
2. Enter Server Configuration mode and create a server named mySecureMail. Assign an IP address and netmask. Assign port 995 for monitoring for POP3S (S-POP) connections and port 110 for sending clear text. Assign the appropriate key, certificate, and security policy. Return to Privileged mode.
(config-ssl[myDevice])> server mySecureMail create
(config-ssl-server[myServer])> sslport 995
(config-ssl-server[myServer])> remoteport 110
(config-ssl-server[myServer])> finished
SCA>
3. Save the configuration to flash memory. If not saved, the configuration is lost during a power cycle or when the reload command is used.
SCA> write flash
SCA>
![]()
![]()
![]()
![]()
![]()
![]()
![]()
![]()
Posted: Mon Aug 19 22:00:59 PDT 2002
All contents are Copyright © 1992--2002 Cisco Systems, Inc. All rights reserved.
Important Notices and Privacy Statement.