|
|

The Cisco MGX 8260 works in conjunction with Media Gateway Controller (MGC) servers or Soft Switches and the Public Switched Telephone Network (PSTN) to control voice and data calls.
This section describes how to configure and view MGCP (Media Gateway Control Protocol). The Cisco MGX 8260 implements the standard MGCP protocol stack (see Figure 5-1).
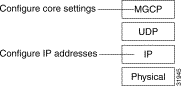
The protocol stack contains the following layers:
Only the IP layer requires configuration. The following diagram shows how to configure MGCP IP addresses in a fully-redundant system (see Figure 5-2).
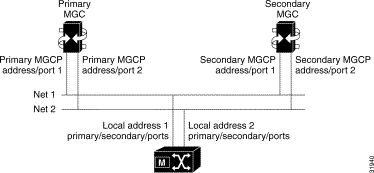
The minimal system consists of a primary MGC network, the MGX 8260 Media Gateway, and an IP network. You can add the secondary network or MGC for more reliable operation.
To configure MGCP, you perform the following tasks:
Before beginning this procedure, obtain the domain name for your MGCP interface.
To configure the domain name and view connection status information, follow these steps:
Step 1 On the Navigation pane, click Protocol.
Step 2 Click MGCP.
Step 3 Click Default.
The MGCP Default Setting screen opens.
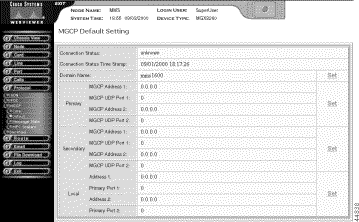
Step 4 Interpret the connection status information as follows:
| Parameter | Description |
|---|---|
Connection Status | The current status of the MGCP connection, as follows:
|
Con. Status Time Stamp | The time the connection status last changed. |
Step 5 In the Domain Name section, click Set.
The MGCP Domain Name Setting screen opens.
Step 6 Enter the domain name or IP address of the MGX 8260, and click Modify.
Before beginning this procedure, obtain the IP addresses and ports for your MGCP interface. Make sure your IP and port selections do not conflict with other equipment on the networks.
To configure MGCP IP addresses, follow these steps:
Step 1 On the Navigation pane, click Protocol.
Step 2 Click MGCP.
Step 3 Click Default.
The MGCP Default Setting screen opens.
Step 4 Interpret the connection status information as follows:
| Parameter | Description |
|---|---|
Connection Status | The current status of the MGCP connection, as follows:
|
Con. Status Time Stamp | The time the connection status last changed. |
Step 5 Click Set in either the Primary, Secondary, or Local sections of the MGCP Default Setting form.
The respective Primary MGCP Setting, Secondary MGCP Setting, or Local MGCP Setting form opens.
Step 6 Specify the MGCP parameters:
| Parameter | Description |
|---|---|
Primary MGCP Address 1 | The IP address of the primary MGC for network 1. Use the standard dot notation for IP addresses. |
Primary MGCP UDP Port 1 | The default UDP port of the primary MGC for network 1. |
Primary MGCP Address 2 | The IP address of the primary MGC for network 2. Use the standard dot notation for IP addresses. |
Primary MGCP UDP Port 2 | The default UDP port of the primary MGC for network 2. |
Secondary MGCP Address 1 | The IP address of the secondary MGC for network 1. Use the standard dot notation for IP addresses. |
Secondary MGCP UDP Port 1 | The default UDP port of the secondary MGC for network 1. |
Secondary MGCP Address 2 | The IP address of the secondary MGC for network 2. Use the standard dot notation for IP addresses. |
Secondary MGCP UDP Port 2 | The default UDP port of the secondary MGC for network 2. |
Local Address 1 | The IP address of the Media Gateway interface for network 1. This address needs to be on the same subnet as the Primary MGCP Address. Specify the IP address in standard dot notation. |
Local Primary Port 1 | The primary UDP port of the Media Gateway interface for network 1. |
Local Address 2 | The IP address of the Media Gateway interface for network 2. This address needs to be on the same subnet as the Secondary MGCP Address. Specify the IP address in standard dot notation. |
Local Primary Port 2 | The primary UDP port of the Media Gateway interface for network 2. |
Step 7 Click Modify. The system configures the MGCP IP addresses.
MGCP core settings enable and disable the protocol and control how it works.
To configure MGCP core parameters, follow these steps:
Step 1 On the Navigation pane, click Protocol.
Step 2 Click MGCP.
Step 3 Click Core.
The MGCP Core Setting screen opens, displaying the status, settings, and other information related to MGCP messages.
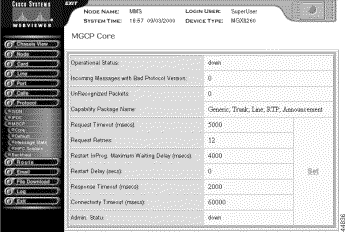
Step 4 Interpret the core status information as follows:
| Parameter | Description |
|---|---|
Operational Status | The administrative state, as follows:
|
Incoming Messages With Bad Version | The total number of incoming messages delivered to the protocol entity that were for an unsupported protocol version. |
UnRecognized Packets | The number of unrecognized packets. |
Capabilities Package Name | A list of the capabilities packages:
|
Step 5 Click Set.
The MGCP Core Setting screen opens.

Step 6 Enter new MGCP core parameters.
| Parameter | Description |
|---|---|
Request Timeout | The time to wait before retransmitting packets. Values: 1 to 100000. |
Request Retries | The maximum number of retries for a request that times out. Values: 0 to 15. |
Restart InProg. Maximum Waiting Delay | The maximum waiting delay, in milliseconds, before the Media Gateway interface sends the Restart In Progress message to the Media Gateway Controller. Values: 0 to 600000. |
Restart Delay | The delay for a graceful shutdown. Values 0 to 600 |
Response TimeOut | The time in milliseconds to wait before retransmitting unacknowledged messages. Values: 1 to 100000. |
Connectivity Timeout | The time in milliseconds to wait for a request from MGCP before dropping the link. Values: 1 to 100000. |
Admin. Status | The desired state of the protocol. Click Set Admin Status to change the setting.
|
Step 7 Select (Set) Admin. Status.
Step 8 Select a setting.
Step 9 Click Set New Status to change the value and return to the MGCP Core Setting screen.
Step 10 Click Modify. The system configures the MGCP core settings.
To view MGCP message statistics, follow these steps.
Step 1 On the Navigation pane, click Protocol.
Step 2 Click MGCP.
Step 3 Click Message Stats.
The MGCP Message Statistics screen opens, displaying the statistics.

Step 4 Click Display. The system refreshes the display of MGCP statistics.
Call setup requires the default type of network, packetization period, bandwidth, echo cancellation, silence suppression, type of service, resource reservation, and COT receive and transmit tones. This section describes how to set default values for these parameters.
To configure MCP scalars, follow these steps:
Step 1 On the Navigation pane, click Protocol.
Step 2 Click MGCP.
Step 3 Click MPC Scalars.
The MPC Scalar screen opens.
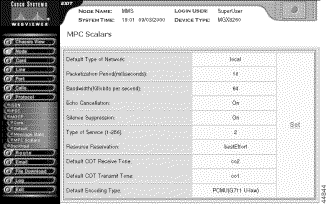
Step 4 Click Set.
The MPC Scalars Setting screen opens.
Step 5 Select new settings:
| Parameter | Description |
|---|---|
Default Type of Network | The type of network, voice-over-IP, voice-over-ATM, or local |
Packetization Period | Packetization Period in milliseconds. Value: fixed at 10 |
Bandwidth | The network bandwidth in kbps. Values: 8 and 64 kbps |
Echo Cancellation | Enables or disables echo cancellation. |
Silence Suppression | Enables or disables silence suppression. |
Type of Service | The type of Service. Values: 1-256, where 1 indicates no service type |
Resource Reservation | The resource reservation type. Values:
|
Default COT Receive Tone | The default receive tone. For transponder COT, when the media gateway controller does not supply the tones, the default tone the gateway receives is the default COT receive tone. Values:
|
Default COT Transmit Tone | The default transmit tone. For transponder COT, when the media gateway controller does not supply the tones, the default tone the gateway transmits is the default COT transmit tone. Values:
|
Default Encoding Type | The type of voice encoding when not specified by the MGC:
|
Step 6 Click Modify.
The system configures the MGCP core settings.
Step 7 Go back to the MPC Scalars screen.
Step 8 Click Display.
The system refreshes the display of settings on the MPC Scalars screen.
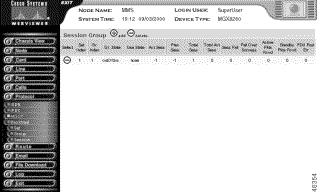
The session manager organizes individual sessions into groups and sets (see Figure 5-3).

The backhaul sessions and groups include the following components:
When adding sessions, you create a structure that supports reliable operation. The goal for a fully-redundant system is to provide multiple management sessions to multiple MGCs via multiple physical networks (see Figure 5-4).
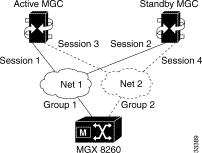
With full redundancy, you configure the following:
If the MGC can't handle all D Channels in one session set, you configure another similar set using different UDP ports and D Channels.
To configure ISDN backhaul signaling, perform the following tasks:
You can view and set session sets.
To view session set status, follow these steps:
Step 1 On the Navigation pane, click Protocol.
Step 2 Click Backhaul.
Step 3 Click Set.
The Session Set screen opens.

Step 4 View the session set summary.
| Displayed Information | Description |
|---|---|
Index | The session set index number. |
State | The state of the session set:
|
Total Groups | The total number of groups added to this Session Set. |
Min Slot | The minimum MGX 8260 slot number for this Session Set. |
Min Line | The minimum line number for this Session Set. |
Max Slot | The maximum MGX 8260 slot number for this Session Set. |
Max Line | The maximum line number for this Session Set. |
Redun Mode | The current redundancy mode:
|
Active Group | The group number which is in the Active state. Displays -1 if no group is active. |
Switch Failed | The total number of switchover failures. |
Switch Succeeded | The total number of switchover successes. |
Down Count | The number of times the session set went down. |
To add a session set, follow these steps:
Step 1 On the Navigation pane, click Protocol.
Step 2 Click Backhaul.
Step 3 Click Set.
The Session Set screen opens.
Step 4 Click the + icon.
The Add Session Set form opens.
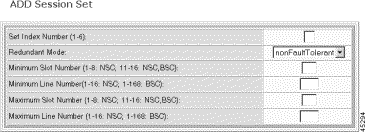
Step 5 Configure the session set parameters.
| Parameter | Description |
|---|---|
Set Index | An index number for the new set. |
Redundant Mode | The redundancy mode:
|
Minimum Slot Number | The minimum MGX 8260 slot number for this Session Set. Range: 1-8 and 11-16 |
Maximum Slot Number | The maximum MGX 8260 slot number for this Session Set. Range: 1-8 and 11-16 |
Minimum Line Number | The minimum line number for this Session Set. Range if Min Slot is a BSC: 1-168 Range if Min Slot is a NSC: 1-16 |
Maximum Line Number | The maximum line number for this Session Set. Range if Max Slot is a BSC: 1-168 Range if Max Slot is a NSC: 1-16 |
Step 6 Click Add.
To delete a session set, follow these steps:
Step 1 On the Navigation pane, click Protocol.
Step 2 Click Backhaul.
Step 3 Click Set.
The Session Set screen opens.
Step 4 Click the - icon for the set you want to delete; then confirm your action.
You can view and add session groups.
To view session set status, follow these steps:
Step 1 On the Navigation pane, click Protocol.
Step 2 Click Backhaul.
Step 3 Click Group.
The Session Group screen opens.
Step 4 View the session group summary.
| Displayed Information | Description |
|---|---|
Set Index | The set number to which this group belongs |
Gr. Index | The group index number |
Gr. State | The state of the session group:
|
Use State | The use state of the session group:
|
Act. Sess | The active session number of the Group. Displays -1 if no session is active. |
Prev Sess | The previously active session set ID of the Group. |
Total Sess | The total number of sessions for the Group. |
Total Act Sess | The total number of active sessions in the Group |
Sess Fail | The total number of session failures for the Group. |
Fail Over Success | The total number of failover successes for this Group. |
Active Pkts Rcvd | The total number of packets Received for this Group. |
Standby Pkts Rcvd | The total number of packets sent by this Group. |
PDU Post Err | The total number of active packets received for this Group. |
To add a session group, follow these steps:
Step 1 On the Navigation pane, click Protocol.
Step 2 Click Backhaul.
Step 3 Click Group.
The Session Group screen opens.
Step 4 Click the + icon.
The Add Session Group form opens.

Step 5 Configure the session group parameters.
| Parameter | Description |
|---|---|
Session Group Index Number | A group number for the new group. |
Session Set Index Number | The index number of the set to which this group belongs. |
Step 6 Click Add.
To delete a session group, follow these steps:
Step 1 On the Navigation pane, click Protocol.
Step 2 Click Backhaul.
Step 3 Click Group.
The Session Group screen opens.
Step 4 Click the - icon for the group you want to delete; then confirm your action.
You can view and add sessions.
To view session status, follow these steps:
Step 1 On the Navigation pane, click Protocol.
Step 2 Click Backhaul.
Step 3 Click Session.
The Session screen opens.
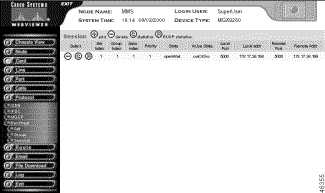
Step 4 View the session summary.
| Displayed Information | Description |
|---|---|
Set Index | The session set to which the group containing the session manger belongs. |
Group Index | The session group of which the session is a member. |
Sess. Index | The session number. |
Priority | The session connection priority. |
State | The session state:
|
InUse State | The use state of the session:
|
Local Port | The local UDP Port. |
Local addr | The local IP address of the connection. |
Remote Port | The remote UDP port. |
Remote Addr | The remote IP address of the connection. |
To add a session connection, follow these steps:
Step 1 On the Navigation pane, click Protocol.
Step 2 Click Backhaul.
Step 3 Click Session.
The Session screen opens.
Step 4 Click the + icon.
The Add Session form opens.
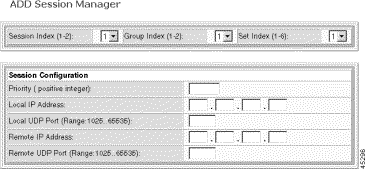
Step 5 Set the Session Index, Group Index, and Set Index.
| Parameter | Description |
|---|---|
Session Index | The session identifier. A session represents a 'physical' connection between the media gateway and media gateway controller. |
Group Index | Session group identifier. A session group consists of one or more RUDP sessions. |
Set Index | The session set identifier. A session set is a collection of session groups, each connecting to a different media gateway controller. Use session sets for redundant media gateway controller architectures. |
Step 6 Configure the session connection parameters.
| Parameter | Description |
|---|---|
Priority | The session priority. |
Local Port | The local port for the session. |
Local Address | The local IP address for the session. |
Remote Port | The remote port for the session. |
Remote Address | The remote IP address for the session. |
Step 7 Click Add.
To delete a session, follow these steps:
Step 1 On the Navigation pane, click Protocol.
Step 2 Click Backhaul.
Step 3 Click Session.
The Session screen opens.
Step 4 Click the - icon for the manager you want to delete; then confirm your action.
To view session counters, follow these steps:
Step 1 On the Navigation pane, click Protocol.
Step 2 Click Backhaul.
Step 3 Click Session.
The Session screen opens.
Step 4 Click the C icon on the session of interest.
Step 5 The Session Counters screen opens, displaying session counter values.
The MGX 8260 Media Gateway extends D Channel signaling to a Media Gateway Controller via a backhaul channel (see Figure 5-5).

Each BSC contains 168 T1 lines, each a potential Primary Rate ISDN line. An ISDN line contains 24 channels, one of which is the D Channel that carries the signaling information for the other 23 channels. The BSC card can terminate a D Channel signaling stack and pass the payload to a Media Gateway Controller, via the SCC, using a backhaul session.
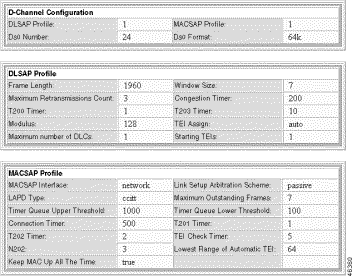
The following procedures describe how to configure a D Channel for a backhaul session. The procedures assume you already have a DS3 line and have provisioned a PRI ISDN line on one of its circuits. ISDN D Channels can be difficult to configure because they have many settings, so the Cisco MGX 8260 simplifies the process by grouping common settings into two types of profiles:
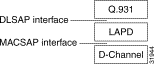
The Digital Link Service Access Profile (DLSAP) and Media Access Control Service Access Profile (MACSAP) profiles define different levels of the ISDN protocol stack (see Figure 5-6).
When adding D Channels, you simply specify suitable profiles that contain the desired configuration set. You can create profiles using default settings that accommodate the signaling requirements for common applications.
The Cisco MGX 8260 simplifies the process of creating D Channels with DLSAP and MACSAP profiles. These profiles provide a template of parameter settings that you apply when adding D Channels. Changes you make to the profiles only apply to lines you subsequently add, not to lines that already exist. If you want to change the configuration of a D Channel, delete it first and then recreate a new one using the new template.
The following section describes the high-level procedure for configuring a D Channel on an existing DS3 trunk:
Step 1 Define a DLSAP profile (see Adding a MACSAP Profile).
Step 2 Define a MACSAP profile (see Adding a DLSAP Profile).
Step 3 Define a D Channel on a PRI ISDN line within the DS3 trunk, using the profiles you defined in Steps 1 and 2 (see Adding D Channels).
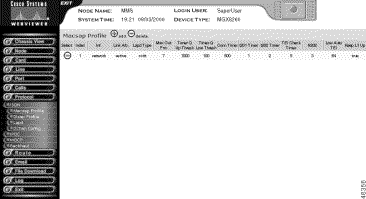
MACSAP management consists of adding and deleting profiles. You need at least one profile to add D Channels.
To add a MACSAP profile, follow these steps:
Step 1 On the Navigation pane, click Protocol.
Step 2 Click ISDN.
Step 3 Click Macsap Profile.
The Macsap Profile screen opens.
Step 4 Click the + icon.
The Add Macsap Profile form opens.
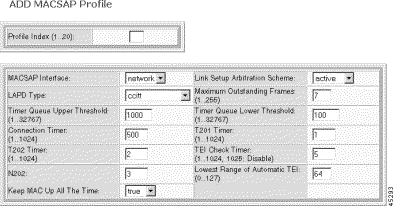
Step 5 Specify the Macsap profile parameters.
| Parameter | Description |
|---|---|
Profile Index | A numeric identifier for the profile. Values: 1 to 20 |
MACSAP Interface | The type of profile. Value: network |
Link Setup Arbitration Scheme | The link setup arbitration scheme. Values: passive or active. |
LAPD Type | The LAPD interface type |
Maximum Outstanding Frames | The maximum number of sequentially numbered I-frames that may be outstanding. Values: 1 to 255 |
Timer Queue Up Threshold | The upper threshold for I-frame queue. When the I-frame queue size exceeds this threshold, the congestion timer is started and flow-control is turned on. Values: 1 to 32767 |
Timer Queue Low Threshold | The lower threshold for I-frame queue. When the I-frame queue size falls below this threshold, the congestion timer is stopped and flow-control is turned off. Values: 1 to 32767 |
Connection Timer | The connection timer. Values: 1 to 1024 |
T201 Timer | The minimum time between transmissions of the TEI Identity check message, in seconds. Values: 1 to 1024 |
T202 Timer | The minimum time between retransmission of the TEI Identity request message, in seconds. Values 1 to 1024 |
TEI Check Timer | The TEI check timer. The value 1025 means the TEI Check Timer is disabled. Values: 1 to 1025, where 1025 = disables |
N202 | Minimum time between transmissions of TEI Identity check messages |
Lowest Range of Automatic TEI | The allocated TEI value. When configured for Automatic TEI Assignment, ASP can allocate TEIs greater than or equal to Lowest Automatic TEI. Values: 1 to 127 |
Keep Mac Up All The Time | The state of the Keep MAC Up All The Time flag. Values: true or false |
Step 6 Click Add. The system adds the profile and updates the Macsap Profile screen.
Note If you add an incorrect profile, delete the profile using the - icon and start over.
DLSAP management consists of adding and deleting profiles. You need at least one profile to add D Channels.
To add a DLSAP profile, follow these steps:
Step 1 On the Navigation pane, click Protocol.
Step 2 Click ISDN.
Step 3 Click Dlsap Profile.
The Dlsap Profile screen opens.

Step 4 Click the + icon.
The Add Dlsap Profile form opens.
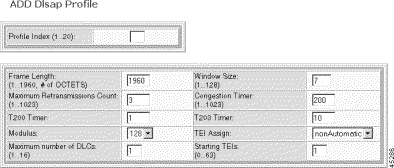
Step 5 Specify the Dlsap profile parameters.
| Parameter | Description |
|---|---|
Profile Index | A numeric identifier for the profile. Values: 1 to 20. |
Frame Length | The frame length, which is the maximum number of octets in an information field. Values: 1 to 1960. Default: 1960. |
Window Size | The maximum number of sequentially numbered I-frames that may be outstanding. This window-size depends on the modulo. If the modulo is 8, then this range is (1 - 8) and if the modulo is 128, then the range of the window size is (1 - 128). |
Maximum Retransmissions | The maximum number of retransmissions of a frame. Values: 1 to 1023. Default: 3 |
Congestion Timer | The time after which DLCs are dropped during periods of network congestion, in seconds. Values: 1 to 1023. Default: 200 |
T200 Timer | The wait time before frame transmission may be initiated, in seconds. Values: 1 to 3. Default: 1 |
T203 Timer | The maximum time between retransmission of the TEI identity request message, in seconds. Values 20 to 60. Default: 10 |
Modulus | Each I-frame is sequentially numbered and may have values 0 through (N-1) where N is this modulus. Values: 8 or 128. Default: 128 |
TEI Assign | The Terminal Endpoint Identifier assignment setting: 1. automatic—TEI is selected by the ASP Layer Management procedure on the network side. Default: 2, which yields a TEI of 1. 2. nonAutomatic—TEI is selected by the user (default) |
Max DLCs | The maximum number of DLCs for this DLSAP. Values: 1 to 16. Default: 1 |
Starting TEIs | The starting number for reassigning TEIs. This number is used in conjunction with the previous two parameters to number TEIs. For example, if TEI Assignment is nonAutomatic, Maximum DLCs for this DLSAP is 4, and TEI is 14. When a D Channel is added, 4 TEIs starting at 14 are preconfigured. Values: 0 to 63 |
Step 6 Click Add. The system adds the profile and updates the Dlsap Profile screen.
To delete a dlsap or macsap profile, follow these steps:
Step 1 On the Navigation pane, click Protocol.
Step 2 Click ISDN.
Step 3 Click Dlsap Profile or Macsap Profile.
The Dlsap Profile or Macsap Profile screen opens.
Step 4 Click the - icon for the profile you want to delete; then confirm your action.
You don't need to configure LAPD, but you can view its status.
To view LAPD status, follow these steps:
Step 1 On the Navigation pane, click Protocol.
Step 2 Click ISDN.
Step 3 Click Lapd.
The LAPD Card Table screen opens.

Step 4 View the LAPD summary.
| Displayed Information | Description |
|---|---|
Card Index | The physical card number |
Number of Phy. Links | The total number of physical links for this instance of LAPD on the card |
Num of DLCs | The total number of DLCs for this instance of LAPD on the card |
Num of LAPD Links | The total number of LAPD links for this instance of LAPD on the card |
Num of ASPs | The number of Assigned Source Points |
Step 5 Click Back to close the screen.
The Cisco MGX 8260 communicates with PSTN equipment over Primary Rate Interface (PRI) ISDN D Channels.
Adding a D Channel requires an existing DS3 line and suitable DLSAP and MACSAP profiles.
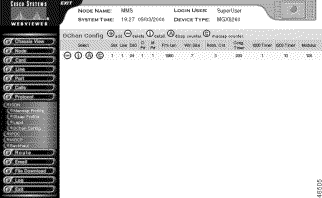
To add a D Channel, follow these steps:
Step 1 On the Navigation pane, click Protocol.
Step 2 Click ISDN.
Step 3 Click DChan Config.
The DChan Config screen opens.
Step 4 Click the + icon.
The Add D Channel Configuration form opens.

Step 5 Specify the D Channel parameters.
| Parameter | Description |
|---|---|
Slot | The slot number for this D Channel |
Line | The line number for this D Channel. |
Contiguous Creating Lines | The number of D Channels to add. |
DLSAP Profile Number | The instance number of a DlSap profile. The profile defines a template for the configuration; the DlSap instance number is created from the template. |
Ds0 Number | The time slot to use for the D Channel |
MacSap Profile Number | The instance number of a MacSap profile. The profile defines a template for the configuration; the MacSap instance number is created from the template. |
Ds0 Format | The D Channel format, either 56 or 64 kbps |
Step 6 Click Add. The system adds the D Channel and updates the DChan Config screen.
To change a D Channel, delete the desired D Channel and then add a new one. When creating the new channel, choose a DLSAP and MACSAP profile that contains the desired settings. If such a profile doesn't exist, create one first before adding the new D-Channel. For more information on the relationship between D Channels and profiles, see Configuration Tasks for D Channels.
To delete a D Channel, follow these steps:
Step 1 On the Navigation pane, click Protocol.
Step 2 Click ISDN.
Step 3 Click DChan Config.
The DChan Config screen opens.
Step 4 Click the - icon for the D Channel you want to delete; then confirm your action.
To view D Channel detail information, follow these steps:
Step 1 On the Navigation pane, click Protocol.
Step 2 Click ISDN.
The DChan Config screen opens.
Step 3 Click the i icon on the D Channel of interest.
The system displays configuration information for the D Channel.
To view D Channel counters, follow these steps:
Step 1 On the Navigation pane, click Protocol.
Step 2 Click ISDN.
The DChan Config screen opens.
Step 3 Click the i icon on the D Channel of interest.
The system displays Counter information for the D Channel.
To view DLSAP counters, follow these steps:
Step 1 On the Navigation pane, click Protocol.
Step 2 Click ISDN.
The DChan Config screen opens.
Step 3 Click the A icon on the D Channel of interest.
The system displays DLSAP Counter information for the D Channel.
To view MACSAP counters, follow these steps:
Step 1 On the Navigation pane, click Protocol.
Step 2 Click ISDN.
The DChan Config screen opens.
Step 3 Click the C icon on the D Channel of interest.
The system displays MACSAP Counter information for the D Channel.
IPDC is an alternative for MGCP for controlling voice calls through the Cisco MGX 8260. When using IPDC, you don't need to configure sessions or backhaul channels.
To configure IPDC, perform the following tasks:
The Cisco MGX 8260 supports two call control protocols, MGCP and IPDC. By default, MGCP is enabled and IPDC is disabled. To switch to IPDC you must change the active protocol type and reset the chassis.
 |
Warning Switching protocols interrupts service. Perform this operation during light traffic periods or in a pre-arranged maintenance window. |
To switch protocols, follow these steps:
Step 1 On the Navigation pane, click Node.
Step 2 Click System.
Step 3 On the Configuration Setting form, click the Set link on the Gateway Control Protocol line. The System Gateway Control Protocol Setting form opens.
Step 4 Select the protocol type, either MGCP or IPDC.
Step 5 Click Modify. The system resets and drops your management session.
Step 6 Log in and continue configurations.
Before beginning this procedure, obtain the IP addresses and ports that apply to your system. Make sure your IP and port selections do not conflict with other equipment on the network.
To IPDC IP addresses, follow these steps:
Step 1 On the Navigation pane, click Protocol.
Step 2 Click IPDC.
Step 3 Click Configuration.
The IPDC Configuration screen opens, which includes the Soft Switch Configuration form:
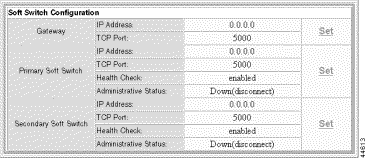
The form displays IP addresses and operational status for the Soft Servers. To change the settings, perform the following steps.
Step 4 In the Gateway section, click Set.
The IPDC Gateway Setting form opens.

Step 5 Specify the IP gateway parameters.
| Parameter | Description |
|---|---|
IP Address | The IP address of the gateway router for IPDC traffic, expressed in standard dot notation. |
TCP Port | The TCP port to use. Values: 1025 to 65535. Default: 5000 |
Step 6 Click Modify; then click Display IPDC Configuration. The IPDC Configuration screen reopens.
Step 7 In the Primary Soft Switch section, click Set.
The Primary Soft Switch Setting form opens.
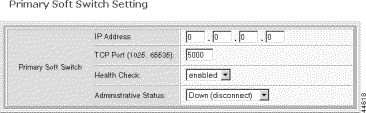
Step 8 Specify the primary Soft Switch parameters.
| Parameter | Description |
|---|---|
IP Address | The IP address of the primary Soft Server, expressed in standard dot notation. |
TCP Port | The TCP port to use. Values: 1025 to 65535. Default: 5000 |
Health Check | The link health check feature. Values: enabled or disabled. Default: enabled |
Administrative Status | The operational status of the link. Values: up or down. Default: down |
Step 9 Click Modify; then click Display IPDC Configuration. The IPDC Configuration screen reopens.
Step 10 For redundancy, click Set in the Secondary Soft Switch section and repeat Steps 8 and 9.
The Cisco MGX 8260 supports a single pseudo-IP address for the four broadband ports. Use this procedure to initialize this address.
To configure a pseudo-IP address, follow these steps:
Step 1 On the Navigation pane, click Protocol.
Step 2 Click IPDC.
Step 3 Click Configuration.
The IPDC Configuration screen opens, which includes the Status and Core Setting form:
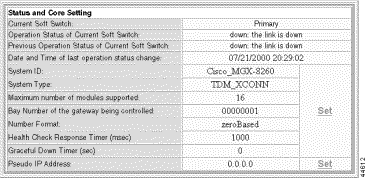
Step 4 In the Pseudo IP Address section, click Set.
The IPDC Pseudo IP Address Setting form opens.

Step 5 Specify the pseudo-IP address, in standard dot notation. Select an IP address that is in the same subnet as the broadband ports.
Step 6 Click Modify; then click Display IPDC Configuration. The IPDC Configuration screen reopens.
To configure IPDC core settings, follow these steps:
Step 1 On the Navigation pane, click Protocol.
Step 2 Click IPDC.
Step 3 Click Configuration.
The IPDC Configuration screen opens, which includes the Status and Core Setting form:
The form displays current operational status for the Soft Switches, along with configuration information for the core settings. To change the core settings, perform the following steps.
Step 4 In the upper section, click Set.
The IPDC Configuration Setting form opens.
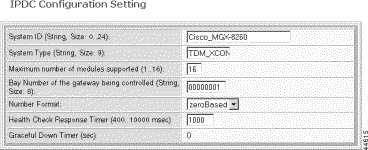
Step 5 Specify the core IPDC parameters.
| Parameter | Description |
|---|---|
System ID | An identifier for the gateway being controlled by IPDC protocol. Value: Text string from 0 to 24 characters. |
System Type | An identifier for the manufacturer and model of the access server. Value: Text string of exactly 9 characters |
Maximum number of modules supported | Maximum number of modules (slot cards) supported. Values: 1 to 16 |
Bay Number of the gateway being controlled | The number associated with Cisco MGX 8260 being controlled. Value: Text string of exactly 8 characters. |
Number Format | The numbering format that the Soft Switch uses to interpret module, line, and channel numbers on an MGX 8260. Values: zeroBased or oneBased. |
Health Check Response Timer | The time to wait after sending the heartbeat before bringing down the link. Values: 400 to 10000 msec. Default 1000 |
Graceful Down Timer | The graceful disconnect time for both Soft Switches. Values: integer seconds from 0 - 32767 seconds. Value: 0 (no graceful down) |
Step 6 Click Modify; then click Display IPDC Configuration. The IPDC Configuration screen reopens.
To configure continuity test settings, follow these steps:
Step 1 On the Navigation pane, click Protocol.
Step 2 Click IPDC.
Step 3 Click Configuration.
The IPDC Configuration screen opens, which includes the COT Configuration form:

The form displays the current COT configuration. To change the settings, perform the following steps.
Step 4 Click Set.
The IPDC COT Configuration Setting form opens.

Step 5 Specify the core COT parameters.
| Parameter | Description |
|---|---|
COT Receive Tone | IPDC COT receive tone. Values: co1 (2010 Hz) or co2 (1780 Hz) |
COT Transmit Tone | IPDC COT transmit tone. Values: co1 or co2 |
Step 6 Click Modify.
IPDC timers and counters control how the link behaves under abnormal or fault conditions. You can use the default settings, or provide a custom set.
To configure a IPDC timers, follow these steps:
Step 1 On the Navigation pane, click Protocol.
Step 2 Click IPDC.
Step 3 Click Timer.
The IPDC Timer Configuration screen opens:
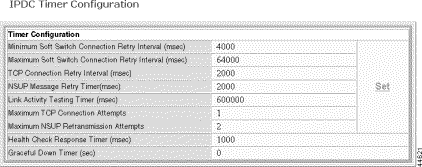
The form displays the current timer and counter configurations. To change these settings, perform the following steps.
Step 4 Click Set.
The IPDC Timer Configuration Setting form opens.
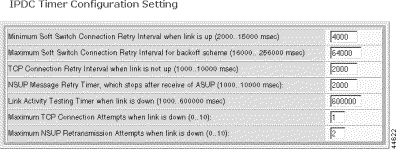
Step 5 Specify the timer parameters.
Minimum Soft Switch Connection Retry Interval when link is up | Minimum connection retry interval for primary or secondary Soft Switch when the link is up. The connection interval doubles with every retry attempt until the ssConnRetryThr value is reached. Values: integer 2000 to 15000 msec. Default: 4000 msec |
Maximum Soft Switch Connection Retry Interval for backoff scheme | Maximum Soft Switch connection retry interval. Values: integer 16000 to 256000 msec. Default: 64000 msec |
TCP Connection Retry Interval when link is not up | Retry interval for a TCP connection when the link is down. Values: 1000 to 10000 msec. Default: 2000 msec |
NSUP Message Retry Timer, which stops after receive of ASUP | Retry interval for NSUP message. The timer stops after receipt of ASUP. Values: 1000 to 10000 msec. Default: 2000 msec |
Link Activity Testing Timer when link is down | The time this device waits for a message from the Soft Switch before declaring the link down. If the health check is enabled, the link stays up until the heartbeat times out. Values: 1000 to 600000 msec. Default 60000 msec |
Maximum TCP Connection Attempts when link is down | The maximum number of TCP connection attempts when the link is down. Values 0 to 10. Default: 1 retry |
Maximum NSUP Retransmission Attempts when link is down | The maximum NSUP retransmission attempts when the link is down. Values: 0 to 10. Default 2 attempts |
Step 6 Click Modify.
To activate IPDC links, follow these steps:
Step 1 On the Navigation pane, click Protocol.
Step 2 Click IPDC.
Step 3 Click Configuration.
The IPDC Configuration screen opens, which includes the Soft Switch Configuration form:
Step 4 Click Modify; then click Display IPDC Configuration. The IPDC Configuration screen reopens.
Step 5 In the Primary Soft Switch or Secondary Soft Switch section, click Set.
The Primary Soft Switch Setting or Secondary Soft Switch Setting form opens.
Step 6 Activate the protocol and health check.
| Parameter | Description |
|---|---|
Health Check | The link health check feature. Values: enabled or disabled. Default: enabled |
Administrative Status | The operational status of the link. Values: Up or Down. Default: down |
Step 7 Click Modify; then click Display IPDC Configuration. The IPDC Configuration screen reopens.
![]()
![]()
![]()
![]()
![]()
![]()
![]()
![]()
Posted: Mon Nov 25 11:03:48 PST 2002
Copyright 1989-2000©Cisco Systems Inc.