cc/td/doc/product/wanbu/bpx8600/9_3_3
hometocprevnextglossaryfeedbacksearchhelp
PDF

Table Of Contents

Installation in Customer Cabinet

Installing a BPX Switch, Rear Rail Setback at 30-inch

Preliminary Procedure


Installation in Customer Cabinet


This chapter provides installation steps for the mechanical placement of a BPX switch shelf in a standard 19-inch customer-supplied equipment cabinet or rack with a rear rail setback at 30 inches.

Before proceeding to this chapter, complete the procedures in "Preliminary Steps Before Installing."

Installing a BPX Switch, Rear Rail Setback at 30-inch

To install a BPX switch shelf to a customer-supplied cabinet with rear vertical rails, which are located at a setback of approximately 30 inches from the front, use the following procedure:


Step 1 If the BPX switch shelf is DC powered, the DC Power Entry Modules are factory-installed in the lower portion of the rear of the BPX switch shelf itself.

Step 2 Locate the DC Power Entry Module(s) and make sure they are equipped as ordered.

Step 3 If the BPX switch shelf is AC powered, you will also need to install an AC Power Assembly below it.


Preliminary Procedure

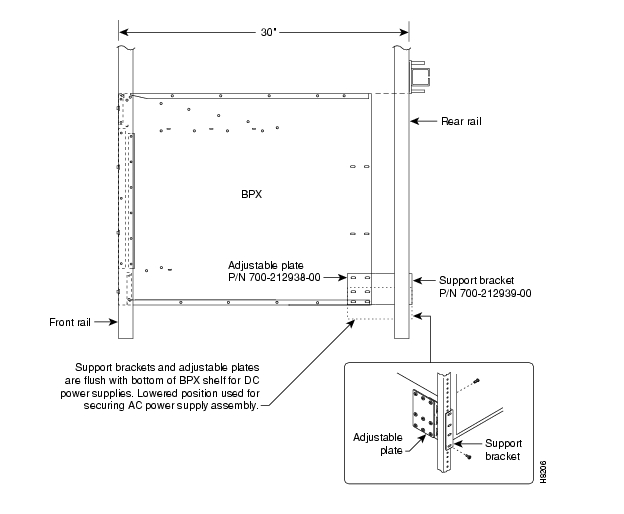
DC-powered systems are illustrated in Figure 9-1, Figure 9-2, Figure 9-3, and Figure 9-4. AC-powered systems are illustrated in Figure 9-5. Figure 9-2 shows the location of the rear-located third rails in a customer supplied cabinet, and of the corresponding adjustable plates and support brackets on the BPX switch shelf.

To install the BPX switch shelf, use the following procedure:


Step 1 With one person on each side of the BPX switch shelf, slide the BPX from lifting device and rest it on the temporary space bar and temporary support brackets. Position the slots at the rear of the pallet tray over the locating tabs on the spacer bracket (see Figure 9-1).

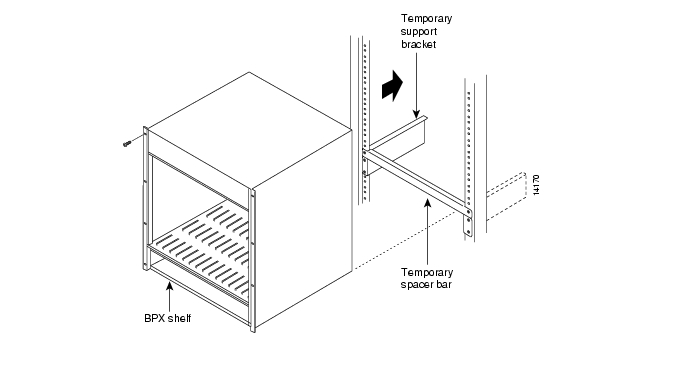
Figure 9-1 BPX Switch Aligned with Temporary Support Brackets and Spacer Bar

Step 2 Slide the BPX switch shelf into the cabinet over the temporary support bar and brackets and into place over the flanges of the brackets previously attached to the rear rails of the cabinet.

Step 3 Secure the BPX switch shelf to the front rail using 8 each #10-32 screws.


Note European installations may use a size M6 metric screw.


Step 4 Locate the rear support brackets (P/N 215960-00B and 215960-01B) in the miscellaneous parts kit.

Step 5 Position the adjustable plates with the tabs in the three punchouts facing up as shown in Figure 9-3.

Step 6 Align the top and bottom holes in the adjustable plates with corresponding holes in the side panel of the BPX switch shelf. (The bottom of the plates should be approximately aligned with the bottom of a
DC- powered BPX switch shelf. They should be extended below the bottom of an AC-powered BPX switch shelf so that the AC Power Supplies can be secured to the shelf.)

Step 7 Secure one each adjustable plate to each side of the BPX switch shelf, using (2) each #10-32 machine screws and flat washers.

Step 8 Attach a rear support bracket to each one of the adjustable plates with 2 each #10-32 screws and washers. Do not tighten yet.

Step 9 Secure the support brackets to the rear located vertical rails using 2 each #10-32 screws. You might have to lift the BPX switch shelf slightly to align the holes in the bracket to the holes in the rack.

Step 10 Tighten the screws attaching the support bracket to the adjustable plate.

Step 11 Slide a cable strap over each of the three tabs on the support brackets.

Step 12 Remove the temporary support bracket and spacer bracket from the front of the cabinet.

Step 13 If this is a DC-powered shelf, proceed to "Installing the DC Shelf."

Step 14 If this is an AC-powered shelf, proceed to "Installing the AC Shelf."


Figure 9-2 BPX Switch with Rear Rail Mounting at Setback of 30 Inches

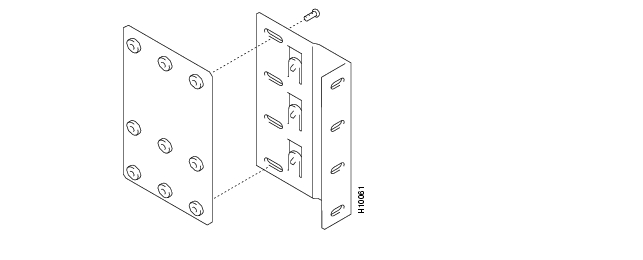
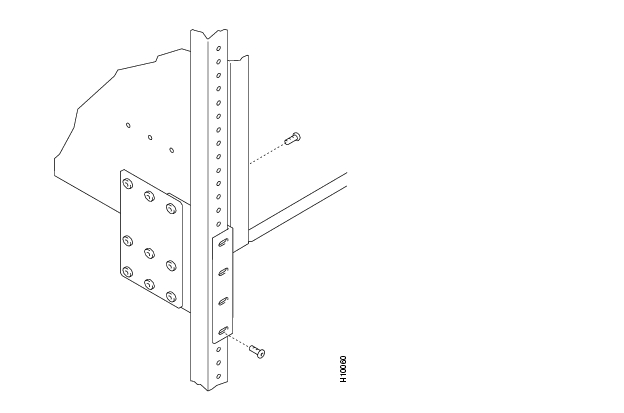
Figure 9-3 Rear Mounting Brackets, Detail

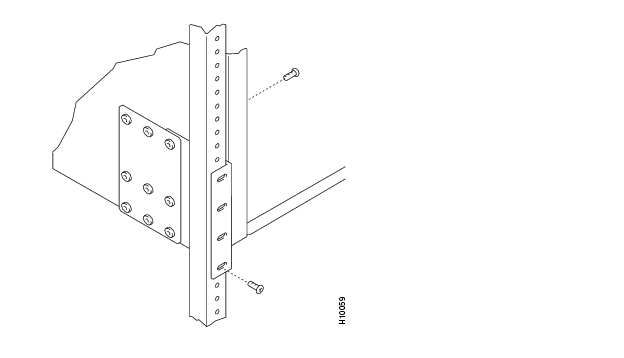
Figure 9-4 Rear Mounting Brackets, with 30-inch Rear Rail Setback (DC Systems)

Figure 9-5 Rear Mounting Brackets, 30 Inch Rear Rail Setback (AC-Powered Systems)


hometocprevnextglossaryfeedbacksearchhelp

Posted: Tue May 10 21:08:48 PDT 2005
All contents are Copyright © 1992--2005 Cisco Systems, Inc. All rights reserved.
Important Notices and Privacy Statement.