|
|

Table Of Contents
Virtual Trunking Configuration
Virtual Trunking Configuration
Permutations of Virtual Trunks You Can Configure Through the ATM Cloud
Ports and Trunks Feature in Release 9.2
Displaying or Printing Trunk Configurations
Setting Up ATM Trunk and Line Redundancy
Using Subrate Trunk Interface Control Templates
Receive and Transmit Rates on Physical Trunks
Receive and Transmit Rates on Virtual Trunks
Physical and Virtual Trunk Configuration
Configuring an IMA-Compliant Trunk
Physical and Virtual Trunk Parameters You Can Configure with cnftrk
Configuring IMA Physical Lines
Setting Up Trunks
This chapter describes the commands you use to set up and configure trunks. The contents in this chapter are as follows:
•
Introduction
•
•
–
–
–
–
–
–
–
–
•
•
Introduction
After you have configured the nodes, you must activate the trunks. Trunks are intra-node communication links in a network. A trunk can connect any combination of IGX or BPX nodes. Trunk characteristics are:
Table 4-1 shows the communication technology for each node type, card combination, and line type.
Overview of Virtual Trunking
The purpose of virtual trunks is to provide customers with a cost-effective way to use Cisco equipment while connecting to a public ATM network. This hybrid network of private trunks and public networks is expected to be a common configuration as customers begin to implement ATM in their networks and public carriers begin to offer ATM service. This hybrid network configuration provided by virtual trunking allows private virtual trunks to use the mesh capabilities of the public network in interconnecting the subnets of the private network.
You establish connectivity through a public ATM cloud by allocating virtual trunks between the nodes on the edge of the cloud. With only a single trunk port attached to a single ATM port in the cloud, a node uses the virtual trunks to connect to multiple destination nodes on the other side of the cloud. From the perspective of a Cisco node, a virtual trunk is equivalent to a VPC provided by the ATM cloud network, which provides connectivity through the cloud.
A virtual trunk is simply "a trunk defined over a public ATM service." The trunk really does not exist as a physical line in the network. You use an additional level of reference, called a virtual trunk number, to differentiate the virtual trunks found within a physical port. The ATM equipment in the cloud must support Virtual Path switching and moving incoming cells based on the VPI in the cell header. Within the cloud, one virtual trunk is equivalent to one VPC. Because the VPC is switched with just the VPI value, the 16 VCI bits (from the ATM cell format) of the ATM cell header are passed transparently through to the other end. The VCI bits within the header are passed transparently through the entire cloud (see Figure 4-1 ). The virtual path ID (VPI) is provided by the ATM cloud administrator (for example, service provider).
Figure 4-1 Typical ATM Hybrid Network Using Virtual Trunks
This release introduces support of the UXM trunk card as a physical interface to the public ATM cloud on the IGX. BXM trunk card support is introduced as a physical interface to the cloud on the BPX. The trunk connection at the cloud's access point can be an ATM UNI or ATM NNI interface. Virtual trunking is supported on the IGX and BPX platforms. With the BPX switch, virtual networks can be set up with either the BNI card or BXM card. The virtual trunks originate and terminate on BXMs to BXMs, or BXMs to UXMs (IGX switch), or BNIs to BNIs, but not BNIs to BXMs or UXMs.
Each Cisco sub-network is connected through the public ATM network with virtual trunks. The trunk interface at the Cisco nodes is either a BNI, BXM, or UXM trunk card. The BXM card's physical trunk interface to the ATM cloud is a standard ATM UNI or NNI interface at the cloud's access point. The administrator of the ATM cloud (for example, service provider) specifies whether the interface is UNI or NNI, and also provides the VPI to be used by a virtual trunk across the cloud. Specifying an NNI cell interface provides four more bits of VPI addressing space.
Virtual trunking is a purchased feature, so Cisco Customer Service must enable it on each node where you intend to use virtual trunking. Virtual trunking is supported on the ASI, BNI and BXM cards in the BPX, and on the UXM card in the IGX. Note that firmware levels on ASI, BXM, and UXM cards must be current. For more information on virtual trunking, see the chapter on BXM virtual trunks in the <CellCommandItalic>Cisco BPX Series Installation and Configuration and Cisco BPX 8600 Series Reference.
Setting Up a Trunk
Before executing the commands in this section, you must have finished setting up the nodes (see the " Setting Up Nodes" chapter.) Also, the front and back cards that support the proposed line type and communication technology must reside in the slot intended for the trunk.
In this release, the Ports and Trunks feature, which is supported on the BPX and IGX, allows you to configure port, routing trunk and feeder trunk interfaces simultaneously on a slot containing a BXM or UXM card. For example, you can up port 1 on a BXM slot as a trunk interface while also upping port 2 as a line interface. See Table 4-2 for card/interface support. For BXM and UXM cards, you do not need to upgrade the firmware.
Note
1.
Use the uptrk command to activate the port so that it can start to generate framing. It also determines whether the trunk is a physical-only trunk or a virtual trunk. The third digit you specify in the uptrk command (represented by slot.port.vtrk) indicates that the trunk is virtual. See the Cisco BPX Series 8600 Reference for more information on virtual trunking.
Use uptrk at each end of the trunk. When the trunk is upped at only one end, the node detects the trunk as being in an alarm state (see dsptrks). Upping the trunk at both ends clears the alarm.
2.
If you use cnftrk, you must make the same changes at both ends of the trunk. To display existing trunk parameters, use the dsptrkcnf command. The configurable parameters are listed for each card type in Table 4-1. (The possible parameters are PKT for FastPackets, ATM cells, BNI if the trunk is a BNI card, or All.) Not all of these parameters apply to the BPX node.
After you configure the trunk, and add the trunk (addtrk), you can respecify certain parameters. For example, a period of trunk use may give you enough information to indicate that you should change parameters to optimize how the trunk is used. Refer to "Reconfiguring a Trunk" for details.
3.
(To add an interface shelf to a routing node in a tiered network, use addshelf. See the chapter " Setting Up Trunks.")
Compatibility Between Cards in Virtual Trunks
Virtual trunking is supported on the BPX and IGX. However, because the BXM and UXM cards both use the standard UNI and NNI cell header formats across the virtual trunks (instead of the Strata-UNI cell format used on BNI virtual trunks), BNI virtual trunks are not compatible with BXM/UXM virtual trunks.
To use virtual trunking on a BXM or a UXM card, Release 9.2 software is required, and Release 9.2 BXM and UXM firmware, which is backward compatible. No hardware upgrade is required. Also, nodes running Release 9.2 software can interoperate with nodes running 9.1 or 8.5, but you cannot add UXM and BXM virtual trunks into a network of mixed software releases. This is because the networking messages are different among the software releases, specifically the virtual trunk number and the cell format on virtual trunks.
You configure the BXM and UXM cards similarly as in releases previous to Release 9.2; that is, you use similar card, line, port and connection commands for configuration.
Virtual Trunking Support on BPX and IGX in Release 9.2
Each BPX node can have a combined maximum of 64 logical (physical and virtual) trunks per node. Each IGX node can have a combined maximum of 32 logical (physical and virtual) trunks per node.
A BNI-T3 or E3 line can support up to 32 virtual trunks on one or both physical ports. A BNI-OC-3 line can support up to 11 virtual trunks.
A BXM card can support up to 31 virtual trunks. A UXM card can support up to 15 virtual trunks. Note that, like regular trunks, virtual trunks can carry high-priority traffic.
Channel Capacities. In Release 9.2, networking channels will be pre-allocated only for AutoRoute trunks. In releases previous to Release 9.2, for UXM and BXM cards, networking channels are pre-allocated when the first trunk is upped; that is, 270 channels are allocated for each trunk on that card. For example, if the card had four trunks enabled on it, trunk 1 would have channels 0 through 270 allocated, trunk 2 would have channels 271 through 540; trunk 3 would have channels 541 through 810, and trunk 4 would have channels 811 through 960 allocated.
Network channels are no longer pre-allocated. Networking channels will be allocated for each trunk when the trunk is upped. For each trunk that is upped, 270 channels will be dynamically allocated for networking.
For legacy UXM/BXM cards, approximately 270 networking channels are allocated for each virtual trunk. For example, UXM cards will allocate 4320 channels if all 16 virtual trunks are upped on a single card. BXM cards will allocate 8640 channels if all 32 virtual trunks are upped. See Table 4-3 for networking channel capacities for virtual trunks.
This implies that UXM legacy cards upping all 15 virtual trunks would consume 4320 gateway channels for networking, leaving none for user traffic. For this reason, you will need to limit the number of virtual trunks that you up on a legacy UXM card. You can use the cnfport command to control the number of trunks upped on a UXM card.
Introduction to Ports and Trunks and Virtual Trunking
The fundamental architecture of the virtual trunking feature in this release is similar to that of the BNI virtual trunk implementation in previous switch software releases. The standard UNI/NNI cell headers are used across the virtual trunks, and two-stage queueing as defined by the Virtual Interface.
This section discusses some features that interact with virtual trunking, including:
•
•
•
You up and configure virtual trunks with the existing commands. The commands have additional parameters for virtual trunk-specific items. You up a trunk with uptrk <slot.port.vtrk>. You configure the trunk VPI (VPI range 1-4095) and other parameters on the trunk with cnftrk, cnftrkparm, and cnfrsrc commands.
Table 4-4 lists the permutation of virtual trunks that you can interface through the public ATM cloud.
The Ports and Trunks feature lets you configure multiple trunk lines and circuit lines on a single BXM or UXM card simultaneously. In releases previous to Release 9.2, when you upped a single port as a trunk (by using the uptrk command), all the remaining ports on that card are treated as trunks. Similarly, when you up a single port as a circuit line (by using the upln command), all the remaining ports on the card are treated as circuit-line ports.
The Ports and Trunks feature is supported on the BXM and UXM cards for the BPX and IGX platforms. A port, routing trunk, and feeder trunk interface can be supported on a given slot containing a BXM or UXM card type simultaneously. For example, a user of a BXM slot can have port 1 upped as a trunk interface while having port 2 upped as a line interface.
For example, a BXM card can have:
•
•
•
•
Table 4-5 lists the interface types which can be supported on a single card.
Version Interoperability
Virtual trunking is not supported in a mixed network (that is, of mixed releases 8.4, 8.5, 9.1, and 9.2). You must upgrade nodes to Release 9.2 to use virtual trunking.
You can use the Ports and Trunks feature in a network of mixed releases.
To support virtual trunk networking channels and VSI on virtual trunks, you must upgrade to new firmware. Refer to 9.2 release notes for system requirements.
Virtual Trunking Configuration
You use the existing trunk commands to manage trunks (for example, uptrk, cnftrk, and addtrk). The syntax to identify a logical trunk has an optional virtual trunk identifier, which you append to the slot and port information.
The ATM cloud must be configured to support virtual trunking. For an ATM cloud containing Cisco equipment (for example, BPX nodes are in the public ATM cloud), the access points are ASI or BXM ports. (These access points serve as physical interfaces to the cloud.) If the ATM cloud has access points of ASI or BXM ports, and the cloud attaches to either BXM or UXM virtual trunks, the ASI or BXM port should be configured (with cnfport) so that the HCF field (sometimes called the shift/no shift option is set correctly. The cnfport shift (H) option specifies that a one-byte shift on the HCF field of the cell header will occur.
For an ATM cloud containing IGXs, the access points are UXM ports. Similarly, you must configure the ports to handle the virtual trunk cells from Cisco nodes. This entails setting the physical port parameters such that they match the trunk to which they are attached. In addition, if the access point in the BPX cloud is a BNI port, you must to configure the port to not shift (Shift N) the VCI in the cell header.
Note
Virtual Trunk Example
An example of a number of virtual trunks configured across a public ATM Network is shown in Figure 4-2. There are three virtual trunks shown across the network, each with its own unique VPC.
The three virtual trunks shown in the network are:
•
•
•
Each VPC defines a virtual trunk which you can configure for support of CBR, VBR, or ABR traffic.
Figure 4-2 Virtual Trunks Across a Public ATM Network
Connection Management
Virtual trunking allows a BPX and IGX node to provide trunks that are compatible with the standard 3.0/3.1 ATM UNI cell format interface of a public ATM network. Unlike previous trunk implementations, the ATM cells are not in a proprietary STI (StrataCom Trunk Interface) format, permitting StrataCom (STRM) trunks to connect through a public ATM network.
The cell addressing method for connections routed through a virtual trunk handles multiple type of traffic flowing through an ATM cloud. The header format of cells may match the ATM-UNI or ATM-NNI format since the port interface to the ATM cloud is a physical interface configured as either a UNI or NNI interface, as specified by the administrator of the ATM cloud.
Congestion management (resource management) cells are passed transparently through the network. Cisco features such as Advanced CoS Management and Optimized Bandwidth Management may not be supported within the public network, but the information is carried through the network. Leased lines may also exist to connect the Cisco subnetworks outside of the ATM network.
Cell Header Formats
Before cells enter the cloud on a virtual trunk, the cell header is translated to a user configured VPI value for the trunk, and a software configured VCI value, which is unique for the cell.
As cells are received from the cloud by the BPX or IGX in the Cisco networks at the other end of the cloud, these VPI/VCIs are mapped back to the appropriate VPI/VCI addresses by the Cisco nodes for forwarding to the next destination.
The VPI value across the virtual trunk is identical for all cells on a single virtual trunk. The VCI value in these cells determines the final destinations of the cells. On BNI cards, for virtual trunking, a modified ATM UNI cell format (Strata-UNI) stores the Optimized Bandwidth Management information, as applicable, in the header of a Strata-UNI cell format. A virtual trunk with a BNI at one end must terminate on a BNI at the other end. (BNI trunks are incompatible with BXM or UXM trunks.)
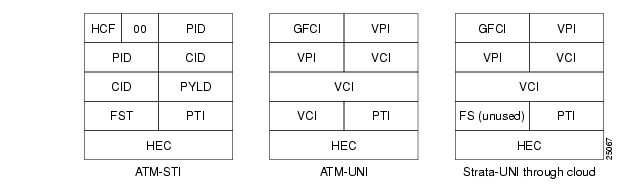
Figure 4-3 shows three different cell header types: ATM-STI, ATM-UNI, and Strata-UNI through a cloud. The ATM-NNI header (which is not shown in the figure) differs in format from the ATM-UNI only in that there is no GFCI field, and those four bits are added to the VPI bits to give a 12-bit VPI.
Figure 4-3 ATM Virtual Trunk Header Types
The ATM-STI header is used with BNI trunks between BPX nodes within a Cisco switch subnetwork. The ATM-UNI is the standard ATM Forum UNI supported by the BXM card along with standard NNI. Virtual trunks terminating on BXMs or UXMs use the standard ATM-UNI or ATM-NNI header as specified by the cloud administrator (for example, service provider). Virtual trunks terminating on BNIs use the Strata-UNI header.
Because the BNI cards use a Strata-UNI format across a virtual trunk, BNI virtual trunks are not compatible with BXM/UXM virtual trunks which use either the standard UNI or NNI cell header formats. Therefore, BXM to BXM, UXM to UXM, and BXM to UXM virtual trunks are supported while BNI to BXM or BNI to UXM virtual trunks are not supported.
Bit Shifting for Virtual Trunks
The ATM-STI header uses four of the VCI bit spaces for additional control information. Only two of the bits are used for HCF. When the cell is to be transferred across a public network, a shift of these bit spaces is performed to restore them to their normal location so they can be used across a network expecting a standard ATM cell header.
This bit shifting is shown in Table 4-6. A BNI in the Cisco subnetwork can interface to an ASI or BXM (port configured for port mode) in the cloud. The ASI or BXM in the cloud is configured for no shift in this case.
A BXM in the Cisco subnetwork can interface to an ASI UNI port, BXM UNI port, or other UNI port in the cloud. The BXM in the cloud is configured for bit shifting as shown in Table 4-6.
In this case the BXMor ASI in the cloud is configured for bit shifting as shown in Table 4-6.
Table 4-6 Bit Shifting for Virtual Trunking
BXM
--
??
>
BXM (port mode)
Yes
BNI
--
>
ASI
No
BNI
--
>
BXM (port mode)
No
Setting up a BNI Virtual Trunk through an ATM Cloud
The following example provides a general procedure on how to set up a virtual trunk through an ATM cloud using Cisco equipment (that is, a BPX or IGX cloud).
Step 1
Step 2
Step 3
upln slot.port
upport slot.port
cnfport slot.port, and set the shift parameter to "N" for no shift.
The shift/no shift parameter specifies whether or not the VCI bits in the cell header should be shifted based on the HCF field of the Cell header on cells arriving from the backplane. It is how Cisco networks convert STI cells to standards based cell formats, and similarly how standards-based cell formats are converted back to STI cells.
Step 4
addcon joker 5.1.1.* swstorm 6.2.10.*
where 5.1 and 6.2 are ASI ports that are hooked up and configured for virtual trunking. DACS connections are acceptable.
Note that the third number is the VPI, which must correspond to the virtual trunk VPI configured with cnftrk in step 4. For BNI virtual trunks, the usable range of VPIs is 1 to 255 (for T3/E3 trunks). For BNI OC-3 virtual trunks, the usable range of VPIs is 1 to 63.
The VPI configured for a virtual trunk must match the VPI of the VPC in the public ATM cloud. Every cell transmitted to the virtual trunk has this VPI value. Valid VPC VPIs depend on the port type as shown in Table 4-7.
Table 4-7 VPI Ranges
BXM/UXM (UNI)
1-255
BXM/UXM (NNI)
1-4095
BNI T3/E3
1-255
BNI OC-3
1-63
The CBR/VBR parameter must also correspond to the virtual trunk type of the virtual trunk. For T3, set PCR to 96000 and CDTV to 24000 for the connection so that the ASI does not drop cells. Cisco recommends these values based on testing.
Step 5
uptrk slot.port.vtrk
If the cloud is already configured, the alarm on the virtual trunk should clear.
cnftrk slot.port.vtrk
When you use cnftrk to configure the virtual trunk, make sure the virtual trunk type and VPI correspond to the existing ASI Virtual Path connections (that is, make sure that the virtual trunk matches the cloud's VPC configuration, uses the correct cell format (UNI or NNI), and that HCF-based shifting is off (which you configure using cnfport on the ASI port).
Step 6
addtrk slot.port.vtrk
The parameters slot.port.vtrk on a BNI card can have the following values:
•
•
•
BXM and UXM Virtual Trunks Connecting through Cloud with Cisco Equipment
Consider the example where the cloud consists of some Cisco MSSBU switches such as BPXs or IGXs. In the case where a virtual trunk is routing cells over only BXM routing trunks, all 16 bits of the ATM cell header can be passed cleanly because BXMs have the capability to handle a standard ATM cell header. However, if there are BNIs in the cloud network, some bits of the VCI could be lost. There is no guarantee that connections can be made. If there are only BXM trunks in the cloud, then set the cnfport Shift parameter to Shift off on all BXM or ASI ports that connect to the cloud. However, if there are some BNIs within the cloud that connections may be routed over, then set the cnfport Shift parameter to Shift on for all ports that connect to the cloud.
Consider another example where you have a BXM routing trunk and a UXM routing trunk connecting through a public cloud. In this situation, all the trunk cards can support the standard ATM cell header, thus all 16 bits of the VCI can be passed through the cloud. In this case, each port interfacing to the cloud should have its cnfport parameter set to Shift off.
Setting Up a BXM or UXM Virtual Trunk Through an ATM Cloud
The following example describes how to set up a virtual trunk through a BPX or IGX cloud:
Step 1
Step 2
Step 3
upln slot.port
upport slot.port
cnfport slot.port, and set the Shift parameter to "H" for shift.
The shift/no shift parameter specifies whether or not the VCI bits in the cell header should be shifted based on the HCF field of the cell header on cells arriving from the backplane. It is how Cisco networks convert STI cells to standards-based cell formats, and similarly how standards-based cell formats are converted back to STI cells. See Table 4-8 for some general guidelines on how to set the shift parameter when using virtual trunking through a cloud of non-Cisco equipment versus Cisco equipment using BXMs.)
Note
For UXM cards, you cannot configure the shift parameter—the shift setting is always n, or shift off.
Step 4
addcon joker 5.1.1.* swstorm 6.2.10.*
where 5.1 and 6.2 are ASI ports that are hooked up and configured for virtual trunking. DACS connections are acceptable.
Note that the third number is the VPI, which must correspond to the virtual trunk VPI configured with cnftrk in step 4. For UXM/BXM UNI virtual trunks, the useable range of VPIs is 1 to 255. For UXM/BXM NNI virtual trunks, the useable range of VPIs is 1 to 4095.
The CBR/VBR parameter must also correspond to the virtual trunk type of the virtual trunk. For T3, set PCR to 96000 and CDTV to 24000 for the connection so that the ASI does not drop cells. Cisco recommends these values based on testing.
Step 5
uptrk slot.port.vtrk
If the cloud is already configured, the alarm on the virtual trunk should clear.
cnftrk slot.port.vtrk
When you use cnftrk to configure the virtual trunk, make sure the virtual trunk type and VPI correspond to the existing ASI Virtual Path connections (that is, make sure that the virtual trunk matches the cloud's VPC configuration, uses the correct cell format (UNI or NNI), and that HCF-based shifting is Shift on.)
Note
Connections between a port set to shift on and a port set to shift off are not guaranteed.Step 6
Step 7
addtrk slot.port.vtrk
The parameters slot.port.vtrk on a BXM card can have the following values:
•
•
•
Note
Note
Consider an example where the cloud consists of all equipment that supports a standard ATM cell header (16-bit VCI). For example, there are three virtual trunks connecting through the cloud—from two BPX-BXM nodes and one IGX-UXM node. Consider that these virtual trunks are connecting to each other through a cloud with non-Cisco equipment. If the cloud has non-Cisco equipment, then Shift/No Shift cannot be configured.
Note
Routing with Virtual Trunks
Virtual trunks appear in the routing topology map as trunks available for routing. The existing physical trunk characteristics, such as bandwidth and satellite/terrestrial type, apply to virtual trunks. The routing algorithm must take into account additional criteria when virtual trunks are in the routing topology:
•
•
•
Virtual Trunk Bandwidth
The total bandwidth of all the virtual trunks in one port cannot exceed the maximum bandwidth of the port. The trunk loading (load units) is maintained per virtual trunk, but the cumulative loading of all virtual trunks on a port is restricted by the transmit and receive rates for the port.
Virtual Trunk Connection Channels
The total number of connection channels of all the virtual trunks in one port cannot exceed the maximum number of connection channels of the card. The number of channels available is maintained per virtual trunk.
Cell Transmit Address Translation
All cells transmitted to a virtual trunk have a translated cell address. This address consists of a VPI chosen by the user and a VCI (ConId) chosen internally by the software. The trunk firmware is configured by the software to perform this translation.
Cell Receive Address Lookup
The user-chosen VPI is the same for all cells on a virtual trunk. At the receiving end, multiple virtual trunks can send cells to one port. The port must be able to determine the correct channel for each of these cells. The VPI is unique on each trunk for all the cells, but the VCI may be the same across the trunks. Each port type has a different way of handling the incoming cell addresses. This applies to both the BXM and UXM cards.
Selection of Connection Identifier
For connections, the associated LCNs are selected from a pool of LCNs for the entire card. Each virtual trunk can use the full range of acceptable conid values. The range consists of all the 16-bit values (1-65535) excluding the node numbers and blind addresses. A port uses the VPI to differentiate connections that have the same conid.
You can change the number of channels per virtual trunk after the trunk has been added to the network. Decreasing the number of channels on an added virtual trunk will cause connection reroutes, but increasing the number of channels on an added virtual trunk will NOT cause connection reroutes.
Routing VPCs over Virtual Trunks
A VPC is not allowed to be routed over a virtual trunk. The routing algorithm excludes all virtual trunks from the routing topology. The reason for this restriction is due to how the virtual trunk is defined within the ATM cloud.
The cloud uses a VPC to represent the virtual trunk. Routing an external VPC across a virtual trunk would consist of routing one VPC over another VPC. This use of VPCs is contrary to its standard definition. A VPC should contain multiple VCCs, not another VPC. In order to avoid any non-standard configuration or use of the ATM cloud, VPCs cannot be routed over a virtual trunk through the cloud.
Configuration Requirements
The primary commands you use to configure virtual trunks are cnftrk, cnfrsrc, and cnftrkparm.
Note
Configuration with cnftrk
The main cnftrk parameters are transmit trunk rate, trunk VPI, Virtual Trunk Type, Connection Channels, and Valid Traffic Classes.
The VPI you configure for a virtual trunk must match the VPI of the VPC in the public ATM cloud. Every cell transmitted to the virtual trunk has this VPI value. Valid VPC VPIs depend on the port type as shown in Table 4-9.
Table 4-9 VPI Ranges
BXM/UXM (UNI)
1-255
BXM/UXM (NNI)
1-4095
BNI T3/E3
1-255
BNI OC-3
1-63
Configuration with cnfrsrc
You use cnfrsrc to configure the resource partition's conids (lcns) and bandwidth. The conid capacity indicates the number of connection channels on the trunk port that are usable by the virtual trunk.
This number cannot be greater than the total number of connection channels on the card. The maximum number of channels is additionally limited by the number of VCI bits in the UNI cell header. For a virtual trunk, the number is divided by the maximum number of virtual trunks on the port to determine the default. You configure this value with the cnfsrc command on the BPX. Table 4-10 lists the number of connection IDs for virtual trunks on various cards.
Table 4-10 Maximum Connection IDs (LCNs)
BXM/UXM
1-(number of channels on the card)
256
BNI T3/E3
1-1771
256
BNI OC-3
1-15867 (3837 max/vtrk
256
Configuration with cnftrkparm
BXM and UXM virtual trunks have all the configuration parameters for queues that physical trunks have. The integrated alarm thresholds for major alarms and the gateway efficiency factor is the same for all virtual trunks on the port.
Note
VPC Configuration with the ATM Cloud
For the virtual trunk to successfully move data through an ATM cloud, the cloud must provide some form of connectivity between the trunk endpoints. The ATM equipment in the cloud must support virtual path switching and move incoming cells based on the VPI in the cell header.
A virtual path connection (VPC) is configured in the cloud to join two endpoints. The VPC can support either CBR, VBR, or ABR traffic. A unique VP ID per VPC is used to moved data from one endpoint to the other. The BPX nodes at the edge of the cloud send in cells that match the VPC's VPI value. As a result the cells are switched from one end to the other of the ATM public cloud.
Within the ATM cloud, one virtual trunk is equivalent to one VPC. Because the VPC is switched with just the VPI value, the 16 VCI bits (from the ATM cell format) of the ATM cell header are passed transparently through to the other end.
If the public ATM cloud consists of BPX nodes using BXM cards, the access points within the cloud are BXM ports. If the cloud consists of IGX nodes, the access points within the cloud are UXM ports.
If the link to the public cloud from the private network is using BNI cards, then access points within the cloud are ASI ports. The BNI card uses an STI header. The ASI port cards within the cloud should be configured to not shift the VCI when forming the STI header. The command cnfport allows you to configure the port's shift parameter to shift off.
More Guidelines on VPC Configuration within the ATM Cloud
If you have a cloud with all Cisco equipment using all BPX-BXM cards, or any public ATM cloud that can fully pass 16 bits in the ATM cell header (thus uses a standard ATM cell header), then there is no need to set the Shift on/Shift off parameter with cnfport.
In a simple example of virtual trunking, say you have BXM and UXM virtual trunks feeding into a public ATM cloud. The cloud has equipment that uses a standard ATM cell header. If the cloud is using equipment that can cleanly pass a 16-bit ATM cell header (a standard ATM cell header), you would need to configure the cnfport parameter to No Shift on both ports at either end of the cloud. In other words, you must configure the port In this case, because the cloud uses standard NNI and UNI cell headers, the cell will pass transparently to the other end of the cloud without any problem.
Note
Because BNI cards were deployed before the ATM cell header became an ATM Forum standard, the BNI cards still use a non-standard ATM cell header. So if within a public cloud there is Cisco equipment with BNIs, these non-standard cell headers use 12-bit VCIs. To work with this situation, if BXM/UXM virtual trunks are being connected, the port can be configured for Shift on. If BNI virtual trunks are being connected, the ports should be Shift off. If the virtual trunk ports are configured this way, as the cells traverse the network through BNI cards, connection continuity can be preserved. Similarly, if BXM cards are used within a cloud, then the VCI bits are preserved when a VPC connection is routing through the cloud.
Note
Consider the case where non-Cisco equipment is used within the public cloud, and a standard ATM cell header is supported. Also consider another example where the cloud has Cisco equipment with BXMs. Another case might be where the cloud has some Cisco equipment, and has some BNI cards in use. In this latter case (cloud has Cisco equipment, including BNIs), ports interfacing with this cloud must have the cnfport parameter set to Shift on. These examples are discussed in the following sections.
Virtual Trunk Interfaces
The two ends of a virtual trunk can have different types of port interfaces. For example, a virtual trunk may contain a T3 port at one end of the ATM cloud and an OC-3 port at the other end. However, both ends of the trunk must have the same bandwidth, connection channels, cell format, and traffic classes. This requirement is automatically checked when a trunk is added.
Virtual Trunk Traffic Classes
All types of traffic from a private network using Cisco nodes are supported through a public ATM cloud. The CBR, VBR, and ABR configured virtual trunks within the cloud should be configured to carry the correct type of traffic.
•
•
•
A CBR configured trunk is best suited to carrying delay-sensitive traffic such as voice/data, streaming video, and ATM CBR traffic, and so on.
An nrt-VBR configured trunk is best suited to carrying Frame Relay and nrt-VBR traffic, and so on.
An ABR configured trunk is best suited to carrying Optimized Bandwidth Management and ABR traffic, and so on.
Two-stage queueing at the egress of virtual trunks to the ATM cloud allows shaping of traffic before it enters the cloud. However, the traffic is still routed on a single VPC and may be affected by the traffic class of the VPC selected.
A user can configure any number of virtual trunks up to the maximum number of virtual trunks per slot (card) and the maximum number of logical trunks per node. These trunks can be any of the three trunk types: CBR, VBR, or ABR.
A user can configure any number of virtual trunks between two ports up to the maximum number of virtual trunks per slot and the maximum number of logical trunks per node. These trunks can be any of the three trunk types.
Virtual Trunk Cell Addressing
Cells transmitted to a virtual trunk use the standard UNI or NNI cell format.
The trunk card at the edge of the cloud ensures that cells destined for a cloud VPC have the correct VPI/VCI. The VPI is an 12-bit value ranging from 1-4095. The VCI is a 16-bit value ranging from 1-65535.
BXM/UXM Two-Stage Queueing
The UXM and BXM share the same queueing architecture. The egress cells are queued in two stages. First they are queued per Virtual Interface (VI), each of which supports a virtual trunk. Within each VI, the traffic is queued as per its normal OptiClass traffic type. In other words, voice, Time-Stamped,
Non- Timestamped, High Priority, BDATA, BDATB, CBR, VBR, and ABR traffic are queued separately. The overall queue depth of the VI is the sum of all the queue depths for all the available queues. The user does not directly configure the VI.The user command cnftrkparm is used to configure the queues within the virtual trunk.
Virtual Trunking Configuration
Connectivity is established through the public ATM cloud by allocating virtual trunks between the nodes on the edge of the cloud. With only a single trunk port attached to a single ATM port in the cloud, a node uses the virtual trunks to connect to multiple destination nodes across the network thereby providing full or partial meshing as required.
From the perspective of the Cisco node, a virtual trunk is equivalent to a VPC provided by an ATM cloud where the VPC provides the connectivity through the cloud.
Virtual Trunk Example
The following is a typical example of adding one virtual trunk across an ATM network. On one side of the cloud is a BPX with a BXM trunk card in slot 4. On the other side of the cloud is an IGX with a UXM trunk card in slot 10. A virtual trunk is added between port 3 on the BXM and port 2 on the UXM ( Figure 4-4).
Perform the following:
.
The VPI values chosen using cnftrk must match those used by the cloud VPC. In addition, both ends of the virtual trunk must match with respect to Transmit Rate, VPC type, traffic classes supported, and the number of connection channels supported. The addtrk command checks for matching values before allowing the trunk to be added to the network topology.
The network topology as seen from a dsptrks command at BPX_A would be:
BPX_A 4.3.1-10.2.1/IGX_A
BPX_A 4.3.2-5.1.1/BPX_B
Figure 4-4 Addition of Virtual Trunks Across a Public ATM Network
Trunk and Line Redundancy
Trunk redundancy can refer to one of two features:
•
•
APS Redundancy
APS line redundancy is supported. APS line redundancy is only supported on BXM SONET trunks and is compatible with virtual trunks. The trunk port supporting virtual trunks may have APS line redundancy configured in the same way it would be configured for a physical trunk. The commands addapsln, delapsln, switchaplsln, and cnfapsln are all supported on virtual trunk ports. These commands accept a trunk port parameter as <slot>.<port>. Refer to the BPX 8600 Installation and Configuration Manual for more information on SONET Automatic Protection Switching support.
Note that you cannot configure virtual trunks as interface shelf (feeder) trunks; similarly, you cannot configure interface shelf (feeder) trunks as virtual trunks.
Y-Redundancy
The original trunk redundancy feature is an IGX-only feature and is not supported for virtual trunks. The commands addtrkred, deltrkred, and dsptrkred are rejected for virtual trunks.
Networking
Virtual Trunk Configuration
The characteristics of a virtual trunk used by connection routing are maintained throughout the network. This information—virtual trunk existence, traffic classes and connection channels—is sent to every node to allow the routing algorithm to use the trunk correctly. Routing uses only those virtual trunks that can support the traffic type of the connection.
ILMI (Integrated Local Management Interface)
For ATM clouds that do not have Cisco equipment (such as BPX or IGX nodes), previous to Release 9.2, you had to configure the ATM ports to block signalling traffic to the Cisco nodes. In this release, you no longer need to configure the ATM ports to block signalling traffic due to ILMI (Integrated Layer Management Interface) signalling support.
Blind Addressing
Each virtual trunk is assigned a blind address. In general terms, the blind address is used by a node to communicate to the node at the other end of a trunk. Specifically, the blind address is used for sending messages across a virtual trunk when a trunk is added, and for sending messages for the Trunk Communication Failure testing.
VPC Failure Within the ATM Cloud
Any VPC failure within the ATM cloud generates a virtual trunk failure in the Cisco network. This trunk failure allows applications (for example, connection routing) to avoid the problem trunk.
Upon receiving notification of a VPC failure, the trunk is placed into the "Communication Failure" state and the appropriate trunk alarms are generated. The trunk returns to the "Clear" state after the VPC clears and the trunk communication failure test passes.
Trunk Alarms
Logical Trunk Alarms
Statistical alarming is provided on cell drops from each of the Advanced CoS Management (formerly called OptiClass) queues. These alarms are maintained separately for virtual trunks on the same port.
Physical Trunk Alarms
A virtual trunk also has trunk port alarms, which are shared with all the other virtual trunks on the port. These alarms are cleared and set together for all the virtual trunks sharing the same port.
Physical and Logical Trunk Alarm Summary
A listing of physical and logical trunk alarms is provide in Table 4-11.
Event Logging
All trunk log events display the virtual trunk number. These messages were implemented on the BPX platform previous to Release 9.2, but are new on the IGX in Release 9.2. The following example shows the log messaging for activating and adding virtual trunk 1.2.1.
All trunk log events will display the virtual trunk number. The examples in Table 4-12 and Table 4-13 show the log messaging for activating and adding a virtual trunk 1.2.1.
Table 4-12 IGX Log Messaging for Activating and Adding VTs
Info
NodeB at other end of TRK 1.2.1
Clear
TRK 1.2 OK
Major
TRK 1.2 Loss of Sig (RED)
Clear
TRK 1.2.1 Activated
Table 4-13 BPX Log Messaging for Activating and Adding VTs
Info
NodeB at other end of TRK 1.2.1
Clear
TRK 1.2.1 OK
Major
TRK 1.2.1 Loss of Sig (RED)
Clear
TRK 1.2.1 Activated
Error Messages
In Release 9.2, there are new error messages to manage the virtual trunks, some of which are listed in Table 4-14 below.
Virtual Trunking Commands
The following command descriptions are summaries specific to virtual trunk usage on the BPX, using the BXM cards. For information about the BPX, refer to the BPX 8600 Series documents. For information about the UXM, refer to the IGX 8400 Series documents. Also, refer to the Cisco WAN Manager documents for application information using a graphical user interface for implementing command functions.
•
•
Note
If a physical trunk is specified on a physical port that supports multiple virtual trunks, the command is applied to all virtual trunks on the physical port. If a virtual trunk is specified for a command that configures information related to the physical port, then the physical port information is configured for all virtual trunks.
With Release 9.2, the BPX statistics organization is modified to separate logical and physical trunk statistics. This method also is used on the UXM card on the IGX 8400 series switches.
Virtual Trunks Commands Common to BXM and UXM
The following commands are available on both the IGX and the BPX and have the same results. Refer to the IGX 8xxx Series documentation for information the IGX and UXM.
The entries in Table 4-15 that are marked with a [*} are configured on a logical trunk basis, but automatically affect all trunks on the port when a physical option is changed. For example, if the line framing is changed on a virtual trunk, all virtual trunks on the port are automatically updated to have the modified framing.
Virtual Trunk UXM Commands
The commands listed in Table 4-16 are IGX-specific, or behave differently than their BPX counterparts. Refer to the IGX 8400 Series documentation for further information about UXM virtual trunk commands.
Virtual Trunk BXM/BNI Commands
The commands listed in Table 4-17 are BPX-specific.
Permutations of Virtual Trunks You Can Configure Through the ATM Cloud
Table 4-18 lists the permutations of virtual trunks that you can set up to pass through the ATM cloud. For example, you can set up a virtual trunk between a BXM card with a T3, E3, OC-3, or OC-12 interface and a UXM card with a T3, E3, or OC-3 interface.
Ports and Trunks Feature in Release 9.2
The Ports and Trunks feature lets you configure multiple trunk lines and circuit lines on a single BXM or UXM card simultaneously. In previous releases, when a single port is upped as a trunk (by using uptrk command), all the remaining ports on that card are treated as trunks. Similarly, in releases previous to Release 9.2, when a single port is upped as a circuit line (by using the upln command), all the remaining ports on the card are treated as circuit-line ports.
The way virtual trunk numbers are displayed is new for IGX trunks. IMA trunk ports are referenced by the first physical line of the trunk port after uptrk has been executed. For example, you can execute uptrk 1.5-8.9, then you can up a second trunk on the same trunk port with uptrk 1.5.11.
In support of the Ports and Trunks feature, a single BXM card can support physical trunks, virtual trunks, feeder trunks and UNI interfaces simultaneously; a UXM card can support physical trunks, virtual trunks and UNI interfaces simultaneously. For example, a BXM card can have:
•
•
•
•
Table 4-19 lists the interface types that can be supported on a single card:
Table 4-19 Interface Types That Can Be Supported on Single Card
3/OC-12)SES Feeder
no
yes
yes (except OC-12)
no
no
IPX Feeder1
no
yes
no
no
no
Physical Trunks
no
yes
yes
yes
yes
Virtual Trunks
no
yes
yes
yes
yes
UNI Port
yes
no
yes
yes
yes
Virtual UNIs
no
no
no
no
no
1 Note that an IPX node running Release 9.1, 8.5, and 8.4 can interoperate with nodes running Release 9.2; however, an IPX node cannot support Release 9.2 switch software.
Virtual Trunking Features Supported in Release 9.2
These virtual trunking features are supported in Release 9.2:
•
•
•
•
•
•
•
•
•
–
F5 (VCC) flows are supported for end to end connections through a virtual trunk
F4 (VPC) VPC is not supported through virtual trunks
F4 flows are not supported between the ATM cloud network and virtual trunk
–
F5 (VCC) flows are supported for end to end connections through a virtual trunk
F4 (VPC)VPC is not supported through virtual trunks
Impact of Other Features on Virtual Trunking in Release 9.2
LMI/ILMI on the BXM Firmware—ILMI monitoring on virtual trunks is supported for the new card types. LMI and ILMI were implemented in the BCC switch software previous to Release 9.2. Because switch software must process multiple LMI/ILMI requests from all the configured ports in the BPX node, this is a severe drain on the available processor bandwidth on the BCC. For this reason, the LMI/ILMI functionality has moved from the switch software in Release 9.1 to the BXM card firmware in Release 9.2.
Hitless Rebuild feature—The hitless trunk reconfiguration feature introduces new flexibility in the options that you can configure on active trunks. This will affect some of the new and existing virtual trunk options.
BXM and UXM Card Interface Capacities
BXM and BXM Enhanced cards can support up to a maximum of 31 interfaces per card. The UXM and UXM Enhanced cards can support up to a maximum of 15 interfaces per card.
For each interface upped on a card's physical trunk, feeder trunk, virtual trunk, or UNI interface, a single virtual interface is used. This implies that on BXM cards any combination of 31 interfaces can be supported, and for UXM any combination of 15 interfaces can be supported. See Table 4-20 for information on BXM and UXM interface capacities.
Channel Capacities
For legacy UXM/BXM cards, approximately 270 networking channels are required for each virtual trunk. For example, UXM cards allocate 4320 channels if all 16 virtual trunks are upped on a single card. BXM cards allocate 8640 channels if all 32 virtual trunks are upped. Table 4-21 lists channel capacities for BXM and UXM cards.
This implies that for UXM legacy cards, upping all 15 virtual trunks would consume 4320 gateway channels for networking, leaving none for user traffic. For this reason, the number of virtual trunks upped on a legacy UXM card is limited. Use the cnftrkport command to control the number of trunks upped on a UXM card.
Errors and Alarm Handling
Errors and alarms function the same as in releases previous to Release 9.2. The Trunks and Ports feature continues to support:
•
•
•
•
•
Physical Interface Specifications and Applicable Standards
For virtual trunking, the trunk cell format will be either standard UNI or NNI.
The current ATM and physical layer standards are the same as in Release 9.1.
Commands You Use to Configure Virtual Trunking
The following commands let you configure virtual trunking on a BXM, a BPX, and a UXM on an IGX node:
•
•
•
•
•
•
•
•
•
Commands to Configure Trunks and Ports on Same Card
Following are the commands you use to configure trunks, lines, ports, and connections on BXM and UXM cards:
•
•
•
•
•
Reliability, Availability, and Serviceability (RAS) Feature Support
•
•
Virtual Trunking Features Supported on BXM and UXM Cards
The BXM and UXM cards come with several combinations of number of virtual interfaces, number of ports, and number of channels. See Table 4-22 and Table 4-23.
Table 4-22 VIs, Ports, and Channels Supported on BXM and UXM Cards
BXM
31
32000
16320
UXM
15
8000
8000
Table 4-23 Virtual Interfaces and LCNs Allowed Per Card
BXM
31
65535
16320
UXM
15
8000
8000
•
•
–
–
•
•
•
–
–
–
–
–
–
•
•
•
•
•
•
•
•
•
•
–
–
•
•
Virtual Trunking Limitations
The following lists some items not supported in Release 9.2, or limitations in Release 9.2, related to virtual trunking:
•
•
•
•
•
•
•
•
•
•
•
Compatibility
The BXM and UXM virtual trunking feature requires Release 9.2 switch software, and new BXM and UXM firmware. The new firmware revisions are backward compatible and support the current physical trunking. The Release 9.2 software is also compatible with the current (Release 9.1) BXM firmware. Release 9.2 software is not compatible with Release 9.1 UXM firmware. A UXM firmware upgrade is required for networks running Release 9.2.
Node by node upgrades in Release 9.2 allows interoperability between Release 9.2 software and Release 9.1 or Release 8.5 software. In a network of hybrid releases, you cannot add UXM and BXM virtual trunks. The restriction is enforced because of changes to networking messages, which involve the virtual trunk number and the cell format on virtual trunks.
Virtual Trunking
The virtual trunking feature lets you define multiple trunks within a single trunk port interface. In previous releases, trunking has been associated with the physical existence of a trunk card and port. The virtual trunking capability already exists for the BPX BNI trunk card. In Release 9.2, the virtual trunking capability is now supported on the BXM and UXM trunk cards.
Virtual trunking allows you to define an additional level of trunking within the port resources. This "many-to-one" virtual trunk to port relationship produces a "fanout" trunk capability.
Each Cisco sub-network is connected through the public ATM network with virtual trunks. The trunk interface at the Cisco nodes is either a BNI, BXM or UXM trunk card. Congestion management (RM) cells are passed transparently through the network. Cisco features such as Advanced COS Management (formerly called FairShare Advanced CoS Management) and Optimized Bandwidth Management (formerly called Optimized Bandwidth Management) may not be supported within the public network, but the information is carried through the network. Leased lines may also exist to connect the Cisco subnetworks outside of the ATM network.
How Virtual Trunking Interacts with Virtual Interfaces
The BXM and UXM trunks are the first to use more than one virtual interface per physical port. Each virtual interface aggregates a group of traffic-type based queues. On a physical trunk, only one virtual interface is used. On a physical port supporting multiple virtual trunks, a virtual interface is used to support each virtual trunk. The virtual interfaces are scaled and managed in the same way queues are, regarding their bandwidth, maximum depth, and drop thresholds. This is sometimes referred to as two-stage queueing for these virtual trunks.
Virtual Trunking Function Changes
Resource management, networking and connection management are the largest areas affected by this project. A virtual trunk requires special handling, even though it behaves very similarly to a physical trunk. Cells routed on a virtual trunk require special address management as they enter and exit the cloud.
Some functional areas of virtual trunking have changed in Release 9.2:
Resource Management—To ease managing virtual trunks, the software now handles physical and virtual trunk configuration similarly. Virtual trunk configuration of a port-level characteristic affects all the virtual trunks on the port. The port characteristics of a trunk consist of the configuration associated with the trunk port. The logical trunk characteristics of a trunk consist of those items not tied directly to the port.
The logical trunks in a node are either virtual or physical trunks. The current trunk commands to up/down, configure, or add/delete a trunk apply to all logical trunks. Trunk statistics are kept for logical trunks.
The logical trunk configuration is stored in the existing logical trunk database. This change allows the number of trunks supported per switch to grow independently of the number of slots and ports per switch.
The way you manage logical trunks is different in Release 9.2. In general, managing virtual interfaces is hidden from the user. Internally, the depth and the bandwidth of the virtual interface are configured based on the aggregate queue depth and bandwidth of all the queues within the virtual interface.
Connection Management—The cell addressing scheme for connections routed through a virtual trunk handles multiple types of traffic flowing through an ATM cloud. The header format of cells may match the ATM-UNI or ATM-NNI format since the port interface to the cloud is a UNI or NNI port. On BNIs, the cell format is modified to store the Optimized Bandwidth Management information in the header. The incompatible cell headers makes BNI to BXM or UXM virtual trunks technically difficult. The solution of adopting the Strata-UNI cell format for all of our virtual trunks has a few distinct disadvantages, including limiting the number of conns which can be routed, inability to guarantee Optimized Bandwidth Management over the trunks, and propagation of a non-standard cell format. Because of all these issues, BNI to BXM or UXM virtual trunks are not supported.
Figure 4-5 ATM Header Types
Before cells enter the cloud on a virtual trunk, the cell header is translated to a user-configured VPI value for the trunk, and a software configured VCI value that is unique for the cell. As cells are received at the other end of the cloud, this VPI/VCI is mapped back to a correct cell header by the Cisco equipment. The VPI value is identical for all cells on a single virtual trunk, so the VCI contains the unique information needed to determine the final destination of the cell.
NNI virtual trunks have four additional VPI bits in place of the GFC bits in the UNI header. Otherwise, this cell format is the same as the ATM-UNI format.
Connection routing uses existing trunk characteristics in the route selection algorithm. Both virtual and physical trunks appear as logical trunks in the routing topology. Supported traffic classes may be configured on virtual or physical trunks. VPC connections can not be routed over virtual trunks.
The trunks and ports feature modifies the way channel allocation is done. Virtual trunk channel allocation will be included in the design from the Trunks and Ports project.
Networking—Virtual trunks appear in the network topology just like physical trunks. Network communication (blind messaging and node-to-node communication) through these trunks is modified to support the cell addressing scheme through the cloud. Information about virtual trunks is stored in each node's Node Information Block (NIB) database.
User Interface—The parsing and display of virtual trunk numbers is new for IGX trunks. IMA trunk ports are referenced by the first physical line of the trunk port after uptrk has been done. For example, a user may uptrk 1.5-8.9. A second trunk on the same trunk port may be upped with uptrk 1.5.11.
External Interfaces—A virtual trunk description consists of a virtual trunk number appended to a physical port description. The user interface and event logging of trunks support this extra number. The current Cisco WAN Manager messages handle virtual trunks, but require modification to support virtual trunks consisting of multiple physical lines (IMA VTs). IMA VTs are only a concern on the IGX. The BPX uses the same modified interface as the IGX.
Common Control—The trunk configuration database is modified to include the mapping between logical trunks and VI numbers and vice versa. These new database fields are supported in the standby updates and BRAM recovery.
SNMP—The configurable trunk options for ATM trunk header type(NNI/UNI) and Traffic Shaping are introduced by this project. The corresponding MIB tables are updated for these values.
Establishing a Virtual Trunk Through an ATM Cloud
You establish connectivity through an ATM cloud by allocating virtual trunks between the nodes on the edge of the cloud. With only a single trunk port attached to a single ATM port in the cloud, a node uses the virtual trunks to connect to multiple destination nodes on the other side of the cloud.
A virtual trunk from the Cisco perspective is equivalent to a VPC provided by an ATM cloud. The VPC provides the connectivity through the cloud. To correctly set up a virtual trunk, the following steps are required.
Step 1
Step 2
Step 3
Step 4
Step 5
Step 6
Step 7
Managing Virtual Trunk Numbers
A simple description of a virtual trunk is a "trunk defined over a public ATM service." The trunk does not exist as a physical line in the network. You must use an additional level of reference, called a virtual trunk number, to differentiate the virtual trunks found within a port.
For the BXM, you can define a maximum of 31 virtual trunks within one port. Valid virtual trunk numbers are 1-31 per port. The number of virtual trunks available is limited by the number of virtual interfaces available on the card. Each logical trunk (physical or virtual) consumes one virtual interface.
The same restrictions apply to the UXM. The maximum virtual trunks on the UXM is 15.
The following user syntax describes a virtual trunk:
•
•
port = port number (1-16)
vtrunk = virtual trunk number (1-31) (1-15 on UXM)Virtual Trunk Configuration
Because a virtual trunk is defined within a trunk port, its physical characteristics are derived from the port. All the virtual trunks within a port have the same port attributes.
You configure all port and trunk attributes of a trunk with cnftrk, cnftrkparm or cnfrsrc. When a physical port attribute change is made, you are notified that all the trunks on the port are affected.
cnftrk Command Parameters
Below are the trunk options you can configure with cnftrk. You can specify all physical options on virtual trunks. If you change a physical option on a virtual trunk, the change is propagated to all virtual trunks on the trunk port.
X in indicates the parameter is configurable.
X* in the virtual trunk columns indicates that the parameter is a physical parameter, and changing the value for one virtual trunk on the port automatically causes all virtual trunks on the port to be updated with the same value. See Table 4-24.
Transmit Trunk Rate—This parameter indicates the trunk load for a BXM. You configure this value by using cnfrsrc on BXMs.
Virtual Trunk Type—The VPC type indicates the configuration of the VPC provided by the ATM cloud. Valid VPC types are CBR, VBR, and ABR.
Traffic classes—The traffic classes parameter indicates the types of traffic a trunk can support. By default, a trunk supports all traffic classes, that is, any type of traffic can be routed on any type of VPC. However, to prevent unpredictable results, a more appropriate configuration would be to configure traffic classes best supported by the VPC type:
VPC Type Recommended Traffic Classes
CBR All Traffic classes
VBR ATM VBR, Bdata, Bdatb (Optimized Bandwidth Management), ABR
ABR ATM ABR, Bdatb (Optimized Bandwidth Management)High priority traffic can be routed over any of the VPC types.
Protocol by the Card—If set to "yes," specifies that LMI is running on the (BXM/UXM) card instead of processor card. If set to "no," LMI is running on the processor card.
VPC VPI—The VPI configured for a virtual trunk matches the VPI for the VPC in the cloud. Every cell transmitted to this trunk has this VPI value. Valid VPC VPIs depend on the port type.
Port Type Valid VPI Range
BXM/UXM (UNI) 1-255
BXM/UXM (NNI) 1-4095
BNI T3/E3 1-255
BNI OC-3 1-63Conid Capacity—The conid capacity indicates the number of connection channels on the trunk port that can be used by the virtual trunk. This number cannot be greater than the total number of connection channels on the card. The maximum number of channels is additionally limited by the number of VCI bits in the UNI cell header. For a virtual trunk, this number is divided by the maximum number of virtual trunks on the port to get the default. You configure this value by using cnfrsrc on BPXs.
Port Type Max Conids
BXM/UXM 1-(#channels on card)
BNI T3/E3 1-1771
BNI OC-3 1-15867 (3837 max/VTRK)Header Type—You can change the cell header from NNI (virtual trunk) to UNI (physical trunk). UNI is the default for virtual trunks, but it may be necessary to configure this parameter to NNI to match the header type of the VPC provided by the cloud. This is a new configurable parameter for physical and virtual trunks.
VC Traffic Shaping—You can change the traffic shaping over the trunk. Different algorithm run by firmware/hardware.
Virtual Trunking Feature must be Enabled by Cisco Technical Assistance Center
The virtual trunking feature is a chargeable feature, which means that it must be enabled on a per node basis with the cnfswfunc command by Cisco TAC personnel. Virtual trunking must be enabled on a node before you can up a virtual trunk on a port in the node.
Virtual Trunks cannot be Configured as Feeder Trunks
A virtual trunk cannot be used as a feeder trunk. Feeder connections cannot be terminated on a virtual trunk. If you try to add a virtual trunk as a feeder trunk, or try to terminate a feeder connection on a virtual trunk, you will be prevented from doing so at the command line interface.
User Interfaces
User Syntax
All trunk commands that allow a trunk description accept a virtual trunk number. You add physical trunks in the same way as in releases previous to 9.2. For virtual trunks, the virtual trunk number is added to the end of the trunk description.
UXM/BXM: slot.port --- slot.port.vtrunk
Cisco WAN Manager
In Release 9.1, the Cisco WAN Manager user interface displays virtual trunks on IGXs. The trunk description passed to Cisco WAN Manager contains the new virtual trunk number. The topology display on Cisco WAN Manager shows the <slot>.<port>.<vtrunk>. Both the topology and robust messages used to maintain network status and displays are modified. This is new for IGX nodes only in this release.
Virtual trunk parameters can be configured or queried through an SNMP manager. This capability already exists on the BPX, but is new to the IGX in Release 9.2.
Virtual trunk information is passed to Cisco WAN Manager using the existing mechanism for physical trunks—no virtual trunk number is sent.
The interface to Cisco WAN Manager has an improved scheme for multiplexed virtual trunks. The messages that communicate trunk and physical line information to Cisco WAN Manager include a primary physical line number, which is used to "glue" the physical lines and the logical trunks. For example, suppose the trunks 5.2-4.9 and 5.2.11 are upped on a UXM/IMA card set. Switch software internally assigns each physical line (5.2, 5.3 and 5.4) a unique physical line number. In this example, assume our physical lines are numbered 8, 9, and 10, respectively. The primary physical line number is the unique identifier for the first physical line of the aggregated trunk port—in this case 8. The Physical line messages for 5.2, 5.3, and 5.4 include the primary physical line 8. The messages for 5.2.9 and 5.2.11 also include the primary physical line 8. Cisco WAN Manager uses this identifier to associate physical lines to an aggregate multiplexed pipe (trunk port), and to associate trunks with a trunk port.
The Compliant IMA (Inverse Multiplexing over ATM) feature requires a bitmap of physical lines to be added to the messages. The bitmap is required because the physical lines forming the trunk port may be non-consecutive. Previously, the first port and the number of physical lines were included. Note that the information provided by the physical line bitmap and the primary physical line number is in some ways redundant. The bitmap enhances the primary physical line scheme by giving instant information about all physical lines associated with a logical trunk.
Reconfiguring a Trunk
This section describes how to change trunk parameters after you have added the trunk. After you have added a trunk, you can reconfigure some parameters without first deleting the trunk (with deltrk). This means that you can reconfigure the following list of trunk and line parameters when the port is in use (active). The cnftrk display highlights all configurable parameters, and dims parameters that are not configurable. The parameters that you can change without first deleting the trunk are:
•
•
•
•
•
•
•
•
•
•
•
•
•
•
•
•
•
•
•
•
•
•
•
•
•
•
•
•
•
•
•
•
•
•
•
•
Before making changes to any other trunk parameters, you must first delete the trunk (deltrk).
To display the current trunk parameters, use dsptrkcnf. If you can make all the needed parameter changes without deleting the trunk, execute cnftrk. Use cnftrk at both ends of the trunk.
To change parameters that require you to first delete the trunk, do the following:
Step 1
Step 2
Step 3
Switch software triggers a reroute of connections only if a change to a parameter results in too few resources to support the current load of connections.
If you attempt to change one of these parameters, the other endpoint will be updated by switch software. It is not necessary to change both endpoints' parameters.
Before Release 9.2, changes made to the following three parameters caused a reroute on the trunk. For example, any increase to Statistical reserve would cause a reroute of all connections on the trunk. In this release, any changes you make to the following parameters will cause reroutes to PVCs on the trunk only if resources are no longer available to support the current connection load:
•
•
•
Note
For a trunk between a node running Release 9.2 and node running an earlier release (such as 9.1 or 8.5), you will be prompted that you can change a parameter only if both ends allow such a change.
Removing a Trunk
To remove a trunk:
Step 1
Step 2
Displaying or Printing Trunk Configurations
You can display the network trunk configuration on the screen or print it on the printer in a one-step process by using any one of the following commands.
•
•
•
•
Setting Up ATM Trunk and Line Redundancy
Trunk redundancy can refer to one of two features:
•
Release 9.2•
ATM trunk redundancy is the T3 and E3 trunk redundancy supported by the AIT, ALM/B, and BTM cards. Redundancy can exist between either an AIT card and BNI (BPX) card, an ALM/B and BNI card, or a BTM and a BNI card. Trunk redundancy cannot exist between IPX and IGX nodes. Also, virtual trunking and trunk redundancy are incompatible. Trunk redundancy uses the standard trunk cables rather than a Y-cable. (For all service card sets other than trunk cards, you manage redundancy by using the Y-cable redundancy commands addyred, delyred, prtyred, and dspyred).
The original ATM trunk redundancy feature is an IPX/IGX feature only and is not supported for virtual trunks. The addtrkred, deltrkred, and dsptrkred will be rejected for virtual trunks.
APS line redundancy is available only on BXM SONET trunks and is compatible with virtual trunks. In other words, you can configure APS line redundancy on a trunk port that supports virtual trunks in the same way you configure a physical trunk. The commands addapsln, delapsln, switchapsln, and cnfaplsln are all supported on virtual trunk ports. (These APS line redundancy commands are described in this chapter.)
Trunk redundancy depends on the applicable commands, the trunk card in the adjacent slot, and the standard trunk cable. You can execute trunk redundancy commands only on the IGX node. The BPX node does not require information regarding this feature. Use the following commands to manage the original trunk redundancy feature (which was supported in previous releases and is still supported in this release) on IGX platforms:
•
•
•
Trunk Redundancy
Trunk redundancy can refer to one of two features: APS line redundancy or the original ATM trunk redundancy feature supported in releases previous to Release 9.2 on the IGX/IPX platforms. APS line redundancy is available only on BXM SONET trunks and is compatible with virtual trunks. In other words, you can configure the trunk port supporting virtual trunks with APS line redundancy the same way you would configure a physical trunk. There are new APS line redundancy commands—addapsln, delapsln, switchapsln, and cnfapsln—which you can use on virtual trunk ports. The syntax for these commands is unchanged from Release 9.1; that is, they accept a trunk port parameter as slot.port. Refer to "APS Command Summary" and to the addapsln, delapsln, cnfapsln, and cnfcdaps commands in this chapter for information on how to configure the APS line redundancy feature.
The original trunk redundancy feature is an IGX-only feature and is not supported for virtual trunks. The commands addtrkred, deltrkred, and dsptrkred are rejected for virtual trunks.
APS Command Summary
A number of commands have been added and modified to support APS. These are listed in Table 4-25, and defined in more detail in the following pages. This is a list of the APS switch events that the BXM can return to switch software. They can be switched successfully or failed (that is, the switch cannot be done).
Table 4-25 APS Commands
Commands to Manage APS
cnfcdaps slot
sets APS options on the card
addapsln slot1.port1 slot2.port2 protocol
adds APS
delapsln slot.port
deletes APS
dspapsln
displays status of APS line pairs
switchapsln slot.port
controls the APS user switching interface
cnfapsln slot.port
configures the APS parameters on a line a
New Commands for Card Redundancy for APS 1+1
addcdred
adds redundancy across two cards (operates like addyred command)
dpscdred
displays redundant cards (operates like dspyred command)
delcdred
deletes redundancy configuration for cards (operates like delyred command)
prtcdred
prints active and redundant cards (operates like prtyred command)
switchcdred
switches active and redundant cards (operates like switchyred command)
Commands Modified for use with APS
cnfbkcd
modified to APS options
dspalms
added row for "APS Alarms" which lists Minor and Major APS alarms
dspcd
displays front and back card APS attributes. For the front card, displays that card supports APS 1+1 and APS 1:1. For the back card, displays if back card is a redundant back card, and if so, the slot number of the redundant back card. Also, displays APS mismatch conditions
dspsv3
modified to display APS alarms pending
dsplog
displays APS alarms. Refer to "dsplog" section on page 14-89 for more information about this command.
addyred
modified to prevent invalid configurations when combined with APS
delyred
modified to prevent invalid configurations when combined with APS
Using Subrate Trunk Interface Control Templates
Subrate trunks use an Interface Control Template that specifies the configuration of an output control lead. The template defines which output lead is to be configured and whether the lead is asserted, inhibited, or follows a specified input source. You can configure a template for a subrate trunk individually or copy a template of another subrate trunk.
You manage subrate trunk interface control templates by using the following commands:
•
•
•
•
Summary of Commands
Table 4-26 shows the full name and starting page for the description of each trunk command.
addapsln/delapsln
The addapsln and delapsln command lets you add SONET APS (Automatic Protection Switching) for BXM OC-3 or OC-12 lines.
SONET APS is a standard that describes the switching of SONET lines from the active line to a standby line to provide hardware line redundancy. The SONET APS feature applies only to BXM OC-3 and OC-12 cards in this release.
You must specify the desired APS protocol when adding a new APS line pair. The delapsln command deletes APS for the lines.
For background information on how SONET APS for BXM cards works, refer to "APS Command Summary" section in this chapter.
When the addapsln command executes, the switch software does the following:
•
•
•
•
Before the addapsln command has been executed, there is no working or protection line. The addapsln command defines which line is the working line and which line is the protection line. (For APS 1+1 Annex B, the active line is called the "primary section," and the standby line is called the "secondary section," which provides protection for the primary section.)
Feature Mismatching to Verify APS (Automatic Protection Switching) Support
In this release, the addapsln command, in addition to other configuration commands, will perform mismatch verification on the BXM and UXM cards. For example, the addapsln command will verify whether the cards both have APS support configured. Refer to "High-Priority Login Feature" section on page 17-1 for more information on Feature Mismatching, refer to the BPX 8600 Series Installation and Configuration Manual.
Whenever you activate a feature by configuring it with CLI commands, switch software performs a verification to ensure that the hardware and firmware support the feature. For example, if you are attempting to add APS on a specific line (by using addapsln), and the BXM card does not support this feature, a warning message is displayed and the addition is not completed.
The Feature Mismatching capability will not mismatch cards unless the actual feature has been enabled on the card. This allows for a graceful card migration from an older release.
Full Name
Add a SONET APS (Automatic Protection Switching) line
Syntax
addapsln <slot.port1> < slot.port2> <protocol>
You must enter the slot.port pair and the protocol option. If you do not enter the protocol option, a menu listing the options is displayed.
Related Commands
delapsln, cnfapsln, cnfcdaps, dspapsln, dsplog, dspalms
Attributes
Example 1
addspln 2.1 3.1 1
Description
Add an APS redundant pair, with Working line on slot2, port 1; Protection line on slot 3, port 1; with "1" specifying APS 1+1 protocol.
System Description
alexa TRM genre BPX 8620 9.2 Sep. 9 1998 16:08 PDTActv Current Line Current APS Last UserWork/Protect Protocol Line Alarm Stat Alarm StatCard Switch Req2.1 3.1 1+1 WORK OK APS OK ClearCommand: addapsln 2.1 3.1 1addtrk
Adds a trunk between nodes. You must add a trunk to the network before it can carry traffic. You only need to execute addtrk at one of the nodes terminating the trunk. Before you add a trunk to the network, you must have activated (or "upped") the trunk at both ends by using uptrk.
A trunk must be free of major alarms before you can add it. If you use addtrk to join two networks that were previously separate, the local node verifies that all node names and node numbers in both networks are unique before it adds the trunk.
You cannot add a trunk while any of the following conditions are true:
•
•
•
•
•
•
When using the addtrk command, exercise caution when adding a new node to a network or one network to another network. With these particular operations, the user IDs and passwords may be replaced by those in the other network. Consult Customer Service before performing these operations.
Adding a Virtual Trunk
You can add a trunk as a physical trunk or a virtual trunk. A virtual trunk is a way to connect Cisco nodes through a public ATM cloud. For this release, you can define virtual trunks on BNI, BXM and UXM cards. Note that even though nodes running Release 9.2 can interoperate with 9.1 or 8.5 nodes, if you are running a network with mixed releases, you cannot add UXM and BXM virtual trunks because the networking messages are incompatible due to the virtual trunk number and different cell format on virtual trunks. (BNI cards use STI cell format, and BXM and UXM cards use NNI cell format.)
To designate a trunk as a virtual trunk, you use a virtual trunk number, which is used to differentiate the virtual trunks within a physical port. (Refer to the BPX 8600 Series Reference for more information on virtual trunking.)
For the BXM card, you can define a maximum of 32 virtual trunks within one port. Valid virtual trunk numbers are 1-31 per port. The number of virtual trunks available is limited by the number of virtual interfaces (VIs) available on the card. Each logical trunk (physical or virtual) consumes on VI.
For the UXM card, you can define a maximum of 16 virtual trunks within one port. Valid virtual trunk numbers are 1-15.
The addtrk command will be blocked for virtual trunks configured for VSI.
Full Name
Add trunk to the network
Syntax
addtrk <slot.port>[.vtrk]
Related Commands
deltrk, dsptrks, uptrk
Attributes
Example 1
addtrk 7
Description
Add trunk between node beta slot 7 and node alpha slot 10.
System Response
beta TRM YourID:1 IPX 8430 9.2 Aug. 3 1998 15:04 MSTPLN Type Current Line Alarm Status Other End7 E1/32 Clear - Line OK alpha.109 T1/24 Clear - Line OK gamma.1013 T1/24 Clear - Line OK alpha.1415 T1/24 Clear - Line OK gamma.1520 T3/3 Major - AIT Missing -Last Command: addtrk 7Next Command:
Table 4-28 addtrk-Parameters
slot.port
Specifies the slot and port number of the trunk to add.
addtrkred
Configures trunk redundancy on an ATM trunk. The addtrkred command specifies a backup trunk to the primary trunk. Applicable line types are T3 and E3. The redundancy scheme requires two sets of ATM trunk cards and two standard T3 or E3 cables (not Y-cables). Note the following characteristics of trunk redundancy:
•
•
•
•
•
Full Name
Add trunk redundancy
Syntax
addtrkred <primary trunk> <secondary trunk>
Related Commands
deltrkred, dsptrkred
Attributes
Example 1
addtrkred 4 5
Description
Add bandwidth redundancy for the primary ATM trunk in slot 4 with backup from the ATM trunk in slot 5.
System Response
beta TRM YourID:1 IGX 8420 9.2 Aug. 3 1998 15:15 MSTATM Line Backup ATM Line4 5Last Command: addtrkred 4 5Next Command:
cnfapsln
SONET APS Line Redundancy in this release implements industry standards. Switching is performed by hardware with better performance than the ATM Trunk Redundancy feature introduced in release 8.4. (The ATM trunk redundancy feature is supported on the IGX platform only.) This release supports both. The IGX platform supports ATM trunk redundancy, and the BPX supports SONET APS line redundancy. APS line redundancy provides a standards-based solution to line redundancy.
The cnfapsln command lets you configure various APS line parameters. Below is a list of the configurable APS parameters:
•
•
•
•
•
Note
Table 4-31 lists configurable APS parameters, descriptions, and possible ranges and options.
Full Name
Configure various SONET APS line parameters
Syntax
cnfapsln <slot.port> <SFBER> < SDBER> <Revertive_mode> <WTR> <Direction>
where:
slot.ports = slot.port of working line of APS pair to be configured
SFBER = Signal Fail Bit Error Rate for line degradation. You must enter a number between 3 and 12. Default is 3.
SDBER = Signal Detect Bit Error Rate for line degradation. You must enter a number between 5 and 12. Default is 5.
Revertive/Non = Revert to working line after WTR interval. You must enter 0 (revertive) or
1 (non-revertive).WTR = Wait to Restore timer [1-12 minutes]
You must enter a number between 1 and 12.Direction = Direction of switching. Unidirectional is switching in only one direction. With bidirectional, after one side switches, then the other side also switches. You must enter 0 for Unidirectional, 1 for Bidirectional. (For Annex B, you are not allowed to change to Unidirectional or revertive mode.)
Related Commands
addapsln, delapsln, cnfapsln, cnfcdaps, dspapsln, dsplog, dspalms, switchapsln
Attributes
Example 1
cnfapsln 1.1
Description
Configures various APS line parameters (described in Table 4-31).
System Response
alexa       TRM    genre         BPX 8620           9.2         Sep. 9 1998
16:15 PDT
APS Configuration parameters for Working, Protection lines 1.1, 1.2APS Protocol: 1+1Signal Fail BER threshold (10 to the -n): 3Signal Detect BER threshold (10 to the -n): 5Revertive Switching: YesWait to Restore Timer: 5 minutesUni/Bi Directional Switching: UnidirectionalCommand: cnfapsln 1.1Example 2
cnfapsln 1.1
Description
Configures various APS line parameters (described in Table 4-31).
System Response
colossus TN StrataCom BPX 8600 9.2 Sep. 9 1998 16:08 PDTAPS Configuration parameters for Working, Protection lines 1.1, 1.2APS Protocol: 1+1Signal Fail BER threshold (10 to the -n): 3Signal Detect BER threshold (10 to the -n): 5Revertive Switching: YesWait to Restore Timer: 5 minutesUni/Bi Directional Switching: UnidirectionalCommand: cnfapsln 1.1Example 3
cnfapsln 6.3
Description
Configures various APS line parameters (described in Table 4-31) for APS 1:1 line redundancy
System Response
colossus TN StrataCom BPX 8600 9.2 Sep. 9 1998 16:08 PDTAPS Configuration parameters for Working, Protection lines 6.3, 6.4APS Protocol: 1+1Channels Halved for APS operation: YesAPS Standard for Card: GR-253Signal Fail BER Threshold (10 to the -n): 3Signal Detect BER Threshold (10 to the -n): 5Uni/Bi Directional Switching: BidirectionalRevertive Switching: YesWait to Restore Timer: 5 minute(s)Command: cnfapsln 6.3cnfcdaps
Use the cnfcdaps command to set the APS 1:1 "channels halved" option and the APS standard option on the card. When you execute the command, the switch software performs the following syntax checking:
•
•
•
•
•
Caution
Note
Executing the cnfcdaps command will automatically perform a resetcd (reset card) command.Configuring the APS Standard Option (GR-253—Annex A or ITUT—Annex B)
Following are some things to be aware of when configuring either Annex A (GR-253) or Annex B (ITUT) options:
•
•
•
•
•
•
GR-253 (Annex A) Configuration. When you configure GR-253 (Annex A) with the cnfcdaps 1 option (the default), the working and protection lines are identified as "Work/Pro."
When Annex A (GR-253) is configured with the cnfcdaps 1 option (GR-253 is the default), either the working line or the protection line can be active. If the working line has an alarm activated on it, APS switches back to the protection line, thus making the protection line the "active" line. If there is an alarm on that line, and the alarm has been cleared on the working line, it reverts the working line back to the active line. The protection line serves as a backup line to the "active" line, or "working" line.
ITUT (Annex B) Configuration. When Annex B is configured as the APS standard (with the cnfcdaps 0 option), the lines are identified as "Work1/Work2." (These are shown on the dspapsln screen as "Work1" and "Work2.") The "Work1" line corresponds to the working line used in Annex A (GR-253), and the "Work2" line corresponds to the protection line used in GR-253 (Annex A). (Work1 and Work2 lines are also sometimes referred to as "primary" and "secondary" lines, and as "working section 1" and "working section 2.") The GR-253 (Annex A) terminology (that is, "working" and "protection" lines) refers to lines on all other screen displays (except for dspapsln screen) for ITUT (Annex B) lines.
If the Work1 line has an alarm activated on it, APS switches to Work2. While the alarm is still on the Work1 line, and APS has already switched, the "Work1" line is still the primary line, and "Work2" is still considered the secondary line. If the alarm clears on "Work1," no switch occurs. Instead, the "Work2" line becomes the primary line, and the "Work1" line becomes the secondary line.
Note
You cannot use Annex B protocol standard when in GR-253 mode. Annex B can be configured by specifying the ITUT option of cnfcdaps 0.APS Environment Setup
This section provides a brief functional description of APS support for the BPX platform. The following configurations of APS are supported in this release:
•
To use the APS 1:1 feature, no new hardware is required. A single front card with a regular single back card will support APS 1:1. Two adjacent lines on the same card are used. A firmware upgrade that supports APS 1:1, Release 9.2 switch software, and Cisco WAN Manager Release 9.2 is required.
For APS 1:1 using existing hardware, you must use the cnfcdaps command to reduce the maximum number of connections on the BXM card, which will in turn decrease the number of channels on the card by half. If lines or trunks are upped already on this card, a warning will be issued and the request denied, because changing the number of channels on the fly will cause a card mismatch condition.
•
Two adjacent lines on the same card are used. (You do not need to use the cnfcdaps command to change the number of maximum connections on the card.) A BXM-Enhanced card, a BXM-E daughter card, BXM firmware revision that supports APS in Release 9.2 (refer to 9.2 release notes), Release 9.2 BPX system software, and Cisco WAN Manager 9.2 software.
•
You should first use the dspcd command to check if the BXM card supports the APS option.
Installing SONET APS is service-affecting. For APS 1:1 using existing hardware, you can use the cnfcdaps command only when all lines and trunks have been downed. For the other options (for example, APS 1:1 with front and back card and new hardware; APS 1+1 with two front and back cards, new hardware, combined with front card redundancy), logical lines, trunks and connections can remain intact, but you must install new firmware and hardware.
For the two-card option, you must install a special dual slot backplane. In addition, when existing BXMs are replaced with BXM APS hardware, the new card must match or exceed the old card's number of channels to avoid a Mismatch condition. Refer to "APS Command Summary" section for more information.
Executing the cnfcdaps command will automatically perform a resetcd (reset card).
Full Name
Configure BXM OC-3 or OC-12 card with SONET APS line redundancy options
Syntax
cnfcdaps <slot> <Y/N> < 0/1>where:
slot = Desired APS slot number
N/Y = Disable/enable the channels halved option on the card (Default is disabled, or N.)
0/1 0 = ITUT (Annex B), 1= GR-253 (Default is 1—GR-253, or Annex A)
Table 4-32 cnfcdaps—Parameters
slot
Specifies the desired BXM APS slot number.
Y/N
Disable/enable the channels option on the card.
10/1
0 = ITUT, 1 = GR253
Related Commands
addapsln, delapsln, cnfapsln, cnfcdaps, dspapsln, dsplog, dspalms
Attributes
System Response
sw117 TN StrataCom BPX 8620 9.2.q3 Mar. 24 1999 21:54 GMTAPS Card Configuration parameters for card 2Channels Halved for APS operation: YesAPS Standard for Card: GR-253This Command: cnfcdaps 2 nEnter channels halved option (Y or N);Enter APS protocol standard to be used on card (0=ITUT, 1=GR-253):MAJOR ALARMcnfrsrc
Use the cnfrsrc command to partition resources for Automatic Routing Management PVCs, VSI-Multiprotocol Label Switching (MPLS), or PNNI SVCs/SPVCs. (If you want to configure resources for a VSI-MPLS controller or PNNI SVCs, refer to cnfrsrc in the "VSI Commands" chapter for more information specific to configuring VSI options.)
This command was introduced in Release 9.1 to support physical trunks. It has been extended to support virtual trunks. After VSI has been enabled, the virtual trunk becomes a "dedicated" VSI virtual trunk. Note that if the trunk has already been added or if the VPI value has not been configured, you will not be able to configure the VPI value. (Switch software will block you from doing so.)
Note
In this release, you can configure a virtual trunk to be dedicated to VSI or to Automatic Routing Management. You cannot configure a virtual trunk for both VSI and Automatic Routing Management.
You configure all port and trunk attributes with cnftrk, cnftrkparm, or cnfrsrc.
Note
Note
Configurable resources (using cnfrsrc) are:
•
•
•
•
•
•
•
•
•
•
•
•
The resources that you can currently configure are the number of connection IDs (conids) and the trunk bandwidth. In this release, you use the cnfrsrc command to configure the cell rate and number of connections on a BXM card only. (You cannot use the cnfrsrc command on the IGX.)
Configuration with cnfrsrc
The cnfrsrc command is used to configure conids (lcns) and bandwidth. The conid capacity indicates the number of connection channels on the trunk port which are usable by the virtual trunk.
This number cannot be greater than the total number of connection channels on the card. The maximum number of channels is additionally limited by the number of VCI bits in the UNI cell header. For a virtual trunk, the number is divided by the maximum number of virtual trunks on the port to determine the default. This value is configured by the cnfsrc command on the BPX. Table 4-33 lists the number of connection IDs for virtual trunks on various cards.
Table 4-33 Maximum Connection IDs (LCNs)
BXM/UXM
1-(number of channels on the card)
256
BNI T3/E3
1-1771
256
BNI OC-3
1-15867 (3837 max/vtrk
256
Full Name
Configure partition resources
Syntax
cnfrsrc <slot>.<port> <maxpvclcns> <maxpvcbw> <partition> <e/d> <minvsilcns> <maxvsilcns> <vsistartvpi> <vsiendvpi><vsiminbw> <vsimaxbw>
Related Commands
dsprsrc
Attributes
Example 1
cnfrsrc 11.2 256 96000 y 1 e 0 0 1 1 0 0Description
Configure resource partitions on card slot 11, port 2, to use Automatic Routing Management PVCs.
System Response
sw98 TN SuperUser BPX 8600 9.2.0r Apr. 4 1998 16:40 PSTPort/Trunk : 11.2Maximum PVC LCNS: 256 Maximum PVC Bandwidth:96000Min Lcn(1) : 0 Min Lcn(2) : 0Partition 1Partition State : EnabledMinimum VSI LCNS: 0Maximum VSI LCNS: 0Start VSI VPI: 1End VSI VPI : 1Minimum VSI Bandwidth : 0 Maximum VSI Bandwidth : 0Last Command: cnfrsrc 4.1 256 26000 1 e 512 7048 2 15 26000 100000Next Command:
Table 4-34 cnfrsrc—Parameters
slot.port
Specifies the BXM card slot and port number.
Maximum PVC LCNs
The maximum number of LCNs allocated for Automatic Routing Management PVCs for this port. The range is 1 to 256; 256 is the default. For trunks, there are additional LCNs allocated for Automatic Routing Management that are not configurable.
You can use the dspcd <slot> command to display the maximum number of LCNs you can configure using the cnfrsrc command for the given port. For trunks, configurable LCNs represent the LCNs remaining after the BCC has subtracted the networking LCNs needed. A trunk has 270 networking LCNs, or channels.
For a port card, a larger number is shown, as compared with a trunk card. This is because a trunk uses 270 networking LCNs, as compared with a port card, which uses no networking LCNs.
Setting this field to 0 would disable Automatic Routing Management PVCs on the specified port.
Note that you must specify a value greater than 0 for the Maximum PVC LCNs, Maximum PVC Bandwidth, and Maximum VSI LCNs parameters. Otherwise, you will not be able to create any Automatic Routing Management PVC connections on a BXM card. Also, if these parameters do not have values greater than 0, you will be unable to change the connection channel amount when you configure the BXM trunk using cnftrk.
Maximum PVC Bandwidth
Specifies the maximum bandwidth of the port allocated for Automatic Routing Management use. The range is 0 to 352207; 0 is the default. You can configure the Maximum PVC Bandwidth value for ports, but not for trunks.
Note that you must specify a value greater than 0 for the Maximum PVC LCNs, Maximum PVC Bandwidth, and Maximum VSI LCNs parameters. Otherwise, you will not be able to create any Automatic Routing Management PVCs on the BXM card.
Configure Partition
Answer yes or no to begin configuring resources for the partition. If you enter "n" for no, you will not be prompted to configure any VSI options. If you are configuring Automatic Routing Management PVCs, enter "n" for no.
If you want to configure VSI options, enter "y" for yes, and you will be prompted to enter the rest of the cnfrsrc parameters, which are related to configuring VSI (such as a VSI MPLS controller or a PNNI controller). Refer to the cnfrsrc command in "VSI Commands" chapter for more information on VSI-related options.
Partition ID
Specifies the ID number of the partition; 1 is the default. Always use 1 in Release 9.1 and Release 9.2.10. (The range of 0 to 255.)
Enable Partition
Answer yes or no to enable your configured partition.
Minimum VSI LCNs
The minimum number of LCNs guaranteed for this partition. The range is 1 to 256; 0 is the default. The VSI controller guarantees at least this many connection endpoints in the partition, provided there are sufficient free LCNs in the common pool to satisfy the request at the time the partition is added. When a new partition is added or the value is increased, it may be that existing connections have depleted the common pool so that there are not enough free LCNs to satisfy the request. The BXM gives priority to the request when LCNs are freed. The net effect is that the partition may not receive all the guaranteed LCNs (min LCNs) until other LCNs are returned to the common pool.
You can increase this value dynamically when there are enough unallocated LCNs in the port group to satisfy the increase.
You may not decrease the value dynamically. All partitions in the same port group must be deleted first and reconfigured in order to reduce this value.
To avoid this deficit condition, which could occur with maximum LCN usage by a partition or partitions, it is recommended that all partitions be configured ahead of time before adding connections. Also, it is recommended that all partitions be configured before adding a VSI controller using the addshelf command.
Maximum VSI LCNs
The total number of LCNs the partition is allowed for setting up connections. The min LCNs is included in this calculation. If max LCNs equals min LCNs, then the max LCNs are guaranteed for this partition.
Otherwise, (max - min) LCNs are allocated from the common pool on a FIFO basis.
If the common pool is exhausted, new connection setup requests will be rejected for the partition, even though the maximum LCNs has not been reached.
You may increase this value dynamically when there are enough unallocated LCNs in the port group to satisfy the increase.
You may not decrease the value dynamically. All partitions in the same port group must be deleted first and reconfigured in order to reduce this value.
Different types of BXM cards support different maximum values. If you enter a value greater than the allowed maximum, a message is displayed with the allowable maximum value.
Note that you must specify a value greater than 0 for the Maximum VSI LCNs, Maximum PVC Channels, and Maximum PVC Bandwidth parameters. Otherwise, you will not be able to add any connections on a BXM card.
Start VSI VPI
By default the TSC (for example, the 7200 or 7500 series router) will use either a starting VSI VPI of 1 or 2 for tag switching, whichever is available. If both are available, a starting VSI VPI of 1 is used. The VPI range should be 2-15 on a BPX 8620 VSI. The VSI range for tag switching on the BPX 8620 is configured as a VSI partition, usually VSI partition number 1. VSI VPI 1 is reserved for Automatic Routing Management PVCs. (This restriction applies only to trunks, not to ports. For a port, you can use any VPI value.) For a port UNI, the VPI range is 1 to 255. For a port NNI, the range is 1 to 4095. For trunks that do not have Automatic Routing Management configured, the VPI ranges are the same as for ports.
The VSI partition for tag switching should start at VPI 2. If VPI 2 is not to be used, you can use the tag switching VPI interface configuration on the TSC to override the defaults.
For trunks with Automatic Routing Management configured, the range is 2 to 4095. Always set to 2 for trunks.
End VSI VPI
Two VPIs are sufficient for Release 9.1, although it may be advisable to reserve a larger range of VPIs for later expansion, for example, VPIs 2-15.
The range is the <Start VSI VPI > value to 4095.
Minimum VSI Bandwidth
The minimum port bandwidth that can be used by this partition in cells/second.
The range is 0 to <Maximum Line Rate>. For example, the OC-3 line rate is 352207. 0 is the default.
Maximum VSI Bandwidth
The maximum port bandwidth that can be used by this partition. This value is used for VSI QBin bandwidth scaling.
The range is 0 to <Maximum Line Rate>. For example, the OC-3 line rate is 352207. 0 is the default.
cnftrk
Configures trunk parameters. A trunk has a default configuration after you activate (or "up") the trunk with the uptrk command. Beyond this default configuration, cnftrk lets you configure trunk parameters. Typically, you use uptrk to first up the trunk, then use cnftrk to configure trunk parameters, then use addtrk to add it to the network. You must execute cnftrk at both ends of a trunk. (You also use cnftrk to configure an interface shelf.)
The section "cnftrk-Parameters" in this description shows required cnftrk parameters. The section titled "cnftrk-Optional Parameters" shows virtual trunk parameters. You can reconfigure some parameters after adding a trunk with addtrk. See the section " Reconfiguring a Trunk."
In the display for cnftrk, the current value for each parameter appears on screen. At the command line prompt for each parameter, the current or default value appears in parentheses and stays the same if you press Return without entering anything. Configurable parameters depend on the trunk type. For example, an NTM card and a BNI support different parameters. If a displayed parameter is not available for the current interface, its name displays at half-intensity, and the value field contains dashes. (Note that Clock Rate is a required parameter for only HSSI. The Clock Rate range is 4 Mbps-50.84 Mbps. The actual clock limits depend on the front card.)
Note
As of Release 9.1, you can configure cost-based routing from either end of the trunk. You can change the cost before or after the trunk has been added to the network. You can also change the cost after connections have been routed over the trunk. Any cost change is updated network-wide. Every node in the network stores the cost of every trunk in the network.
In this release, the cnftrk command configures a logical trunk (physical or virtual), so when you change a physical parameter, all trunks on the port (both physical and virtual) are affected. For example, if you change the line framing on a virtual trunk, all virtual trunks on the port are automatically updated to have the modified line framing.
You can use cnftrk to configure the Transmit Trunk Rate for all BPX cards, except for the BXM card. For BXM cards, you must use the cnfrsrc command to configure the Transmit Trunk Rate (trunk load). For IGX cards, you can configure the Transmit Trunk Rate after a trunk has been added.
You can use the cnftrk command to assign a VPI value. You will not be able to configure the VPI value if the virtual trunk is already configured for VSI. Also note that if the VSI feature is enabled, and you execute cnftrk to decrease the transmit rate, you must confirm whether the Qbin configuration is set up correctly by using the cnfqbin command to change the value. The reason for this is that when the transmit rate is decreased, the Qbin depth will be automatically recalculated.
In this release, cnftrk supports the rt-VBR and nrt-VBR traffic classes (instead of just the VBR traffic class). Similarly, the virtual trunk type can be rt-VBR or nrt-VBR.
You can configure the ILMI protocol running on a trunk interface to run on the BCC instead of the BXM.
Subrate and Fractional Trunks
For FastPacket trunks, which the NTC and NTM front cards support, you can configure the Subrate interface and Subrate data rate fields only if the back card is a BC-SR. The interface types for a subrate trunk are V.11, X.21, V.35, and EIA/TIA-449. Set the data rate to match the subrate facility within the range 64 Kbps-1.920 Mbps.
The DS0 map is used to define fractional E1 and T1 trunks. It consists of a repeating set of specifications in the form <x[-y[a]]>, where "x" and the optional "y" are DS0 numbers 0-23, and the optional "a" indicates alternating. The value of "y" must be greater than the value of "x." The values of both "x" and "y" cannot be less than 0 or greater than the maximum number of DS-0s for the line type. In the DS0 map for unframed E1, use 0-31. For framed E1, use 1-31. For 30 DS-0 E1, use 1-15, 17-31.
Receive and Transmit Rates on Physical Trunks
The parameters RCV Trunk Rate and Transmit Trunk Rate apply to physical ATM trunks on an IGX node. On a BPX node, only Transmit Trunk Rate is available. These parameters let you configure lower rates than the maximum line rate for the trunk type. If you adjust a rate, you need to do this at both ends of the trunk. For example, if RCV Trunk Rate on an IGX is 40,000 packets per second (pps), Transmit Trunk Rate on the far end must be 20,000 cells per second (cps). The typical relationship between pps and cps is two FastPackets for each cell.
For ATM trunks terminating on a BTM (IGX), make sure the receive rate is below the maximum of the T3 or E3 line rate. For these cards, the rate should be no more than 40,000 packets per second. Increments for RCV Trunk Rate and Transmit Trunk Rate can be as small as 1 cell or packet per second. (Note that the node may round up or round down the value you enter.)
The default value for Transmit Trunk Rate is the maximum rate for the back card type. You can reduce this rate to any number of cells per second that is less than or equal to the physical port rate. If E3 or T2 is selected, the bandwidth is reduced from the T3 rate.
Note
On the cnftrk screen, the Transmit Rate and Transmit Load are always displayed in cps (cells per second). (The Transmit Load displays in brackets above the Transmit Rate field, for example, TRK 13.1.1 Config T3 [2867 cps].) Because switch software performs an internal conversion from DS0s to cells for the receive rate, this receive rate dictates the transmit load at the other end of the trunk, and vice versa. Because the Transmit Load (in cps) may not fit into the full DS0, the resulting number that appears in the Transmit Load field (for example, [2867 cps], could be truncated. For example, if you were to change the Transmit Rate on a routing trunk from 96000 to 104268, cnftrk will prompt you to enter a Transmit Rate of 0-104268, and will accept 104268, but it may assign a value of 104150 instead of 104268. The Transmit Load would be the same, for example, 104150 cps, regardless of whether the user configured the Transmit Rate as 104268 or 104269 or 104270.
The following shows how the transmit rate is calculated internally by switch software:
1 DS0 = 64000 bits/sec
or
DS0 = 8 bits x 8000 samples/sec = 64000 bits/sec
1 cell long unit = 424 bits/sec
therefore:
Number of cells per second (cps) = DS0 * 8000 / 53 bytes per ATM cellFollowing is some further explanation of how the Transmit Trunk Rate is calculated internally by switch software:
For any user-provided Transmit Trunk Rate value in T1 cells per second (cps).
Rcv Trunk Rate = T1 x 53 /8000 (in DS0)
(This is the actual value used for everything and dictates the Transmit Trunk Load value at the other end of the trunk.)
The conversion occurs again at the other end:
T2 = R1 * 8000 / 53 (in cps)
The Transmit Load number displayed in brackets is the same, that is, 104150 cells per second, whether the user has given the Transmit Rate as 104268 or 104269 or 104270.
Receive and Transmit Rates on Virtual Trunks
The implementation of XMT Trunk Rate on a virtual trunk differs from the implementation on a physical trunk. On a physical trunk, XMT Trunk Rate limits the rate at which the back card physically generates cells. For a virtual trunk, XMT Trunk Rate does not limit the rate at which the back card generates cells: the line rate stays at the maximum for the line type. However, XMT Trunk Rate is the maximum transmission rate allowed on a virtual trunk.
The provider of the virtual trunk service assigns the value for XMT Trunk Rate. You must have this provider-assigned value for XMT Trunk Rate and enter it when you use cnftrk.
The total bandwidth of all the virtual trunks in one port cannot exceed the maximum bandwidth of the port. The trunk loading (load units) is maintained per virtual trunk, but the cumulative loading of all virtual trunks on a port is restricted by the transmit and receive rates for the port.
Physical and Virtual Trunk Configuration
Physical and virtual trunk configuration is similar. When you configure a port-level characteristic of a virtual trunk, all the virtual trunks on the port are modified with that characteristic. When the port characteristics of a trunk are modified, all characteristics related to that trunk port are updated.
Virtual trunks appear in the routing topology map as available trunks for routing. The existing physical trunk characteristics, such as bandwidth and satellite/terrestrial type, apply to virtual trunks. The routing algorithm must take into account special restrictions and conid assignments for a virtual trunk. For example, VPCs cannot be routed over a virtual trunk. Also, each virtual trunk has a configurable number of connection channels reserved from the card. The routing algorithm checks for adequate channel availability on a virtual trunk before selecting the trunk for the route.
The connection channel management scheme for the UXM and BXM cards is the same as in the previous release. The conids are selected on a per logical trunk basis. The associated LCNs are selected from a pool of LCNs for the entire card. Each virtual trunk can use the full range of acceptable conid values. The range consists of all the 16-bit values (1-65535), excluding the node numbers and blind addresses. A port uses the VPI to differentiate connections that have the same conid.
The number of channels per virtual trunk can be changed after the trunk has been added to the network. Decreasing the number of channels on an added virtual trunk causes connection reroutes where increasing the number of channels on an added virtual trunk will not cause connection reroutes.
Configuring an IMA-Compliant Trunk
The cnftrk command has a parameter that lets you add or delete physical lines of an existing IMA group (IMA Group member parameter). You will be prompted to enter the physical lines using the same format as described in the "Configuring IMA Physical Lines" section on 4-134. When you add or delete a physical link, the following are enforced:
•
•
•
Note that the above functional characteristics only apply to the UXM Firmware Model M, which supports the ATM Forum IMA-Compliant protocol. If a card has UXM Firmware Model A, which supports the Cisco Proprietary protocol, the IMA trunk functions as it did in Release 9.1. For example, you will not be able to add or delete physical links of an existing IMA group.
Primary Link—In an IMA group, you must select one of the physical links to be a primary link. This primary link number is used to refer to this IMA group or trunk. You can use cnftrk to add additional links to the group or delete existing links.
When deleting existing links from an IMA group, you cannot delete the primary link. You must first deactivate the trunk using deltrk, then use dntrk to remove the primary link.Refer to 9.2 release notes for up-to-date feature support and system requirements.
Specifying a Set of Physical Lines (Comprising an IMA Group)
In Release 9.1, it was a requirement that the IMA group had to consist of consecutive physical lines. In this release, you can define an IMA trunk consisting of non-consecutive physical lines. In addition, you can change the group member by deleting a physical line from an existing IMA trunk.
Use the following syntax to specify an IMA group on a UXM trunk:
•
where:
slot is the slot number
group_member is a set of physical lines composing an IMA group. You can specify the member in an expression consisting of the primary link followed by a, or - and additional physical links.
vtrk is the optional virtual trunk number. If at least one virtual trunk already exists on this port, you only have to specify the primary link as the group_member.
For example, 9.1-4 defines trunk 9.1 to consist of four physical links, that is, 1, 2, 3 and 4, where physical link 1 is the primary link. (This example is compatible with Release 9.1.)
For example, 9.1-3,5 defines trunk 9.1 to consist of four physical links, that is, 1, 2, 3 and 5 where physical link 1 is the primary link.
For example, 9.5-7,2-3 defines trunk 9.5 to consist of five physical links, that is, 2, 3, 5, 6 and 7 where physical link 5 is the primary link.
9.8,2,4,6 defines trunk 9.8 to consist of all even number of physical links where physical link 8 is the primary link.
Physical and Virtual Trunk Parameters You Can Configure with cnftrk
Table 4-35 below shows the trunk parameters that you can configure with cnftrk. You can specify all physical options on virtual trunks. If you change a physical option on a virtual trunk, the change is propagated to all virtual trunks on the trunk port. An X indicates that the parameter is configurable. An X* in the Virtual column indicates that the parameter is a physical parameter, and changing the value for one virtual trunk on the port will automatically cause all virtual trunks on the port to be updated with the same value.
Virtual Trunk Traffic Classes
All types of Cisco traffic are supported through an ATM cloud. Every trunk is defaulted to carry every type of traffic. The CBR, VBR (rt-VBR and nrt-VBR), and ABR virtual trunks within the cloud should be configured to carry the correct type of traffic. The CBR trunk is suited to carry all types of traffic. The VBR trunk is best suited to carry IGX Frame Relay and BPX VBR traffic, as well as Optimized Bandwidth Management (formerly called ForeSight) and ABR traffic. The ABR trunk is best suited to carry Optimized Bandwidth Management and ABR traffic. You can change the type of traffic each trunk carries. However, to avoid unpredictable results, it is best to stick to the recommended traffic types for a given VPC type.
Two-stage queueing at the egress of virtual trunks allows shaping of traffic before it enters the cloud. However, the traffic is still routed on a single VPC and may be affected by the traffic class of the VPC selected.
You can configure any number of virtual trunks between two ports up the maximum number of virtual trunks per slot and the maximum number of logical trunks per node. These trunks can be any number of three trunk types.
The unique characteristics of CBR, VBR (rt-VBR and nrt-VBR), and ABR traffic are maintained through the cloud as long as the correct type of virtual trunk is used. The traffic classes allowed per virtual trunk are configured with cnftrk. The routing algorithm excludes virtual trunks whose traffic class is not compatible with the candidate connection to be routed.
Adding a Single Virtual Trunk
The following example describes a typical scenario of adding one virtual trunk across an ATM network. One one side of the cloud is a BPX with a BXM trunk in slot 4. On the other side of the cloud is an IGX with a UXM trunk card in slot 10. A virtual trunk is added between port 3 on the BXM and port 2 of the UXM.
Use the same steps that follow to add a virtual trunk on top of IMA ports on the IGX platform.
Once you up a virtual trunk, and the IMA port has been allocated during the uptrk command, then you up additional virtual trunks using ONLY the primary IMA port, for example, 10.2.2, 10.2.3, and so on.
Note
Note
1.
uptrk 4.3.1
2.
cnftrk 4.3.1
3.
uptrk 10.2.1
4.
cnftrk 10.2.1
5.
addtrk 4.3.1
The VPI values you chose during cnftrk must match those used by the cloud VPC. Also, both ends of the virtual trunk must match on Transmit Rate, VPC type, traffic classes supported, and number of connection channels supported. The addtrk command checks for matching values before allowing the trunk to be added to the network topology.
The network topology from BPX_A's perspective after you add the trunk will be:
BPX_A 4.3.1-10.2.1/IGX_A
This release supports virtual trunking on both the BPX and IGX. IMA trunk ports are referenced by the first physical line of the trunk port after uptrk has been executed. For example, you can uptrk 1.5-8.9. You can then up a second trunk (which, in this case, is a virtual trunk on slot.port 1.5) on the same trunk port using uptrk 1.5.11.
Full Name
Configure trunk
Syntax
cnftrk <slot.port>[.vtrk] <options for E1 | T1 | E3 | T3 | OC-3 | OC-12 | E2 | HSSI | SR >
Related Commands
addtrk, dsptrkcnf
Attributes
Example 1
cnftrk 11
Description
Configure trunk 11. The trunk in slot 11 is an ATM T3 trunk on an ALM/B. (If you want to verify the card is the trunk version of the ALM, use either dspcd or dspcds and check the front card "Rev." The Rev column contains a B for the first character for an ALM/B.)
System Response
IGX8420 TN SuperUser IGX 8420 9.2 Sep. 5 1998 16:38 PSTPLN 11 Config T3/576 [192000pps] ALM slot: 11Clock Rate: -- Idle code: 7F hexTransmit Trunk Rate: 96000 cps Restrict PCC traffic: NoRcv Trunk Rate: 192000 pps Link type: TerrestrialSubrate interface: -- Line framing: --Subrate data rate: -- coding: --Line DS-0 map: -- CRC: --Pass sync: Yes recv impedance: --Loop clock: No cable type:Statistical Reserve: 992 pps length: 0-225 ft.Header Type: STI HCS Masking: YesGateway Type: BAM Payload Scramble: NoVPI Address: 0 End supp BData: YesVCI Address: 0 End supp FST: YesDeroute delay time: 0 secondsLast Command: cnftrk 11Next Command:Example 2
cnftrk 1.1
Description
Configure trunk 1.1. This trunk is an ATM T3 trunk on a BPX node.
System Response
batman TN SuperUser BPX 8620 9.1 Date/Time Not SetTRK 1.1 Config T3 [96000 cps] BNI-T3 slot: 1Restrict CC traffic: NoTransmit Rate: 96000 Link type: TerrestrialSubrate interface: -- Line framing: --Subrate data rate: -- coding: --Line DS-0 map: -- CRC: --Pass sync: Yes recv impedance: --Loop clock: No cable type:Statistical Reserve: 992 cps length: 0-225 ft.Idle code: 7F hex HCS Masking: YesConnection Channels: 1771 Payload Scramble: NoValid Traffic Classes: Frame Scramble: --V,TS,NTS,FR,FST,CBR,rt-VBR,nrt-VBR,ABR Cell Header Type: --Virtual Trunk Type: --SVC Channels: 0 Virtual Trunk VPI: --SVC Bandwidth: 0 cps Virtual Trunk Service: --This Command: cnftrk 1.1Transmit Rate [T2=14490, E3=80000, T3=96000, OC-3 = 353208](96000):Example 3
cnftrk 13.1.1
Description
Configure trunk 13.1.1 (a virtual trunk on an ATM T3).
System Response
sw97 TN SuperUser BPX 8620 9.2 July 30 1998 11:45 GMTTRK 13.1.1 Config T3 [2867 cps] BNI-T3 slot: 13Restrict CC traffic: NoTransmit Rate: 3000 Link type: TerrestrialSubrate interface: -- Line framing: --Subrate data rate: -- coding: --Line DS-0 map: -- CRC: --Pass sync: No recv impedance: --Loop clock: No cable type:Statistical Reserve: 992 cps length: 0-225 ft.Idle code: 7F hex HCS Masking: YesConnection Channels: 55 Payload Scramble: NoValid Traffic Classes: Frame Scramble: --V,TS,NTS,FR,FST,CBR,rt-VBR,nrt-VBR,ABR Virtual Trunk Type: CBRVirtual Trunk VPI: 0Virtual Trunk Service: 4Last Command: cnftrk 13.1.1 3000 N N 992 7F 55 V,TS,NTS,FR,FST,CBR,rt-VBR,nrt-VBR,ABR N TERRESTRIAL 0 Y N CBR 0Next Command:Example 4
cnftrk 6.3
Description
Configure trunk 6.3 (an OC-3 trunk on a UXM).
System Response
sw228 TN SuperUser IGX 8420 9.2.0r Aug. 27 1998 17:42 PSTTRK 6.3 Config OC-3 [353056cps] UXM slot: 6Transmit Trunk Rate: 353207 cps Frame Scramble: YesRcv Trunk Rate: 353207 cps Cell Framing: STS-3CPass sync: YesLoop clock: NoStatistical Reserve: 1000 cpsIdle code: 7F hexRestrict PCC traffic: NoLink type: TerrestrialRouting cost: 10HCS Masking: YesPayload Scramble: YesConnection Channels: 256Gateway Channels: 256Valid Traffic Classes:V,TS,NTS,FR,FST,CBR,rt-VBR,nrt-VBR,ABRLast Command: cnftrk 6.3Next Command:Example 5
cnftrk 8.1
Description
Configure trunk 8.1 (a T3 trunk on a UXM).
System Response
sw228 TN SuperUser IGX 16 9.1.w2 Aug. 27 1997 17:42 PSTTRK 8.1 Config T3 [96000cps] UXM slot: 8Transmit Trunk Rate: 96000 cpsRcv Trunk Rate: 96000 cps Line Framing: PLCPPass sync: Yes Cable Length 0-255 ft.Loop clock: NoStatistical Reserve: 1000 cpsIdle code: 7F hexRestrict PCC traffic: NoLink type: TerrestrialRouting cost: 10HCS Masking: YesPayload Scramble: YesConnection Channels: 256Gateway Channels: 256Valid Traffic Classes:V,TS,NTS,FR,FST,CBR,rt-VBR,nrt-VBR,ABRLast Command: cnftrk 8.1Next Command:Example 6
cnftrk 10.1
Description
Configure trunk 10.1 (an E3 trunk on a UXM).
System Response
sw228 TN SuperUser IGX 8420 9.2 Aug. 27 1998 17:42 PSTTRK 10.1 Config E3 [80000cps] UXM slot: 10Transmit Trunk Rate: 80000 cpsRcv Trunk Rate: 80000 cps Line Framing: HECPass sync: Yes Cable Length 0-255 ft.Loop clock: NoStatistical Reserve: 1000 cpsIdle code: 7F hexRestrict PCC traffic: NoLink type: TerrestrialRouting cost: 10HCS Masking: YesPayload Scramble: YesConnection Channels: 256Gateway Channels: 256Valid Traffic Classes:V,TS,NTS,FR,FST,CBR,rt-VBR,nrt-VBR,ABRLast Command: cnftrk 10.1Next Command:Example 7
cnftrk 5.2
Description
Configure an IMA trunk 5.2 (an E1 trunk on a UXM), which consists of non-consecutive physical lines 1, 3, 5, and 7.
System Response
sw224 TN SuperUser IGX 8420 9.2 Aug. 27 1998 17:50 GMTTRK 5.2-8 Config E1/203 [30641 cps] UXM slot: 5Line DS-0 map: 1-15,17-31Retained links: 7IMA Group member: 1,3,5,7 Valid Traffic Classes:Transmit Trunk Rate: 30641 cps V,TS,NTS,FR,FST,CBR,rt-VBR,nrt-VBR,ABRRcv Trunk Rate: 28075 cps IMA Protocol Option: DisabledPass sync: Yes IMA Max. Diff. Dly: 200 msecLoop clock: No IMA Clock Mode: CTCStatistical Reserve: 600 cps Deroute delay time: 0 secondsIdle code: 54 hexRestrict PCC traffic: NoLink type: TerrestrialRouting cost: 10Line coding: HDB3HCS Masking: YesPayload Scramble: YesConnection Channels: 256Gateway Channels: 256This Command: cnftrk 5.2
Note
The IMA group member and IMA Differential delay parameters are configurable. The IMA Clock Mode parameter is fixed at CTC and is not configurable.
Also, note that you can configure IMA trunk parameters on virtual trunks that are on top of IMA ports.Example 8
cnftrk 10.1
Description
Configure trunk 10.1 (a T1 trunk on a UXM).
System Response
sb-reef TN SuperUser IGX 8420 9.2 Aug. 27 1998 17:46 PDTTRK 10.1-5 Config T1/115 [17358 cps] UXM slot: 10IMA group member 1,3,5,7Transmit Trunk Rate: 17358 cps Connection Channels: 256Rcv Trunk Rate: 17358 cps Gateway Channels: 256Pass sync: Yes Valid Traffic Classes:Loop clock: No V,TS,NTS,FR,FST,CBR,rt-VBR,nrt-VBR,ABRStatistical Reserve: 600 cps Retained links: 5Idle code: 7F hex IMA Protocol Option: DisabledRestrict PCC traffic: No IMA Max. Diff. Dly: 200 msec.Link type: Terrestrial IMA Clock Mode: CTCLine framing: ESFLine coding: B8ZSLine cable type: ABAMLine cable length: 0-131 ft.HCS Masking: YesPayload Scramble: NoLast Command: cnftrk 10.1
Note
If the IMA link auto disable option is disabled, the Window size, Max transition counts, and Link reenable time parameters will not display. In this release, because the ATM Forum-compliant ATM Inverse Multiplexing standard does not support the IMA link auto disable option, these parameters do not display.Refer to Table 4-36 and Table 4-37 for a list of cnftrk parameters, and cnftrk optional parameters.
Table 4-36 cnftrk—Parameters
slot.port
All
The number of the trunk to configure.
Any valid slot and port. For cards with one port, use slot.
N/A
Trunk Identification
(display only—not configurable)
All
Displays trunk number, trunk type and bandwidth supplied; and the card type and slot number of the unit supporting the trunk.
T3, E3, T1, E1, E2, fractional T1, fractional E1 subrate, ATM, NTC, NTM, OC-3, STM1, OC-12, STM4.
none
Clock Rate
ATM
This clock rate is for only HSSI.
4 Mbps-50.84Mbps
Transmit Trunk Rate
(display only—not configurable)
ATM
This indicates the trunk load, and is configurable by using cnfrsrc command for BXM cards (BPX platform). This parameter appears on the cnftrk screen for display purposes only.
On IGX, Transmit Trunk Rate is configurable after a trunk has been added.
Note
Rcv TRK Rate
ATM
CELLBUS or MUXBUS bandwidth in packets per second (pps) to allocate to a BTM, ALM/B. On a BPX, Rcv TRK Rate is not used.
On IGX, Rcv Trunk Rate is configurable after a trunk has been added.
ALM/B T3: 1K-192K pps
BTM (IGX): 0-80K pps
BTM-E1: 0-10538 pps for CGW, unframed E1 or
0-10208 pps for CGW, for framed E11000 pps
Subrate interface
PKT
Subrate physical interface type
X.21 | V.35
X.21
Subrate data rate
PKT
Subrate data rate in Kbps. Allows you to specify, in Kpbs, the clock rate for the selected subrate interface. Acceptable values are any multiple of 64 Kpbs up to a maximum of 1920 Kbps.
64 Kbps, 128 Kbps,
256 Kbps, 384 Kbps, 1.024Mbps, 1.536 Mbps, and 1.920Mbps1920 Kbps
DS0 map
PKT
Specifies the DS0s to use for a fractional T1 or E1 bundle. Optional "a" = "use alternating channels" (for example, 20-30a means 20, 22, 24, and so on.)
x - y[a]
0-31 (E1) 0-23 (T1)
Pass sync
All
Enables the trunk to pass a clock for network synchronization.
Yes | No
Yes for standard, no for virtual trunks
Loop Clock
All
Loop receive clock back to transmit.
Yes | No
No
Statistical
ReserveAll
This trunk bandwidth is reserved for non-standard traffic, such as internode controller messages or user traffic diverted because of a failure.
With Release 9.3.0 switch software, the default values for statistical reserves are increased to accommodate sufficient bandwidth for control traffic. The statistical reserve can be changed. However, if you modify the reserves below the recommended statistical reserve, a warning message is displayed. For example, if the statistical reserve is changed below recommended values for "upped" trunks, the warning message that follows is displayed:
WARNING: Changing stats reserve
< {1000| 300 } may cause a drop in CC
traffic
0-10666
The recommended stats reserve for T3/E3/OC3/OC12 is 1000 cps and 300 cps for T1/E1 virtual trunks.
See also Table 4-38 and Table 4-39 for values.Header Type
ATM
Selects the ATM cell header type: UNI, NNI, or STI. UNI is the default for virtual trunks but you may need to configure this parameter to NNI to match the header type of the VPC provided by the ATM cloud. In this release, this parameter is configurable for physical and virtual trunks. See the Cisco WAN Switching System Overview for a description.
UNI | NNI | STI
STI
Gateway Type
ATM
Defines the type of addressing mode for this trunk. See Cisco WAN Switching System Overview for a description.
BPX-BPX (BAM)
Cloud (CAM)
Simple (SAM)BAM
VPI Address
ATM
Virtual path address in ATM cell. The VPI configured for a virtual trunk must match the VPI for the VPC in the cloud. Valid VPC VPIs depend on the port type. Must be non-0 for a virtual trunk.
BXM/UXM (UNI)—1-255
BXM/UXM (NNI)—1-4095
BNI T3/E3—1-255
BNI OC-3—1-630
VCI Address
ATM
Virtual circuit address in ATM cell.
0-65,535
0
Idle code
All
HEX code either in the payload space of an ATM idle cell or on an idle FastPacket trunk (idle packets do not exist)
0-FF (hex)
54 (E1)
7F (T1, ATM)SVC Channels
ATM
The number of channels reserved for SVCs.
T3: 0-1771
E3: 0-1771
OC-3: 0-16199
0
SVC Bandwidth
ATM
The bandwidth reserved for SVCs.
T3: 96000 cps
E3: 80000 cps
OC-3: 353208 cps
0
Restrict CC traffic (requires superuser privilege)
All
Restrict node controller messages from
a trunk. Restricting CC traffic can cause serious problems. Contact the TAC through Cisco Customer Engineering before you change it.Y | N
No
Link type
All
Terrestrial or Satellite link.Link Type applies to configuring a route so it can "avoid satellite."
T | S
T
Routing Cost
ATM
The administrative cost of a trunk for when cost-based routing is configured.
1-50
10 (upon trunk activation)
Line framing
PKT
T1 line framing
D4 | ESF
D4
Line coding
PKT
E1 line coding
T1 line codingHDB3 | AMI
ZCS | B8ZS | AMIHDB3
ZCSLine CRC
PKT
E1 CRC-4
Yes | No
No
Recv impedance
PKT
E1 receive impedance.
1 = 75W unbalanced
2 = 75W balanced
3 = 120W balanced1
Cable type and
cable lengthPKT
ATMLength and type of cable used for trunk. Designates the software configurable line build-out to match the cable length from the IGX node to the DSX cross-connect.
For BPX, the choices are 0-225 feet and over 225 feet. Cable type is not selectable for BPX. Not applicable to MMF or SMF.1 = 0-220' MAT
2 = 220-440' MAT
3 = 440-655' MAT
4 = 0 -133' ABAM
5 = 133-266' ABAM
6 = 266-399' ABAM
7 = 399-533' ABAM
8 = 533-655' ABAM
0= 0-225
1= greater than 2554
0HCS Masking
ATM
Mask the ATM cell header checksum to disable error checking. HCS Masking applies to E3, OC-3, and OC-12 only.
Yes | No
Yes
Payload Scramble
ATM
BNIScramble the cell payload.
Yes | No
Yes for BNI-E3
No for all othersEnd supp BData
PKT
ATMIndicates whether the far end of a trunk supports bursty, Frame Relay data.
Yes | No
No
End supp FST
PKT
ATMIndicates whether the far end of the trunk supports Optimized Bandwidth Management for Frame Relay.
Yes | No
No
Gateway
EfficiencyATM
How many packets to stuff into an ATM cell. Does not apply to BNI.
1 | 2 | 3
2
IMA Differential Delay
The possible value ranges between 0 to
200 milliseconds. Differential delay of 200 msec is the default.Because all physical links share the same line configuration, any changes made to this parameter and IMA Clock Mode parameter will be applied to all physical links of the specified IMA group.
This parameter is configurable on virtual trunks that are on top of IMA ports.
0-200 msec
0-200 msec
IMA Clock Mode
Two clock mode options are available: Common Transmit Clock Source (CTC mode), and Independent Transmit Clock Source (ITC mode). CTC mode is the default.
This parameter is configurable on virtual trunks that are on top of IMA ports.
CTC mode
IMA Group member
Lets you add or delete physical lines of an existing IMA group. You are prompted to enter the physical lines using the following format, for example:
IMA Group member: 1,3,5,7
or
IMA Group member:where 1,3,5,7 are physical lines that comprise the IMA group.
You can configure this parameter on virtual trunks that are on top of IMA ports.
IMA Group member is a set of physical lines comprising an IMA group. You can specify the group member as an expression consisting of the primary link followed by a "," (comma), or a hyphen (-), and additional physical links. You then use the following syntax to up a trunk when you specify an IMA group on a UXM trunk:
uptrk slot.group_member.vtrk
primary link (slot.port)
No default
Retained links
Total number of physical links in the group must be greater than or equal to the number of retained links.
IMA Protocol Option
Lets you enable/disable the IMA Protocol on trunks that have only one physical line.
Enabled/Disabled
Default: IMA protocol disabled on these types of trunks
Deroute Delay Time
All
Indicates how long in seconds the network will wait before rerouting connections on a failed trunk. This helps when statistical errors are occurring or when a trunk momentarily moves into a failure state then returns to normal operation. This feature is relevant when rerouting the connections is more of a disruption than the errors caused by the intermittent trunk.
Causes each node not to recognize the trunk as failed until this timer expires at the nodes used by the trunk. This indirectly affects the time that A-bit notifications are sent out because the connection deroute is also delayed.
Regarding the A-bit Notifications feature in Release 9.1.07, this parameter specifies the maximum number of connections that can be derouted at the same time when the connection management (CM) state machine runs.
0-600
0
Table 4-39 Default Statistical Reserves for Virtual Trunks
T1/E1
N/A
N/A
300 cps
T3/E3
1000 cps
1000 cps
1000 cps
OC3
1000 cps
1000 cps
1000 cps
OC12
N/A
1000 cps
N/A
N/A = not available
cnftrkalm
Use cnftrkalm to configure whether or not alarms on a trunk cause system alarms and reporting (on IGX only). When a trunk is upped and added to the network, alarm reporting is enabled, but cnftrkalm lets you disable alarms on upped trunks. Disabling alarms can be useful when a trunk is connected to a node but not yet in service or when a trunk has occasional bursts of errors but still functions.
A virtual trunk also has trunk port alarms that are shared with all the other virtual trunks on the port. These alarms are cleared and set together for all the virtual trunks sharing the same port.
Statistical alarming is provided on cell drops from each of the Advanced CoS Management queues. These alarms are maintained separately for virtual trunks on the same port.
On an IGX node, enabled alarms cause an output from the ARC or ARM card or an indication to Cisco WAN Manager.
Table 4-40 below shows a table of physical and logical trunk alarms, with the alarm type, the physical interface type, and whether the alarm is a logical, statistical, or integrated alarm.
Trunk Alarms
Logical trunk alarms, physical trunk alarms, and IMA physical line alarms are briefly described below.
Logical Trunk Alarms
Statistical alarming is provided on cell drops from each of the Advanced CoS Management queues. These alarms are maintained separately for virtual trunks on the same port.
Physical Trunk Alarms
A virtual trunk also has trunk port alarms that are shared with all the other virtual trunks on the port. These alarms are cleared and set together for all the virtual trunks sharing the same port.
IMA Physical Line Alarms
IMA physical line alarms are a special case. Each IMA trunk port has a configurable number of retained links. If the number of non-alarmed lines is less than the number of retained links, the logical trunks on the IMA trunk port are placed into major alarm.
For example, suppose there are IMA virtual trunks 4.5-8.2 and 4.5-8.7. Further, the number of retained links on 4.5-8 has been configured to 2. If 4.5 and 4.6 go into LOS, physical line alarms are generated for these 2 physical lines. The logical trunks 4.5-8.2 and 4.5-8.7 do not go into alarm because the two retained links are still healthy. In this situation, the bandwidth on the logical trunks is adjusted downwards to prevent cell drops, and the connections on those trunks are re-routed. If a third line goes into alarm, the logical trunks are then failed. See Table 4-41 for a list of physical and trunk alarms that are supported on IMA lines.
Full Name
Configure trunk alarms
Syntax
cnftrkalm <slot.port>[.vtrk] <e | d>
Related Commands
dspalms, dsptrks
Attributes
Example 1
cnftrkalm 7 d
Description
Disable trunk alarms on trunk 7.
System Response
beta TRM YourID:1 IGX 8430 9.2 Aug. 3 1998 15:21 MSTPLN Type Current Line Alarm Status Other End7 E1/32 Clear - Line OK alpha.109 T1/24 Clear - Line OK gamma.1013 T1/24 Clear - Line OK alpha.1415 T1/24 Clear - Line OK gamma.1520 T3/3 Major - AIT Missing -Last Command: cnftrkalm 7 dNext Command:
Table 4-42 cnftrkalm—Parameters
slot.port
Specifies the trunk number.
e
Enables the alarm.
d
Disables the alarm.
Table 4-43 cnftrkalm—Optional Parameters
vtrk
Specifies the virtual trunk number.
cnftrkict
Configures the output lines of an interface control template for a subrate trunk. Table 4-44 shows the configurable signals.
Table 4-44 Configurable Signals in an Interface Control Template
X.21
C, I
V.35
RTS, DTR
CTS, DSR
MIL-188
IS, LL, RL, RS, SF, SS, TR
DM, CS
Full Name
Configure trunk interface control template
Syntax
cnftrkict <line> <output> <source>
Related Commands
dsptrkict, prttrkict
Attributes
Example 1
cnftrkict 9 c on
Description
Configure output lead "c" as "on" in the interface control template for subrate trunk 9.
System Response
beta TRM YourID:1 IPX 8430 9.2 Aug. 3 1998 15:15 MSTPacket Line: 9Interface: X.21 DTEInterface Control Template for Trunk LineLead Output Value Lead O Output ValueC /DTR ONLast Command: cnftrkict 9 c onNext Command:
cpytrkict
Copies the interface control template of one trunk to another trunk. Once copied, the control information can be edited with the cnftrkict command. See the cnftrkict description for more information on configuring the trunk interface control templates.
Full Name
Copy trunk interface control template
Syntax
cpytrkict <source_trunk> <destination_trunk>
Related Commands
cnftrkict, dsptrkict
Attributes
Example 1
cpytrkict 9 11
Description
Copy the interface control template for trunk 9 to trunk 11.
System Response
beta TRM YourID:1 IPX 8430 9.2 Aug. 3 1998 15:15 MSTPacket Line: 9Interface: X.21 DTEInterface Control Template for Trunk LineLead Output Value Lead Output ValueC/DTR ONLast Command: cpytrkict 9 11Enter destination line number:
delapsln
The delapsln command deletes SONET Automatic Protection Switching (APS) for the lines. You must enter the working slot.port pair. When you execute the delapsln command, the dspapsln display appears, showing you that the line you deleted is gone. (The delapsln display will be empty, or show only the remaining APS lines.)
SONET APS is a standard that describes the switching of SONET lines from the active line to a standby line to provide hardware line redundancy. The SONET APS feature applies only to BXM OC-3 and OC-12 cards in this release.
For background information on how SONET APS for BXM cards works, refer to "APS Command Summary" in this chapter.
When you execute the delapsln command, the switch software does verifies that the slot.port arguments support APS.
Full Name
Delete a SONET APS (Automatic Protection Switching) line
Syntax
delapsln <slot.port1> < slot.port2> <protocol>
where:
slot.port1 = Desired working line number.
Related Commands
addapsln, cnfapsln, cnfcdaps, dspapsln, dsplog, dspalms
Attributes
Example 1
delapsln 2.1
Description
Deletes a SONET APS line from a BXM OC-3 or OC-12 card.
System Response
sw117 TRM genre BPX 8620 9.2.c1 June 1 1999 16:25 PDTWork/Protect Actv Active Line Standby Line Current APS Last User(Work 1/Work 2) Line Alarm Status Alarm Status Alarm Status Switch ReqCommand: delapsln 2.2deltrk
Deletes a trunk. Because deleting a trunk removes the communication path between two nodes, using deltrk may split a network into two separate networks. If executing deltrk splits the network, then the connections that are using the deleted trunk are also deleted.
If both nodes on the trunk are reachable, you only need to execute deltrk on one node. If you delete a trunk on a node while the node at the other end is unreachable, the unreachable node does not detect that the trunk to the other node has been deleted, so be sure to delete the trunk at both nodes in this case.
After you delete a trunk, it still carries framing signals but no traffic. Also, the trunk can generate alarms for counting. To remove a trunk completely, use dntrk after executing the deltrk command.
In the following situations, the node does not allow deltrk to execute:
•
•
•
In Release 9.1.07, when the A-bit Notifications on LMI/ILMI Interface feature is enabled (using cnfnodeparm), after deleting the trunk, the master node will deroute all the connections on the trunk. The slave end will receive the A7 (CMUP_DEROUTE) message before the reroute message from the master node. For information on the A-bit Notifications feature, see "Summary of Commands" on page 46.
Regarding the A-bit Notifications feature, each pass in the Connection Management routing state machine involves two activities: deroute and then followed by routing connections. However, connections can be derouted without going through the reroute state machine (for example, deltrk). There are several ways to kick off the routing state machine resulting in slightly different deroute and reroute behavior. See the deltrk, dncd, and cnfcmparm (superuser) commands.
Full Name
Delete trunk from a network
Syntax
deltrk <slot.port>[.vtrk]
Related Commands
addtrk, dntrk, dspnw, dsptrks, uptrk
Attributes
Example 1
deltrk 7
Description
Delete trunk 7 from the network.
System Response
beta TRM YourID:1 IGX 8430 9.2 Aug. 15 1998 15:02 MSTPLN Type Current Line Alarm Status Other End7 E1/32 Clear - Line OK -9 T1/24 Clear - Line OK gamma.1013 T1/24 Clear - Line OK alpha.1415 T1/24 Clear - Line OK gamma.1520 T3/3 AIT - AIT Missing -Last Command: deltrk 7Next Command:
Table 4-49 deltrk-Optional Parameters
vtrk
Specifies the virtual trunk portion of the trunk identifier.
deltrkred
Removes redundancy from a UXM, ALM/B, BTM, or AIT trunk. After you execute deltrkrd, you can remove the backup card without causing an alarm.
The trunk redundancy feature (not the Automatic Protection Switching redundancy feature) is supported on the IPX and IGX platforms. This is different from the Automatic Protection Switching redundancy feature, supported in this release. APS is supported only on BXM SONET trunks, and can be used with virtual trunks. That is, the trunk port supporting virtual trunks can have APS line redundancy configured in the same way it would be configured for a physical trunk. The APS commands addapsln, delapsln, switchapsln, and cnfaplsn are all supported on virtual trunk ports.
Note that the trunk redundancy feature is not supported for virtual trunks. The addtrkred, deltrkred, and dsptrkred commands will be rejected for virtual trunks.
Note that Y-cable redundancy is supported for both the UXM and BXM trunk cards at the edge of the ATM cloud.
Full Name
Delete ATM trunk redundancy
Syntax
deltrkred <backup ATM trunk number>
Related Commands
addtrkred, dsptrkred
Attributes
Example 1
deltrkred 5
Description
Remove ATM trunk redundancy for the card set in slot 5.
System Response
beta TRM YourID:1 IGX 8430 9.2 Aug. 15 1998 15:15 MSTATM Line Backup ATM Line5 8Last Command: deltrkred 5Next Command:
Table 4-50 deltrkred-Parameters
Backup trunk number
Specifies of the ATM card set assigned as the backup.
dntrk
Downs a trunk, after which it no longer carries framing or statistics. Before you can down a trunk with dntrk, you must remove it must from the network with deltrk (or delshelf in a tiered network).
Full Name
Down trunk
Syntax
dntrk <slot.port>[.vtrk]
Note
Related Commands
addtrk, deltrk, uptrk, dsptrks
Attributes
Example 1
dntrk 9
Description
Deactivate trunk 9.
System Response
beta TRM YourID:1 IPX 8430 9.2 Aug. 3 1998 10:53 MSTFrom Type Current Line Alarm Status Other End13 T1/24 Clear - Line OK alpha.1415 T1/24 Clear - Line OK gamma.1520 T3/3 Major - AIT Missing -Last Command: dntrk 9Next Command:
Table 4-52 dntrk-Optional Parameters
vtrk
Specifies a virtual trunk number (applies to BNI only). T3/E3 range is 1-32. OC-3 range is 1-11.
dspapsln
The dspapsln command displays the currently configured APS lines and their status.
Full Name
Display currently configured APS lines and their status
Syntax
dspapsln
Related Commands
addapsln, delapsln, cnfapsln, dspapsln, dsplog, dspalms
Attributes
Example 1
dspapsln
Description
Display all the currently configured APS lines and their status.
System Response
alexa TRM genre BPX 8600 9.2 May 11 1999 16:25 PDTActv Active Line Standby Line Current APS Last UserWork/Protect Line Alarm Status Alarm Status Alarm Status Switch Req2.1 3.1 PROT OK OK Loss of Sig(RED) Clear5.1 5.2 WORK OK LOS LOS Lockout6.3 6.4 NONE Deactivated APS Deactivated10.1 11.1 PROT OK OK Standard Mismatch ClearCommand: dspapslnExample 2
dspapsln
System Description
Display currently configured APS lines and their status.
System Response
sw117 TRM genre BPX 8620 9.2.c1 June 1 1999 16:25 PDTWork/Protect Actv Active Line Standby Line Current APS Last User(Work 1/Work 2) Line Alarm Status Alarm Status Alarm Status Switch Req2.2 3.2 WORK Loss of Sig (RED) Remote (YEL) Remote (YEL) ClearCommand: dspapslndspnw
Displays the network topology in tabular form. Alarms appear in a column, and added trunks (by addtrk) appear to the right to the node name. Each trunk entry shows the local back card slot number and the node name and back card slot number on the other end of the line. Note the following conventions:
•
•
•
If the network has more nodes and trunk connections than are currently on the screen, a "Continue?" prompt appears. Press the Return key to display other parameters, or enter "n" to exit the command.
Full Name
Display network
Syntax
dspnw [+b | -b] [+z | -z]
Related Commands
dspnds, prtnw
Attributes
Example 1
dspnw
Description
Display the network topology in tabular form.
System Response
sw91 TN SuperUser IGX 8410 9.2 Nov. 13 1998 16:06 GMTNodeName Alarm Trunk Trunksw92 UNRCH8-7/sw91sw200 UNRCH14-14/sw201 15-15/sw201 16-16/sw201sw201 UNRCH14-14/sw200 15-15/sw200 16-16/sw20012.1-4.5/sw26sw12 MAJOR3.1.2-4.7/sw26 3.1.3-6.3/sw91sw91 MAJOR7-8/sw92 6.3-3.1.3/sw12 6.4-3.1.4/sw68sw68 Minor3.1.4-6.4/sw91This Command: dspnwContinue?The display shows a network containing the nodes sw92, sw200, sw201, sw12, sw91, and sw68. The word "Major" to the right of "sw12" and "sw91" (see Alarm column) indicates the existence of alarm conditions such as loss of signal.
On node "sw92", trunk 8 connects to trunk 7 on node "sw91". Similarly, on node "sw200", trunk 14 connects to trunk 14 on node "sw201". If the two trunk numbers are separated by a tilde (~) in place of a dash (-), this indicates a satellite. Table 4-53 illustrates a map of this network.
dspphyslns
Displays a summary of line alarm status for the ATM port specified. These include the cell count in the transmit and receive directions, and error counts associated with the port. The display indicates the date and time that the statistics were cleared and the statistics collection time since they were last cleared. Cells transmitted indicates the amount of data transmitted out the port to the user device. Cells received indicates the amount of data received from the user device at the port. Corrupted statistics result from channel/port loopbacks or port tests. A yes in this field indicates that such a loopback or port test has occurred since the statistics were last cleared.
Note that IMA physical line alarms are maintained differently from other types of logical (physical and virtual) trunks. Each IMA trunk has a configurable number of retained links. If the number of non-alarmed lines is less than the number of retained links, the logical (physical and virtual) trunks on the IMA trunk are placed into major alarm. For example, if a line has IMA virtual trunks 4.5-8.2 and 4.5-8.7, the number of retained links on 4.5-8 has been configured to 2. If 4.5 and 4.6 go into LOS (loss of signal), physical line alarms are generated for these two physical lines. The logical trunks 4.5-8.7 do not go into alarm because the two retained links are still healthy. In this situation, the bandwidth on the logical trunks is adjusted downward to prevent cell drops, and the connections on those trunks are re-routed. If a third line goes into alarm, the logical trunks are then failed.
Full Name
Display the status of the UXM trunk and its physical line (or lines if IMA)
Syntax
dspphyslns [slot]
Related Commands
dspphyslnstathist
Attributes
Example 1
dspphyslns
Description
Display the physical line of all the UXM cards on the node.
System Response
sw228 TN SuperUser IGX 8420 9.2 Aug. 27 1998 17:52 PSTPHYSLN Type Current Line Alarm Status TRK6.2 OC-3 Major - Loss of Sig (RED) 6.26.3 OC-3 Clear - OK 6.311.3 E1/30 Clear - OK 11.311.4 E1/30 Major - Loss of Sig (RED) 11.4-611.5 E1/30 Major - Loss of Sig (RED) 11.4-611.6 E1/30 Major - Loss of Sig (RED) 11.4-6Last Command: dspphyslnsExample 2
dspphyslns 11
Description
Display the physical lines of the UXM card in slot 11.
System Response
sw228 TN SuperUser IGX 8420 9.2 Aug. 27 1998 17:53 PSTPHYSLN Type Current Line Alarm Status TRK11.1 T1/24 Clear - OK 11.1x411.3 T1/24 Clear - OK 11.1x411.5 T1/24 Clear - OK) 11.1x411.7 T1/24 Clear - OK 11.1x4Last Command: dspphyslns 11
dsptrkbob
Displays the state of all inputs from subrate line equipment to an IPX or IGX node and the state of all outputs from the node to the subrate line equipment. Display updates can occur at an optional, user-specified interval. Otherwise, the display remains on-screen until Delete is pressed or the display times out. The default interval for updating the display is every 5 seconds. If a trunk is disabled, its number appears in dim, reverse video. See cnftrkict for configuration details.
Full Name
Display trunk breakout box
Syntax
dsptrkbob <line> [interval]
Related Commands
cnftrkict, dsptrkict
Attributes
Example 1
dsptrkbob 9
Description
Display the breakout for subrate trunk 9.
System Response
beta TRM YourID:1 IGX 8430 9.2 Sep. 15 1998 15:15 MSTPacket Line: 9Interfaces: X.21 DTEInputs from Line Equipment Outputs to Line EquipmentLead Pin State Lead Pin State Lead Pin State Lead Pin State RxD 4/11 Idle TxD 2/9 Active I/DSR 5/12 On C/DTR 3/10 On S/RxC 6/13 ActiveLast Command: dsptrkbob 9Hit DEL key to quit:
Table 4-56 dsptrkbob-Optional Parameters
interval
The number of seconds between updates of the breakout box display. The range is 1-60.
dsptrkcnf
Displays trunk configuration. The parameter values that dsptrkcnf displays have been set with cnftrk or are default values.
With Release 9.3.0 switch software, the default values for statistical reserves are increased to accomodate sufficient bandwidth for control traffic. The statistical reserve can be changed. However, if you modify the reserve below recommended values, a warning message is displayed. For example, if the statistical reserve is modified below 1000 cps for "upped" T1/E1/T3/OC3/OC12 physical trunks and 300 for T1/E1 virtual trunks, the warning message that follows is displayed:
"WARNING: Changing stats reserve < {1000 | 300 } may cause a drop in CC traffic"
Table 4-58 Default Statistical Reserves for Virtual Trunks
T1/E1
N/A
N/A
300 cps
T3/E3
1000 cps
1000 cps
1000 cps
OC3
1000 cps
1000 cps
1000 cps
OC12
N/A
1000 cps
N/A
N/A = not available
As of Release 9.1, dsptrkcnf displays the cost of a trunk if cost-based routing is configured. You configure the administrative cost of a trunk with cnftrk.
Full Name
Display trunk configuration
Syntax
dsptrkcnf <slot.port>[.vtrk]
Related Commands
cnftrk
Attributes
Example 1
dsptrkcnf 6.8
Description
Display the configuration for trunk 6.8
System Response
sw203 TN StrataCom BPX 8620 9.2 Sep. 25 1998 07:35 GMTTRK 6.8 Config OC-3 [353207cps] BXM slot: 6Transmit Rate: 353208 Line framing: STS-3CSubrate data rate: -- coding: --Line DS-0 map: -- CRC: --Statistical Reserve: 1000 cps recv impedance: --Idle code: 7F hex cable type: --Max Channels/Port: 256 length: --Connection Channels: 256 Pass sync: YesTraffic: V,TS,NTS,FR,FST,CBR,VBR,ABR Loop clock: NoSVC Vpi Min: 0 HCS Masking: YesSVC Channels: 0 Payload Scramble: YesSVC Bandwidth: 0 cps Frame Scramble: YesRestrict CC traffic: No Cell Header Type: --Link type: Terrestrial Virtual Trunk Type: --Routing Cost: 10 Virtual Trunk VPI: --Deroute delay time: 0 secondsLast Command: dsptrkcnf 6.8Next Command:Example 2
dsptrkcnf 6
Description
Display the configuration for trunk 6. Trunk 6 is an AIT trunk on an IPX node.
System Response
sw91 TN SuperUser IGX 8410 9.2 Sep. 22 1998 16:09 GMTPLN 6 Configuration T3/3 [1000 pps] AIT slot: 6Clock Rate: -- Idle code: 7F hexTransmit Trunk Rate: 96000 cps Restrict PCC traffic: NoRcv Trunk Rate: 1000 pps Link type: TerrestrialSubrate interface: -- Line framing: --Subrate data rate: -- coding: --Line DS-0 map: -- CRC: --Pass sync: Yes recv impedance: --Loop clock: No pps cable type:Statistical Reserve: 992 length: 0-225 ft.Header Type: STI HCS Masking: YesGateway Type: BAM Payload Scramble: NoVPI Address: 0 End supp BData: YesVCI Address: 0 End supp FST: YesRouting Cost: 0Last Command: dsptrkcnf 6Next Command:Example 3
dsptrkcnf 11
Description
Display the configuration for the E3 trunk in slot 11 (an ALM/B trunk).
System Response
IGX16 TN SuperUser IGX 16 9.1 Sep. 23 1997 02:08 GMTPLN 11 Config E3/480 [160000pps] ALM slot: 11Clock Rate: -- Idle code: 7F hexTransmit Trunk Rate: 80000 cps Restrict PCC traffic: NoRcv Trunk Rate: 160000 pps Link type: TerrestrialSubrate interface: -- Line framing: --Subrate data rate: -- coding: --Line DS-0 map: -- CRC: --Pass sync: Yes recv impedance: --Loop clock: No cable type:Statistical Reserve: 992 pps length: 0-225 ft.Header Type: STI HCS Masking: YesGateway Type: BAM Payload Scramble: NoVPI Address: 0 End supp BData: YesVCI Address: 0 End supp FST: YesRouting Cost: 10Last Command: dsptrkcnf 11Next Command:Example 4
dsptrkcnf 13.3.1
Description
Display the configuration for virtual trunk 13.3.1. The trunk is on a BNI-T3 card set in a BPX node.
System Response
sw97 TN SuperUser BPX 8620 9.2 June 22 1998 07:34 GMTTRK 13.3.1 Config T3 [2867 cps] BNI-T3 slot: 13Restrict CC traffic: NoTransmit Rate: 3000 Link type: TerrestrialSubrate interface: -- Line framing: --Subrate data rate: -- coding: --Line DS-0 map: -- CRC: --Pass sync: No recv impedance: --Loop clock: No cable type:Statistical Reserve: 992 cps length: 0-225 ft.Idle code: 7F hex HCS Masking: YesConnection Channels: 55 Payload Scramble: NoValid Traffic Classes: Frame Scramble: --V,TS,NTS,FR,FST,CBR,VBR,ABR Virtual Trunk Type: CBRVirtual Trunk VPI: 1Virtual Trunk Service: 3Last Command: dsptrkcnf 13.3.1Example 5
dsptrkcnf 4.1
Description
Display the configuration for BXM 4.1 trunk.
System Response
b2 TRM StrataCom BPX 8620 9.2.3N Dec. 14 1999 04:43GMTTRK 4.1 Config E3 [80000 cps] BXM slot: 4Transmit Rate: 80000 VPC Conns disabled: NoProtocol By The Card: No <=====?? Line framing: --VC Shaping: No coding: --Hdr Type NNI: Yes recv impedance: --Statistical Reserve: 1000 cps cable type: --Idle code: 7F hex length: 0-225ft.Connection Channels: 256 Pass sync: NoTraffic:V,TS,NTS,FR,FST,CBR,NRT-VBR,ABR Loop clock: NoSVC Vpi Min: 0 HCS Masking: YesSVC Channels: 0 Payload Scramble: YesSVC Bandwidth: 0 cps Frame Scramble: --Restrict CC traffic: No Virtual Trunk Type: --Link type: Terrestrial Virtual Trunk VPI: --Routing Cost: 10 Deroute delay time: 0Example 5
dsptrkcnf 6.3
Description
Display the configuration for trunk 6.3. The trunk is on a UXM-OC-3 card set in an IGX node.
System Response
sw228 TN SuperUser IGX 8420 9.2 Aug. 27 1998 17:42 PSTTRK 6.3 Config OC-3 [353056cps] UXM slot: 6Transmit Trunk Rate: 353207 cps Frame Scramble: YesRcv Trunk Rate: 353207 cps Cell Framing: STS-3CPass sync: YesLoop clock: NoStatistical Reserve: 1000 cpsIdle code: 7F hexRestrict PCC traffic: NoLink type: TerrestrialHCS Masking: YesPayload Scramble: YesConnection Channels: 256Gateway Channels: 256Valid Traffic Classes:V,TS,NTS,FR,FST,CBR,VBR,ABRRouting Cost: 10 Deroute delay time: 0 secondsLast Command: dsptrkcnf 6.3Next Command:Example 6
dsptrkcnf 5.2
Description
Display the configuration for trunk 5.2. The trunk is on a UXM-E1 card set in an IGX node.
System Response
sw224 TN SuperUser IGX 8420 9.2 Aug. 27 1998 17:50 GMTTRK 5.2-8 Config E1/203 [30641 cps] UXM slot: 5Line DS-0 map: 1-15,17-31 Valid Traffic Classes:Transmit Trunk Rate: 30641 cps V,TS,NTS,FR,FST,CBR,VBR,ABRRcv Trunk Rate: 28075 cps Retained links: 7Pass sync: Yes IMA link auto disable:DisableLoop clock: NoStatistical Reserve: 600 cpsIdle code: 54 hexRestrict PCC traffic: NoLink type: TerrestrialLine coding: HDB3HCS Masking: YesPayload Scramble: YesConnection Channels: 256Gateway Channels: 256Routing Cost: 10 Deroute delay time: 0 secondsThis Command: dsptrkcnf 5.2Example 7
dsptrkcnf 10.1
Description
Display the configuration for trunk 10.1. The trunk is on a UXM-T1 card set in an IGX node.
System Response
sb-reef TN SuperUser IGX 8420 9.2 Aug. 27 1998 17:46 PDTTRK 10.1-5 Config T1/115 [17358 cps] UXM slot: 10Transmit Trunk Rate: 17358 cps Connection Channels: 256Rcv Trunk Rate: 17358 cps Gateway Channels: 256Pass sync: Yes Valid Traffic Classes:Loop clock: No V,TS,NTS,FR,FST,CBR,VBR,ABRStatistical Reserve: 600 cps Retained links: 5Idle code: 7F hex IMA link auto disable:EnableRestrict PCC traffic: No Window size: 30 (x10 secs)Link type: Terrestrial Max transition cnts:10Line framing: ESF Link reenable time: 6 (x10 mins)Line coding: B8ZSLine cable type: ABAMLine cable length: 0-131 ft.HCS Masking: YesPayload Scramble: NoRouting Cost: 10 Deroute delay time: 0 secondsLast Command: dsptrkcnf 10.1
Table 4-59 dsptrkcnf-Parameters
slot.port
Specifies the physical slot and port number of the trunk.
Table 4-60 dsptrkcnf-Optional Parameters
vtrk
Specifies the virtual trunk number. The maximum value on a node is 32. The maximum on a T3 or E3 line is 32. The maximum for user traffic on an OC-3/STM1 trunk is 11. (See also the section called " Compatibility Between Cards in Virtual Trunks" at the front of this chapter.)
dsptrkict
Displays interface control information for the subrate trunks. The displayed information includes:
•
•
•
•
To see a list of configurable outputs, and information on how to configure an output, see the cnftrkict command. Disabled trunks have their trunk number displayed in dim, reverse video on the screen.
Full Name
Display trunk interface control templates
Syntax
dsptrkict <line>
Related Commands
cnftrkict, prttrkict
Attributes
Example 1
dsptrkict 9
Description
Display subrate for the trunk 9 interface control template.
System Response
beta TRM YourID:1 IGX 8430 9.2 Aug. 15 1998 15:15 MSTTrunk: 9Interface: X.21 DTEInterface Control Template for Trunk LineLead Output Value Lead Output ValueC/DTR ONLast Command: dsptrkict 9Next Command:dsptrkred
Displays the backup and primary cards for a trunk.
Full Name
Display ATM trunk redundancy
Syntax
dsptrkred [trunk]
Related Commands
addtrkred, deltrkred
Attributes
Example 1
dsptrkred
Description
Display all ATM trunks with redundancy.
System Response
beta TRM YourID:1 IGX 8430 9.2 Aug. 15 1998 15:15 MSTATM Line Backup ATM Line 4 5 7 8Last Command: dsptrkredNext Command:
dsptrks
Displays basic trunk information for all trunks on a node. This command applies to both physical only and virtual trunks. The displayed information consists of:
•
•
•
In addition, for trunks that have been added to the network with the addtrk command, the information includes the node name and trunk number at the other end. Trunks that have a "-" in the Other End column have been upped with uptrk but not yet added on both ends with addtrk. For disabled trunks, the trunk numbers appear in reverse video on the screen.
For UXM trunks with ATM Forum IMA-compliant trunks, a trunk is displayed in dsptrks as:
<slot>.<primary_port>x<num ports>
For example, an IMA trunk would display in the TRK column in the dsptrks screen as the following:
5.1x4
In this case, 5.1x4 indicates an ATM Forum-compliant IMA trunk 5.4, which consists of four physical lines. To see all physical lines belonging to this IMA trunk, you can enter the dspphyslns command.
In Release 9.2.20, dsptrks displays all interface shelves attached to a BPX or an IGX routing hub that use the AAL5 protocol.
Note that in this release, for IMA trunks, you can configure non-consecutive physical lines. In Release 9.1, an IMA trunk required that consecutive physical lines be configured on the same card. In this release, non-consecutive physical lines are supported.
For VSI "dedicated" virtual trunks, dsptrks will indicate this.
Full Name
Display trunks
Syntax
dsptrks
Related Commands
addtrk, deltrk, dntrk, uptrk
Attributes
Example 1
dsptrks
Description
Display information on the trunk configuration and alarm status for the trunks at a node. The trunk numbers with three places represent virtual trunks.
System Response
sw288 TN SuperUser BPX 8620 9.2 Dec. 10 1998 15:39 GMTTRK Type Current Line Alarm Status Other End4.1 OC-12 Clear - OK SIMFDR(AAL5)11.2 T3 Clear - OK redhook/1411.3 T3 Clear - OK sw113/16Last Command: dsptrksNext Command:Example 2
dsptrks
Description
Display information on the trunk configuration and alarm status for the trunks at a node. The trunk numbers with three places (slot.port.vrtk) represent virtual trunks; for example—trunk 13, port 3, virtual trunk 12. Also, on trunk 4, slot 8, is a simulated interface shelf "SIMFDR0", with interface shelf type of AAL5.
System Response
sw288 TN SuperUser BPX 8620 9.2 Dec. 10 1998 23:03 GMTTRK Type Current Line Alarm Status Other End2.1 T3 Clear - OK pswbpx1/1.24.8 T3 Clear - OK SIMFDR0 (AAL5)13.3.12 OC-3 Clear - OK rita/4.2.10Last Command: dsptrksNext Command:Example 3
dsptrks
Description
Display information on the trunk configuration and alarm status for the trunks at a node. The trunk numbers with three places (slot.port.vrtk) represent virtual trunks. An ATM Forum-compliant trunk is configured on slot 11, which has a primary port of 1 and 4 physical lines.
System Response
sw53 TN SuperUser BPX 8620 9.2 Sep. 24 1998 23:03 GMTTRK Type Current Line Alarm Status Other End2.1 T3 Clear - OK pswbpx1/1.24.8 T3 Clear - OK SIMFDR0 (AAL5)11.1x4 T1/92 Clear - OK a1c/3.5x415.1 OC-3 Clear - OK alc/3.5x4Last Command: dsptrksNext Command:Example 4
dsptrks
Description
Display information on the trunk configuration and alarm status for the trunks at an IGX node showing IMA compliant links on slot 11.
System Response
oo1 TN SuperUser IGX 8430 9.2.zR Dec. 10 1998 23:03 GMTTRK Type Current Line Alarm Status Other End6.1 OC-3 Clear - OK oo1p(AAL5)8.5 T3 Clear - OK n4b/4.58.6 E3/530 Clear - OK alc/1510 T3/240 Clear - OK alc/3.5x411.1x4 T1/92 Clear - OK alc/3.5x415.1 OC-3 Clear - OK n1a/11.315.2 OC-3 Clear - OK n2b/5.3Last Command: dsptrksNext Command:Example 5
dsptrks
Description
Display information on the feeders attached to an IGX 8400 routing hub. (The SES feeder uses the AAL5 protocol to communicate with the routing network.) Feeder names appear in the Other End field on the dsptrks screen on an IGX routing hub.
System Response
oo1 TN SuperUser IGX 8430 9.2.zR Dec. 10 1998 23:03 GMTTRK Type Current Line Alarm Status Other End13 E1 Clear - OK igx1/1214.1 OC-3 Clear - OK ases1 (AAL5)Last Command: dsptrksNext Command:Example 6
dsptrks
Description
Display trunks including virtual trunks. A VSI trunk is on trunk 2.1.1; dsptrks indicates this with "VSI trunk."
System Response
TRK Type Current Line Alarm Status Other End1.1 E3 Clear - OK sw58/1.11.2 E3 Clear - OK sw183(AXIS)2.1.1 OC-3 Clear - OK VSI trunkExample 7
dsptrks
Description
The dsptrks screen shows VSI trunks 4.1, 4.2 and 4.3, with the "Other End" of 4.1 reading "VSI (VSI)". A typical dsptrks screen example showing some VSI trunks configured follows:
System Response
n4 TN SuperUser BPX 15 9.2 Apr. 4 1998 16:45 PSTTRK Type Current Line Alarm Status Other End2.1 OC-3 Clear - OK j4a/2.13.1 E3 Clear - OK j6c(AXIS)5.1 E3 Clear - OK j6a/5.25.2 E3 Clear - OK j3b/35.3 E3 Clear - OK j5c(IPX/AF)6.1 T3 Clear - OK j4a/4.16.2 T3 Clear - OK j3b/44.1 OC-3 Clear - OK VSI(VSI)4.2 OC-3 Clear - OK VSI(VSI)4.3 OC-3 Clear - OK VSI(VSI)Last Command: dsptrksdsptrkstats
Displays the trunk port status, ATM cell loss counts, cell payload errors, and cell header errors for the specified trunk. Table 4-62 lists the other statistics. If you include the optional clear parameter, executing dsptrkstats clears the statistics.
Logical trunk statistics refer to counts on trunks that are visible as routing entities. This includes physical and virtual trunks (all logical trunks). Logical trunk statistics are displayed on the dsptrkstats, dsptrkstathist, and screens. These commands accept only logical trunk numbers and display only logical trunk statistics. Virtual interface (VI) statistics and queue statistics are both subsets of the logical trunk statistics.
Trunk Statistics
Statistics are collected on trunks at several different levels.
•
On both the BPX and the IGX, physical line stats are displayed on the dspphyslnstats, dspphyslnstathist, and dspphyslnerrs screens. These commands accept only physical line numbers (that is, slot.port). These commands are new to the BPX in this release.
•
Logical trunk stats are displayed on the dsptrkstats, dsptrkstahist, and dsptrkerrs screens. These commands accept only logical trunk numbers and display only logical trunk statistics.
•
•
•
A listing of trunk statistics including statistics type, card type, and line type, as applicable, is provided in Table 4-63.
Full Name
Display trunks statistics
Syntax
dsptrkstats <slot.port> [clear]
Related Commands
cnftrkstats, dsptrkerrs
Attributes
Example 1
dsptrkstats 1.1
Description
Display cell statistics for ATM trunk 1.1.
System Response
sw53 TN SuperUser BPX 8620 9.2 Sep. 24 1998 23:07 GMTTrunk 1.1 Status: Clear - OK Cleared: 04/24/96 17:31:16Type CountCells dropped due to BFrame parity err 0Cell header mismatch error count 0BFrame cell data payload error 0BFrame cell loss due to disabled chan 0BFrame cell count(TX) 8316 non-hipri cells - 52BFrame cell count(RX) 12452First mismatch cell masked VPI/VCI 0First mismatch cell full VPI/VCI 0Last Command: dsptrkstats 1.1Next Command:Example 2
dsptrkstats 11.1
Description
Display cell statistics for ATM trunk 11.1 on a UXM card.
System Response
sw199 TN SuperUser IGX 8620 9.2 Aug. 27 1998 19:26 PDTTrunk 11.1-2 Status: Clear - OK SnapshotCollection Time: 0 day(s) 00:49:40 Clrd: 08/27/97 18:36:05Type CountQBIN: NTS Cells Tx to line 0QBIN: Tx NTS Cells Received 0QBIN: Tx NTS Cells Discarded 0QBIN: Hi-Pri Cells Tx to line 2561QBIN: Tx Hi-Pri Cells Received 2561QBIN: Tx Hi-Pri Cells Discarded 0QBIN: rt-VBR Cells Tx to line 0QBIN: Tx rt-VBR Cells Received 0QBIN: Tx rt-VBR Cells Discarded 0QBIN: TimeStamped Cells Tx to ln 0QBIN: Tx TS Cells Received 0QBIN: Tx TS Cells Discarded 0QBIN: BData A Cells Tx to line 0QBIN: Tx BData A Cells Received 0QBIN: Tx BData A Cells Discarded 0QBIN: BData B Cells Tx to line 0QBIN: Tx BData B Cells Received 0QBIN: Tx BData B Cells Discarded 0QBIN: Tx CBR Cells Served 0QBIN: Tx CBR Cells Received 0QBIN: Tx CBR Cells Discarded 0QBIN: Tx nrt-VBR Cells Served 0QBIN: Tx nrt-VBR Cells Received 0QBIN: Tx nrt-VBR Cells Discarded 0QBIN: Tx ABR Cells Served 0QBIN: Tx ABR Cells Received 0QBIN: Tx ABR Cells Discarded 0VI: Cells received 655VI: Cells transmitted 653VI: Cells received w/CLP=1 0VI: Cells transmitted w/CLP=1 0VI: Cells received w/CLP=0 655VI: Cells transmitted w/CLP=0 653VI: Cells discarded w/CLP=1 0VI: Cells discarded w/CLP=0 0VI: OAM cells received 0VI: OAM cells transmitted 0VI: RM cells received 0VI: RM cells transmitted 0CGW: Packets Rx From Network 0CGW: Cells Tx to Line 0CGW: NIW Frms Relayed to Line 0CGW: SIW Frms Relayed to Line 0CGW: Aborted Frames Tx to Line 0CGW: Dscd Pkts 0CGW: 0-Length Frms Rx from Network 0CGW: Bd CRC16 Frms Rx from Network 0CGW: Bd Length Frms Rx from Network 0CGW: OAM RTD Cells Tx 0CGW: Packets Tx to Network 0CGW: Cells Rx from Line 0CGW: NIW Frms Relayed from Line 0CGW: SIW Frms Relayed from Line 0CGW: Aborted Frms Rx From Line 0CGW: Dscd Cells 0CGW: 0-Lngth Frms Rx from Line 0CGW: Bd CRC32 Frms Rx from Line 0CGW: Bd Lngth Frms Rx from Line 0CGW: OAM RTD Cells Rx 0CGW: OAM Invalid OAM Cells Rx 0CF: Egress Packet Sequence Errs 0CF: Egress Bad HEC from cellbus 0CF: Egress Packets from cellbus 0CF: Egress Cells Tx to Line 0CF: Ingress Packets to cellbus 0CF: Ingress Cells from Line 0IE: Egress Packets to Extract Buf 0IE: Egress Cells injected 0IE: Egress Packets Extract Buf full 0IE: Ingress Cells to Extract Buf 0IE: Ingress Packets injected 0IE: Ingress Cells Extract Buf full 0Last Command: dsptrkstats 11.1Next Command:
Table 4-64 dsptrkstats-Parameters
slot.port
Specifies the physical part of the logical trunk number.
Table 4-65 dsptrkstats-Optional Parameters
clear
Directs the system to clear the statistics counters.
prtapsln
The prtapsln command prints the dspapsln screen, that is, the currently configured APS lines and their status.
Full Name
Prints dspapsln screen (currently configured APS lines and their status)
Syntax
printapsln
Related Commands
addapsln, delapsln, cnfapsln, cnfcdaps, dspapsln, dsplog, dspalms
Attributes
Example
prtapsln
System Response
No display produced.
prtnw
Prints the network topology table. Alarms print in a column, and added trunks (by addtrk) appear to the right to the node name. Each trunk entry shows the local back card slot number and the node name and back card slot number on the other end of the line. Note the following conventions:
•
•
•
Parameters set Zero Coded Suppression (ZCS) display characteristics. ZCS writes a 1 over the least significant bit of any byte that contains 0s. The purpose is to ensure a minimum occurrence of 1s so that the receiving node can extract timing information. The prtnw command uses the same syntax and prints the same information as the dspnw command.
Full Name
Print network
Syntax
prtnw [+b | -b] [+z | -z]
Related Commands
dspnw
Attributes
Example 1
prtnw
Description
Print the network topology.
System Response
(No screen display appears—just a printout.)
prttrkict
Prints the interface control template of a subrate trunk. For a list of configurable outputs and configuration steps, see the cnftrkict description. The printed information includes:
•
•
•
•
Full Name
Print trunk interface control template
Syntax
prttrkict <line>
Related Commands
dsptrkict
Attributes
Example 1
prttrkict
Description
Print network topology.
System Response
No screen display—just a printout.
Table 4-67 prttrkict-Parameters
line
Specifies the trunk interface control template.
prttrks
Prints the trunk configuration for the node. This command uses the same syntax and prints the same information as the dsptrks command. Configuration information for trunks includes the trunk number and the type of line (T3, E3, and so on). For trunks that have been added to the network with the addtrk command, the configuration information also includes the node name and trunk number at the other end of the line.
Note the following printout characteristics:
•
•
•
Full Name
Print trunks
Syntax
prttrks
Related Commands
dsptrks
Attributes
Example 1
prttrks
Description
Print trunk configuration for the node.
System Response
No screen display appears—just a printout.
switchapsln
The switchapsln command lets you control the APS switching interface. You use the switchapsln command, along with other APS commands such as addapsln, delapsln, dspapsln, switchapsln, and cnfapsln to configure and control a SONET APS (Automatic Protection Switching) line for a BXM OC-3 or OC-12 card. SONET APS is a standard that describes the switching of SONET lines from the active line to a standby line to provide hardware line redundancy.
Several options are available that determine the type of switch operation:
•
•
•
Note
•
•
Be sure that the associated front card is active for the back card that is to remain in the rack. You may have to perform a switchcdred so that the back card to which the service switch switches has its associated front card active.
Note
Full Name
Controls APS switching interface.
Syntax
switchapsln <slot.port> <switchoption> [S]
Related Commands
cnfcdaps, addapsln, delapsln, dspapsln, switchapsln, cnfapsln
Attributes
Example 1
switchapsln 2.1 1 S
Description
Controls the APS switching interface to configure and control SONET APS line switching from an active line to a standby line. Upon executing switchapsln, the dspapsln screen appears.
System Response
alexa TRM genre BPX 8600 9.2 Sep. 9 1998 16:25 PDTActive Current Line Current APS last UserWork/Protect Protocol Line Alarm Status Alarm Status Switch Request2.1 3.1 1+1 PROT OK APS OK Forced W->PCommand: switchapsln 2.1 3
uptrk
Activates (or ups) a trunk and, if you include the optional vtrk parameter for applicable cards, activates the trunk as a virtual trunk. You also use uptrk to enable a feeder trunk on a port.
After you have upped the trunk but not yet added it, the trunk carries line signalling but does not yet carry live traffic. Before you add the trunk with addtrk, the node can monitor the trunk for reliability. Once a trunk has shown reliability and is ready to go into service, add the trunk to the network. If you need to take an active trunk out of service, use dntrk. The dntrk command causes the node to reroute any existing traffic if sufficient bandwidth is available.
The Ports and Trunks feature lets you configure multiple trunk lines and circuit lines on a single BXM or UXM card simultaneously. In previous releases, when a single port is upped as a trunk (by using the uptrk command), all the remaining ports on that card are treated as a trunk. Similarly, when you up a single port as a circuit line (by using the upln command), all the remaining ports on the card are treated as circuit line ports. This feature allows the BXM and UXM trunks to be trunk line cards as well as circuit line cards, and to allow trunks and circuit lines to coexist on these cards.
For example, assuming that a four-port BXM card is plugged into slot 11, you could do the following:
1.
2.
3.
4.
That is, you could up a trunk at port 1 on slot 11, up a line at port 2 of slot 11, up a line at port 3 of card slot 11, and also up a trunk at port 4 of card slot 11.
You can now mix physical and virtual trunk specifications. For example, after you up a trunk as a standard trunk, you can then add it as a virtual trunk when you execute addtrunk. Furthermore, if you want to change trunk types between standard and virtual, you must first down the trunk with dntrk, then up it as the new trunk type.
You cannot up a trunk if the required card is not available. Furthermore, if a trunk is executing a self-test, a "card in test" message may appear on-screen. If this message appears, re-enter uptrk.
If, after upping a BXM trunk, you get a message telling you to use cnfrsrc to configure PVCs, make sure that when configuring resource partitions with cnfrsrc, you specify values greater than 0 for the Maximum PVC Channels, Maximum PVC Bandwidth, and Maximum VSI LCNs. Otherwise, you will be unable to create any PVCs on a BXM card. Also, you will not be able to change the Connection Channels amount with cnftrk if you do not first use cnfrsrc to configure PVCs.
In this release, to support the Multilevel Channels Statistics feature, you will be prompted when you attempt to up the line with upln or up the trunk with uptrk, warning you to initialize the channel statistics level before activating the card. This warning only applies when upping the first trunk or first line on the card:
"Channel Statistic Level must be initialized prior to card activation"Configuring IMA Physical Lines
Release 9.1 supported a Cisco proprietary IMA (Inverse Multiplexing ATM) protocol on UXM trunks, which was able to interoperate only with Cisco products, for example, MGX-8220 IMATM. Release 9.2 supports the ATM Forum-compliant IMA protocol, which allows UXM trunks to interoperate with other vendor equipment. IMA provides inverse multiplexing of ATM cells across multiple physical lines. The ATM Forum-compliant IMA protocol is supported only on UXM trunks.
The IMA protocol feature requires you to upgrade the UXM firmware to Model B. When you load Model B firmware onto a UXM card, all IMA trunks invoked on that card automatically perform ATM Forum-compliant IMA protocol. You do not need to use any switch software commands to enable the IMA protocol. Note that switch software Release 9.2 is not set up to work with UXM Release 9.1 firmware, so it is advised that you not downgrade to Model A firmware, as the software will not work. (The UXM firmware code space is not large enough to hold both versions of the protocol in a single firmware image.)
Note also that the ATM Forum-compliant IMA feature is not compatible with the Cisco proprietary IMA protocol supported in Release 9.1 (which uses UXM firmware Model A). Both ends of the UXM IMA trunk requires UXM firmware Model B. If the UXM trunk is connected to another device, that device must support the ATM Forum-compliant IMA protocol.
Note
Note that this release supports a subset of the ATM Forum compliant IMA protocol. These functions supported in Release 9.2 are:
•
•
•
–
–
–
•
•
Release 9.2 supports virtual trunking on both the BPX and IGX. IMA trunk ports are referenced by the first physical line of the trunk port after uptrk has been executed. For example, you can uptrk 1.5-8.9. You can then up a second trunk (which, in this case, is a virtual trunk on slot.port 1.5) on the same trunk port using uptrk 1.5.11.
This release supports using a UXM IMA trunk to connect an IGX feeder node to a routing node, either an IGX or a BPX using IMATM. UXM IMA provides redundancy in case one of the physical lines on an IMA trunk should fail. This reduces the chance of a single point of failure when a single feeder trunk is out of service. Also, you may configure the services on a feeder node rather than on a router node; this indirectly allows the network to scale better with respect to the limit of 223 network nodes.
Specifying an IMA Group Member
In this release, you can define an IMA trunk consisting of non-consecutive physical lines. In addition, you can change the group member by deleting a physical line from an existing IMA trunk.
Use the following syntax to specify an IMA group on a UXM trunk:
•
where:
slot is the slot number
group_member is a set of physical lines composing an IMA group. You can specify the member in an expression consisting of the primary link followed by a, or - and additional physical links.
vtrk is the optional virtual trunk number. If at least one virtual trunk already exists on this port, you only have to specify the primary link as the group_member. In the case of adding a UXM IMA feeder trunk from an IGX routing node to an IGX feeder node, you will not know whether the trunk is a regular trunk or feeder trunk. There is no virtual trunk for the feeder.
For example, 9.1-4 defines trunk 9.1 to consist of four physical links, that is, 1, 2, 3 and 4, where physical link 1 is the primary link. (This example is compatible with Release 9.1.)
For example, 9.1-3,5 defines trunk 9.1 to consist of four physical links, that is, 1, 2, 3 and 5 where physical link 1 is the primary link.
For example, 9.5-7,2-3 defines trunk 9.5 to consist of five physical links, that is, 2, 3, 5, 6 and 7 where physical link 5 is the primary link.
Similarly, 9.8,2,4,6 defines trunk 9.8 to consist of all even number of physical links where physical link 8 is the primary link.
cnftrk is used to specify the primary link on the IMA trunk.
Primary Link—In an IMA group, you must select one of the physical links to be a primary link. This primary link number is used to refer to this IMA group or trunk. You can use cnftrk to add additional links to the group or delete existing links. When deleting existing links from an IMA group, you cannot delete the primary link. You must deactivate the trunk using deltrk followed by dntrk to remove the primary link. The cnftrk will be blocked after the trunk has been added as a feeder trunk.
Feature Mismatching on Virtual Trunks
The uptrk command, in addition to other configuration commands, will perform mismatch verification on the BXM and UXM cards. For example, the uptrk command will verify whether the card has virtual trunk support. Refer to "High-Priority Login Feature" section on page 17-1. For more information about Feature Mismatching, refer to the BPX 8600 Series Installation and Configuration Manual.
The Feature Mismatching capability will not mismatch cards unless the actual feature has been enabled on the card. This allows for a graceful card migration from an older release.
Full Name
Up trunk
Syntax
uptrk <slot.port>[.vtrk]
uptrk <slot.group_member.[<vtrk]> for IMA
uptrk <slot>.<group-member(s)>
Related Commands
addtrk, dntrk, cnfrsrc
Attributes
Example 1
uptrk 21
Description
Activate (up) trunk 21—a single-port card, in this case, so only the slot is necessary.
Example 2
uptrk 6.1.1
Description
Activate (up) trunk 6.1.1—in this case, a virtual trunk, as indicated by the third digit.
Example 3
uptrk 4.1
uptrk 4.2
uptrk 4.3
Description
On the BXM in slot 4, bring up the ports 4.1, 4.2, and 4.3.
Note
System Response
n4 TN SuperUser BPX 15 9.2 Apr. 4 1998 16:39 PSTTRK Type Current Line Alarm Status Other End2.1 OC-3 Clear - OK j4a/2.13.1 E3 Clear - OK j6c(AXIS)5.1 E3 Clear - OK j6a/5.25.2 E3 Clear - OK j3b/35.3 E3 Clear - OK j5c(IPX/AF)6.1 T3 Clear - OK j4a/4.16.2 T3 Clear - OK j3b/44.1 OC-3 Clear - OK VSI(VSI)Last Command: uptrk 4.1Next Command:
Table 4-70 uptrk—Optional Parameters
vtrk
Specifies the virtual trunk number. The maximum on a node is 32. The maximum on a T3 or E3 line is 32. The maximum for user traffic on an OC-3/STM1 trunk is 11 (so more than one OC-3/STM1 may be necessary). See also the section called " Compatibility Between Cards in Virtual Trunks" at the front of this chapter.
When specifying an IMA group, if at least one virtual trunk already exists on this port, then you only have to specify the primary link as the group_member.
![]()
![]()
![]()
![]()
![]()
![]()
![]()
![]()
Posted: Mon Jan 8 11:24:19 PST 2007
All contents are Copyright © 1992--2007 Cisco Systems, Inc. All rights reserved.
Important Notices and Privacy Statement.