|
|

This chapter provides installation steps for the mechanical placement of a BPX shelf in a standard 19-inch customer supplied equipment cabinet or rack with a rear rail setback at 30 inches.
Before proceeding to this chapter, the procedures should be completed, in:
The steps in this procedure apply to a BPX shelf that is being installed in a customer supplied cabinet with rear vertical rails located at a setback of approximately 30 inches from the front.
If the BPX shelf is DC-powered, the DC Power Entry Modules are factory-installed in the lower portion of the rear of the BPX shelf itself. Locate the DC Power Entry Module(s) and make sure it/they are equipped as ordered. If the BPX shelf is AC-powered, an AC Power Assembly will be installed below it.
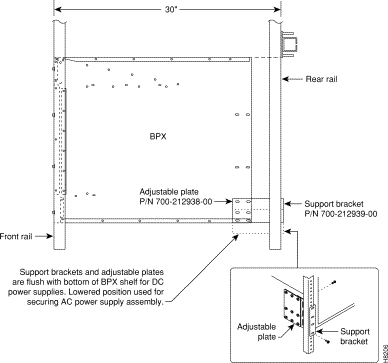
Figure 4-2 shows the location of the rear located third rails in a customer supplied cabinet and of the corresponding adjustable plates and support brackets on the BPX shelf.
Proceed as follows to install the BPX shelf, referring to Figure 4-1 through Figure 4-3, and to either Figure 4-4 for DC powered systems or Figure 4-5 for AC powered systems.
Step 2 Slide the BPX shelf back over the support brackets and into place.
Step 3 Secure the BPX shelf to the front rail using 8 each #10-32 screws.
Step 4 Locate the two rear support brackets and adjustable plates in the miscellaneous parts kit.
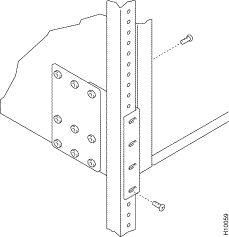
Step 5 Position the adjustable plates with the tabs in the three punchouts facing up as shown in Figure 4-3.
Step 6 Align the top and bottom holes in the adjustable plates with corresponding holes in the side panel of the BPX shelf. (The bottom of the plates should be approximately aligned with the bottom of a DC powered BPX shelf. They should be extended below the bottom of an AC powered BPX shelf so that the AC Power Supplies can be secured to the shelf.)
Step 7 Secure one each adjustable plate to each side of the BPX shelf using (2) each #10-32 machine screws and flat washers.
Step 8 Attach a rear support bracket to each one of the adjustable plates with 2 each 10-32 screws and washers. Do not tighten yet.
Step 9 Secure the support brackets to the rear located vertical rails using 2 each #10-32 screws (or up to M6 metric screws). You may have to lift the BPX shelf slightly to align the holes in the bracket to the holes in the rack.
Step 10 Tighten the screws attaching the support bracket to the adjustable plate.
Step 11 Slide a cable strap over each of the three tabs on the support brackets.
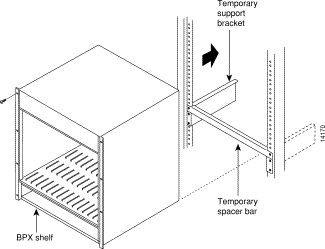
Step 12 Remove the temporary support bracket and spacer bracket from the front of the cabinet.
Step 13 If this is a DC powered shelf, proceed to Chapter 5, Installation, DC Shelf Initial Setup.
Step 14 If this is an AC powered shelf, proceed to Chapter 6, Installation, AC Shelf Initial Setup.


![]()
![]()
![]()
![]()
![]()
![]()
![]()
![]()
Posted: Thu Jan 18 01:18:54 PST 2001
All contents are Copyright © 1992--2001 Cisco Systems, Inc. All rights reserved.
Important Notices and Privacy Statement.