|
|

The configuration parameters are divided into five categories as follows:
In System Configuration, you identify the basic functionality of the unit. System configuration parameters specify whether the unit operates in point-to-point mode (connected directly to another FastPAD) or is connected to a larger IPX and FastPAD network.
In Map Configuration, you define a Speed Dial Facility that allows VFC card users to reach a specific destination by dialing a 2-, 3-, or 4-digit speed dial number. Up to 999 different speed dial numbers can be defined. Each speed dial number is assigned a destination Switch number, Switch Port number, FastPAD Slot number, and FastPAD Channel number or Hunt Group.
When a user dials the speed dial number, the system will attempt to reach the destination assigned to the number in the system map configuration. If a Hunt Group is selected instead of a specific FastPAD Channel number, the system will access the first available, compatible expansion channel that is included in the Hunt Group.
As an example, assume the speed dial number "123" is assigned the following destination:
When a voice or Fax user dials "123", they will be connected to the first available, compatible expansion channel where Hunt Group A is enabled at the FastPAD attached to Port #2 of Switch #1. Data and expansion channels can be individually included in or excluded from Hunt Group selection in Data and Expansion Channel configuration. Expansion channels allow two hunt groups, A or B, per FastPAD. Data Channels allow only one hunt group per FastPAD.
In Link Configuration, you specify the operating parameters of the Composite Link. These parameters define internal or external clocking, the composite link data rate (9.6 to 128 Kbps), and the bandwidth (BW) allocated for high-priority data/voice packets.
In Data Channel Configuration, you specify the operating parameters of the data channels (1-5), the High Speed port, and the NMS port. In addition to TRANS, H/SDLC, ASYNC operating mode, data rate, control signals, etc., each data channel can be configured for connection to a specific destination (i.e., Switch Number, Switch Port Number, and destination FastPAD port number).
For data channels that are configured for TRANS (transparent) operation, all data is processed by a Compression algorithm. The compressed frames are smaller, experience less transmit delay through the network, and, therefore, save bandwidth.
A data channel can be configured to connect to a remote data channel, a High Speed port, or a Hunt Group. If a Hunt Group is used, the system will connect to the first available data channel where Hunt Group selection is enabled. Data channel connections can also be enabled or disabled on a per-channel basis.
When a data channel is enabled and not configured to initiate a call, it will accept incoming calls from any compatible data channel.
Load From: ACTIVE
SYSTEM MAP LINK
Data Channel: 1
Expansion:    1
Use the <Left Arrow> and <Right Arrow> keys to select an entry in this field. This entry selects the source from which configuration parameters are loaded into the Edit Buffer. Select the Active Buffer, Default Buffer, Saved Buffer, or the Edit Buffer. For Map configuration, the Saved Buffer is always used regardless of the selection in this field.
Use the <Up Arrow> and <Down Arrow> keys to select one of the following:
Select this field to modify/display FastPAD system configuration parameters. The system configuration defines global parameters that affect the operation of all FastPAD functions.
Select this field to create, modify, or display the system mapping table. The system mapping table defines speed dial numbers that can be used to access a specific location in the FastPAD network. Each speed dial number can be up to 4 digits and up to 999 destinations can be defined in the mapping table. Additionally, Hunt Forwarding is also configured with this parameter.
Select this field to modify/display FastPAD link configuration parameters. These parameters define the operating mode of the FastPAD composite link.
To select Data Channel configuration, use the <Left Arrow> and <Right Arrow> keys to select a data channel number (1-5), the NMS port, or the HS (High Speed) port.
To select Expansion channel configuration, use the <Left Arrow> and <Right Arrow> keys to select an expansion channel number (1-8).
Press the <Enter> key to make your selection. The system will display the first configuration screen for the selected configuration function (System, Map, Link, Data Channel, or Expansion Channel).
System Parameters
Ring Frequency:
Country Code:     1
Dial Digits:      4
If the FastPAD is used in a country with a 50 Hz AC line frequency, this parameter can be set to 50Hz, 25 Hz, or 17 Hz. When used in a country with a 60 Hz AC line frequency, this parameter can be set to 60 Hz, 30 Hz, or 20 Hz. The default value is the main line frequency divided by 3 (20 or 17 Hz).
The value of this parameters specifies the number of digits that will be used in the speed dialing scheme. It can be set to a value in the range 2-4. The default value is 4.
 | Caution
If you change the number of dial digits in a system where a map table has already been defined, the current map table is invalid and you will be required to create a new map table with the new number of dial digits. This entry also affects the number of digits you may specify for Auto Dial in Expansion Channel configuration. After changing this parameter, the FastPAD must be reset. |
When you press the down-arrow key in the Dial Digits field, the next System Configuration screen is displayed in the following format:
System Parameters
Link Mgmt Protocol:
LMI Rev 1 XXX
N:   P:   T:   N:
Set this parameter to Point-to-Point if the FastPAD is connected directly to another FastPAD. Set this parameter to LMI Rev 1 or ANSI T1.617 D if the FastPAD is connected to a supported Frame Relay Switch. This setting should match the FTC Frame Relay Port configuration when connecting to an IPX. The default value is LMI Rev 1.
This parameter refers to a FastPAD DLCI. The DLCI is composed of the node parameter value and the port parameter value. When taken together, the node and port parameters provide the network with a 12 bit DLCI.
The node value can be set to a range between 1-61 and constitutes 8 bits of the 12 bit DLCI. The default value is 1. The port value can be set to a range between 0-15 and constitutes 4 bits of the 12 bit FastPAD DLCI. The default value is 1.
The value of this parameter specifies how frequently (in seconds) the FastPAD should send status inquiry frames to the switch. If set to 0, the IPX/FTC Protocol should be set to "DISABLE" for proper interfacing between the FastPAD and IPX.
The value of this parameter specifies how often a full status enquiry is to be sent to the frame relay switch, e.g., 3 = every 3 frames.
The next system configuration screen is displayed in the following format:
System Parameters
HH:MM:SS
MONTH   DAY
YEAR
Use the <Left Arrow> and <Right Arrow> keys in this field to select the current month number (1-12).
Use the <Left Arrow> and <Right Arrow> keys in this field to select the day of the month (1-31).
Use the <Left Arrow> and <Right Arrow> keys in this field to select the year number.When the time and date is set correctly, use the <Down Arrow> to view the next system configuration screen.
System Parameters
min:	  xx kbps
max:			  xx kbps
This parameter specifies the maximum operating rate of all voice channels when there is no congestion. It can be set to a value in the range 6 to 19.9 kbps. The maximum operating range must be set from the control panel. Allowable values in this range are displayed when you press the <Left Arrow> and <Right Arrow> buttons. The default value is 16K. When the voice rate fields are set correctly, use the <Down Arrow> to select the next System Parameters screen.
System Parameters
Jitter:	   165 msec
This parameter is used to specify the amount of jitter delay in the system. It can be set to a value in the range 10 to 255 milliseconds in 5 millisecond increments. The default value is 165 milliseconds. This parameter is used to compensate for the variable arrival time of packets. When packets arrive at inconsistent intervals, the voice quality will remain smooth. Smaller values will decrease the end-to-end delay, but may cause the voice quality to be choppy.
You may use the <Up Arrow> and <Down Arrow> keys to review previous screens of system configuration parameters. When all parameter entries are correct, press the <Enter> key to display the Store To menu, described at the end of this Chapter.
When the Map function is selected from the Configuration menu, the Map configuration screen is displayed in the following format:
Map: <xxxx> Next: <yyy>
Switch:<xx> Port: <x>
Slot: <x>   Ch: VOICE
Save            Delete
The number of digits displayed in the Map field (xxxx) depends on the number of Dial Digits specified in System Configuration. It can be 2, 3, or 4 digits from 0000 through 9999
For example, if you set the Dial Digits field in System Configuration to "3", this screen will only display three digit positions and a maximum of three digits can be entered in this field (e.g., 123, 010, 234, etc.).
Hunt Group Busy Call Forwarding for Groups A and B is also configured within this parameter. Use the <Up Arrow> and <Down Arrow> keys to select each digit in the speed dial number. Use the <Left Arrow> and <Right Arrow> keys to increment/decrement each digit. In the last digit position, press the <Down Arrow> key to select the NEXT field. Press the <Enter> key to select the entry.
This field is used to display subsequent and previous auto-speed dial numbers that have been defined in the map table. Press the <Right Arrow> key to display the map table entry for the next lower-numbered auto-speed dial number. Press the <Left Arrow> key to display map table entry for the next higher-numbered map table entry.
Press the <Down Arrow> key to move the cursor to the Save or Delete options. Select the Save option to save the currently display map parameters in EEPROM. Select the Delete option to delete the currently displayed entry.
Press the <Enter> key to activate your selection (Save or Delete). Or, press the <Esc> key to exit the Map configuration screen.
As an example of mapping table configuration, the following illustration shows a typical speed dial configuration entry:
Map:0123(xx)Next: YYY
Switch: 1   Port: 1
Slot: 1
When a telephone user dials the digit string "123", or initiates an Auto Dial call, the system will automatically place a call to the device attached to Slot #1 of the FastPAD that is attached Port #1 of Switch #1. The attached device is expected to be a telephone device. If the speed dial number is not defined in the mapping table or the remote device is incompatible or the remote device is busy, the user will receive a busy tone.
The Hunt Group feature allows you to specify connection to the first available, compatible channel at the selected destination. The following example mapping table entry illustrates this feature:
Map:0456(xx)Next: YYY
Switch: 1   Port: 1
Slot: A or B
When a user dials the digit string "456", or initiates an Auto Dial call, the system will place a call to the device attached to the FastPAD attached to Port #1 of Switch #1. The first available, compatible channel will be selected at the destination. If the speed dial number is not defined in the mapping table or a remote channel configured for the selection Hunt Group in not available, the user will receive a busy tone.
To configure a Hunt Group Busy Call Forwarding address for Hunt Group A:
Map:  A (xx)Next: YYY
Switch: 1   Port: 1
Slot: A
With this mapping table entry specified, all Hunt Group A calls received from remote FastPADs by this unit will be forwarded to Switch 1, Port 2, Hunt Group A, when all Group A channels within this unit are busy. This option allows a user to logically group a set of FastPADs to one mapping table address.
For example, assume FastPAD [1,1] and [1,2] have 8 VFC-01 cards installed and all are configured into Hunt Group A, and these two FastPADs are connected to FastPAD [1,3] as shown in Figure 9-1.
In FastPAD [1,1], the following mapping table entry exists:
Map:  A (xx)Next: YYY
Switch: 1   Port: 2
Slot: A
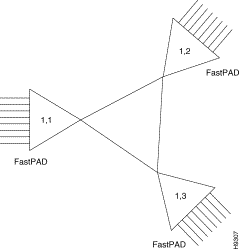
And in FastPAD [1,3], the following mapping table entry exists:
Map:  A (xx)Next: YYY
Switch: 1   Port: 2
Slot: A
If a Hunt Group A call arrives at FastPAD [1,1] and all 8 cards were active (busy), the hunt group call would be redirected to FastPAD [1,2], Hunt Group A channels. FastPAD [1,2] would send a message back to FastPAD [1,3] to route the call to FastPAD [1,2] using his Hunt Group Busy Map.
Link Configuration
BW: 64K   HSC: BS
Clock: EXTERNAL
Rate:   64 kbps
When calculating BW for high priority data use:
This parameter consists of two fields that are used to select the base card composite link or a high speed composite link on a FRAM-01 expansion module. Select "BS" to identify the base card composite link. For a FRAM-01 channel, select a slot number (1-8 for a FastPAD or 1-4 for a FastPAD Micro) in the first field and a FRAM-01 port (channel) number in the second field. The default value is "BS".
If INTERNAL is selected in the Clock field for a base card (BS) composite link, the maximum allowable rate is 112K. If you select 128K in this field, the clock selection will automatically be set to EXTERNAL and you will not be allowed to change it until a value other than 128 kbps is selected.
After setting the Link parameters, press the <Enter> key to display the Store To menu, and with the cursor on Activate and Send, press the <Enter> key. This menu is described at the end of this chapter.
When the Data Channel option is selected from the Configuration Menu, the screen format will be different depending on whether a data channel 1-5, the High Speed port, or the NMS port is selected.
Data # <n>    TRANS
Rate:         19.2KBPS
Clock Stop    Yes
Tx Clk        Int
Where: <n> = a data channel number (1-5), HS for the High Speed Port or NMS for the NMS Port. NMS Port configuration is described at the end of this chapter.
Data #<n>
This field identifies the channel number being configured (1-5, HS for High Speed, or NMS for the NMS Port) and allows you to specify its operating mode (TRANS (transparent sync), H\SDLC, or ASYNC).
The High Speed Channel can only be configured for TRANS or H\SDLC operation. The default for low speed data channels (1-5) is TRANS (transparent sync).
For data channels that are configured for TRANS operation, all normal data frames will be processed by a Compression algorithm. The compressed frames are smaller and experience less transmit delay through the network.
If TRANS or H\SDLC mode is selected, Clock Stop and Tx Clock fields will be added to the screen:
Data # <n>    TRANS
Rate:         19.2KBPS
Clock Stop    No
Tx Clk        Int
This parameter specifies channel baud rate. For the low speed data channels 1-5, the rate can be set to a value in the range 1.2 to 19.2 kbps. For the High Speed data channel, the rate can be set to a value in the range 1.2 to 64 kbps. The rate can be set to "---" to disable the channel. The default is 19.2 kbps for Transparent Sync and H/SDLC. The default is 9.6 kbps for ASYNC.
This parameter enables (YES) or disables (NO) flow control by regulating the clocks to the attached device. The attached device must be a DTE. When this parameter is enabled (YES), the attached device can be flow controlled by regulating the clocks to the attached device. When disabled (NO), the attached device cannot be flow controlled. The default value is YES.
This parameter specifies the clocking to/from the attached device. It can be set to either Int. (internal) or Ext (external). For Int, this channel supplies both transmit and receive clocks to the attached device (e.g., as a modem would to a DTE). For Ext, this channel provides one clock to and accepts one clock from the connected device (e.g., like a DCE [a modem] configured for external timing). See Section 6.4 for more information. The default value is Int.
When you exit the Rate field for Async mode or the TX Clock field for TRANS or H\SDLC mode by pressing the <Down Arrow> key, the next data channel configuration screen is displayed in the following format:
Data # <n>    <mode>
CTS: ON     DTR: ON
DCD: ON
CTS Delay:   0 MSEC
This parameter specifies the handling of the local CTS signal. It can be set to: ON for always on, OFF for always off, or L-RTS to follow the condition of the Local RTS signal. When L-RTS is selected, the CTS Delay parameter (described below) controls the time between the off-to-on transition of RTS with the same transition of CTS. The default value is ON.
This parameter specifies the handling of the local DSR signal. It can be set to: ON for always on, OFF for always off, or R-DTR to follow the condition of the Remote DTR signal. The default value is ON.
This parameter specifies the handling of the local DCD signal. It can be set to: ON for always on, OFF for always off, or R-RTS to follow the condition of the Remote RTS signal. The default value is ON.
This parameter specifies the local CTS delay: the delay at which CTS follows the condition of RTS. It can be set to a value in the range 0 (zero) to 1000 milliseconds in 10 millisecond increments (i.e., 0, 10, 20, 30...).
For the default value of zero, CTS follows local RTS immediately. CTS Delay only applies if Local CTS is set to LOCAL RTS. The default value is zero.
Press the <Down Arrow> from the CTS Delay field. The next data channel configuration screen will be displayed in the following format:
Data # <n>    <mode>
Dest Switch:  1 xxx
Dest Port:    1
Dest Channel: 1
These fields define the destination switch, port, and channel number where this data channel will be connected. The xxx field is the DLCI number and is derived from the Dest Switch Dest Port numbers.
This parameter specifies a destination switch port number (0-15) where this channel will be connected. The default value is 1.
This parameter specifies a destination FastPAD channel number (1-5, HS (High Speed), or HUNT (Hunt Group)) where this channel will be connected. The default value is 1. If HUNT is selected, the system will attempt to establish a connection to the first available, compatible data channel at the FastPAD specified by the Switch and Port Number.
Press the <Down Arrow> key from the Destination Channel field. One of the two following data channel configuration screens will be displayed. If configuring ASYNC or H\SDLC, the following screen format is displayed:
Data # <n>    <mode>
In HUNT Group:    YES
Call Retry Timer: 5
If configuring TRANS, the following screen format is displayed:
Data # <n>    <mode>
In HUNT Group:    YES
Call Retry Timer: 5
Fill Characters:  7E
This parameter includes (YES) or excludes (NO) this data channel from the Base Card Hunt Group. If this parameter is enabled, incoming calls to a hunt group can be directed to this channel when it is available. The default value is YES (included in the Hunt Group).
This parameter specifies the amount of time the FastPAD should wait for a response to a Call Connect or Call Clear request. It can be set to a value in the range 1-30 seconds. When the FastPAD issues a Call Connect or Call Clear request, it will set a timer equal to the value specified here. The default value is 5 seconds.
This parameter specifies the hexadecimal value of an ASCII character that will be output by the TRANS channel in case of data underrun. It can be set to a value in the range 0 (zero) to FFh.
When a channel is configured for TRANS operation, it must run continuously. It cannot start and stop like an Async channel. When no actual data is available for transmission, the system will send the character defined in this field. If you select a value other than the default, make sure the selected character does not appear in actual data that may appear on this data channel. The default value is 0x7E.
Press the <Down Arrow> key to exit the Fill Character field. The next data channel configuration screen is displayed in the following format:
Data # <n>    <mode>
Enable Channel:   NO
Connect Channel:  NO
Bandwidth:        NO
This parameter enables (YES) or disables (NO) the channel to accept incoming calls. When enabled (YES), the channel will accept incoming calls. When disabled (NO), the channel will not accept incoming calls. The default value is NO (disabled).
This parameter enables (YES) or disables (NO) the initiation of a call to the destination channel. When enabled (YES), the channel will initiate a call to the destination Switch, Port, and Channel Number defined in the Dest Switch, Dest Port, and Dest Channel fields described above. When disabled (NO), the channel will not initiate a call. The default value is NO (disabled).
This parameter enables (YES) or disables (NO) a data connection as high priority data. If enabled (YES), this channel will operate in the high priority bandwidth allocated in the link. When disabled (NO), data will be low priority bandwidth configuration. See Section 9-4. The default value is NO (disabled).
If you are configuring the data channel for TRANS or Async operation, when you exit the Bandwidth field, you have been presented with all operating parameters. If you are configuring the data channel for H\SDLC operation, the next data channel configuration screen is displayed in the following format:
Data # <n>      H/SDLC
Inter frame:    FLAG
Mode:           NRZ
This parameter controls what is output by the data channel to the attached device when there is no data to be transmitted. If FLAG is selected, the data channel to will output a hexadecimal 0x7E to the attached device during idle periods. If MARK is selected, the data channel to will output a hexadecimal 0xFF to the attached device during idle periods. The default value is FLAG.
This parameter determines the encoding scheme to be used on the data channel. Allowed values are NRZ (non-return to zero) and NRZI (non-return to zero inverted). The default value is NRZ.
At this point, you may use the <Up Arrow> and <Down Arrow> keys to review previous screens of data channel configuration parameters. Press the <Enter> key to display the Store To screen. Press the <Enter> key to Activate and Save. This menu is described at the end of this Chapter.
Data # NMS    ASYNC
Rate:         9.6 kbps
Unit#:
This parameter specifies the baud rate. For the NMS port, the rate can be set to a value in the range 300 to 9.6 kbps. The rate can be set to "---" to indicate that no NMS PC is connected and the channel input and output are not active. The default value is 9.6 kbps.
This field is used for NMS (network management system) identification. The value entered here and in the NMS must match before communication can occur. Allowed values are from 0 to 255. The unit number for each FastPAD in the network must be unique.
Press the <Enter> key to display the Store To screen.
Store to:
ACTIVE & SAVED
ACTIVE ONLY
SAVED ONLY
This selection will store the configuration parameters in EEPROM and use them immediately.
This selection will allow you to use the new configuration parameters immediately, but they will not be stored permanently. The changes are stored in RAM but not in non-volatile EEPROM.
This selection will store the configuration parameters in EEPROM, but they will not be used until the next power-on or reset.
You may also press the <Esc> key in this or any other configuration screen to exit the configuration function without changing anything.
When you press the <Enter> key in the Store To menu, the system will confirm your selection with a screen in the following format:
Saving Configuration
![]()
![]()
![]()
![]()
![]()
![]()
![]()
![]()
Posted: Thu Jan 25 13:31:56 PST 2001
All contents are Copyright © 1992--2001 Cisco Systems, Inc. All rights reserved.
Important Notices and Privacy Statement.