|
|

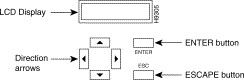
The FastPAD front panel consists of a Liquid Crystal Display (LCD) and six push buttons. The LCD is a 4-line by 20-character display. The buttons are used to select and control the information that is presented in the display.
The following key combinations can also be used for special functions:
There are four memory locations that contain existing parameters:
2. Edit Buffer: This area of memory stores the configuration parameters that are currently being displayed/edited in the configuration screens. When you work with any of the configuration parameters, the values display on the front panel LCD are from the Edit Buffer. Any changes that you make do not become active until you instruct the FastPAD to store the new parameters into the Active Buffer, Saved Buffer, or both.
4. Saved Buffer: This buffer is located in non-volatile memory (EEPROM) and retains the FastPAD's operating parameters while the system is powered down. Configuration changes can be stored in the Saved Buffer. New parameters do not become effective until the system is reset.
You can examine and change configuration parameters using the configuration screens. The values presented in the configuration screens are always taken from the Edit Buffer. When you select the configuration function, you will ask to specify the source (Active, Saved, Default, or Edit) from which configuration parameters are to be loaded. The selected buffer is copied into the Edit Buffer and presented in the configuration screens. Any changes that you make in the configuration screens do not take affect until they are subsequently stored in the Saved Buffer, Active Buffer, or both.
Exceptions: The Default, Saved, and Edit Buffers do not apply to mapping table configuration. Mapping table entries are always taken from and stored directly to EEPROM. Also note that Expansion Channel Voice Input levels, Output levels, and Silence Suppression parameters are stored to the Active buffer immediately. This allows you to adjust voice levels and determine the results of the adjustment immediately. When controlled from and IPX, the active buffer stores the configuration so that it is recognized by the IPX.
From the FastPAD front panel you can examine and modify configuration parameters, show status, display events, and activate diagnostic tests for the local or a remote unit. If a connection is not established to another FastPAD, you will only be allowed to access parameters and execute commands that affect the local unit. If a connection is established (either point to point or to an IPX network), you can specify the address (switch and port number) of a remote FastPAD to be accessed. The following paragraphs describe local and remote node selections.
FastPAD Mux [xx,yy]
Select:
LOCAL NODE
When this screen is displayed, press the <Enter> key to select the Main Menu. The Main Menu selections are described below. However, note that some busy conditions may make it impossible to access the Main Menu at all times. If a message is displayed instead of the Main Menu, refer to the Status/Error Messages described below.
If a point to point connection is established to another FastPAD, you will automatically be allowed to configure the remote parameters. The remote FastPAD's address (e.g., 2,1) will appear in the upper right corner of the local display.
FastPAD Mux [xx,yy]
Select:
LOCAL NODE
REMOTE NODE
Where:
When this screen is displayed, use the <Up Arrow> and <Down Arrow> keys to select the LOCAL NODE or REMOTE NODE field. Press the <Enter> key to activate the current selection. If REMOTE NODE is selected, a screen is displayed in the following format:
FastPAD Mux [xx,yy]
Remote Switch #:
Remote Port #:
Use the <Up Arrow> and <Down Arrow> keys to select the Remote Switch # and Remote Port # fields. Use the <Right Arrow> and <Left Arrow> keys to increment and decrement the switch number and port number. The switch number can be set to a number in the range 1-62. The port number can be set to a number in the range 0-15. These two entries identify the remote FastPAD to be accessed. Press the <Enter> key to activate your selection. The system will attempt to access the selected node and display the following message:
Connecting to the
Selected Node...
A LOCAL or REMOTE NODE selection will activate the Main Menu described 8.3.3. However, note that some busy conditions may make it impossible to access the Main Menu at all times.
FastPAD Mux [xx,yy]
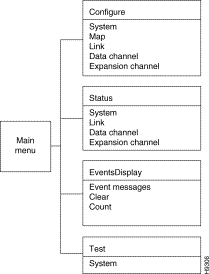
Main Menu
STATUS CONFIGURE
EVENTS TEST
Use the <Up Arrow> and <Down Arrow> keys to select one of the Main Menu functions (Status, Configure, Events, or Test). Press the <Enter> key to activate the desired selection.
The screen that is presented in the LCD will be different depending on your Main Menu Selection. Main menu selections are described in following chapters.
The following message will be displayed for five seconds when a node is busy:
User Interface Busy

Try Later...
This message will be displayed when LOCAL NODE is selected in the LOCAL/REMOTE NODE selection menu and the local unit is busy communicating with another node. This message will also be displayed when REMOTE NODE is selected and the remote node is busy communicating with another node or is being configured locally or is being controlled by an IPX.
When a remote node is selected in the LOCAL/REMOTE NODE selection menu, the system will attempt to access a specified remote node. If the system is unable to access the node, the following message is displayed for five seconds:
Unable to Access the

Selected Node...
After five seconds, the LOCAL/REMOTE NODE selection menu is displayed.
When the Main Menu is selected for the LOCAL NODE or a REMOTE NODE, the system will continuously monitor the LCD and keys on the front panel for display and/or keystroke activity. If no activity occurs for three minutes, the following message is displayed:
No Keyboard activity

for over 3 minutes...
This message is displayed for five seconds. If no activity occurs during the five-second period, the LOCAL/REMOTE NODE selection menu is displayed.
When REMOTE NODE is selected, the system will expect to receive a "keep alive" message at regular intervals. If the interval expires with no communications activity from the remote node, the following message is displayed:
Node not responding

Try again...
This message will be displayed for five seconds. When the five-second period expires, the LOCAL/REMOTE NODE selection menu is displayed.
When an IPX (Rel. 7.2 or later) has control over the configuration activity of the FastPAD, the following message is displayed:
Local Access
Locked Out.
Incompatible Expansion Modules: At power-up, the system will attempt to load each installed expansion module with the appropriate firmware. If a card type and voice algorithm exists, this message will be displayed. The FLT and/or the LBK and TST LEDs will also flash continuously.
EX #n Empty Voice
Software Not Loaded
Check the Cards and
Algorithm(s)!!
![]()
![]()
![]()
![]()
![]()
![]()
![]()
![]()
Posted: Thu Jan 25 14:04:02 PST 2001
All contents are Copyright © 1992--2001 Cisco Systems, Inc. All rights reserved.
Important Notices and Privacy Statement.