The FlashPAK's EPROMs are programmed at the factory. However, flash EPROM technology allows the FlashPAK to be reprogrammed in the field. New firmware revisions can be downloaded from a personal computer via the local or remote asynchronous NMS port or via the StrataView FastPAD Network Management System. Contact StrataCom ISC for more information as needed.
Warning
The FastPAD and FastPAD Micro FlashPAK modules are completely different hardware components. DO NOT attempt to install a FastPAD FlashPAK in a FastPAD Micro or vice versa.
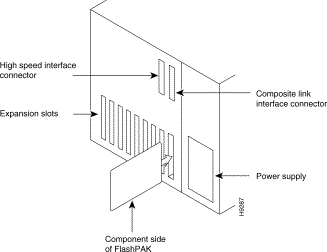
The FlashPAK plugs into the slot on the baseboard that is closest to the front panel and the power supply cage, see Figure 3-1.
Complete the following steps to install or remove a FlashPAK module.
Step 1 Turn the power switch on the back of the unit to the OFF position and unplug the unit from the AC or DC power source.
Step 2 Remove the top cover and locate the FlashPAK module in the interior of the unit. (See Figure 3-1 for FastPAD and FastPAD Micro.)
Step 3 To remove an existing FlashPAK, complete the following steps:
Place tips of index fingers on the ends of the connector housing.
Place thumbs (or thumbnails) over the latch tabs on either side of the connector and deflect the tabs outward to release the FlaskPAK module.
Allow the FlaskPAK board to tilt forward.
Remove it from the card slot by evenly pulling it outward.
Step 4 To install a FlashPAK complete the following steps:
Insert the connector edge of the FlashPAK board into the card slot of the connector at an angle of approximately 30 degrees from vertical until it is seated in the card slot.
The component side of the FlashPAK board should be facing the outside wall of the unit, away from the power supply.
Maintaining an even pressure over the length of the board, rotate the board forward until the edges of the board snap behind the latch tabs on the connector. Slight pressure may be required to engage the latch tabs.
Caution
Plug the FlashPAK in with the component side facing away from the power supply cage and the power turned off. Damage will result if the module is installed incorrectly or while power is on.
Complete the following steps to install or remove a FlashPAK module.
Step 1 Turn the power switch on the back of the unit to the OFF position and unplug the unit from the AC or DC power source.
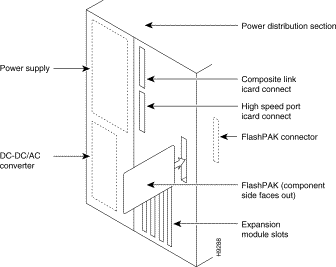
Step 2 Remove the top cover and locate the FlashPAK module in the interior of the unit. (See Figure 3-2 for FastPAD and FastPAD micro.)
Step 3 To remove an existing FlashPAK, complete the following steps:
Place tips of index fingers on the ends of the connector housing.
Place thumbs (or thumbnails) over the latch tabs on either side of the connector and deflect the tabs outward to release the FlaskPAK module.
Allow the FlaskPAK board to tilt forward.
Remove it from the card slot by evenly pulling it outward.
Step 4 To install a FlashPAK complete the following steps:
Insert the connector edge of the FlashPAK board into the card slot of the connector at an angle of approximately 30 degrees from vertical until it is seated in the card slot.
The component side of the FlashPAK board should be facing the outside wall of the unit, away from the power supply.
Maintaining an even pressure over the length of the board, rotate the board forward until the edges of the board snap behind the latch tabs on the connector. Slight pressure may be required to engage the latch tabs.