|
|


When the FastPAD equipment is in service (see Management functions manual for start-up), access to the configuration function is gained via an asynchronous terminal.
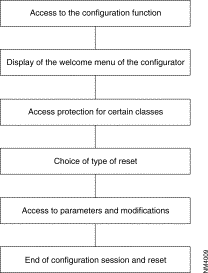
The figure below gives the sequence of a configuration session. For the description of the different phases see the paragraphs mentioned in the figure.

The configuration function is a resident internal subscriber in each FastPAD. It is accessed via an X.25 address which conforms to the same numbering system as defined across the network.
The syntax of the access code to the configuration function is:
DNIC Z0 AB D is Nº Password (CR)
e.g. 90000099D10CC is the access code of the default configuration.
Typing an incorrect access code results in rejection of access to the function. An error code followed by a message in clear language is then displayed on the screen (see the chapter "Network Trouble Management" of the Management Functions Manual.)
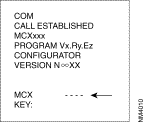
Typing the access code defined in the preceding paragraph causes a welcome page of the following type to be displayed.

F (CR) | To clear the call and start a selective reset (*) with the deriving of the configuration in EEPROM |
V (CR) | To clear the call and start a selective reset (*) without deriving the configuration in EEPROM |
SA (CR) | Deriving of configuration in EEPROM without updating the operational configuration and without selective reset |
I (CR) | To reset the equipment only in session ITO |
DC (CR) | To view the whole configuration |
DS Recurrence No. (CR) | To view the connection parameters of a line |
DA line No (CR) | To view the extension parameters of a line |
DE Recurrence No. (CR) | To view the parameters of the management functions, securized lines (SVC) or X.29 rerouting, compression or DLM/Virtual Router defined in C24. |
DX Recurrence No. (CR) | To view the X.25 dynamic connection parameters of the B or D channels (ISDN) or frame relay channels defined in C30. |
H (CR) | To obtain help. |
MENU (CR) | To view the meaning of classes. |
PRPS (CR) | To view the meaning of the connection profiles (in class 12, 24 and 30). |
PRPA (CR) | To view the meaning of the extension profiles (in class 13) |
PS Profile No. (CR) | For the contents of a connection profile. |
PA Profile No. (CR) | For the contents of an extension profile. |
EC (CR) | To save the fixed configuration in EEPROM in the removable configuration. |
LC (CR) | To copy the removable configuration into the fixed configuration in EEPROM and in CONFIG RAM |
Class No. (CR) | To access the requested class |
SS (CR) (**) | Status of configuration supports |
T (CR) | To view the Transparent BSC terminators |
(CR) | To return to the class level |
H (CR) | To call for help |
MENU (CR) | To view the meaning of recurrences |
PRPS (CR) | To view the meaning of the connection profiles |
PRPA (CR) | To view the meaning of the extension profiles |
EC (CR) | To save the fixed configuration in EEPROM into the removable configuration |
LC (CR) | To copy the removable configuration into the fixed configuration in EEPROM and in CONFIG RAM |
Recurrence No. (CR) | To access the selected recurrence |
(CR) | To validate a modification |
D (CR) | To cancel a recurrence |
S/Parameter No./ |
|
new value (CR) | To modify a parameter (1) |
C/R = Recurrence No. (CR) | To copy the parameters of a recurrence |
S/Parameter No./(CR) | To cancel the value of a parameter |
The Copy and Cancel commands are valid for classes 12, 13, 24 and 30.
(1) Except for classes 12, 24 and 30 where the syntax is:
S/Row no./Parameter no./New value (CR)
(*) Selective reset of one or more lines takes place only if there is a modification of the connection or extension parameters in class 12 or 13 or C1 R1 before the output through F or V.
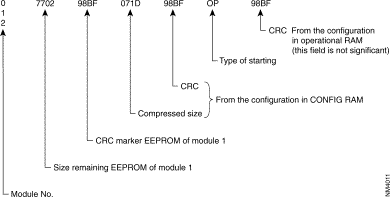
(**) The status of the configuration may be consulted at the class level by typing SS followed by (CR). The status of the configuration indicates the following information depending on its location:
As an example, when command SS is used, the configurator displays the following:

In the above example, modules 0 and 2 are not present.
Certain recurrences or classes that contain system data may be read-and/or write-protected. Access to these classes is therefore subject to the typing of a KEY code (from l to 8 alphanumeric characters) specified in the existing configuration (see C0R0, C2R0 and C2R1 in Chapter 4 of this manual).
The display of the word "key" on the welcome page indicates that the system is waiting for a command.
This command may be:
When the KEY code is validated, the "TYPE OF SESSION, ISE OR ITO?" message is displayed to allow the operator to specify the type of reset planned at the end of the configuration session.
Type ITO and (CR) for a complete reset if the changes affect all lines or the overall operation of the FastPAD (classes not accessible during an ISE session, described below).
The commands F, V or SA are impossible during a ITO session.
Type ISE followed by (CR). In ISE, the classes/recurrences/parameters (general operation of FastPAD) below are not accessible for modification:
· Class 1: | Identification OF CONFIGURATION (except for recurrence 1) |
· Class 2: | GENERAL PARAMETERS |
· Class 3: | MANAGEMENT FUNCTIONS |
· Class 4: | TABLE OF INTERNAL SUBSCRIBERS |
· Class 14: | X.3 CUSTOMER PROFILE |
· Class 24: | MANAGEMENT FUNCTION, SECURIZED VCs. X.29 REROUTING, COMPRESSlON |
All modifications outside these classes are updating the fixed configuration's EEPROM and RAM by the command "F".
The selective reset (ISE) of one or more lines by the command "F" or "V" is only possible when the parameters to modify are parameters in class 1, recurrence 1, and classes 12 or 13.
· Class 12: | X.25 PARAMETERS | |
| Parameter 4: | Number of the 1st group of incoming logical channels |
| Parameter 5: | Number of 1st incoming logical channel |
| Parameter 6: | Number of groups of incoming logical channels |
| Parameter 7: | Number of incoming logical channels |
| Parameter 8: | Number of the 1st group of mixed logical channels |
| Parameter 9: | Number of 1st mixed logical channel |
| Parameter 10: | Number of groups of mixed logical channels |
| Parameter 11: | Number of mixed logical channels |
| Parameter 12: | Number of the 1st group of outgoing logical channels |
| Parameter 13: | Number of 1st outgoing logical channel |
| Parameter 14: | Number of groups of outgoing logical channels |
| Parameter 15: | Number of outgoing logical channels |
| Parameter 90: | Number of PVCs or cluster |
| Parameter 91: | Position of first PVC or cluster |
| Parameter 94: | Securized virtual secrets |
Modification of these parameters is still possible when the new value is lower than the existing value.
Example:
Because the classes 8, 17 and 19 refer to each other, these classes must be reset with an ITO.
When the KEY code and the (CR) and the type of session have been typed, the operator may access the parameters to be modified.
The system imposes a selection among the three configuration levels:

Example:
Parameter 3, recurrence 1 of class 15 may be modified before parameter 1, recurrence 8 of class 3.
From the welcome page of the configurator, the parameters to be modified are reached as follows:

The meeting of the line is not taken into account when the modifications involve parameters other than in classes 12 and 13 linked with the line. The modifications of these parameters requires the operator to use the command: ISE line-number.
* One or more lines may be reset without parameter modification by typing:

** When the key code is not correct, whatever the session (lSE or ITO), the configuration session cannot be closed with the commands "F", "V", "SA" or "I". To quit the configuration, type "CTRL/P", "CLR". The command "CTRL/P", "CLR" cancels all the modifications entered during the session.
 Configurator Display and Operator Response
** This meaning does not apply to classes 12, 24 and 30:
*** Command usable only in classes 12, 13, 24 and 30.
The typing of an incorrect class, recurrence, or parameter number leads to the display of one of the following messages:
INVALID CLASS No.
INVALID RECURRENCE No.
INVALID PARAMETER No.
LINE No. NOT ACCESSIBLE (selective reset of an XX line).
LINE No. CAN NOT BE RESET (in class 1, recurrence 1 of XX).
PASSWORD NOT CORRECT.
COMMAND NOT POSSIBLE.
The user is invited to type the correct number.
Typing a number of a write-protected class will display the following message:
"write-protected recurrence".
During deriving, in EEPROM, of the fixed operational configuration present in RAM, the following error messages may be displayed:
COMPRESSED SIZE TOO LARGE
CCR ERROR, DO YOU WISH TO RESTORE THE CONFIGURATION?
PLEASE CONFIRM (Y/N)?
If the response is:
Y: | The last saved configuration is restored, and all modifications are lost. |
N: | The modifications are saved, and others are possible to reduce the size of the file to be compressed. |
To quit the configurator and initiate the equipment reset when you have finished making changes, type:
The reset from the new configuration can be checked by displaying the welcome page of the configurator (for example).

If the identification is that of the customer and if the counter is incremented by 1 in relation to the preceding configuration version, the equipment has been reset with the new configuration.
If the identification is 9000 and the value of the counter 00, the new configuration is wrong and the equipment has been reset with the default configuration.
In this case, it is possible to access the erroneous configuration to modify it by setting up a new configuration session.
To quit a configuration session without resetting the equipment and without updating the operational configuration in RAM, type one of the following commands:
![]()
![]()
![]()
![]()
![]()
![]()
![]()
![]()
Posted: Thu Jan 25 13:40:10 PST 2001
All contents are Copyright © 1992--2001 Cisco Systems, Inc. All rights reserved.
Important Notices and Privacy Statement.