|
|

The VPN 3002 Hardware Client Manager is an HTML-based interface that lets you configure, administer, monitor, and manage the VPN 3002 with a standard Web browser. To use it, you need only to connect to the VPN 3002 using a PC and browser on the same private network with the VPN 3002.
The Manager uses the standard Web client / server protocol, HTTP (Hypertext Transfer Protocol), which is a cleartext protocol. However, you can also use the Manager in a secure, encrypted HTTP connection over SSL (Secure Sockets Layer) protocol, which is known as HTTPS.
When the SSL certificate is installed, you can connect directly using HTTPS; see "Connecting to the VPN 3002 using HTTPS."
The VPN 3002 Hardware Client Manager requires either Microsoft Internet Explorer version 4.0 or higher, or Netscape Navigator / Communicator version 4.5-4.7. For best results, we recommend Internet Explorer. Whatever browser and version you use, install the latest patches and service packs for it.
 |
Note You cannot use the Live Event Log feature with Netscape navigator/Communicator version 4.0. |
Be sure JavaScript is enabled in the browser. Check these settings:
Be sure cookies are enabled in the browser. Check these settings:
Do not use the browser navigation toolbar buttons Back, Forward, or Refresh / Reload with the VPN 3002 Hardware Client Manager unless instructed to do so. To protect access security, clicking Refresh / Reload automatically logs out the Manager session. Clicking Back or Forward may display stale Manager screens with incorrect data or settings.
We recommend that you hide the browser navigation toolbar to prevent mistakes while using the VPN 3002 Hardware Client Manager.
For best ease of use, we recommend setting your monitor or display:
When your system administration tasks and network permit a cleartext connection between the VPN 3002 and your browser, you can use the standard HTTP protocol to connect to the system.
Even if you plan to use HTTPS, you use HTTP at first to install an SSL certificate in your browser.
1. Bring up the browser.
2. In the browser Address or Location field, you can just enter the VPN3002 Private interface IP address; e.g., 10.10.147.2. The browser automatically assumes and supplies an http:// prefix.
The browser displays the VPN3002 Hardware Client Manager login screen.
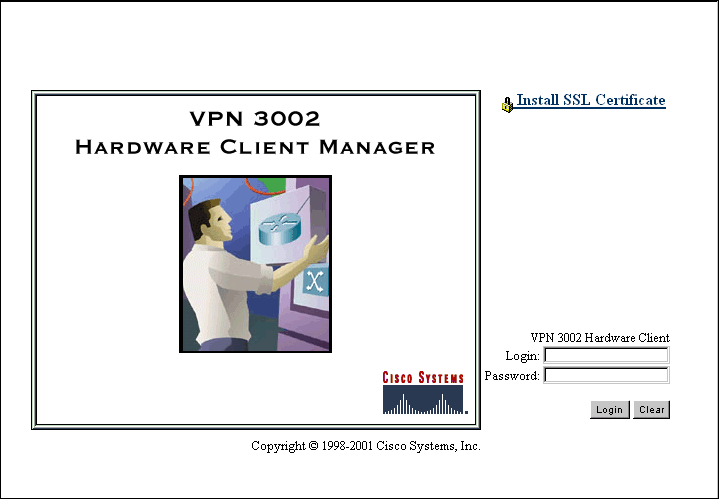
To continue using HTTP for the whole session, skip to "Logging in the VPN 3002 Hardware Client Manager."
The Manager provides the option of using HTTP over SSL with the browser. SSL creates a secure session between your browser (VPN 3002 hardware client) and the VPN Concentrator (server). This protocol is known as HTTPS, and uses the https:// prefix to connect to the server. The browser first authenticates the server, then encrypts all data passed during the session.
HTTPS is often confused with a similar protocol, S-HTTP (Secure HTTP), which encrypts only HTTP application-level data. SSL encrypts all data between client and server at the IP socket level, and is thus more secure.
SSL uses digital certificates for authentication. The VPN 3002 creates a self-signed SSL server certificate when it boots, and this certificate must be installed in the browser. Once the certificate is installed, you can connect using HTTPS. You need to install the certificate from a given VPN 3002 only once.
Managing the VPN 3002 is the same with or without SSL. Manager screens may take slightly longer to load with SSL because of encryption / decryption processing. When connected via SSL, the browser shows a locked-padlock icon on its status bar. Both Microsoft Internet Explorer and Netscape Navigator support SSL.
For HTTPS to work on the Public interface, you must enable HTTPS on the VPN 3002 through the CLI or from an HTTP session on the Private interface first. See
Follow these steps to install and use the SSL certificate for the first time. We provide separate instructions for Internet Explorer and Netscape Navigator when they diverge.
1. Connect to the VPN 3002 using HTTP as above.
2. On the login screen, click the Install SSL Certificate link.
The Manager displays the Install SSL Certificate screen and automatically begins to download and install its SSL certificate in your browser.
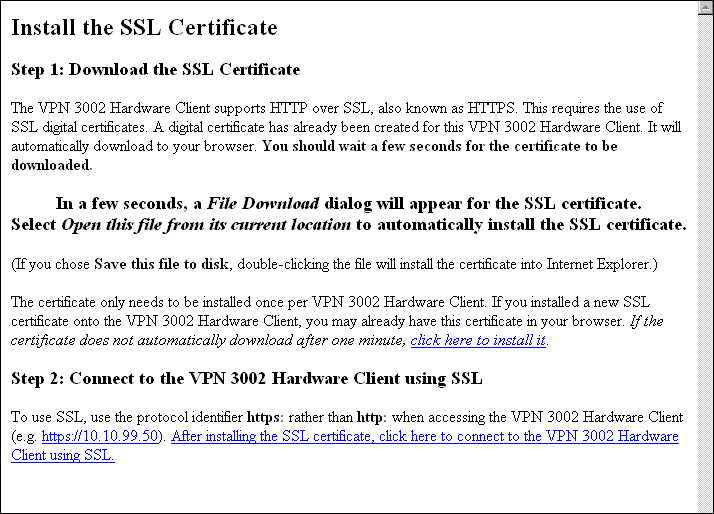
The installation sequence now differs depending on the browser. Continue below for Internet Explorer, or skip to "Installing the SSL certificate with Netscape."
This section describes SSL certificate installation using Microsoft Internet Explorer 5.0. (With Internet Explorer 4.0, some dialog boxes may differ but the process is similar.)
You need to install the SSL certificate from a given VPN 3002 only once. If you do reinstall it, the browser repeats all these steps each time.
A few seconds after the VPN 3002 Hardware Client Manager SSL screen appears, Internet Explorer displays a File Download dialog box that identifies the certificate filename and source, and asks whether to Open or Save the certificate. To immediately install the certificate in the browser, select Open. If you Save the file, the browser prompts for a location; you must then double-click on the file to install it.
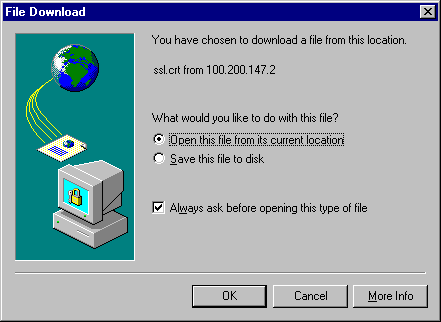
3. Click the Open this file from its current location radio button, then click OK.
The browser displays the Certificate dialog box with information about the certificate. You must now install the certificate.
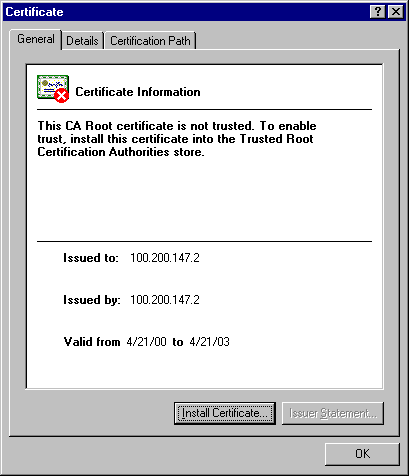
4. Click Install Certificate.
The browser starts a wizard to install the certificate. The certificate store is where such certificates are stored in Internet Explorer.
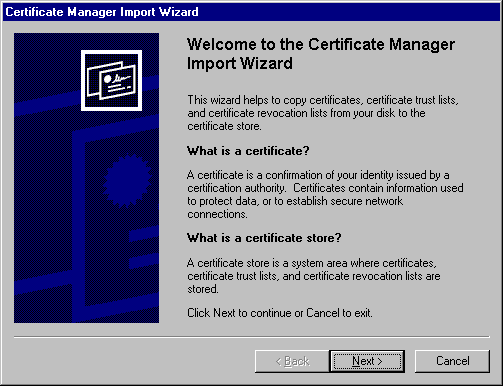
5. Click Next to continue.
The wizard opens the next dialog box asking you to select a certificate store.
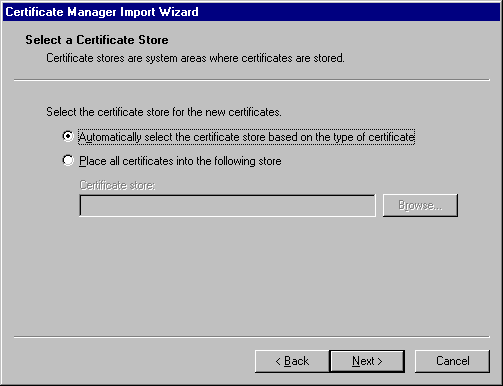
6. Let the wizard Automatically select the certificate store, and click Next.
The wizard opens a dialog box to complete the installation.

7. Click Finish.
The wizard opens the Root Certificate Store dialog box asking you to confirm the installation.

8. To install the certificate, click Yes. This dialog box closes, and a final wizard confirmation dialog box opens.

9. Click OK to close this dialog box, and click OK on the Certificate dialog box (Figure 1-4) to close it.
You can now connect to the VPN 3002 using HTTP over SSL (HTTPS).
10. On the Manager SSL screen (Figure 1-2), click the link that says, After installing the SSL certificate, click here to connect to the VPN 3002 Hardware Client using SSL.
Depending on how your browser is configured, you may see a Security Alert dialog box.
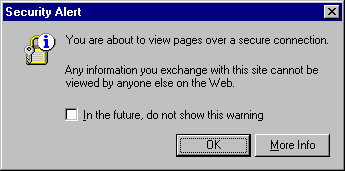
11. Click OK.
The VPN 3002 Hardware Client displays the HTTPS version of the Manager login screen.
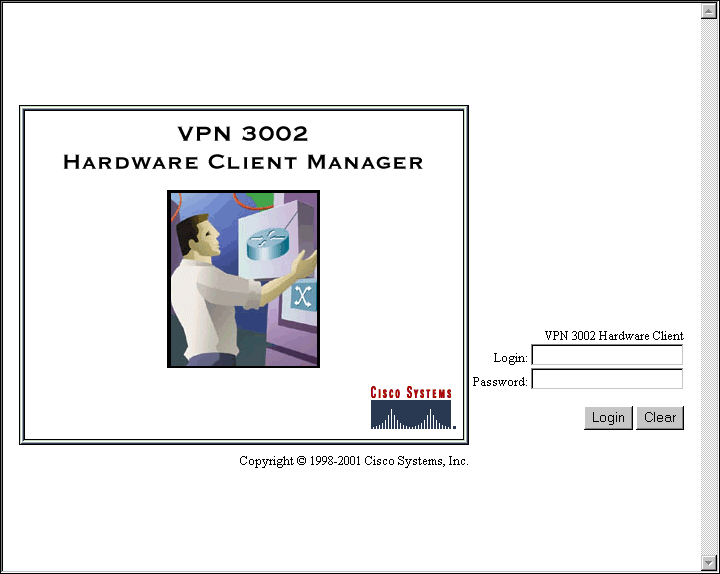
The browser maintains the HTTPS state until you close it or access an unsecure site; in the latter case you may see a Security Alert screen.
Proceed to Logging in the VPN 3002 Hardware Client Manager to log in as usual.
There are (at least) two ways to examine certificates stored in Internet Explorer.
First, note the padlock icon on the browser status bar in Figure 1-11. If you double-click on the icon, the browser opens a Certificate Properties screen showing details of the specific certificate in use.
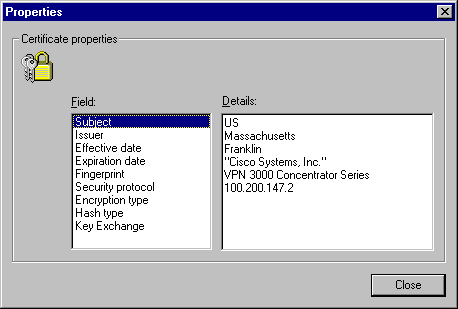
Click any of the Field items to see Details. Click Close when finished.
Second, you can view all the certificates that are stored in Internet Explorer 4.0. Click the browser View menu and select Internet Options. Click the Content tab, then click Authorities in the Certificates section.
In Internet Explorer 5.0, click the browser Tools menu and select Internet Options. Click the Content tab, then click Certificates in the Certificates section. On the Certificate Manager, click the Trusted Root Certification Authorities tab.
The VPN 3002 Hardware Client SSL certificate name is its Ethernet 1 (Private) IP address.
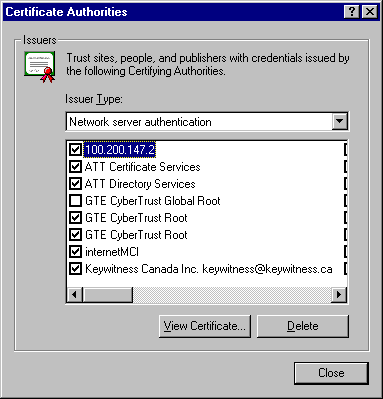
Select a certificate, then click View Certificate. The browser displays the Certificate Properties screen, as in Figure 1-12 above.
This section describes SSL certificate installation using Netscape Navigator / Communicator 4.5.
You need to install the SSL certificate from a given VPN 3002 only once. If you try to reinstall it, Netscape displays the note in Figure 1-14. Click OK and just connect to the VPN 3002 using SSL (see Step 7 in this section.

The instructions below follow from Step 2 in "Installing the SSL certificate in your browser," and describe first-time certificate installation.
A few seconds after the VPN 3002 Hardware Client Manager SSL screen appears, Netscape displays a New Certificate Authority screen.
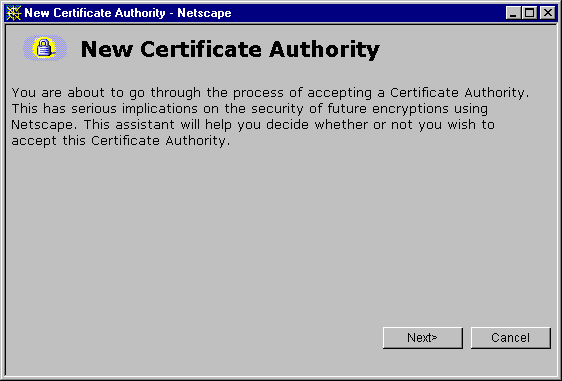
1. Click Next> to proceed.
Netscape displays the next New Certificate Authority screen, which further explains the process.
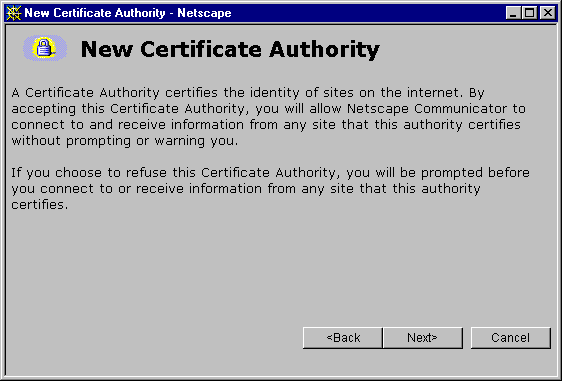
2. Click Next> to proceed.
Netscape displays the next New Certificate Authority screen, which lets you examine details of the VPN 3002 Hardware Client SSL certificate.
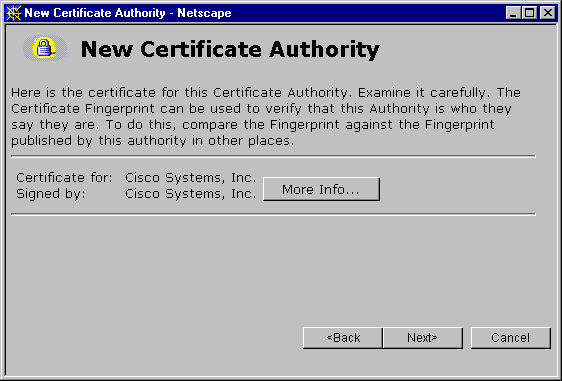
3. Click Next> to proceed.
Netscape displays the next New Certificate Authority screen, with choices for using the certificate. No choices are checked by default.
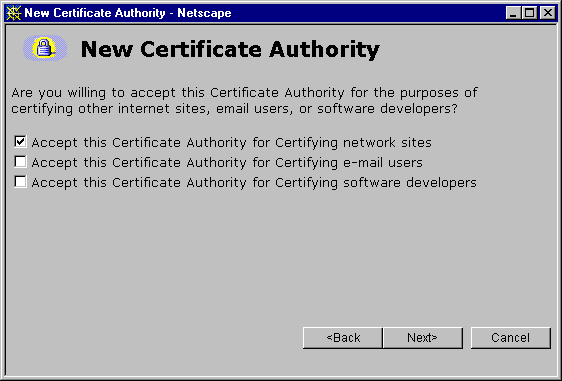
4. You must check at least the first box, Accept this Certificate Authority for Certifying network sites. Click Next> to proceed.
Netscape displays the next New Certificate Authority screen, which lets you choose to have the browser warn you about sending data to the VPN 3002.
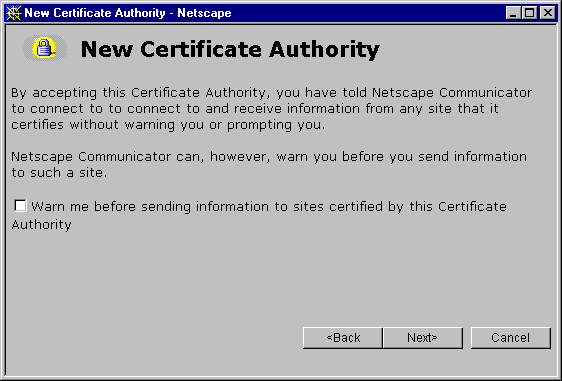
5. Checking the box is optional. Doing so means that you get a warning whenever you apply settings on a Manager screen, so it's probably less intrusive to manage the VPN 3002 without those warnings. Click Next> to proceed.
Netscape displays the final New Certificate Authority screen, which asks you to name the certificate.
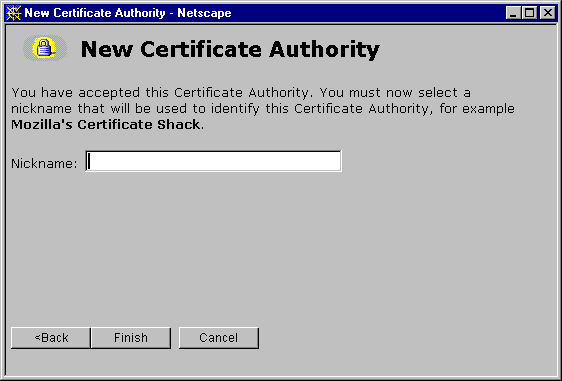
6. In the Nickname field, enter a descriptive name for this certificate. "Nickname" is something of a misnomer. We suggest you use a clearly descriptive name such as Cisco VPN 3002 10.10.147.2. This name appears in the list of installed certificates; see "Viewing certificates with Netscape," below.
You can now connect to the VPN 3002 using HTTP over SSL (HTTPS).
7. On the Manager SSL screen (Figure 1-2), click the link that says, After installing the SSL certificate, click here to connect to the VPN 3002 Hardware Client using SSL.
Depending on how your browser is configured, you may see a Security Information Alert dialog box.
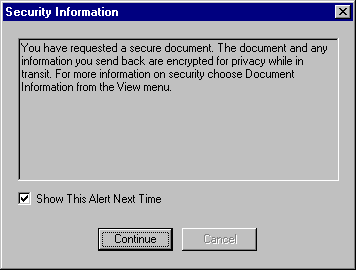
8. Click Continue.
The VPN 3002 displays the HTTPS version of the Manager login screen.

The browser maintains the HTTPS state until you close it or access an unsecure site; in the latter case, you may see a Security Information Alert dialog box.
Proceed to the section, "Logging in the VPN 3002 Hardware Client Manager," to log in as usual.
There are (at least) two ways to examine certificates stored in Netscape Navigator / Communicator 4.5.
First, note the locked-padlock icon on the bottom status bar in Figure 1-22. If you click on the icon, Netscape opens a Security Info window. (You can also open this window by clicking Security on the Navigator Toolbar at the top of the Netscape window.)
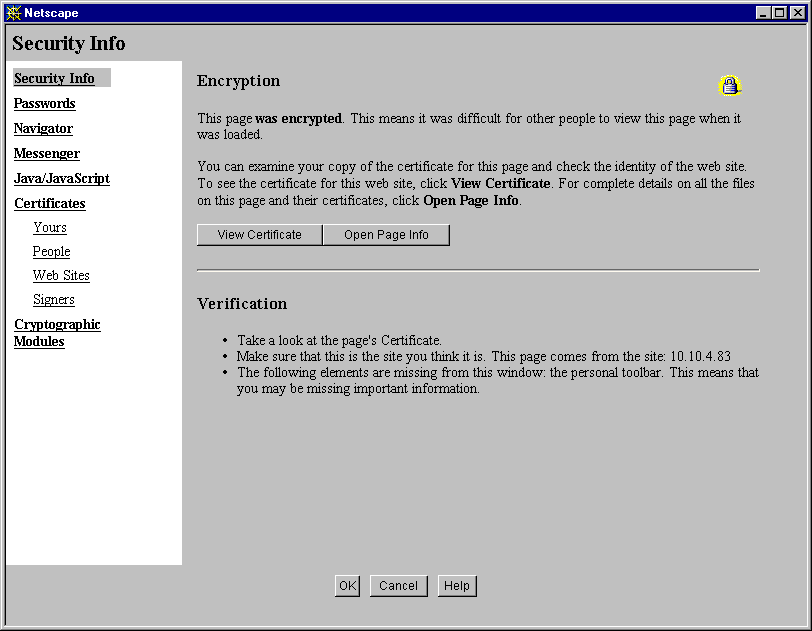
Click View Certificate to see details of the specific certificate in use.
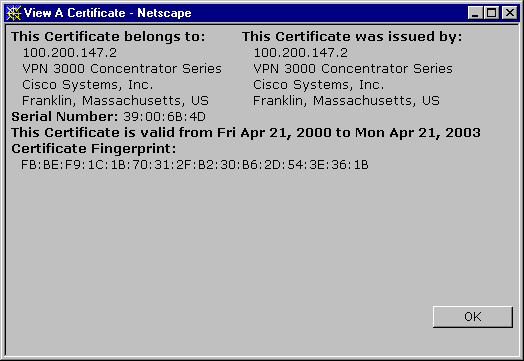
Click OK when finished.
Second, you can view all the certificates that are stored in Netscape. On the Security Info window, select Certificates then Signers. The "nickname" you entered in Step 6 in the section, "First-time installation," identifies the VPN 3002 Hardware Client SSL certificate.
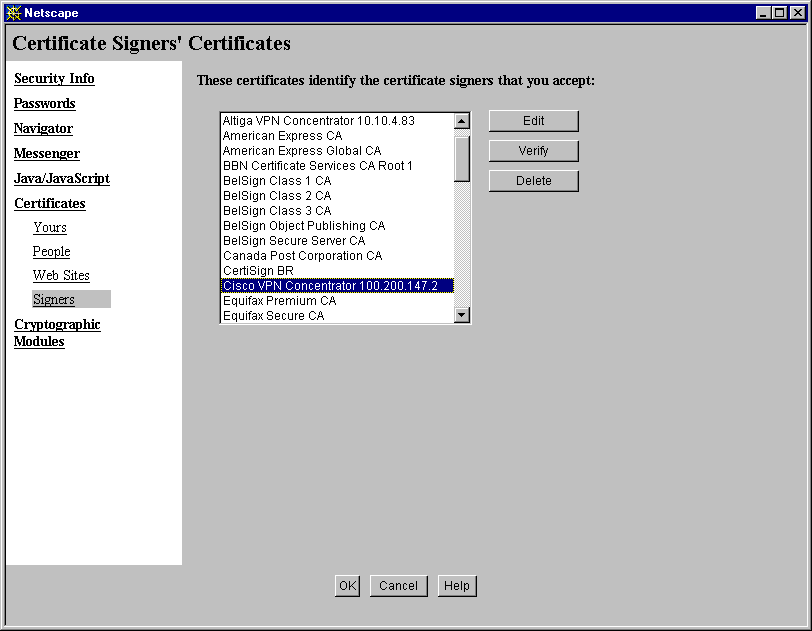
Select a certificate, then click Edit, Verify, or Delete. Click OK when finished.
When you have installed the SSL certificate in the browser, you can connect directly using HTTPS.
1. Bring up the browser.
2. In the browser Address or Location field, enter https:// plus the VPN 3002 private interface IP address; for example, https://10.10.147.2.
The browser displays the VPN 3002 Hardware Client Manager HTTPS login screen.
A locked-padlock icon on the browser status bar indicates an HTTPS session. Also, this login screen does not include the Install SSL Certificate link.

Logging in the VPN 3002 Hardware Client Manager is the same for both types of connections: cleartext HTTP or secure HTTPS.
Entries are case-sensitive. With Microsoft Internet Explorer, you can press the Tab key to move from field to field; other browsers may work differently. If you make a mistake, click the Clear button and start over.
The entries that follow are the factory-supplied default entries. If you have changed them, use your entries.
1. Click in the Login field and type admin. (Do not press Enter.)
2. Click in the Password field and type admin. (The field shows *****.)
3. Click the Login button.
The Manager displays the main welcome screen.
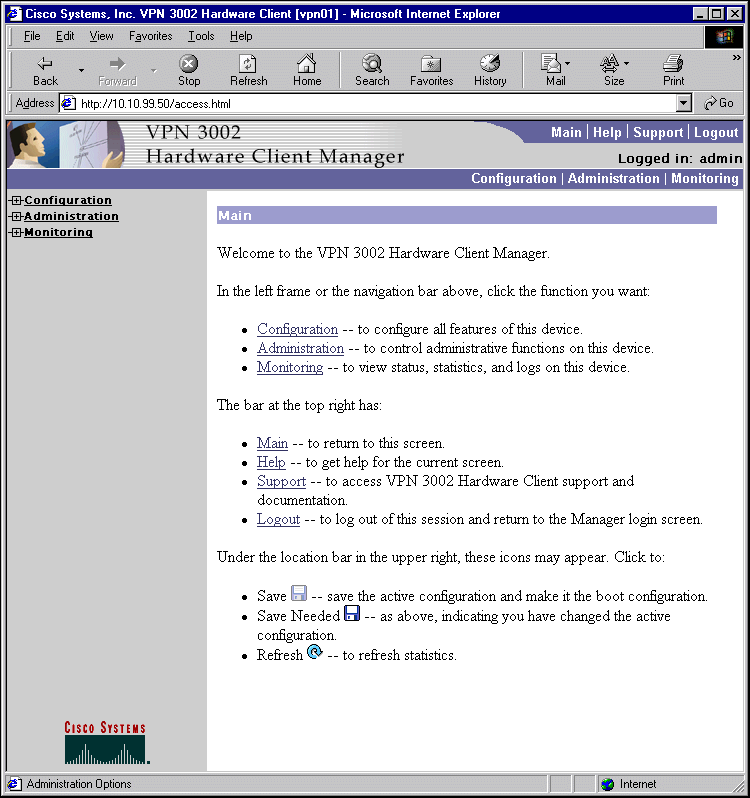
From here you can navigate the Manager using either the table of contents in the left frame, or the Manager toolbar in the top frame.
HTTP, HTTPS, and SSL are enabled by default on the VPN 3002, and they are configured with recommended parameters that should suit most administration tasks and security requirements.
To configure HTTP and HTTPS parameters, see the Configuration | System | Management Protocols | HTTP/HTTPS screen.
To configure SSL parameters, see the Configuration | System | Management Protocols | SSL screen.
The VPN 3002 Hardware Client Manager window on your browser consists of three frames — top, left, and main — and it provides helpful messages and tips as you move the mouse pointer over window items. The title bar and status bar also provide useful information.
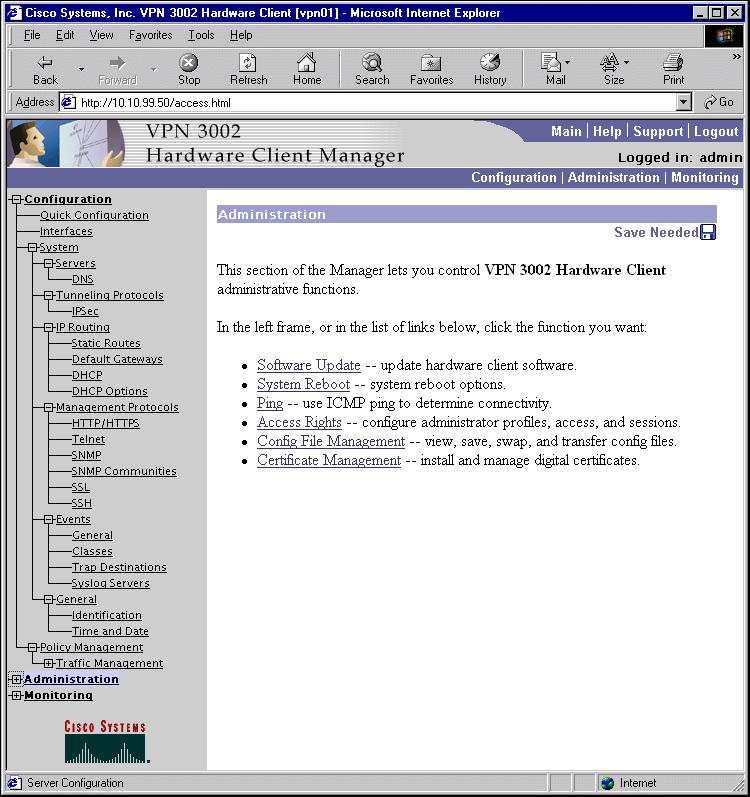
The title bar at the top of the browser window includes the VPN3002 device name or IP address in brackets; e.g., [10.10.104.7].
The status bar at the bottom of the browser window displays explanatory messages for selected items and Manager activity.
As you move the mouse pointer over an active area, the pointer changes shape and icons change color. A description also appears in the status bar area. If you momentarily rest the pointer on an icon, a descriptive tip appears for that icon.
The Manager toolbar in the top frame provides quick access to Manager features.

Click to go to the main Manager screen, and to close all subordinate sections and titles in the left frame.

Click to open context-sensitive online help. Help opens in a separate browser window that you can move or resize as you wish. Close the help window when you are finished.

Click to open a Manager screen with links to Cisco support and documentation resources.

Click this link to open a browser window on the Cisco Technical Documentation Web page for Virtual Private Networks. That page has links to VPN 3000 Concentrator Series and VPN 3002 Hardware Client documentation in PDF format. (To view the PDF files, you need Adobe® Acrobat® Reader 3.0 or later, and version 4.0 is included on the VPN 3000 Concentrator Series software CD-ROM.) When you finish, close the documentation browser window and return to the Manager.
Click this link to open a browser window on the main Cisco Web page, Cisco Connection Online (CCO). From that page, you can browse to all Cisco resources, including the Technical Assistance Center (TAC). When you finish, close the CCO browser window and return to the Manager.
Click this link to open your configured email application and compose an email message to Cisco's Technical Assistance Center (TAC). When you finish, the application closes and returns to this Support screen.

Click to log out of the Manager and return to the login screen.
The administrator username you used to log in to this Manager session.

Click to go to the main Configuration screen, to open the first level of subordinate Configuration pages in the left frame if they are not already open, and to close Administration or Monitoring pages in the left frame.

Click to go to the main Administration screen, to open the first level of subordinate Administration pages in the left frame if they are not already open, and to close Configuration or Monitoring pages in the left frame.

Click to go to the main Monitoring screen, to open the first level of subordinate Monitoring pages in the left frame if they are not already open, and to close Configuration or Administration pages in the left frame.

The Save button displays in the detailed configuration screens. Click to save the active configuration and make it the boot configuration. In this state, the reminder indicates that the active configuration is the same as the boot configuration, but you can save it anyway. When you change the configuration, the reminder changes to Save Needed.

This reminder indicates that you have changed the active configuration. Click to save the active configuration and make it the boot configuration. As you make configuration entries, they take effect immediately and are included in the active, or running, configuration. However, if you reboot the VPN 3002 Hardware Client without saving the active configuration, any configuration changes are lost. Clicking this reminder saves the active configuration as the boot configuration and restores the Save reminder.
In Quick Configuration, as in the detailed configuration screens, you changes take effect immediately and become the active configuration. There is a difference, however, in that the Manager saves the new configuration automatically when you reach the Done screen, and there is neither the Save or Save Needed button.

Click to refresh (update) the screen contents on screens where it appears (mostly in the Monitoring section). The date and time above this reminder indicate when the screen was last updated.

Click the Cisco Systems logo to open a browser and go to the Cisco web site, www.cisco.com.
The left frame provides a table of contents to Manager screens. The table of contents uses the familiar Windows Explorer metaphor of collapsed and expanded entries.
Click a title to open subordinate sections and titles, and to go to that Manager screen in the main frame.

Click the closed / collapsed icon to open subordinate sections and titles. Clicking this icon does not change the screen in the main frame.

Click the open / expanded icon to close subordinate sections and titles. Clicking this icon does not change the screen in the main frame.
The main frame displays the current VPN 3002 Hardware Client Manager screen.
Many screens include a bullet list of links and descriptions of subordinate sections and titles. You can click a link to go to that Manager screen and open subordinate sections and titles in the table of contents.
The VPN 3002 Hardware Client Manager consists of three major sections and many subsections:
This manual covers all these topics. For Quick Configuration, see the VPN 3002 Hardware Client Getting Started manual.
Your primary tool for navigating the VPN 3002 Hardware Client Manager is the table of contents in the left frame. Figure 1-30 shows all its entries, completely expanded. (The figure shows the frame in multiple columns, but the actual frame is a single column. Use the scroll controls to move up and down the frame.)
| |
![]()
![]()
![]()
![]()
![]()
![]()
![]()
![]()
Posted: Tue Nov 19 15:17:50 PST 2002
Copyright 1989-2000©Cisco Systems Inc.