|
|

Tunneling protocols are the heart of virtual private networking. The tunnels make it possible to use a public TCP/IP network, such as the Internet, to create secure connections between remote users and a private corporate network.
The secure connection is called a tunnel, and the VPN 3000 Concentrator Series uses tunneling protocols to:
The VPN Concentrator functions as a bidirectional tunnel endpoint: it can receive plain packets from the private network, encapsulate them, create a tunnel, and send them to the other end of the tunnel where they are unencapsulated and sent to their final destination; or it can receive encapsulated packets from the public network, unencapsulate them, and send them to their final destination on the private network.
The VPN Concentrator supports the three most popular VPN tunneling protocols:
It also supports L2TP over IPSec, which provides interoperability with the Windows 2000 VPN client. The VPN Concentrator is also interoperable with other clients that conform to L2TP/IPSec standards, but it does not formally support those clients.
This section explains how to configure the system-wide parameters for PPTP and L2TP, how to configure IPSec LAN-to-LAN connections, how to configure IKE proposals for IPSec Security Associations and LAN-to-LAN connections, and how to configure NAT Transparency, which includes IPSec over TCP and NAT Traversal (NAT-T).
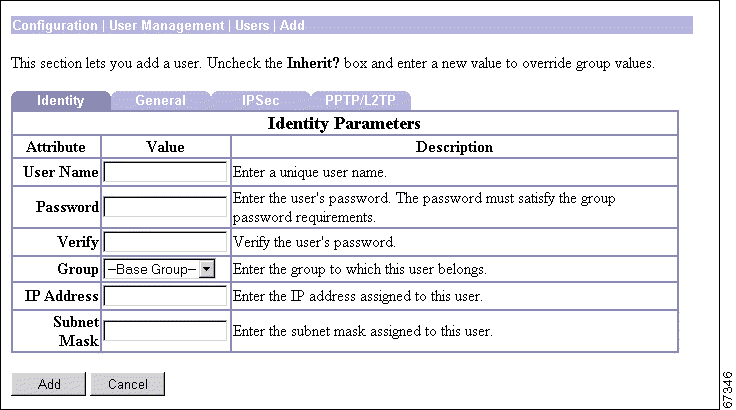
To configure L2TP over IPSec, see Configuration | System | Tunneling Protocols | IPSec | IKE Proposals, and Configuration | User Management.
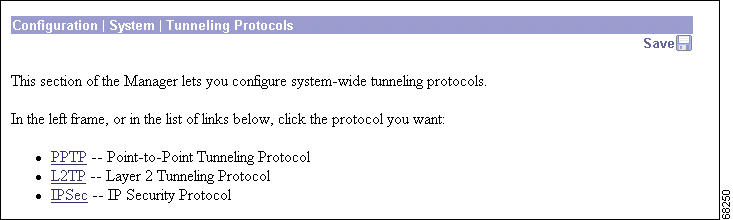
This section of the Manager lets you configure system-wide parameters for tunneling protocols.
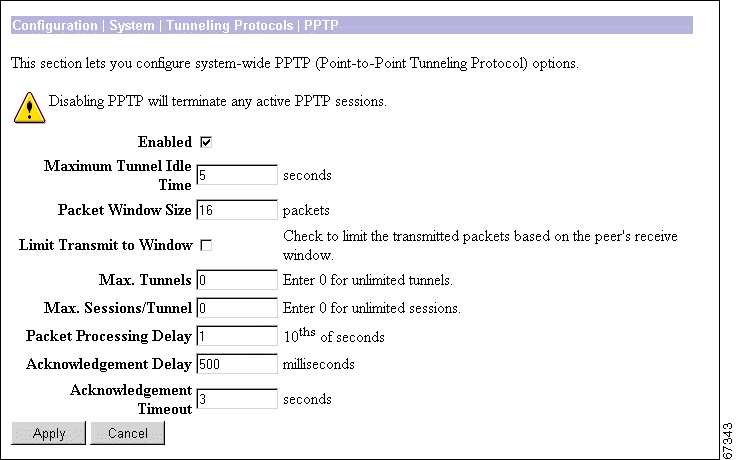
This screen lets you configure system-wide PPTP (Point-to-Point Tunneling Protocol) parameters.
The PPTP protocol defines mechanisms for establishing and controlling the tunnel, but uses Generic Routing Encapsulation (GRE) for data transfer.
PPTP is a client-server protocol. The VPN Concentrator always functions as a PPTP Network Server (PNS) and supports remote PC clients. The PPTP tunnel extends all the way from the PC to the VPN Concentrator.
PPTP is popular with Microsoft clients. Microsoft Dial-Up Networking (DUN) 1.2 and 1.3 under Windows 95/98 support it, as do versions of Windows NT 4.0, Windows 2000, and Windows XP. PPTP is typically used with Microsoft encryption (MPPE).
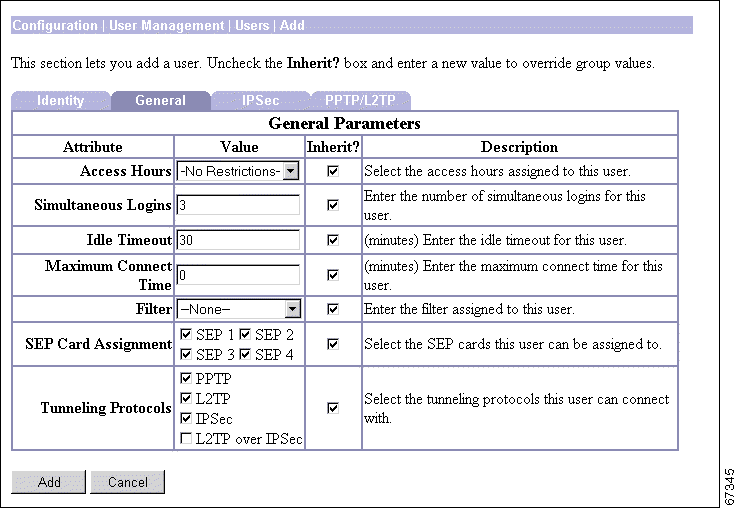
You can configure PPTP on rules in filters; see Configuration | Policy Management | Traffic Management. Groups and users also have PPTP parameters; see Configuration | User Management.
 |
Note Cisco supplies default settings for PPTP parameters that ensure optimum performance for typical VPN use. We strongly recommend that you not change the defaults without advice from Cisco personnel. |
Check the Enabled check box to enable PPTP system-wide functions on the VPN Concentrator, or uncheck it to disable. The box is checked by default.
 |
Caution Disabling PPTP terminates any active PPTP sessions. |
Enter the time, in seconds, to wait before disconnecting an established PPTP tunnel with no active sessions. An open tunnel consumes system resources. Enter 0 to disconnect the tunnel immediately after the last session terminates (no idle time). The maximum idle time is 86400 seconds (24 hours). The default is 5 seconds.
Enter the maximum number of received but unacknowledged PPTP packets that the system can buffer. The system must queue unacknowledged PPTP packets until it can process them. The minimum number of packets is 0. The maximum number is 32. The default is 16 packets.
Check the Limit Transmit to Window check box to limit the number of transmitted PPTP packets to the client's packet window size. Ignoring the window improves performance, provided that the client can ignore the window violation. The box is unchecked by default.
Enter the maximum allowed number of simultaneously active PPTP tunnels. The minimum number of tunnels is 0. The maximum number of tunnels depends on the VPN Concentrator model, for example: model 3060 = 5000. Enter 0 for unlimited tunnels (the default).
Enter the maximum number of sessions allowed per PPTP tunnel. The minimum number of sessions is 0. The maximum number of sessions depends on the VPN Concentrator model, for example, model 3060 = 5000. Enter 0 for unlimited sessions (the default).
Enter the packet processing delay for PPTP flow control. This parameter is sent to the client in a PPTP control packet. Entries are in units of 100 milliseconds (0.1 second). The maximum delay is 65535; The default delay is 1 (0.1 second).
Enter the number of milliseconds that the VPN Concentrator will wait to send an acknowledgement to the client when there is no data packet on which to piggyback an acknowledgement. Enter 0 to send an immediate acknowledgement. The minimum delay is 50 milliseconds. The maximum delay is 5000 milliseconds. The default delay is 500 milliseconds.
Enter the number of seconds to wait before determining that an acknowledgement has been lost, in other words, before resuming transmission to the client even though the transmit window is closed. The minimum is number of seconds is 1. The maximum number of seconds is 10. The default value is 3 seconds.
To apply your PPTP settings and to include them in the active configuration, click Apply. The Manager returns to the Configuration | System | Tunneling Protocols screen.
To save the active configuration and make it the boot configuration, click the Save Needed icon at the top of the Manager window.
To discard your settings, click Cancel. The Manager returns to the Configuration | System | Tunneling Protocols screen.
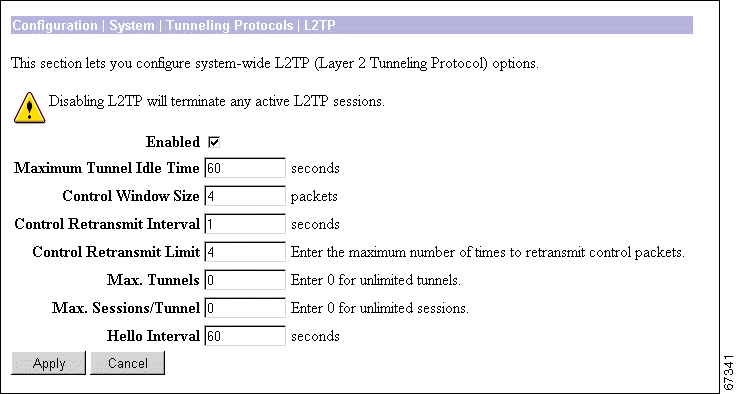
This screen lets you configure system-wide L2TP (Layer 2 Tunneling Protocol) parameters.
L2TP is a client-server protocol. It combines many features from PPTP and L2F (Layer 2 Forwarding), and is regarded as a successor to both. The L2TP protocol defines mechanisms both for establishing and controlling the tunnel and for transferring data.
The VPN Concentrator always functions as a L2TP Network Server (LNS) and supports remote PC clients. The L2TP tunnel extends all the way from the PC to the VPN Concentrator. When the client PC is running Windows 2000, the L2TP tunnel is typically layered over an IPSec transport connection.
You can configure L2TP on rules in filters; see Configuration | Policy Management | Traffic Management. Groups and users also have L2TP parameters; see Configuration | User Management.
|
Note Cisco supplies default settings for L2TP parameters that ensure optimum performance for typical VPN use. We strongly recommend that you not change the defaults without advice from Cisco personnel. |
Check the Enabled check box to enable L2TP system-wide functions on the VPN Concentrator, or uncheck it to disable. The box is checked by default.
|
Caution Disabling L2TP terminates any active L2TP sessions. |
Enter the time in seconds to wait before disconnecting an established L2TP tunnel with no active sessions. An open tunnel consumes system resources. Enter 0 to disconnect the tunnel immediately after the last session terminates (no idle time). Maximum is 86400 seconds (24 hours). The default is 60 seconds.
Enter the maximum number of unacknowledged L2TP control channel packets that the system can receive and buffer. The minimum number of packets is 1. The maximum number is 16. The default number is 4.
Enter the time in seconds to wait before retransmitting an unacknowledged L2TP tunnel control message to the remote client. Minimum is 1 (the default), and maximum is 10 seconds.
Enter the number of times to retransmit L2TP tunnel control packets before assuming that the remote client is no longer responding. The minimum number of times is 1. The maximum number of times is 32. The default is 4 times.
Enter the maximum allowed number of simultaneously active L2TP tunnels. The minimum value is 0 tunnels. The maximum value depends on the VPN Concentrator model; for example, model 3060 can have a maximum of 5000 tunnels. Enter 0 for unlimited tunnels. The default value is 0.
Enter the maximum number of sessions allowed per L2TP tunnel. The minimum number of sessions is 0. The maximum number depends on the VPN Concentrator model, for example: model 3060 = 5000. Enter 0 for unlimited sessions (the default).
Enter the time in seconds to wait when the L2TP tunnel is idle (no control or payload packets received) before sending a Hello (or "keepalive") packet to the remote client. The minimum wait time is 1 second. The maximum wait time is 3600 seconds. The default wait time is 60 seconds.
To apply your L2TP settings and to include them in the active configuration, click Apply. The Manager returns to the Configuration | System | Tunneling Protocols screen.
To save the active configuration and make it the boot configuration, click the Save Needed icon at the top of the Manager window.
To discard your settings, click Cancel. The Manager returns to the Configuration | System | Tunneling Protocols screen.
This section of the Manager lets you configure IPSec LAN-to-LAN connections, IKE (Internet Key Exchange) parameters for IPSec Security Associations and LAN-to-LAN connections, and NAT Transparency.
IPSec provides the most complete architecture for VPN tunnels, and it is perceived as the most secure protocol. Both LAN-to-LAN connections and client-to-LAN connections can use IPSec.
In IPSec terminology, a "peer" is a remote-access client or another secure gateway. During tunnel establishment under IPSec, the two peers negotiate Security Associations that govern authentication, encryption, encapsulation, key management, etc. These negotiations involve two phases: first, to establish the tunnel (the IKE SA); and second, to govern traffic within the tunnel (the IPSec SA).
In IPSec LAN-to-LAN connections, the VPN Concentrator can function as initiator or responder. In IPSec client-to-LAN connections, the VPN Concentrator functions only as responder. Initiators propose SAs; responders accept, reject, or make counter-proposals—all in accordance with configured SA parameters. To establish a connection, both entities must agree on the SAs.
The Cisco VPN Client complies with the IPSec protocol and is specifically designed to work with the VPN Concentrator. However, the VPN Concentrator can establish IPSec connections with many protocol-compliant clients. Likewise, the VPN Concentrator can establish LAN-to-LAN connections with other protocol-compliant VPN devices (often called "secure gateways").
The Cisco VPN Client supports these IPSec attributes:
You configure IKE proposals (parameters for the IKE SA) here. You apply them to IPSec LAN-to-LAN connections in this section, and to IPSec SAs on the Configuration | Policy Management | Traffic Management | Security Associations screens. Therefore, you should configure IKE proposals before configuring other IPSec parameters. Cisco supplies default IKE proposals that you can use or modify.
This section of the Manager lets you configure, add, modify, and delete IPSec LAN-to-LAN connections between two VPN Concentrators.
While the VPN Concentrator can establish LAN-to-LAN connections with other protocol-compliant VPN secure gateways, these instructions assume VPN Concentrators on both sides. And here, the "peer" is the other VPN Concentrator or secure gateway.
In a LAN-to-LAN connection, IPSec creates a tunnel between the public interfaces of two VPN Concentrators, which correspondingly route secure traffic to and from many hosts on their private LANs. There is no user configuration or authentication in a LAN-to-LAN connection; all hosts configured on the private networks can access hosts on the other side of the connection, at any time.
To fully configure a LAN-to-LAN connection, you must configure identical basic IPSec parameters on both VPN Concentrators, and configure mirror-image private network addresses or network lists.
The VPN Concentrator also provides a network autodiscovery feature that dynamically discovers and updates the private network addresses on each side of the LAN-to-LAN connection, so you do not have to explicitly configure them. This feature works only when both devices are VPN Concentrators and both VPN Concentrators have routing enabled on the private interface.
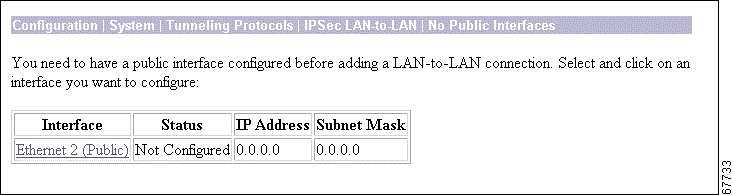
You must configure a public interface on the VPN Concentrator before you can configure an IPSec LAN-to-LAN connection. See the Configuration | Interfaces screens. You must also configure IKE proposals before configuring LAN-to-LAN connections. See the Configuration | System | Tunneling Protocols | IPSec | IKE Proposals screens.
You can configure only one LAN-to-LAN connection with each VPN Concentrator (or other secure gateway) peer.
The LAN-to-LAN Connection list shows connections that have been configured. The connections are listed in the order you configure them, in the format Name (Peer IP Address) on Interface, for example: Branch 1 (192.168.34.56) on Ethernet 2 (Public). If no connections have been configured, the list shows --Empty--.
To configure and add a new connection, click Add. See the Configuration | System | Tunneling Protocols | IPSec LAN-to-LAN | Add screen. If you have not configured a public interface, the Manager displays the Configuration | System | Tunneling Protocols | IPSec LAN-to-LAN | No Public Interfaces screen.
To modify the parameters of a configured connection, select the connection from the list and click Modify. See the Configuration | System | Tunneling Protocols | IPSec LAN-to-LAN | Modify screen.
To delete a configured connection, select the connection from the list and click Delete.
|
Note There is no confirmation or undo. |
The Manager deletes the connection, its LAN-to-LAN filter rules, SAs, and group. The Manager then refreshes the screen and shows the remaining connections in the list.
|
Caution Deleting a connection immediately deletes any tunnels (and user sessions) using that connection. |
The Manager immediately includes your changes in the active configuration. To save the active configuration and make it the boot configuration, click the Save Needed icon at the top of the Manager window.
The Manager displays this screen if you have not configured a public interface on the VPN Concentrator and you try to add an IPSec LAN-to-LAN connection. The public interface need not be enabled, but it must be configured with an IP address and the Public Interface parameter enabled.
You should designate only one VPN Concentrator interface as a public interface.
Click the highlighted link to configure the desired public interface. The Manager opens the appropriate Configuration | Interfaces screen.
You must configure a public interface on the VPN Concentrator before you can configure an IPSec LAN-to-LAN connection. See the Configuration | Interfaces screens.
You can configure only one LAN-to-LAN connection with each VPN Concentrator (or other secure gateway) peer.
The maximum number of LAN-to-LAN connections supported is determined by the hardware and is model-dependent.
Table 7-1 Maximum LAN-to-LAN Connections for Each VPN Concentrator Model
| VPN Concentrator Model | Maximum Number of Sessions |
|---|---|
When you Add or Modify a connection on these screens, the VPN Concentrator automatically:
All of the rules, SAs, filters, and group have default parameters or those specified on this screen. You can modify the rules and SA on the Configuration | Policy Management | Traffic Management screens, the group on the Configuration | User Management | Groups screens, and the interface on the Configuration | Interfaces screens. However, we recommend that you keep the configured defaults. You cannot delete these rules, SAs, or group individually; the system automatically deletes them when you delete the LAN-to-LAN connection.
To fully configure a LAN-to-LAN connection, you must configure identical IPSec LAN-to-LAN parameters on both VPN Concentrators, and configure mirror-image local and remote private network addresses. For example:
| Configure | On this VPN Concentrator | On Peer VPN Concentrator |
|---|---|---|
If you use network lists, you must also configure and apply them as mirror images on the two VPN Concentrators. If you use network autodiscovery, you must use it on both VPN Concentrators.
|
Caution On the Modify screen, any changes take effect as soon as you click Apply. If client sessions are using this connection, changes delete the tunnel (and the sessions) without warning. |
Enter a unique descriptive name for this connection. The maximum name length is 32 characters. Since the created rules and SA use this name, we recommend that you keep it short.
Enter the IP address of the remote peer in the LAN-to-LAN connection. This must be the IP address of the public interface on the peer VPN Concentrator. Use dotted decimal notation, for example: 192.168.34.56.
This parameter specifies whether to use preshared keys or a PKI (Public Key Infrastructure) digital identity certificate to authenticate the peer during Phase 1 IKE negotiations. See the discussion under Administration | Certificate Management.
Click the Digital Certificate drop-down menu button and choose the option. The list shows any digital certificates that have been installed, plus:
If you configured authentication using digital certificates, choose the type of certificate transmission.
Enter a preshared key for this connection. Use a minimum of 4, a maximum of 32, alphanumeric characters, for example: sZ9s14ep7. The system displays your entry in clear text.
This key becomes the password for the IPSec LAN-to-LAN group that is created, and you must enter the same key on the peer VPN Concentrator. (This is not a manual encryption or authentication key. The system automatically generates those session keys.)
This parameter specifies the data, or packet, authentication algorithm. Packet authentication proves that data comes from whom you think it comes from; it is often referred to as "data integrity" in VPN literature. The IPSec ESP (Encapsulating Security Payload) protocol provides both encryption and authentication.
Click the Authentication drop-down menu button and choose the algorithm:
This parameter specifies the data, or packet, encryption algorithm. Data encryption makes the data unreadable if intercepted.
Click the Encryption drop-down menu button and choose the algorithm:
This parameter specifies the set of attributes for Phase 1 IPSec negotiations, which are known as IKE proposals. See the Configuration | System | Tunneling Protocols | IPSec | IKE Proposals screen. You must configure, activate, and prioritize IKE proposals before configuring LAN-to-LAN connections.
Click the IKE Proposal drop-down menu button and choose the IKE proposal. The list shows only active IKE proposals in priority order. Cisco-supplied default active proposals are:
Filters consist of rules that determine whether to allow or reject tunneled data packets coming through the VPN Concentrator, based on criteria such as source address, destination address, and protocol. Cisco supplies three default filters, which you can modify. To configure filters and rules, see the Configuration | Policy Management | Traffic Management screens.
Click the Filter drop-down menu button and select the filter:
Additional filters that you have configured also appear on the list.
NAT-T (NAT Traversal) lets IPSec peers establish a LAN-to-LAN connection through a NAT device. It does this by encapsulating IPSec traffic in UDP datagrams, using port 4500, thereby providing NAT devices with port information. NAT-T auto-detects any NAT devices, and only encapsulates IPSec traffic when necessary.
The VPN Concentrator implementation of NAT-T supports IPSec peers behind a single NAT/PAT device as follows:
Check the box to enable NAT-T for this LAN-to-LAN connection.
Select a bandwidth policy to apply to this IPSec LAN-to-LAN connection from the drop-down list. If there are no policies in this list, you must go to Configuration | Policy Management | Traffic Management | Bandwidth Policies and define one or more policies. If you do not want to select a policy here, then select None. For more information on the Bandwidth Management feature, see the Configuration | Policy Management | Traffic Management | Bandwidth Policies | Add or Modify screen.
The VPN Concentrator provides two ways to advertise static LAN-to-LAN routes.
These entries identify the private network on this VPN Concentrator, the hosts of which can use the LAN-to-LAN connection.
Click the Network List drop-down menu button and choose the configured network list that specifies the local network addresses. A network list is a list of network addresses that are treated as a single object. See the Configuration | Policy Management | Traffic Management | Network Lists screens. Otherwise, you can choose:
If you choose a configured network list, the Manager ignores entries in the IP Address and Wildcard Mask fields.
Enter the IP address of the private local network on this VPN Concentrator. Use dotted decimal notation, for example: 10.10.0.0.
Enter the wildcard mask for the private local network. Use dotted decimal notation, for example: 0.0.255.255. The system supplies a default wildcard mask appropriate to the IP address class.
These entries identify the private network on the remote peer VPN Concentrator whose hosts can use the LAN-to-LAN connection.
Click the Network List drop-down menu button and choose the configured network list that specifies the remote network addresses. A network list is a list of network addresses that are treated as a single object. See the Configuration | Policy Management | Traffic Management | Network Lists screens. Otherwise, you can choose:
If you choose a configured network list, the Manager ignores entries in the IP Address and Wildcard-mask fields.
See the preceding wildcard mask note.
Enter the IP address of the private network on the remote peer VPN Concentrator. Use dotted decimal notation, for example: 11.0.0.1.
Enter the wildcard mask for the private remote network. Use dotted decimal notation, for example: 0.255.255.255. The system supplies a default wildcard mask appropriate to the IP address class.
|
Caution Any changes take effect as soon as you click Apply. If client sessions are using this connection, changes delete the tunnel (and the sessions) without warning. |
The Manager immediately includes your changes in the active configuration. To save the active configuration and make it the boot configuration, click the Save Needed icon at the top of the Manager window.
To discard your entries, click Cancel. The Manager returns to the Configuration | System | Tunneling Protocols | IPSec LAN-to-LAN screen, and the LAN-to-LAN Connection list is unchanged.
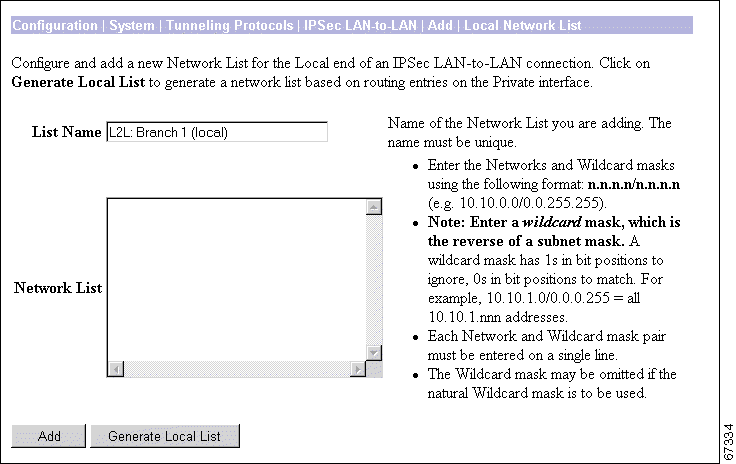
These screens let you configure and add network lists for the Local Network or Remote Network of a new IPSec LAN-to-LAN connection. The Manager automatically opens these screens if you choose Create new Network List under Network List on the Configuration | System | Tunneling Protocols | IPSec LAN-to-LAN | Add screen.
A network list is a list of network addresses that are treated as a single object. See the Configuration | Policy Management | Traffic Management | Network Lists screens also.
On the Local Network List screen, the Manager can automatically generate a network list using the valid network routes in the routing table for the Ethernet 1 (Private) interface of this VPN Concentrator. (See Monitoring | Routing Table.)
A single network list can contain a maximum of 10 network entries.
The Manager supplies a default name that identifies the list as a LAN-to-LAN local or remote list, which we recommend you keep. Otherwise, enter a unique name for this network list. The maximum name length is 48 characters. Entries are case-sensitive. Spaces are allowed.
If you use the Generate Local List feature on the Local Network List screen, edit this name after the system generates the network list.
Enter the networks in this network list. Enter each network on a single line using the format n.n.n.n/w.w.w.w, where n.n.n.n is the network IP address and w.w.w.w is the wildcard mask.
If you omit the wildcard mask, the Manager supplies the default wildcard mask for the class of the network address. For example, 192.168.12.0 is a Class C address, and default wildcard mask is 0.0.0.255.
You can enter a maximum of 200 networks in a single network list.
On the Local Network List screen, click the Generate Local List button to have the Manager automatically generate a network list using the first 200 valid network routes in the routing table for the Ethernet 1 (Private) interface of this VPN Concentrator. (See Monitoring | Routing Table.) The Manager refreshes the screen after it generates the list, and you can then edit the Network List and the List Name.
To add this network list to the configured network lists, click Add. The Manager displays either the Remote Network List screen or the Configuration | System | Tunneling Protocols | IPSec LAN-to-LAN | Add | Done screen.
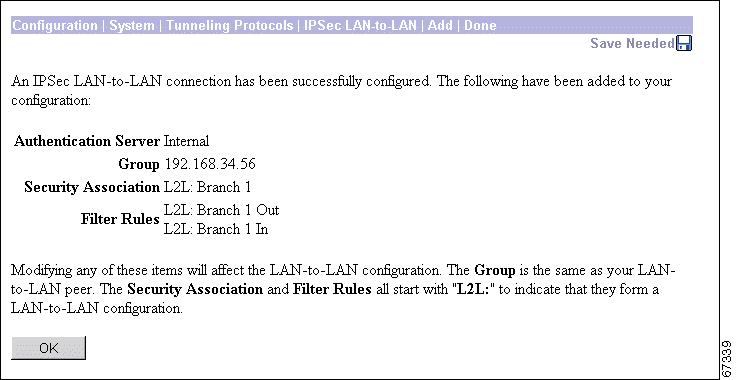
The Manager displays this screen when you have finished configuring all parameters for a new IPSec LAN-to-LAN connection. It documents the added configuration entities.
The Manager displays this screen only once. We suggest you print a copy of the screen to save it for your records.
To examine or modify an entity, see the appropriate screen:
You cannot delete the group, SA, or rules individually, nor can you remove the rules from their filter. The system automatically deletes them when you delete the LAN-to-LAN connection.
To close this screen and return to the Configuration | System | Tunneling Protocols | IPSec LAN-to-LAN screen, click OK. The LAN-to-LAN Connection list shows the new connection, and the Manager includes all the new settings in the active configuration.
To save the active configuration and make it the boot configuration, click the Save Needed icon at the top of the Manager window.
This section of the Manager lets you configure, add, modify, activate, deactivate, delete, and prioritize IKE proposals, which are sets of parameters for Phase 1 IPSec negotiations. During Phase 1, the two peers establish a secure tunnel within which they then negotiate the Phase 2 parameters.
The VPN Concentrator uses IKE proposals both as initiator and responder in IPSec negotiations. In LAN-to-LAN connections, the VPN Concentrator can function as initiator or responder. In client-to-LAN connections, the VPN Concentrator functions only as responder.
You must configure, activate, and prioritize IKE proposals before you configure IPSec Security Associations. See Configuration | Policy Management | Traffic Management | Security Associations, or click the Security Associations link on this screen.
You must also configure and activate IKE proposals before configuring IPSec LAN-to-LAN connections. See Configuration | System | Tunneling Protocols | IPSec LAN-to-LAN.
You can configure a maximum of 150 IKE proposals total (active and inactive).
Cisco supplies default IKE proposals that you can use or modify; see Table 7-2. The documentation for the Cisco VPN Client and for the VPN 3002 Hardware Client each include a table of all valid IKE proposals for remote access connections. See Configuration | System | Tunneling Protocols | IPSec | IKE Proposals | Add for explanations of the parameters.
Table 7-2 Cisco-Supplied Default IKE Proposals: Proposals Active by Default
| Proposal Name | Authen- tication Mode |
Authen- tication Algorithm |
Encryption Algorithm | Diffie- Hellman Group |
Lifetime Measure- ments |
Data Lifetime | Time Lifetime |
|---|---|---|---|---|---|---|---|
Table 7-3 Cisco-Supplied Default IKE Proposals: Proposals Inactive by Default
| Proposal Name | Authen. Mode | Authen. Algorithm | Encryption Algorithm | Diffie- Hellman Group |
Lifetime Measure- ments |
Data Lifetime | Time Lifetime |
|---|---|---|---|---|---|---|---|
The field shows the names of IKE proposals that have been configured, activated, and prioritized. As an IPSec responder, the VPN Concentrator checks these proposals in priority order, to see if it can find one that agrees with parameters in the initiator's proposed SA.
Activating a proposal also makes it available for use wherever the Manager displays an IKE Proposal list, and the first active proposal appears as the default selection.
The field shows the names of IKE proposals that have been configured but are inactive. New proposals appear in this list when you first configure and add them. The VPN Concentrator does not use these proposals in any IPSec negotiations, nor do they appear in IKE Proposal lists.
|
Note To configure L2TP over IPSec, you must activate IKE-3DES-MD5-RSA. Also see the Configuration | User Management screens. |
To activate an inactive IKE proposal, select it from the Inactive Proposals list and click the <<Activate button. The Manager moves the proposal to the Active Proposals list and refreshes the screen.
To deactivate an active IKE proposal, select it from the Active Proposals list and click the >>Deactivate button. If the active proposal is configured on a Security Association, the Manager displays an error message; and you must remove it from the SA before you can deactivate it. Otherwise, the Manager moves the proposal to the Inactive Proposals list and refreshes the screen.
To change the priority order of an active IKE proposal, select it from the Active Proposals list and click Move Up or Move Down. The Manager refreshes the screen and shows the reordered Active Proposals list. These actions move the proposal up or down one position.
To configure and add a new IKE proposal to the list of Inactive Proposals, click the Add button. See Configuration | System | Tunneling Protocols | IPSec | IKE Proposals | Add.
To modify a configured IKE proposal, select it from either Active Proposals or Inactive Proposals and click the Modify button. See Configuration | System | Tunneling Protocols | IPSec | IKE Proposals | Modify. Modifying an active proposal does not affect connections currently using it, but changes do affect subsequent connections.
To use a configured IKE proposal as the basis for configuring and adding a new one, select it from either Active Proposals or Inactive Proposals and click the Copy button. See Configuration | System | Tunneling Protocols | IPSec | IKE Proposals | Copy. The new proposal appears in the Inactive Proposals list.
To delete a configured IKE proposal, select it from either Active Proposals or Inactive Proposals and click the Delete button. If an active proposal is configured on a Security Association, the Manager displays an error message; and you must remove it from the SA before you can delete it. Otherwise, there is no confirmation or undo. The Manager refreshes the screen and shows the remaining IKE proposals in the list.
The Manager immediately includes your changes in the active configuration. To save the active configuration and make it the boot configuration, click the Save Needed icon at the top of the Manager window.
You can configure a maximum of 150 IKE proposals total (active and inactive), and you can make any number of them active.
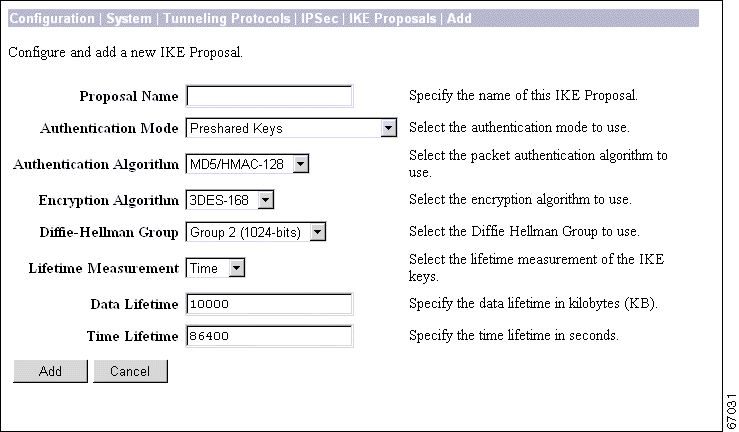
Enter a unique name for this IKE proposal. The maximum name length is 48 characters. Entries are case-sensitive. Spaces are allowed.
This parameter specifies how to authenticate the remote client or peer. Authentication proves that the connecting entity is the one you think it is. If you select one of the digital certificate modes, an appropriate digital certificate must be installed on this VPN Concentrator and the remote client or peer. See the discussion under Administration | Certificate Management.
Click the Authentication Mode drop-down menu button and choose the method:
This parameter specifies the data, or packet, authentication algorithm. Packet authentication proves that data comes from the source you think it comes from.
Click the Authentication Algorithm drop-down menu button and choose one of the following algorithms:
This parameter specifies the data, or packet, encryption algorithm. Data encryption makes the data unreadable if intercepted.
Click the Encryption Algorithm drop-down menu button and choose the algorithm:
When you select an encryption algorithm, the Manager selects and displays the default Diffie-Hellman group for that encryption algorithm. You can
This parameter specifies the Diffie-Hellman group used to generate IPSec SA keys. The Diffie-Hellman technique generates keys using prime numbers and "generator" numbers in a mathematical relationship. When you choose an encryption algorithm, the Manager automatically selects the default Diffie-Hellman group for that algorithm; you can change the group here if you want, subject to the constraints noted below.
|
Note For the VPN 3002 Hardware Client: In order to use Groups 1 or 5, you must be using digital certificates. Otherwise, only Group 2 is available. To use Groups 1, or 5, make sure there is a digital certificate installed on the VPN 3002; and on the VPN Concentrator, choose one of the digital certificate authentication options under Authentication Mode. |
Click the Diffie-Hellman Group drop-down menu button and choose the group:
This parameter specifies how to measure the lifetime of the IKE SA keys, which is how long the IKE SA lasts until it expires and must be renegotiated with new keys. It is used with the Data Lifetime or Time Lifetime parameters.
|
Note If the peer proposes a shorter lifetime measurement, the VPN Concentrator uses that lifetime measurement instead. |
Click the Lifetime Measurement drop-down menu button and choose the measurement method:
If you choose Data or Both under Lifetime Measurement, enter the number of kilobytes of payload data after which the IKE SA expires. The minimum number is 10 KB. The default number is 10000 KB. The maximum number is 2147483647 KB.
If you choose Time or Both under Lifetime Measurement, enter the number of seconds after which the IKE SA expires. The minimum number is 60 seconds. The default number is 86400 seconds (24 hours). The maximum number is 2147483647 seconds (about 68 years).
The Manager immediately includes your changes in the active configuration. To save the active configuration and make it the boot configuration, click the Save Needed icon at the top of the Manager window.
To discard your settings, click Cancel. The Manager returns to the Configuration | System | Tunneling Protocols | IPSec | IKE Proposals screen, and the IKE proposals lists are unchanged.
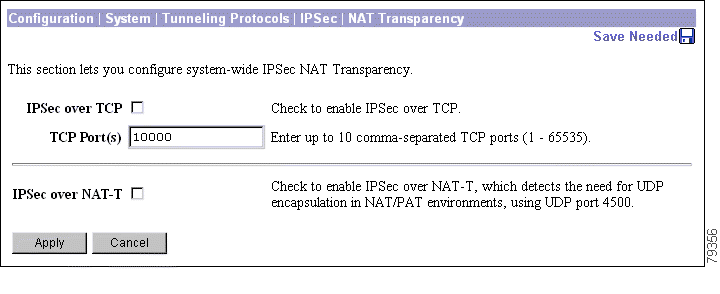
This screen lets you configure NAT Transparency, which consists of IPSec over TCP and IPSec over NAT Traversal (NAT-T).
IPSec over TCP enables a VPN client to operate in an environment in which standard Encapsulating Security Protocol (ESP, Protocol 50) or Internet Key Exchange (IKE, UDP 500) cannot function, or can function only with modification to existing firewall rules. IPSec over TCP encapsulates both the IKE and IPSec protocols within a TCP packet, and enables secure tunneling through both NAT and PAT devices and firewalls.
|
Note This feature does not work with proxy-based firewalls. |
IPSec over TCP works with both the VPN software client and the VPN 3002 hardware client. It works only on the public interface. It is a client to Concentrator feature only. It does not work for LAN-to-LAN connections.
To use IPSec over TCP, both the VPN Concentrator and the client must:
You enable IPSec over TCP on both the Concentrator and the client to which it connects. For software clients, refer to the VPN Client User Guide for configuration instructions. For the VPN 3002 hardware client, refer to the VPN 3002 Hardware Client Getting Started guide, and to the VPN 3002 Hardware Client Reference.
If you enter a well-known port, for example port 80 (HTTP) or port 443 (HTTPS), the system displays a warning that the protocol associated with that port will no longer work on the public interface. The consequence is that you can no longer use a browser to manage the VPN Concentrator through the public interface. To solve this problem, reconfigure the HTTP/HTTPS management to different ports.
You must configure TCP port(s) on the client as well as on the VPN Concentrator. The client configuration must include at least one of the ports you set for the VPN Concentrator here.
Check the box to enable IPSec over TCP.
Enter up to 10 ports, using a comma to separate the ports. You do not need to use spaces. The default port is 10,000. The range is 1 to 65,635.
NAT-T (NAT Traversal) lets IPSec peers establish a connection through a NAT device. It does this by encapsulating IPSec traffic in UDP datagrams, using port 4500, thereby providing NAT devices with port information. NAT-T auto-detects any NAT devices, and only encapsulates IPSec traffic when necessary.
Both the VPN Client and the VPN 3002 hardware client support NAT-T in software version 3.6 and later.
Remote access clients that support both NAT-T and IPSec/UDP methods first attempt NAT-T, and then IPSec/UDP (if enabled) if a NAT device is not auto-detected, allowing IPSec traffic to pass through firewalls that disallow IPSec.
The VPN Concentrator implementation of NAT-T supports IPSec peers behind a single NAT/PAT device as follows:
Check the box to enable IPSec over NAT Traversal.
![]()
![]()
![]()
![]()
![]()
![]()
![]()
![]()
Posted: Fri Apr 18 18:16:31 PDT 2003
All contents are Copyright © 1992--2002 Cisco Systems, Inc. All rights reserved.
Important Notices and Privacy Statement.