|
|

Table Of Contents
Preconfiguring the VPN Client for Remote Users
File Format for All Profile Files
Features Controlled by Global Profile
Global Profile Configuration Parameters
Features Controlled by Connection Profiles
Creating a .pcf file for a Connection Profile
Distributing Configured VPN Client Software to Remote Users
Preconfiguring the VPN Client for Remote Users
This chapter explains how to prepare configurations for remote users and how to distribute them. This chapter includes the following sections:
•
Profiles
•
Profiles
Groups of configuration parameters define the connection entries that remote users use to connect to a VPN device. Together these parameters form files called profiles. There are two profiles: a global profile and an individual profile. A global profile sets rules for all remote users; it contains parameters for the VPN Client as a whole. The name of the global profile file is vpnclient.ini. Individual profiles contain the parameter settings for each connection entry and are unique to that connection entry. Individual profiles have a
.pcf extension.Profiles get created in two ways: when you or a remote user creates connection entries using the VPN Dialer application (connection wizard) or when you create profiles using a text editor. In the first case, the remote user is also creating a file that can be edited through a text editor. You can start with a profile file generated through the GUI and edit it. This approach lets you control some parameters that are not available in the VPN Client GUI application.
The default location for individual profiles is C:\Program Files\Cisco Systems\VPN Client\Profiles.
This chapter explains how to create and edit the vpnclient.ini and individual profiles. Both files use the same conventions.
Note
File Format for All Profile Files
The vpnclient.ini and .pcf files follow normal Windows.ini file format:
•
•
•
Making a Parameter Read Only
To make a parameter read-only so that the client user cannot change it within the VPN Client applications, precede the parameter name with an exclamation mark (!). This controls what the user can do within the VPN Client applications only. You cannot prevent someone from editing the global or .pcf file and removing the read-only designator.
Creating a Global Profile
The name of the global profile is vpnclient.ini. You can locate it in the C:\Program Files\Cisco Systems\VPN Client directory (default location created during installation).
Features Controlled by Global Profile
The vpnclient.ini file controls the following features:
•
•
•
•
•
•
•
•
•
•
•
•
•
Sample vpnclient.ini file
This sample file shows what you might see if you open it with a text editor
[main]
IncompatibleGinas=PALGina.dll,theirgina.dll
RunAtLogon=0 EnableLog=1DialerDisconnect=1AutoInitiationEnable=1AutoInitiationRetryInterval=1AutoInitiationList=techsupport,admin[techsupport]Network=175.55.0.0Mask=255.255.0.0ConnectionEntry=ITsupport[admin]Network=176.55.0.0Mask=255.255.0.0ConnectionEntry=Administration[LOG.IKE]LogLevel=1[LOG.CM]LogLevel=1[LOG.PPP]LogLevel=2[LOG.DIALER]LogLevel=2[LOG.CVPND]LogLevel=1[LOG.CERT]LogLevel=0[LOG.IPSEC]LogLevel=3[LOG.FIREWALL]LogLevel=1[LOG.CLI]LogLevel=1[CertEnrollment]SubjectName=Alice WonderlandCompany=University of OZDepartment=International RelationsState=MassachusettsCountry=USEmail=AliceW@UOZ.comCADomainName=CertsAreUsCAHostAddress=10.10.10.10CACertificate=CAU[Application Launcher]Enable=1Command=c:\apps\apname.exeThe rest of this section explains the parameters that can appear in the vpnclient.ini file, what they mean, and how to use them.
Global Profile Configuration Parameters
Table 2-1 lists all parameters, keywords, and values. It also includes the parameter name as used in the VPN Client GUI application if it exists, and where to configure it in the application.
Table 2-1 vpnclient.ini file parameters
[main]
Required keyword to identify main section.
[main]
Enter exactly as shown, as first entry in the file.
Does not appear in GUI
IncompatibleGinas
Lists Graphical Identification and Authentication dynamic link libraries (GINA.DLLs) that are not compatible with Cisco's GINA. Adding a GINA to the list causes the VPN Client to leave the GINA alone during installation and use fallback mode. The VPN Client goes into fallback mode only if RunAtLogon = 1. Otherwise, the Client gina is never installed. (See "Installing the VPN Client Without User Interaction".
After the keyword and equal sign, enter the name(s) of the GINAs, separated by commas. For example:
IncompatibleGinas=
PALgina.dll, Yourgina.dll, Theirgina.dllDo not enclose the name in quotes.
Does not appear in GUI
MissingGroupDialog
Controls the pop up window warning that occurs when a user tries to connect without setting the group name in a preshared connection.
0= Do not show the warning message.
1=Show the warning message.Does not appear in GUI
RunAtLogon
Specifies whether to start the VPN Client connection before users log on to their Microsoft network. Available only for the Windows NT platform (Windows NT 4.0, Windows 2000 and Windows XP). This feature is sometimes known as the NT Logon feature.
0 = Disable
1 = EnableDefault = 0
Dialer > Options >
Windows Logon Properties > Enable start before logonEntrustIni=
Locates the entrust.ini file if it is in a location that is different from the default.ini file. The default location is the base Windows system directory.
Complete pathname of location
Does not appear in GUI
DialerDisconnect=
Determines whether to automatically disconnect upon logging off a Windows NT platform (Windows NT 4.0, Windows 2000 and Windows XP). Disabling this parameter lets the VPN connection remain when the user logs off, allowing that user to log back in without having to establish another connection.
0 = Disable
1 = EnableDefault = 1 (disconnect on logoff)
Dialer > Options >
Windows Logon Properties > Disconnect VPN connection when logging offThere are limitations to DialerDisconnect. For example, in the case of MS DUN, the RAS (PPP) connection might go down when the user logs off. For more information about this specific case, see the following URL:
http://support.microsoft.com/support/kb/articles/Q158/9/09.asp?LN=EN-US&SD=gn&FR=0&qry=RAS%20AND%20LOGO FF&rnk=2&src=DHCS_MSPSS_gn_SRCH&SPR=NTW40
EnableLog=
Determines whether to override log settings for the classes that use the logging services. By default, logging is turned on. This parameter lets a user disable logging without having to set the log levels to zero for each of the classes. By disabling logging you can improve the performance of the client system.
0 = Disable
1 = EnableDefault = 1
Log Viewer > Options > Capture
StatefulFirewall=
Determines whether the stateful firewall is always on. When enabled, the stateful firewall always on feature allows no inbound sessions from all networks, whether a VPN connection is in effect or not. Also, the firewall is active for both tunneled and nontunneled traffic.
0 = Disable
1 = EnableDefault = 0
Dialer > Options >
Stateful Firewall (Always On)AutoInitiationEnable
Enables auto initiation, which is an automated method for establishing a wireless VPN connection in a LAN environment
0 = Disable
1 = EnableDefault = 0
Dialer > Options >
Automatic VPN InitiationAutoInitiationRetry-
IntervalSpecifies the time to wait, in minutes, before retrying auto initiation after a connection attempt failure.
1 to 10 minutes
Default = 1
Dialer > Options > Automatic VPN Initiation
AutoInitiationList
Identifies auto initiation-related section names within the vpnclient.ini file. Each section contains a Network, Mask, and ConnectionEntry. The Network and Mask values identify a subnet. The ConnectionEntry identifies a connection entry profile (.pcf) file. The vpnclient.ini file can contain a maximum of 64 entries.
A list of section names separated by commas; for example:
SJWLAN, RTPWLAN, CHWLAN
Does not appear in GUI
[section name]
(of an item in the AutoInitiationList)
Identifies the network address, subnet mask, and connection entry name for an item in the AutoInitiationList
Network = IP address
Mask = Subnet mask
ConnectionEntry = name of a connection entry (profile).Example:
[SJWLAN]
Network=110.110.110.0
Mask=255.255.0.0
ConnectionEntry=SantaJuan ita
WirelessLANDoes not appear in GUI
OutlookNotify
Controls Microsoft Outlook to Microsoft Exchange polling. In MS Outlook 2000, if Outlook is polling and synchronizing at the same time, Outlook hangs. If you prefer synchronization over new mail notifications, disable this parameter.
0 = Disable
1 = EnableDefault = 1
Does not appear in GUI
For each class that follows, use the LogLevel= parameter to set the logging level
[LOG.IKE]
Identifies the IKE class for setting the logging level.
[LOG.IKE]
Enter exactly as shown.
Log Viewer > Options > Filter
[LOG.CM]
Identifies the CM class for setting the logging level.
[LOG.CM]
Enter exactly as shown.
Log Viewer > Options > Filter
[LOG.PPP]
Identifies the PPP class for setting the logging level.
[LOG.PPP]
Enter exactly as shown.
Log Viewer > Options > Filter
[LOG.DIALER]
Identifies the DIALER class for setting the logging level.
[LOG.DIALER]
Enter exactly as shown.
Log Viewer > Options > Filter
[LOG.CVPND]
Identifies the CVPND class for setting the logging level.
[LOG.CVPND]
Enter exactly as shown.
Log Viewer > Options > Filter
[LOG.CERT]
Identifies the CERT class for setting the logging level.
[LOG.CERT]
Enter exactly as shown.
Log Viewer > Options > Filter
[LOG.IPSEC]
Identifies the IPSEC class for setting the logging level.
[LOG.IPSEC]
Enter exactly as shown.
Log Viewer > Options > Filter
[LOG.FIREWALL]
Identifies the FWAPI class for setting the logging level.
[LOG.FIREWALL]
Enter exactly as shown
Log Viewer > Options > Filter
[LOG.CLI]
Identifies the CLI class for setting the logging level.
[LOG.CLI]
Enter exactly as shown
Log Viewer > Options > Filter
LogLevel=
Determines the log level for individual classes that use logging services. By default, the log level for all classes is
Low. You can use this parameter to override the default setting for the preceding [LOG] parameters.0 = Disable
1 = Low - only critical and warning events
2 = Medium - critical, warning, and informational events
3 = High - all eventsDefault = 1
Log Viewer > Options > Filter
[CertEnrollment]
Required keyword to identify the Certificate Enrollment section.
[CertEnrollment]
Enter exactly as shown.
Does not appear in GUI
SubjectName=
Identifies the username associated with this certificate.
Maximum of 519 alphanumeric characters.
Certificate Manager > Enrollment form
Company=
Identifies the company or organization of the certificate owner.
Maximum of 129 alphanumeric characters.
Certificate Manager > Enrollment form
Department=
Identifies the department or organizational unit of the certificate owner. If matching by IPSec group in a VPN 3000 Concentrator, must match the group name in the configuration.
Maximum of 129 alphanumeric characters.
Certificate Manager > Enrollment form
State=
Identifies the state or province of the certificate owner
Maximum of 129 alphanumeric characters.
Certificate Manager > Enrollment form
Country=
Identifies the two-letter code identifying the country of this certificate owner.
Maximum of 2 alphanumeric characters.
Certificate Manager > Enrollment form
Email=
Identifies the certificate owner's email address.
Maximum of 129 alphanumeric characters.
Certificate Manager > Enrollment form
IPAddress
Identifies the IP address of the system of the certificate owner.
Internet address in dotted decimal notation.
Certificate Manager > Enrollment form
Domain
Identifies the fully qualified domain name of the host that is serving the certificate owner.
Maximum of 129 alphanumeric characters.
Certificate Manager > Enrollment form
CADomainName=
Identifies the domain name that the certificate authority belongs to; for network enrollment.
Maximum of 129 alphanumeric characters.
Certificate Manager > Enrollment form
CAHostAddress=
Identifies the IP address or hostname of the certificate authority.
Internet hostname or IP address in dotted decimal notation. Maximum of 129 alphanumeric characters.
Certificate Manager > Enrollment form
CACertificate=
Identifies the name of the self-signed certificate issued by the certificate authority.
Maximum of 519 alphanumeric characters.
Note: The VPNClient GUI ignores a read-only setting on this parameter.
Certificate Manager > Enrollment form
NetworkProxy=
Identifies a proxy server you can use to route HTTP traffic. Using a network proxy can help prevent intrusions into your private network.
IP address in dotted decimal notation or domain name. Maximum of 519 alphanumeric characters. The proxy setting sometimes has a port associated with it.
Example:
10.10.10.10:8080Does not appear in GUI
[ApplicationLauncher]
(No VPN Client field)
Required keyword to identify Application Launcher section.
[ApplicationLauncher]
Enter exactly as shown, as first entry in the section.
Does not appear in GUI
Enable=
Use this parameter to allow VPN Client users to launch an application when connecting to the private network.
0 = Disabled (default)
1 = EnabledDisabled means no launching.
Options> Application Launcher
Command=
The name of the application to be launched. This variable includes the pathname to the command, and the name of the command complete with arguments
command string
Maximum 512 alphanumeric characters.
Example:
c:\auth\swtoken.exe.Options> Application Launcher> Application
[DNS]
(No VPN Client field)
Required keyword to identify DNS section.
[DNS]
Enter exactly as shown, as first entry in the section.
Does not appear in GUI
AppendOriginalSuffix=
Determines the way the VPN Client treats suffixes to domain names. See "DNS Suffixes and the VPN Client (Windows 2000 and Windows XP Only)", following this table.
1= append the primary DNS suffix to the suffix that the VPN Concentrator supplies.
2= append the primary and connection-specific DNS suffixes to the suffix that the VPN Concentrator supplies.
Does not appear in GUI
DNS Suffixes and the VPN Client (Windows 2000 and Windows XP Only)
When a command or program such as ping server123 passes a hostname without a suffix to a Windows 2000 or Windows XP platform, Windows 2000/XP has to convert the name into a fully-qualified domain name (FQDN). The Windows operating system has two methods for adding suffixes to domain names: Method 1 and Method 2. This section describes these two methods.
Method 1—Primary and Connection-Specific DNS Suffixes
A primary DNS suffix is global across all adapters. A connection-specific DNS suffix is only for a specific connection (adapter), so that each connection can have a different DNS suffix.
Identifying a Primary DNS Suffix
A primary suffix comes from the computer name. To find or assign a primary DNS suffix, use the following procedure according to your operating system:
On Windows 2000
Step 1
The System Properties dialog displays.
Step 2
The entry next to Full Computer Name identifies the computer's name and DNS suffix on this screen, for example,
SILVER-W2KP.tango.dance.com. The part after the first dot is the primary DNS suffix, in this example:tango.dance.com.Step 3
The Identification Changes dialog displays.
Step 4
This action displays the DNS Suffix and Net BIOS Computer Name dialog. The Primary DNS suffix of this computer entry identifies the primary suffix. You can edit this entry.
On Windows XP
Step 1
The System Properties dialog displays.
Step 2
The entry next to Full Computer Name identifies the computer's name and DNS suffix on this screen (for example,
SILVER-W2KP.tango.dance.com). The part after the first dot is the primary DNS suffix (in this example:tango.dance.com).Step 3
The Computer Name Changes dialog displays.
Step 4
This action displays the DNS Suffix and Net BIOS Computer Name dialog. The Primary DNS suffix of this computer entry identifies the primary suffix. You can edit this entry.
Identifying a Connection-Specific DNS Suffix
You can identify a connection-specific DNS suffix in one of two ways.
1.
Note
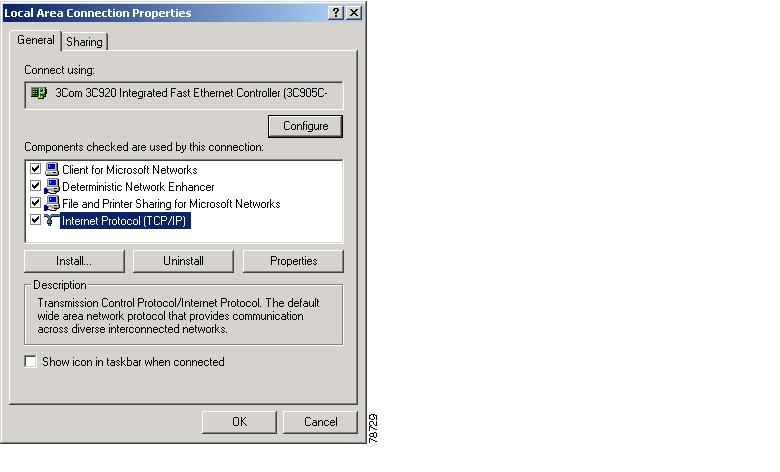
To display the Advanced TCP/IP Settings dialog, use the following procedure:
Step 1
Step 2
Figure 2-1 Displaying Properties for a Connection
Step 3
Step 4
Step 5
DNS suffix for this connectionbox. If the box is empty, you can have it assigned by the DHCP Server.a.
2.
DNS Suffix Search List.Under Ethernet Adapter Connection Name, look forConnection-specific DNS Suffix.Method 2—User Supplied DNS Suffix
For this method, you can provide specific suffixes. You can view and change suffixes in the DNS tab of the connection properties page. The Append these DNS suffixes (in order) edit box supplies the name that you can edit. The values you provide here are global to all adapters.
VPN Client Behavior
When the VPN Client establishes a VPN tunnel to the VPN central device (for example, the VPN 3000 Concentrator), the VPN Client uses Method 2 without regard for the method that the Windows platform uses. If the Windows platform is using Method 2, the VPN Client appends the suffix provided by the VPN central device. This is the default behavior and works correctly with no problem
However if Windows is using Method 1, the VPN Client does not append the primary or connection-specific suffix. To fix this problem, you can set the AppendOriginalSuffix option in the vpnclient.ini file. In Table 2-1, the [DNS] section contains this option:
[DNS]
AppendOriginalSuffix Option=1:
In this case, the VPN Client appends the primary DNS suffix to the suffix provided by the VPN Concentrator. While the tunnel is established, Windows has two suffixes: one provided by the VPN Concentrator and the primary DNS suffix.
AppendOriginalSuffix Option=2:
In this case, the VPN Client appends the primary and connection-specific DNS suffixes to the suffix provided by the VPN Concentrator. While the tunnel is established, Windows has three suffixes: one provided by the VPN Concentrator, the primary DNS suffix, and the connection-specific DNS suffix.
Note
The VPN Client sets these values every time a tunnel is established and then restores the original configuration when tearing down the tunnel.
Creating Connection Profiles
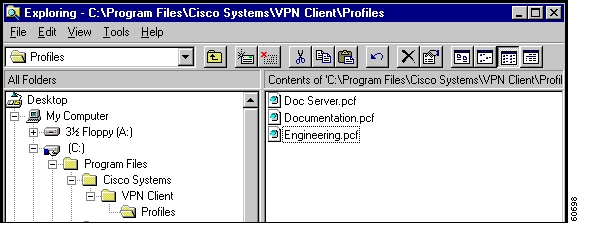
The VPN Client uses parameters that must be uniquely configured for each remote user of the private network. Together these parameters make up a user profile, which is contained in a profile configuration file (.pcf file) in the Program Files\Cisco Systems\VPN Client\Profiles directory (if the software installed in the default location) in the VPN Client user's local file system. These parameters include the remote server address, IPSec group name and password, use of a log file, use of backup servers, and automatic Internet connection via Dial-Up Networking. Each connection entry has its own .pcf file. For example, if you have three connection entries, named Doc Server, Documentation, and Engineering, the Profiles directory shows the list of .pcf files shown in Figure 2-2.
Figure 2-2 List of .pcf files
Features Controlled by Connection Profiles
A connection profile (.pcf file) controls the following features.
•
•
•
•
•
•
•
•
•
•
•
•
•
•
•
•
•
•
•
•
•
•
•
•
Sample .pcf file
When you open the Doc Server.pcf file, it looks like the example below. This is a connection entry that uses preshared keys. Note that the
enc_prefix (for example,enc_GroupPwd) indicates that the value for that parameter is encrypted.[main]Description=connection to TechPubs serverHost=10.10.99.30AuthType=1GroupName=docusersGroupPwd=enc_GroupPwd=158E47893BDCD398BF863675204775622C494B39523E5CB65434D3C851ECF2DCC8BD488857EFA FDE1397A95E01910CABECCE4E040B7A77BFEnableISPConnect=0ISPConnectType=0ISPConnect=ISPCommand=Username=aliceSaveUserPassword=0UserPassword=enc_UserPassword=NTDomain=EnableBackup=1BackupServer=Engineering1, Engineering2, Engineering 3, Engineering4EnableMSLogon=0MSLogonType=0EnableNat=1EnableLocalLAN=0TunnelingMode=0TCPTunnelingPort=10000CertStore=0CertName=CertPath=CertSubjectNameSendCertChain=0VerifyCertDN=CN="ID Cert",OU*"Cisco",ISSUER-CN!="Entrust",ISSURE-OU!*"wonderland"DHGroup=2ForceKeepAlives=0PeerTimeOut=90You can configure the VPN Client for remote users by creating a profile configuration file for each connection entry and distribute the .pcf files with the VPN Client software. These configuration files can include all, or only some, of the parameter settings. Users must configure those settings not already configured.
You can also distribute the VPN Client to users without a configuration file and let them configure it on their own. In this case, when they complete their configuration using the VPN Client program, they are in effect creating a
.pcffile for each connection entry, which they can edit and share.To protect system security you should not include key security parameters such as the IPSec group password, authentication username, or authentication password in .pcf files for remote users.
Note
Creating a .pcf file for a Connection Profile
Each user requires a unique configuration file. Use Notepad or another ASCII text editor to create and edit each file. Save as a text-only file with no formatting.
Connection Profile Configuration Parameters
Table 2-2 lists all parameters, keywords, and values. It also includes the VPN Client parameter name (if it exists) that corresponds to the keyword and where it is configured on the VPN Client GUI.
Distributing Configured VPN Client Software to Remote Users
When you have created the VPN Client profile configuration file, you can distribute it to users separately or as part of the VPN Client software.
Separate Distribution
To distribute the configuration file separately and have users import it to the VPN Client after they have installed it on their PCs, follow these steps:
Step 1
Step 2
Step 3
a.
b.
c.
d.
Distribution with the VPN Client Software
If the vpnclient.ini file is bundled with the VPN Client software when it is first installed, it automatically configures the VPN Client during installation. You can also distribute the profile files (one .pcf file for each connection entry) as preconfigured connection profiles for automatic configuration.
To distribute preconfigured copies of the VPN Client software to users for installation, perform the following steps:
Step 1
Step 2
CD-ROM or network distribution: Be sure the vpnclient.ini file and profile files are in the same directory with all the CD-ROM image files. You can have users install from this directory through a network connection; or you can copy all files to a new CD-ROM for distribution; or you can create a self-extracting ZIP file that contains all the files from this directory, and have users download it, and then install the software.
Step 3
![]()
![]()
![]()
![]()
![]()
![]()
![]()
![]()
Posted: Mon Apr 18 08:21:00 PDT 2005
All contents are Copyright © 1992--2005 Cisco Systems, Inc. All rights reserved.
Important Notices and Privacy Statement.