|
|

Table Of Contents
Configuring Automatic VPN Initiation
Creating Entries in the vpnclient.ini File
Configuring Automatic VPN Initiation
Note
Before you begin, we highly recommend that you read the document "SAFE: Wireless LAN Security in Depth," which you can access at http://www.cisco.com/go/safe. This document analyzes the best practices of implementing security for wireless LANs using VPNs.
Automatic VPN initiation (auto initiation) provides secure connections within an on-site wireless LAN (WLAN) environment through a VPN Concentrator. When auto initiation is configured on the VPN Client, the VPN Client:
•
•
•
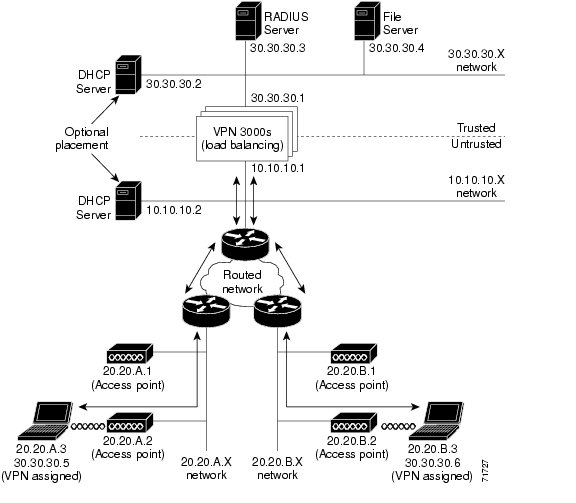
Figure 3-1 depicts a simple network configuration that employs VPN for securing on-site WLANs. The VPN 3000 Concentrators, which may or may not be using load balancing, provide the gateway between the untrusted and the trusted networks. The DHCP Server can be on either side of the VPN 3000 Concentrator. VPN Client users with laptops that have wireless NIC cards can connect through access points (AP) throughout the campus or building and tunnel to the trusted 30.30.30.x network from the untrusted 10.10.10.x network. The network administrator can set this type of scenario up to be largely transparent to the VPN Client user.
Figure 3-1 Auto Initiation Scenario
To configure auto initiation for users on the network, you add parameters to the VPN Client's global profile (vpnclient.ini). For information on how to create or use a global profile, see " Creating a Global Profile."
The only configurable features available to the user through the VPN Client GUI application are the ability to disable auto initiation and the ability to change the retry interval. These features are available through the Options menu when auto initiation has been configured through the global profile. If auto initiation is not configured, these options do not appear in the Options menu. When auto initiation is configured, some VPN Client status displays and dialog boxes differ slightly from standard connection dialog boxes to indicate to the user that auto initiation is occurring. For a complete explanation of how auto initiation appears to the VPN Client user, see Cisco VPN Client User Guide for Windows, "Using Automatic VPN Initiation."
The auto initiation feature can be used in WLAN environments containing NIC cards and access points from any vendor.
Creating Entries in the vpnclient.ini File
This section shows how to create or edit the vpnclient.ini file to activate auto initiation on a VPN Client.
Preparation
Before you begin, you should gather the information you need to configure auto initiation:
•
•
•
What You Have to Do
To configure auto initiation, you must add the following keywords and values in the [Main] section of the vpnclient.ini global profile file:
•
•
•
For example, suppose a sales manager travels among three locations (Chicago, Denver, and Laramie) within a corporation, attending sales meetings, and wants to securely and easily initiate a wireless connection at these locations. The vpnclient.ini contains the entries shown in this example. The connection entry named in each network section points to the individual's profile (.pcf) for that on-site wireless LAN network.
Example 3-1 Section of vpnclient.ini File for Auto Initiation
[Main]AutoInitiationEnable=1AutoInitiationRetryInterval=3AutoInitiationList=ChicagoWLAN,DenverWLAN,LaramieWLAN[ChicagoWLAN]Network=110.110.110.0Mask=255.255.255.0ConnectionEntry=Chicago (points to a connection profile named chicago.pcf)[DenverWLAN]Network=220.220.220.0Mask=255.255.255.0ConnectionEntry=Denver (points to a connection profile named denver.pcf)[LaramieWLAN]Network=221.221.221.0Mask=255.255.255.0ConnectionEntry=Laramie (points to a connection profile named laramie.pcf)
![]()
![]()
![]()
![]()
![]()
![]()
![]()
![]()
Posted: Mon Apr 18 08:20:40 PDT 2005
All contents are Copyright © 1992--2005 Cisco Systems, Inc. All rights reserved.
Important Notices and Privacy Statement.